How to Send Secure Documents
For organizations that must send documents to remote team members or to members of other organizations, ensuring the documents remain secure en route is extremely important. A document with sensitive information that ends up in the wrong hands can be devastating for the reputation of the organization.
A few different methods exist to help your organization send documents securely. When the organization has strong security measures in place, clients and customers will trust your team.
What Does Sending Documents Securely Involve Anyway?
Document security is important for a number of reasons, including:
- Following government guidelines for handling personal information
- Minimizing the chance of a hacker intercepting data
- Gaining the trust of clients
- Enhancing data security in all parts of the business
Sending secure documents means ensuring the documents remain protected from possible hackers or from being accessed by someone other than the recipient. Only the intended recipient will be able to view and control the document when sending it securely.
Security measures should cover the document from the time the sender sends the document until the time the recipient opens the document. The security measures will protect the document during the time it digitally travels from one reader’s location to the other’s.
How Sending a Secure Document Works
Sending documents can include processes such as email and cloud storage, both of which can make use of security measures. Some other options include using secure online portals to share documents.
When looking to send secure documents, organizations can follow a few different methods. The process typically involves things like scrambling the data inside a document attached to an email or creating password protection for a document to ensure only the recipient will be able to open the file.
Some types of software give the sender the ability to implement security measures as part of the general use of the software. Other options involve using a third-party software package to create the security measures for the documents, ensuring they remain protected all the way from the sender to the recipient.
Here are five ideas for sending secure documents.
1. Encrypting Email Content
Emails are documents too, even if they’re not always treated like them. If you need the contents of an email to be secure, you’ll want to look into encrypting the message. To encrypt the entire email message, you’ll either need to use a third-party email client that supports encryption, or you’ll need to add encryption capabilities to your current email service.
Here are some of the different options for encrypting messages and documents sent over email.
Using an Encrypted Email Service
Third-party email clients, such as Mailfence and CTemplar, provide a high level of encryption, giving those sending messages the security and protection they need to have.
With the encrypted email service, the messages often do not travel to the recipient over the open Internet. This allows the service to guarantee the security of the message.
When a team member in the organization sends an encrypted message through this type of service, the message travels securely from your organization to the secure email service’s server.
This act generates a message for the recipient, who then can request access to the message.
The recipient will receive a secure password that they use to open the message on the server, rather than the server sending the message to the recipient.
The message typically remains on the email service’s server until the sender or recipient deletes it. The sender also can set a deadline, after which the message disappears, and the recipient will no longer have access to it.
Using a Common Email Service
If you’re unsure whether your email client uses encrypted messages, it probably doesn’t. Sending encrypted email messages often requires adjusting the settings for the email client.
For those organizations that don’t want to give up the email service they currently use, there are some options to send emails securely. However, commonly used email clients, such as Gmail, Microsoft Outlook, or Apple Mail, cannot provide the same levels of encryption as a dedicated encrypted email service.
Even without the highest level of encryption, though, senders can send messages with limited security measures in place.
Let’s use Gmail as an example. In Gmail, senders can send messages through confidential mode. This doesn’t encrypt the message en route from the sender to the recipient, but it does limit the options the recipient has for handling the email and any attachments, including:
- Preventing forwarding
- Preventing copying
- Preventing downloading
- Preventing printing
- Requiring verification of the recipient through a text message passcode
- Setting an expiration date
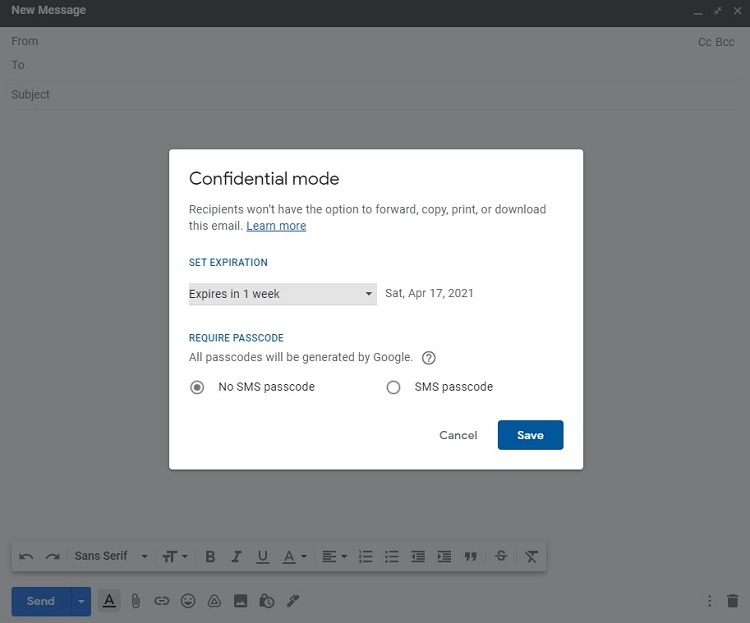
To set up confidential mode in a new Gmail message, click the confidential mode icon (marked with a lock and a clock). If desired, set the parameters for an expiration date for the message. Set the passcode for sending by text message as well, if desired.
Choose SMS Passcode to require all recipients to unlock the message with a passcode sent via text. Choose No SMS Passcode to allow other Gmail users to open the message without a passcode.
After sending the message in confidential mode, the sender can choose to revoke the recipient’s privileges to access the message at any time.
Choose a Third-Party Encryption Process
If using a common email service that does not include encryption, some third-party services include the ability to add encryption to the email client you’re currently using.
Using Gmail as an example again, a popular third-party encryption service that works with Gmail is FlowCrypt. FlowCrypt is an extension that integrates with the Gmail client. Once installed, FlowCrypt adds a Secure Compose button to the Gmail window. Just click this button to compose an encrypted message.
The downside to using FlowCrypt is the recipient of the message will need to have FlowCrypt installed or another PGP client to unlock and view the message. (PGP is short for Pretty Good Privacy and represents the type of encryption system that FlowCrypt uses.)
2. Encrypting Attachments Through Email
Many organizations send documents through email as attachments, whether they’re sending data to other members of the organization or to clients. Unfortunately, sending attachments over email is not a secure option, unless you take a few extra steps to secure the attachments.
For the highest level of security for sending a document via email, consider encrypting the file that you’re attaching to the email message. This sounds like it should be an easy process, but it does have some challenges, including making sure that the recipient has the key or password to decrypt the file.
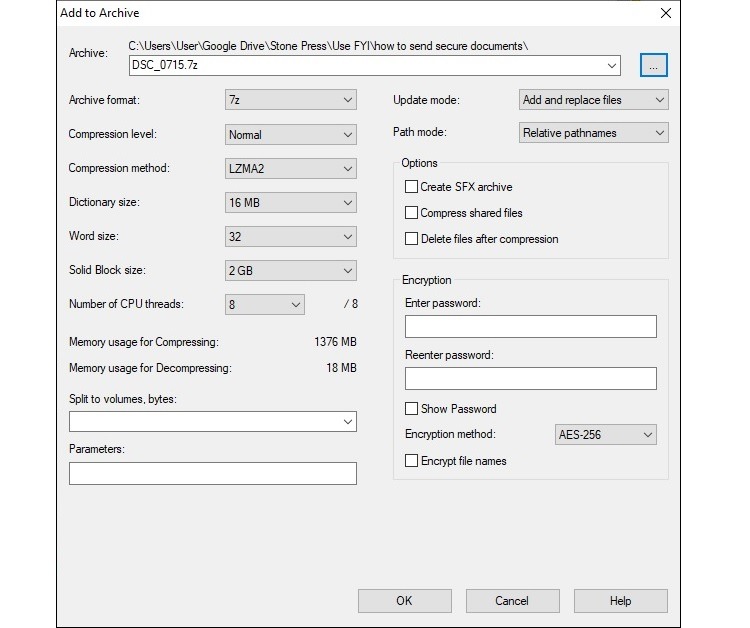
Perhaps the easiest method we’ve found to encrypt a file you’ll be attaching to an email message is through using a free Zip utility, such as 7-Zip. Zip utilities work to compress files, reducing the size for sending or saving them. You then can extract the file later to its original configuration so you can use it.
In the 7-Zip utility, as part of the process of compressing the document file, it will encrypt the file too. You then can send the document securely to the recipient, allowing them to decrypt and unzip the file on the other end with the password.
3. Password-Protect the Document File

You have the option of adding a password to some documents that you create. This secures the document, making it only available to those who have the password.
When creating documents in many commonly used apps, such as Microsoft 365 or Adobe Acrobat, you’ll have the option of creating password protections for the documents.
You then can send the document securely to a recipient. Send them the password for the document in a different manner, such as through a text message, and the recipient can unlock the document later.
Password-Protect a Microsoft 365 Document
Creating a password in a document created using a Microsoft 365 app (such as Word or Excel) is an easy process. Click the File menu, followed by Info, and then Protect Document. Then click the Encrypt with Password button to enter the password you want to use.
After setting a password, no one can open the file without the password.
Password-Protect an Adobe Acrobat Document
To create a password for a PDF document in Acrobat, click the Tools menu, followed by Protect, Encrypt, and Encrypt with Password. Place a checkmark next to Require a Password to Open the Document, and enter the password you want to use in the text box.
Then select the oldest version of Acrobat that a recipient can use to open the file. (Forcing the recipient to use a newer version of Acrobat to open the file will give you a stronger level of encryption, but allowing the recipient to use an older version of Acrobat will ensure more recipients will be able to open the file.)
Click on Encrypt All Document Contents and click the OK button. With the password set, no one can open the PDF without the password.
4. Use Secure Online Cloud Storage
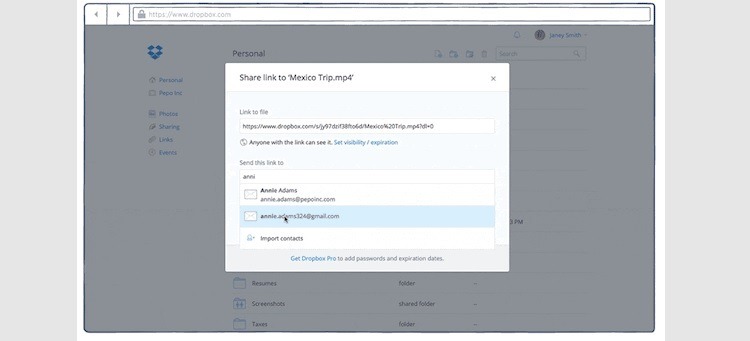
You can share files securely through cloud storage systems, such as Dropbox. As the owner of the document in Dropbox, you can share it with anyone, even if they don’t use Dropbox. The recipient will receive a link to the file that they can click on to gain access to the document.
Dropbox applies encryption to the files as it sends and receives them, which ensures no one can intercept the documents and gain access to them.
When using Dropbox, you will have a few features you can add to your documents to make them a bit more secure once the recipient receives them.
View-Only Permission
As the document owner, you can choose to share the document as view-only, which makes it secure from unwanted editing from the recipient. (Should you want to allow the recipient to make editing changes, you have this option too.)
Don’t Allow Downloads
When you send a document to a recipient, you can add the disable downloads feature within Dropbox to prevent the recipient from downloading the file. This creates a level of security for your documents, so they don’t end up being copied and passed around.
Should you need to give the recipient the ability to make edits to the document, they can make their edits in the browser version of Dropbox and save the changes. They just won’t be able to download the file to store it locally.
Add a Password
To provide a greater level of security in the file, ensuring that only the intended recipient can view it, you can use Dropbox to add a password to the file. Only those recipients with both the link to the file and the password will be able to open the document.
You will need to send the password through a separate means (such as a text message) to the recipient.
Set Expiration Dates for Accessing the Document
When creating the link to send the document to the recipient, Dropbox gives you the ability to create an expiration date for the link. Once the date passes, the recipient no longer can access the file.
This gives you a level of security, as you know that the recipient cannot access the document indefinitely.
5. Use a Secure Client Portal
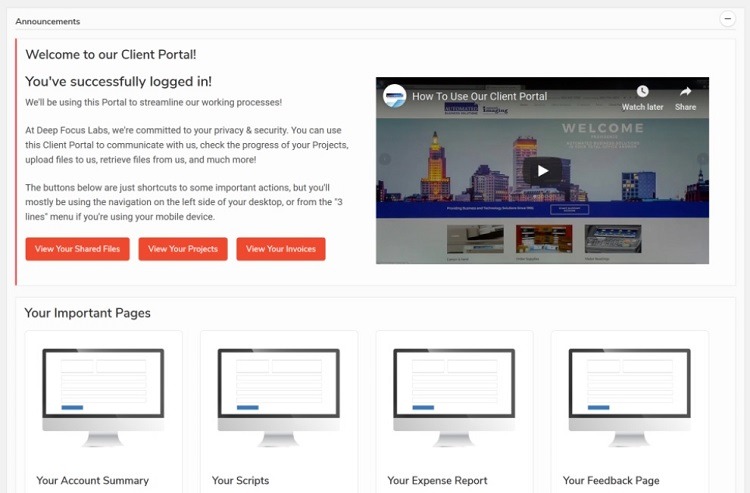
A secure client portal gives the sender the ability to send secure documents with encryption in a safer manner than using email. Software options such as SuiteDash and Nifty are examples of secure client portals.
With a secure client portal, sending documents containing sensitive information, such as tax records for a client or medical records for a patient, always occurs through an encrypted process. Only the recipient and the sender will be able to access the documents inside the secure client portal.
With many client portals, the system sends email messages to the appropriate parties whenever someone adds a new document to the secure client portal. The recipient will log into the client portal software to gain access to the documents.
Organizations often can send encrypted messages to clients and customers through the portal as well.
Although client portals are extremely secure, they do require both the recipient and sender to learn how to use a new type of software and to create login credentials. Some people may balk at having to take the time to learn how to use the portal. Subscribing to secure client portal software often generates an extra cost too.
How to Send Your First Secure Document
Now it’s time to put these tips into action. We’ll show you how to send a secure document over email using only free tools. (We’ll use Gmail, FlowCrypt, and 7-Zip, as we described earlier.)
Certainly, if you need a greater level of security, you may want to select an encrypted email service. If you must send a lot of documents securely to clients and customers, selecting a secure online portal may be the easier and better option for your organization.
But for sending documents securely without extra costs and hassle, this method will work.
Download FlowCrypt and 7-Zip
You’ll need to start by adding the FlowCrypt extension to the Gmail app in Chrome. It’s available in the Chrome web store. Download it to add it to Gmail.
Next, download the 7-Zip utility and install it.
Compress the Document
Open the 7-Zip utility. In the window, search through your storage folders to find the file you want to compress. Click on the file you want to compress and click Add.
In the popup window, select how you want to handle the file. In the Encryption area of the window, add the password to unzip and decrypt the document. Click OK.
You should see the compressed document in the same folder as the original file.
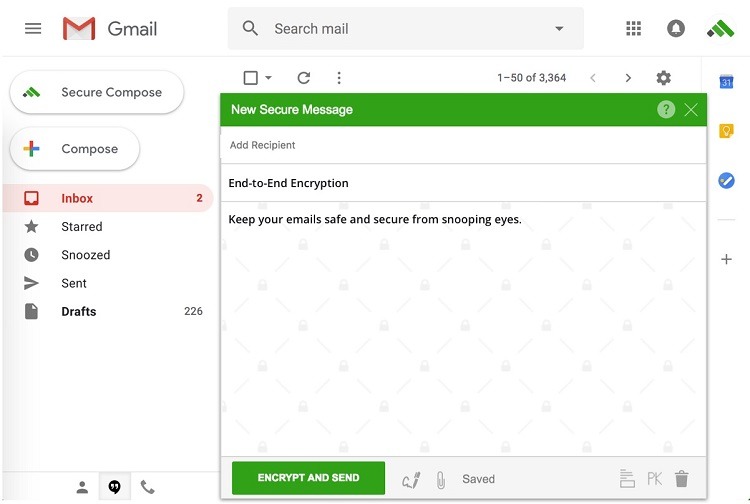
Compose a Gmail Message
In Gmail, click FlowCrypt’s Secure Compose button to create an encrypted message. Write a message as you normally would and select the recipient.
Click the paper clip icon at the bottom of the window to add the file you compressed earlier with 7-Zip. Click the Encrypt and Send button to send the message.
Receiving the Secure Document
When the recipient receives the encrypted message, they will need to enter a password to open the message. Additionally, the recipient will need a password to unzip the encrypted attached document and gain access to it.
You will have to send the recipient the password for unzipping the file and for reading the email by text message or another method that doesn’t involve sending the passwords by an unencrypted email message. (If someone intercepts the unencrypted email message, they could use the passwords included in the message to gain access to the encrypted message and compressed file.)
How to protect your data with real-time access control
Nira is a real-time access control system that provides visibility and management over who has access to company documents in Google Workspace, with more integrations coming soon.
Contact us for a demo, and we’ll review your current setup or help you implement a real-time access control system for the data you already have.

