How to Secure Your Documents
The ability to share documents in multiple ways among members of your organization makes everyone’s jobs easier. Unless your job is managing the organization’s security, that is. Then your job becomes much harder.
With so many ways to share items, document security is a challenging undertaking, but it is possible to succeed by following the right steps.
We’ve put together a series of tips to help organizations secure their documents. No matter what methods your organization uses to share documents, implementing security is possible.
What is Document Security Anyway?
Securing documents in an organization involves protecting them from a wide range of perils. Some of these perils include:
- Hackers stealing document data
- Loss of documents
- Revealing personal information
- Unwanted copies of sensitive documents
How Document Security Works
When trying to secure your documents, it involves thinking about the security of both paper and digital copies of documents. Team members should undertake steps that allow them to protect documents at all times.
The implementation of document security starts at an administrative level, including setting organizational policies and setting up hardware to force team members to follow specific rules and steps regarding document security.
Individually, team members will need to follow the policies, ensuring they are doing everything they can to guard sensitive information and documents.
Here are nine reliable practices for securing your documents.
1. Digitize Your Documents
For the majority of organizations, paper documents become a greater security risk than digital documents. A team member could lose a hard copy of a document, or someone could carry it out of the building without anyone’s knowledge.
Organizations have a number of options for adding security measures to their digital copies of documents, receiving a greater level of protection.
Create digital scans of any paper documents, and then apply security measures to the digital copies for maximum protection. Shred the paper documents to finish the job.
2. Use Password Protection
Using password protection on the most important files is a smart idea. If members of the organization are using laptops or smartphones to work on sensitive documents, someone could take the device. Without password protection on the files on the mobile device, the person who takes the device may access the sensitive files.
When working with certain types of commonly used software to create documents, adding password protection to secure the documents is an easy process.
Password Protecting Microsoft 365 Documents
To protect a document you created in Microsoft 365 with a password, click the File menu and then Info. In the Info window, click the Protect Document button. In the popup menu, click Encrypt with Password.
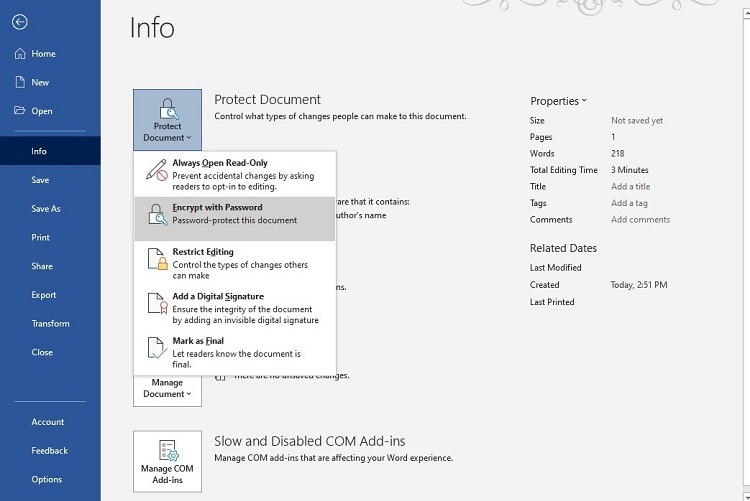
In the popup window, enter the password name you want to use. It is case-sensitive. If you forget the password, the file will remain locked. Microsoft support cannot unlock the password, as the password’s storage is local to your copy of the software.
The next time someone tries to access the document, the software will require entering the password.
Password Protecting Adobe Acrobat PDF Documents
To create a password for a PDF file in Acrobat, click the Tools menu, followed by Protect, then Encrypt, and then Encrypt with Password. You may have to click the “yes” button to verify your decision.
In the Password window, add a checkmark to Require a Password to Open the Document. Then enter your password in the text box. Acrobat will give you a rating as to the strength of your password.
In the Compatibility menu, select the oldest version of Acrobat that people can use to open the document. With later versions of Acrobat selected, such as Acrobat X, 256-bit encryption is possible. With older versions of Acrobat, you’ll have a 128-bit encryption limit.
Click on Encrypt All Document Contents and click OK. The next time someone opens the PDF, Acrobat will prompt them for a password.
3. Use Strong Passwords
Creating passwords that are difficult to guess or decipher is as important as choosing to use passwords on your documents. The idea of creating strong passwords should be part of your network access and cloud storage accounts too.
It’s essential for all members of the organization to use a similar set of rules for creating passwords, which should ensure that they always use a strong password every time they make one. Some tips for creating strong passwords include:
- Don’t use common words or phrases unless you’re adding in numbers and special characters
- Don’t use items that relate to your life or personality
- Use a mix of uppercase and lowercase letters
- Use multiple numbers and special characters
- Use at least eight characters, but 10 to 20 characters is even better
Additionally, organizations can encourage their team members to use password managers to track their passwords and make them extremely complex and strong, without having to try to remember them. High-quality password managers include 1Password and Dashlane.
4. Set Up Two-Factor Authentication
If the software or cloud storage provider the organization is using allows you to set up and use two-factor authentication (2FA) to guard the account, deploying it is a smart choice.
With two-factor authentication, the user enters a username and password. To finish the login process, though, the software will generate a code that it sends to your smartphone, tablet, or computer through a text message or email. After entering the 2FA code, the software allows the user to access the account.
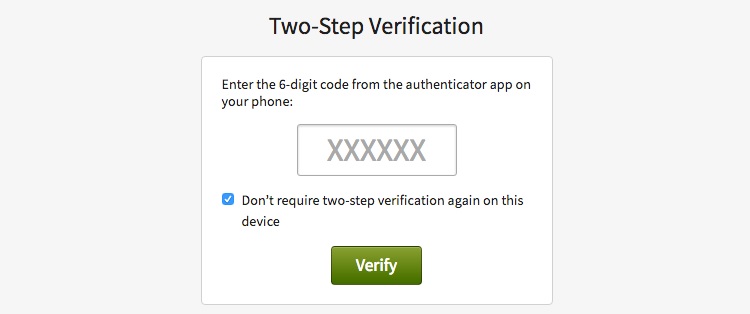
Even if a hacker steals the team member’s username and password, the hacker would also need access to the team member’s email account or smartphone to be able to complete the login process and steal the information that’s part of the account.
Two-factor authentication isn’t perfect, but it provides a strong two-step process to secure your documents.
5. Encrypt Your Files
Encrypting the files on the computer provides another layer of security that’s easy to use for your team members, but that thwarts would-be thieves effectively.
When placing encryption on the hard drive, the encryption software scrambles the data in a file, making it impossible to read without the correct password. After entering the password, the file’s contents return to normal.
You have the option of using a free or subscription-based third-party encryption software. You also can use the encryption system built into the Windows or Macintosh operating systems.
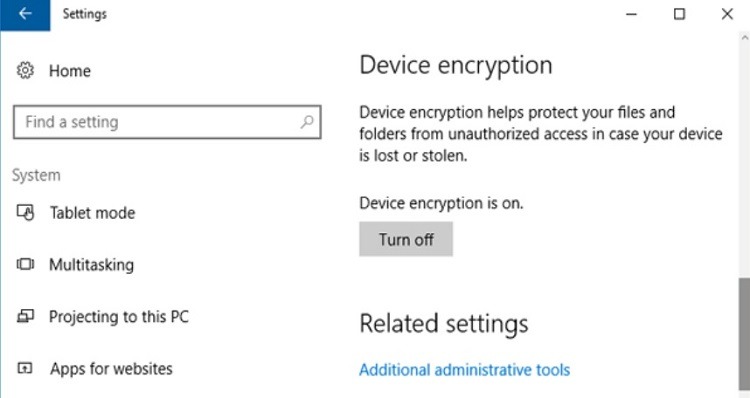
Setting Up Encryption on Windows
With Windows 10 Pro, Education, or Enterprise versions, encryption is automatically available for your files. To turn on encryption on a Windows computer, sign in as an administrator.
Click the Start button. Then click Settings, Update & Security, and Device Encryption. If you do not see Device Encryption as an option, you are running Windows 10 Home, do not have administrator privileges, or your computer doesn’t have the hardware to support encryption through Windows. Click the button to turn on (or turn off) encryption for the Windows computer.
Another option is BitLocker encryption, which is available for some Windows users. Open the Control Panel in Windows, followed by System and Security and Manage BitLocker. You then can choose how to manage BitLocker’s settings.
If you do not see the Manage BitLocker option, you don’t have the hardware required to enable the use of BitLocker. A Windows computer must have a TPM (Trusted Platform Module) chip to enable BitLocker encryption. For those who cannot turn on encryption using this method, using third-party encryption software for Windows is the only option.
Setting Up Encryption on Macintosh
For a Mac computer, FileVault is the built-in system encryption tool. Users enter a password at the time of login to decrypt the data.
Mac users can choose to encrypt their files using their iCloud account login information or create a separate password (also called a recovery key).
To turn on FileVault, click the Apple menu, followed by System Preferences. Then click Security & Privacy, followed by FileVault. You may need to click on the lock icon near the bottom of the page, too.
Click Turn on FileVault. Then choose whether you want to use your iCloud login data for FileVault or whether you want to create a new password. Click the Continue button, and FileVault will immediately begin encrypting the data on the Mac computer.
6. Avoid Emailing Documents
Rather than emailing documents to clients or coworkers, where recipients could make copies or printouts of sensitive data, organizations can use a few different options that don’t involve sending attachments.
- Cloud Storage: Many cloud storage providers give users the ability to share links to documents stored in the cloud. The document’s creator can provide recipients with the ability to view it and make comments without copying or editing the document.
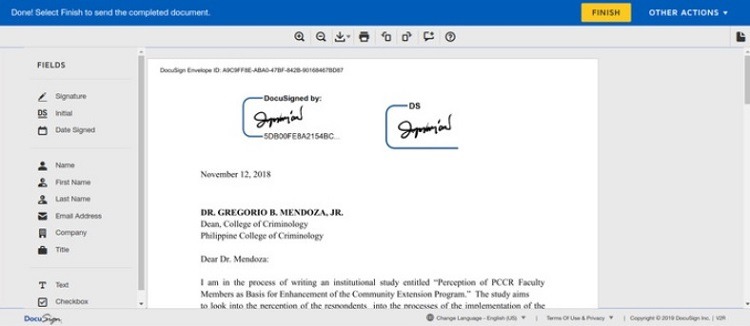
- Digital Signatures: When an organization needs signatures on a document, rather than emailing the documents back and forth, use services that allow for digital signatures, such as DocuSign. The document remains protected, and you can send the recipient an uneditable copy after all parties sign it.
7. Have Backup Copies Available
Part of the process of securing your documents involves having a backup policy in place. Should one team member have the only copy of a critical document on a laptop hard drive that fails, destroying the only copy, the organization’s security isn’t working as well as it should.
One of the best ways to ensure constant backing up of files securely is using cloud storage. With the right settings in place, the local computers will automatically and constantly send edited copies of files to the cloud, ensuring backup copies always exist, even if the locally stored copy becomes corrupted or destroyed.
Cloud storage providers often give subscribers the option of encrypting all data they’re storing in the cloud, which provides another level of security for documents for the organization.
For those organizations that store data on a local server, software that creates automatic backup copies of files on the server in the cloud is another option for securing documents.
Whether using cloud storage or server backup software to create backup copies of the team’s documents requires a subscription, resulting in an added cost for the organization. But taking this step is important to avoid accidental loss of documents because of a catastrophe at the local level.
8. Make Sure Deleted Files Actually Go Away
When deleting a file, either on the local computer or in the cloud storage area, the deleted file may still be available for days or weeks after the deletion. This is a handy feature when you realize you inadvertently deleted a file and need to recover it.
However, when focusing on the security of documents, this is not necessarily a feature you want to see.
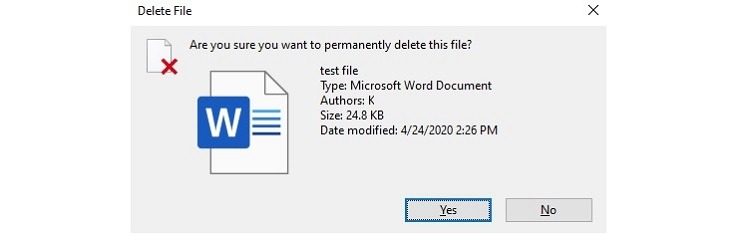
Set up the hard drive or the cloud storage service to immediately delete files to alleviate this issue. With Windows, hold down the Shift key while pressing the Delete key to bypass the recycle bin and delete a file.
However, even using this technique, the data that makes up the document file may still be retrievable for a hacker. Even though the file undergoes immediate deletion, a hacker may still be able to retrieve the file or fragments of it.
Retrieval becomes a very difficult process once the hard drive or cloud storage provider has overwritten the data.
For this reason, for maximum security, use third-party shredding software to overwrite the file’s data on the hard drive. This will leave the file’s data unreadable for the majority of hackers. Many third-party shredding software packages will overwrite the data several times, decreasing the chance of someone retrieving it.
9. Determine Which Files to Protect
If team members don’t like the idea of protecting every file because some files have no sensitive information, they may balk at using the organization’s policies for securing documents. You may want to limit the types of files you decide to secure to make the process easier for everyone.
Some types of files an organization should protect include:
- Financial documents
- Documents with personal information in them
- Company plans
- Documents with sensitive information about employees
- Documents with sensitive competitive information
How to Get Started With Securing Documents
As an organization, having and enforcing policies regarding the security of documents is essential. If team members know exactly how to handle documents with clear guidelines and instructions, it will significantly improve the organization’s ability to keep records secure.
Some potential policies to adopt include the following.
Watch Paper Documents
Paper documents must have a secure storage option if your organization chooses to use them at all. Some teams enforce a clean desk policy, meaning visitors to the building won’t see sensitive paper documents left on a desk. Watch out for leaving paper documents on a shared printer or copier, too.
Watch Network Access
When team members leave the organization or move to a new position, someone in the organization needs to review the team member’s permissions on the computer network, remove them, or change their permissions. Someone should review permission policies regularly for all team members, too, ensuring they are appropriate.
Manage Document Sharing
Set up policies that dictate what types of files team members can share with people from other organizations. Team members must use care when setting permissions for other people who will be accessing the organization’s documents.
Guidelines for Passwords
Having a written policy on the length of passwords and the types of characters the team member should use when creating passwords helps with document security. The organization may want to require that team members use password vault software to keep track of all their passwords securely, rather than writing them on a piece of paper.
Encryption for Mobile Devices
If team members are storing documents on a laptop, tablet, smartphone, USB thumb drive, or some other item that allows them to carry the documents away from the main network, the organization should have policies in place to handle the protection of those documents, such as requiring encryption on the entire device.
Cloud Storage Guidelines
The organization may want to have policies in place that determine the rules for team members who choose to use cloud storage for documents. If the organization has its own cloud storage account, it may want to prevent team members from using a personal cloud storage option.
Otherwise, if personal cloud storage is acceptable, rules about encrypting and deleting files in cloud storage should be part of the policy.
Next Steps for Document Security
Once the organization has a policy in place, it’s important to relay the policy to team members through training. The policy should not be confusing or require a long time for team members to implement, or they will be less likely to follow it.
Document security policies can have some specific elements, but they should provide a general set of guidelines that are easy to understand and follow.
Additionally, helping team members understand why it’s vital to secure your documents will give them more incentive to follow the policies and keep the organization’s documents as safe as possible.
How to Protect your Documents with Real-Time Access Control
Nira is a real-time access control system that provides visibility and management over who has access to company documents in Google Workspace, with more integrations coming soon.
Contact us for a demo, and we’ll review your current setup or help you implement a real-time access control system for the data you already have.

