The Complete Guide To Document Retention In Google Workspace

For Google Workspace users, document retention policies are key for keeping sensitive information secure and compliant. However, they usually must be implemented using an extra, paid service called Google Vault. We’ll go over these policies and how to create them using Google Vault.
In this article, we’ll explore:
- Why document retention policies matter
- How to implement them using Google Vault
- How to retain files in Drive in Vault
- How to set a custom retention rule
- How to set a default retention rule
- What employees should know about document retention
What is document retention?
Many companies must have a solid document retention plan in place, especially if they are in charge of sensitive information. Document retention allows companies to create policies for how to handle their files and documents after a certain time.
Companies set retention policies to stay compliant with legal and compliance frameworks, mitigate Access-Risk incidents, and keep organized and up-to-date with the most relevant information.
These retention policies dictate that companies will take actions like automatically deleting files after a certain number of years have passed or moving documents to a new directory or system to archive them.
Why document retention matters
One of the biggest reasons companies implement a document retention policy is to stay compliant. A multitude of U.S. federal laws and regulations deal with document retention, including HIPAA, the Fair Labor Standards Act, and the Employee Retirement and Income Security Act.
You’ll want to keep certain documents for as long as relevant laws and compliance frameworks require. On the flip side, once that time period is up, it’s important to purge documents and files that are no longer necessary to your business needs, to mitigate risk and stay compliant.
Document retention policies can also keep you better organized and even save your organization time and money, particularly if the process of retention policy enforcement is automated or delegated to employees. However, IT and security teams often lack the necessary tools to get visibility into which documents fall outside the data retention policies and to enforce these policies.
How to set up document retention
As of this writing, in Google Workspace, document retention is mostly possible through Google Vault. Another way is through a Data Access Governance system.
Document Retention through Google Vault
For Vault to search and retain a user’s data, employees need a Google Workspace license and a Vault license. These plans have Vault’s licenses included: Business Plus, Enterprise, Enterprise Essentials (domain-verified only), Education Fundamentals and Plus, and G Suite Business. You can also buy Vault add-on licenses for the Frontline and G Suite Basic plans.
Google’s default settings require that data stays in Workspace until an admin or user deletes it.
In Google’s updated Data Retention Policy, end-users’ Drive files in the Trash will be deleted after 30 days. However, in Workspace, admins will be able to restore items deleted from a user’s trash for up to 25 days.
How Vault retention works
Admins can keep data for as long as is needed or remove it when keeping the data is no longer necessary. Admins can change the settings to retain files even after they are deleted by employees or employees empty their Trash.
Admins can also set retention rules to automatically delete data after a certain period and remove it from all user accounts and Google systems.
However, admins should be extremely careful when configuring retention rules, as important information could be immediately and permanently deleted.
Retain files in Drive in Vault
In Vault, you can set two types of retention rules: custom and default.
Custom data retention rules allow data to be kept for a set amount of time. In Drive, custom rules can be set by the dates the documents were created, trashed, or last modified.
Choosing dates based on when documents were last modified addresses the issue of stale documents. Meanwhile, setting custom rules by when documents were created helps with compliance requirements.
A default retention rule is used when organizations need to keep all company data for all licensed accounts for a set period. This means that you can’t apply default retention rules to only specific accounts or time periods.
Remember, you can have only one default retention rule per service, and it only applies to files in Drive that aren’t covered by a custom rule or hold.
How to set a custom retention rule
- Visit vault.google.com
- Go to “Retention”> “Custom Rules”> “Create”
- Click “Drive” and “Continue.”
- Choose from an organizational unit, all shared drives, or specific shared drives:
- You can choose from an organizational unit such as Sales, Marketing, etc., and then you have the additional option of including shared drives by selecting “Include results from shared drives.”
- You can choose to include all shared drives in your organization.
- You can select shared drives from specific accounts. Enter the names of one or more accounts and click “Find.” Select one or more shared drives and click “Add.”
5. Click “Continue”
6. Choose how long to keep your files:
- If you select “Indefinitely,” you will permanently retain documents under this rule.
- If you select “Retention period,” you can choose a number of days to retain your documents and select the reference time for the start of the period.
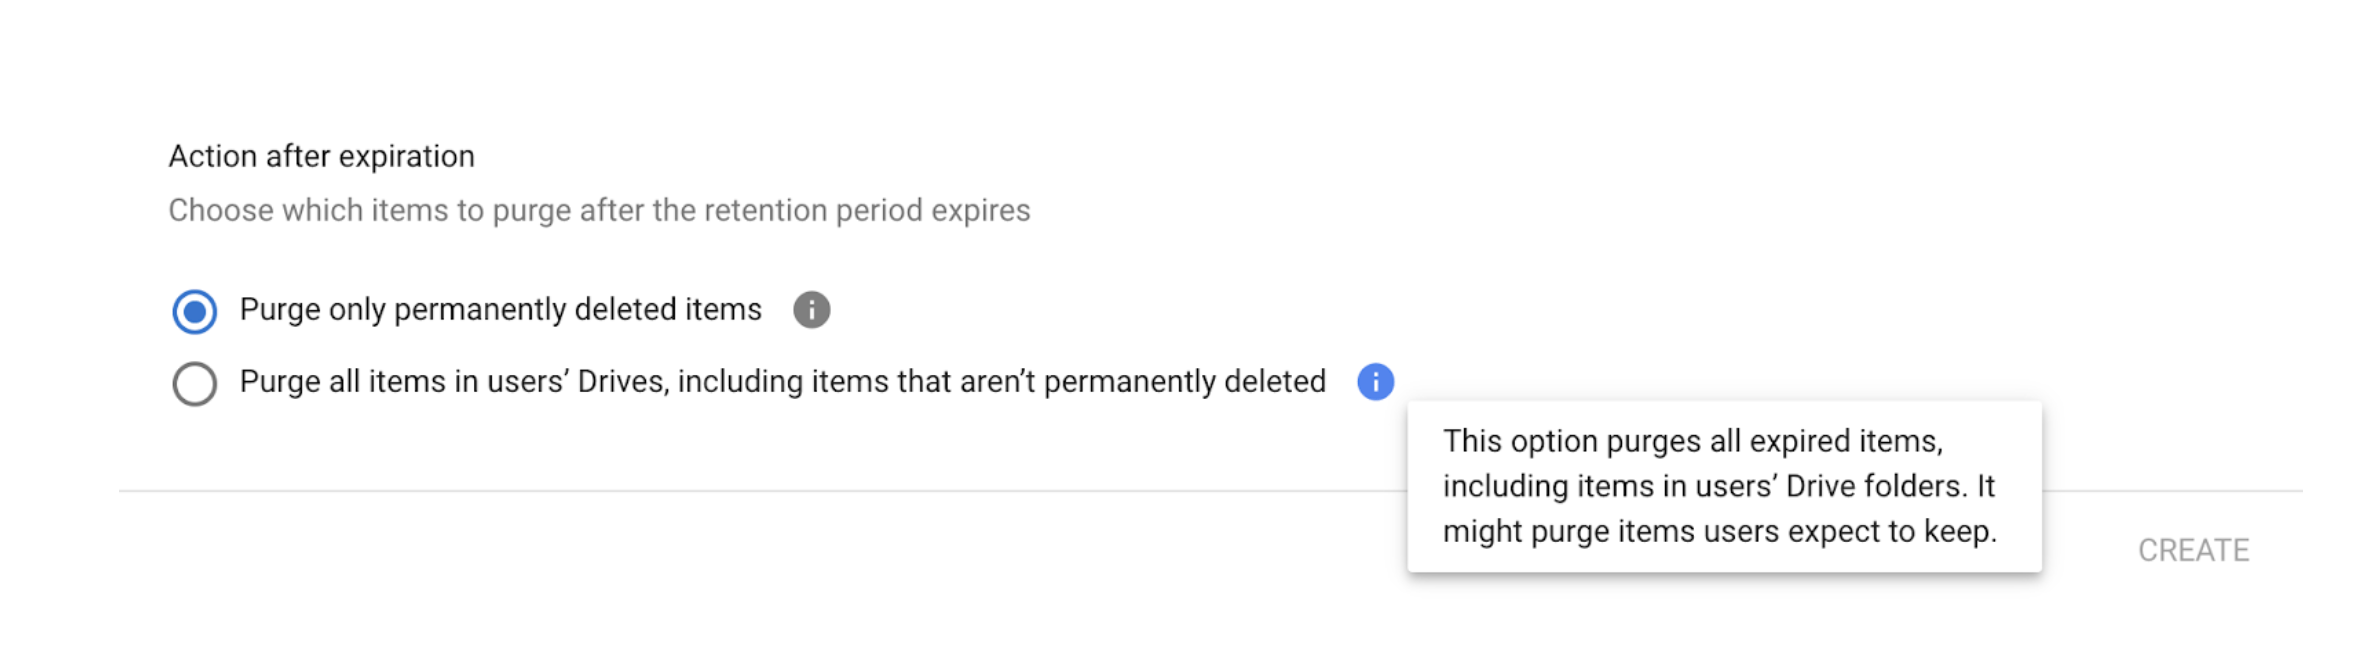
7. Decide what to do with files after the retention period:
- Choose option one in the modal to remove only the files that are already emptied from the users’ Trash folder.
- Choose option two in the modal to remove all files, including files that aren’t deleted.
8. Click “Create.”
9. For accounts with a retention period, you must confirm that you understand the rule’s effects. Check the boxes and click “Accept” to create the retention rule.
 How to set a default retention rule
- Visit vault.google.com.
- Click “Retention.”
- Click “Drive.”
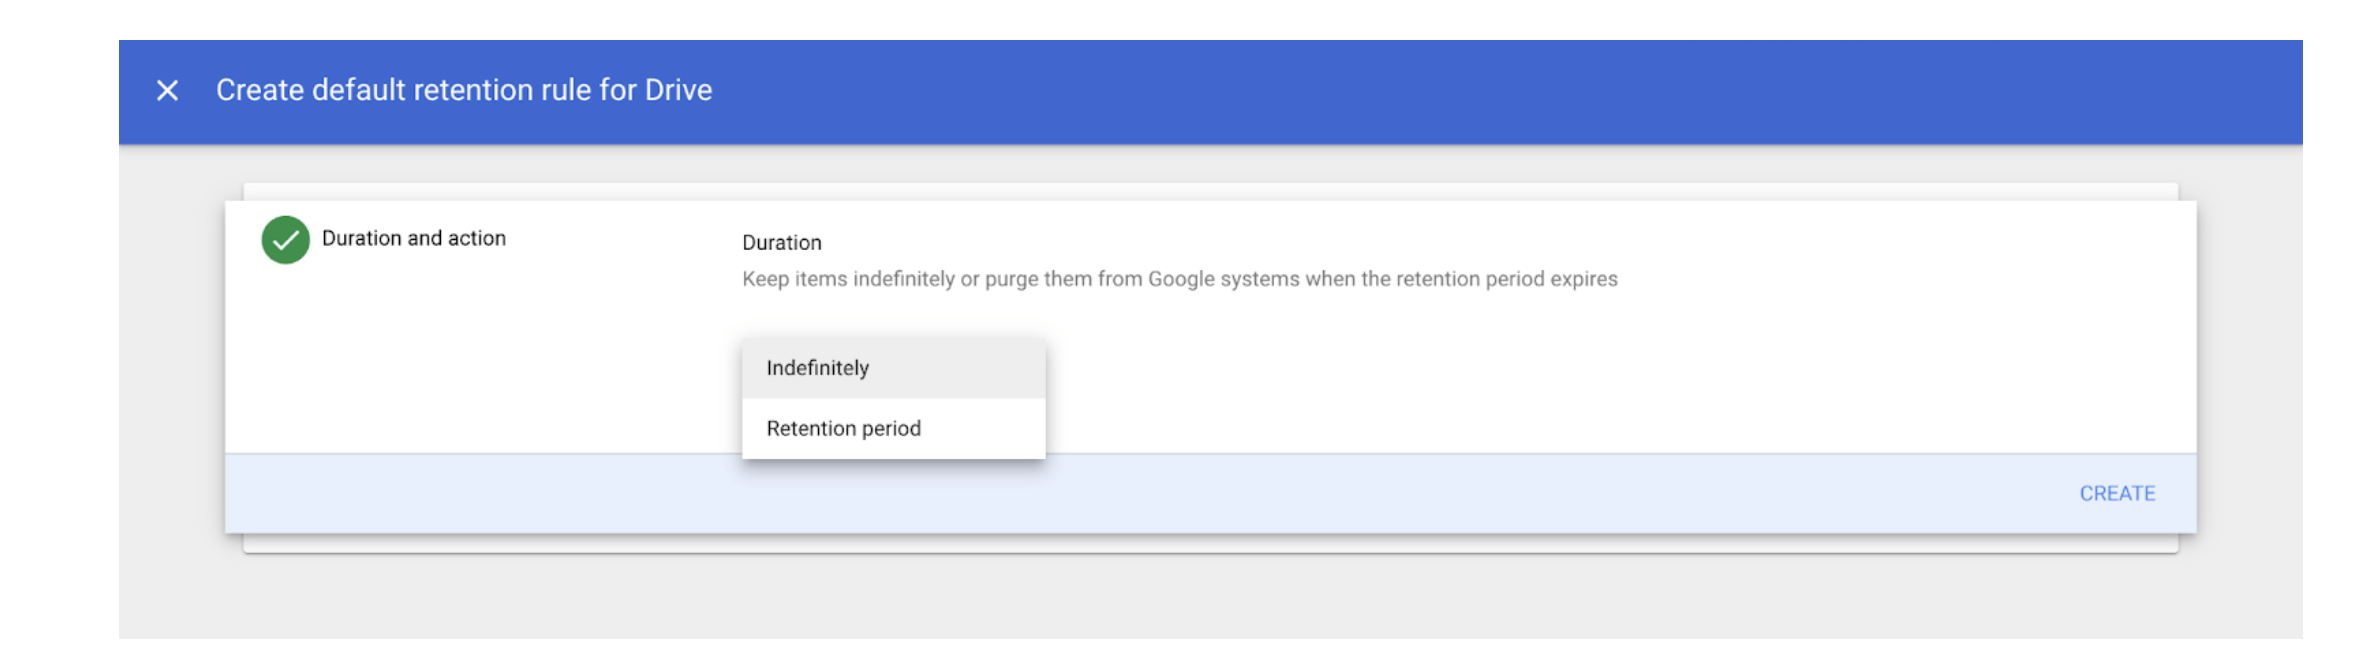
- Choose how long to keep files:
- If you select “Indefinitely,” you will permanently retain documents under this rule.
- If you select “Retention period,” you can choose a number of days to retain your documents and select the time for the start of the period.
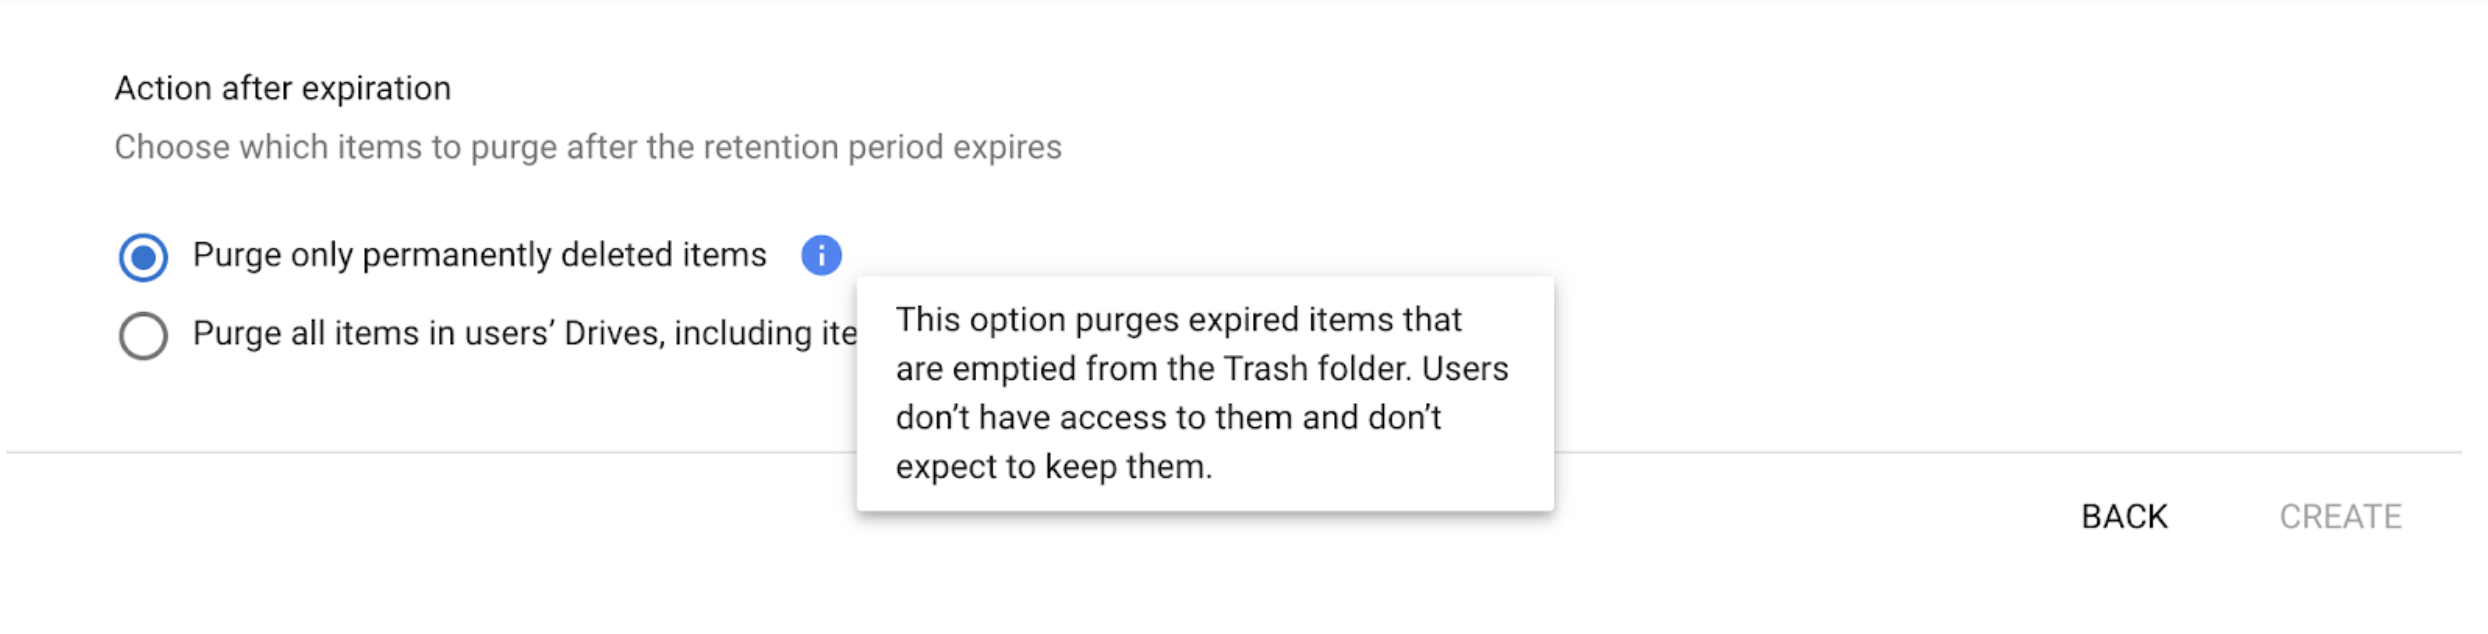
5. Decide what to do with files after the retention period
-
- Choose option one in the modal to remove only the files that are already emptied from the users’ Trash folder.
- Choose option two in the modal to remove all files, including files that aren’t deleted.
6. Click “Save.” You must then confirm that you understand the rule’s effects. Check the boxes and click “Accept,” to save the retention rule.
Here’s What Employees Should Know about Retention
- Documents get stale when their contents haven’t been changed in months or even years.
- There are lots of risks associated with older documents, including:
- Stale information that’s no longer relevant.
- Access that’s no longer needed—whether it’s from internal accounts, personal accounts, or other domains.
- Public or Company links that should have been set to restricted because no one is using the documents anymore.
- If your company has a document retention policy that applies to you, make sure to follow it by deleting old documents or using the mechanisms laid out in the retention policy (like archiving documents or transferring ownership).
- If you are exempt from the policy because of the nature of your work (e.g. you are a part of a legal hold because of a special project), or you need to keep information and not delete it, please make sure to follow those guidelines.
Document retention rules and policies can help greatly with the Access-Risk issues that stem from having stale documents or not properly following compliance protocol. However, these rules and policies are not always easy to set up without the proper tools.
One way to manage document retention is through Google Vault where you can set custom and default retention rules. Another way is through a Data Access Governance system like Nira that enables you to quickly get visibility into documents that are outside your data retention policy and be able to delete the documents (or restrict access) in a few clicks. For more insights about document security in Google Workspace, download the full ebook.

