How to Use Bitbucket
Bitbucket is a software tool developers use to store their coding projects using Git software. Bitbucket provides an interface that simplifies the process of using Git while also simplifying collaboration on coding projects.
This guide will help you learn how to use Bitbucket and make the most of its features.
1. Install Git
Git is an open-source software package that helps developers manage the various versions of their coding projects. Through Git, coders can protect certain sections of their code while working on their other sections. This makes it easier to revert back to older versions of the code and discard recent editing changes when the developer makes edits that don’t work.
Git is free to use. But some people struggle with using Git’s native interface. That’s where a software package like Bitbucket provides help. Bitbucket creates a friendlier interface for making use of the Git software. Running Git through Bitbucket can simplify the process of coding with Git.
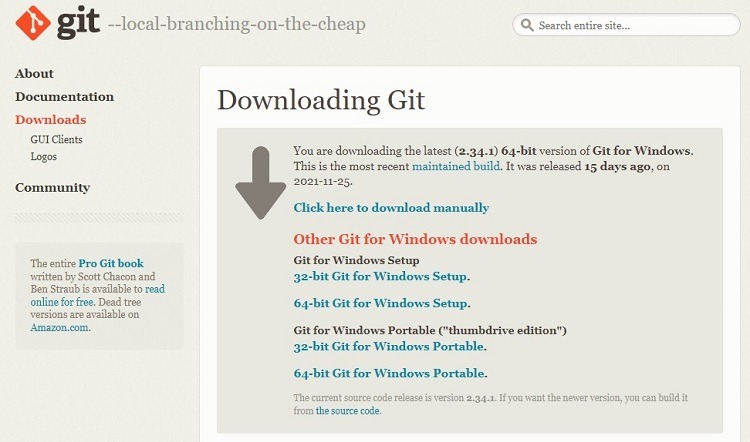
You will have to install Git before you can make use of Bitbucket. Git has downloadable installers for Windows, Linux, and Macintosh users. Follow the instructions that match your operating system.
Learn to Use Git
If you are new to using Git, you will want to take some time to learn how to run the basic commands. You can learn more about Git’s advanced features after signing up for a Bitbucket account.
Git is a challenging language to learn to use, but you should be able to manage the basic commands with just a little bit of practice. Bitbucket certainly makes the process easier.
The Git website has a number of resources for learning more about coding with Git, both printed and video options. The Bitbucket website also has some Git tutorials and documentation aimed at beginners.
2. Sign Up for a Bitbucket Account
Visit the Bitbucket pricing page to determine which pricing tier best fits your potential usage plans. You can sign up for any cloud-based pricing tiers on the page.
Bitbucket Pricing Tiers
Bitbucket offers three different subscription tiers for its cloud-based product. You can run all of the steps listed in our guide to using Bitbucket in any of these subscription tiers. The cloud-based subscription tiers include:
- Free: The Free version of Bitbucket is always free to use, rather than a trial period. (If desired, you can try the other two subscription tiers during a free trial period.) The Free tier has a limit of five users on the account and a limit of 50 build minutes per month. (You’ll use build minutes to test your code with Bitbucket pipelines.) You can set up an unlimited number of private repositories in the Free tier. It provides integration with other Atlassian software packages, including Jira and Trello. You’ll have to rely on community support options for your customer support options in the Free tier.
- Standard: Those who subscribe to the Standard tier of Bitbucket cloud will pay $3 per month per user. You will receive all of the features found in the Free tier, along with some additional features. In the Standard tier, Bitbucket does not limit the number of users on the account. Each account allows for up to 2,500 build minutes per month. You will have access to standard customer service options from Bitbucket with this tier.
- Premium: The Premium tier subscription costs $6 per month per user. It has all of the features in the Standard tier, as well as a few extras. Primarily, you will receive advanced security features in the Premium tier, such as two-step verification. The account also has access to up to 3,500 build minutes per month.
Bitbucket also offers an on-premises Data Center product for larger businesses and organizations that need this type of solution. Bitbucket currently supports a Server product as an additional on-premises option, but the company announced it will no longer support the Server product as of early 2024.
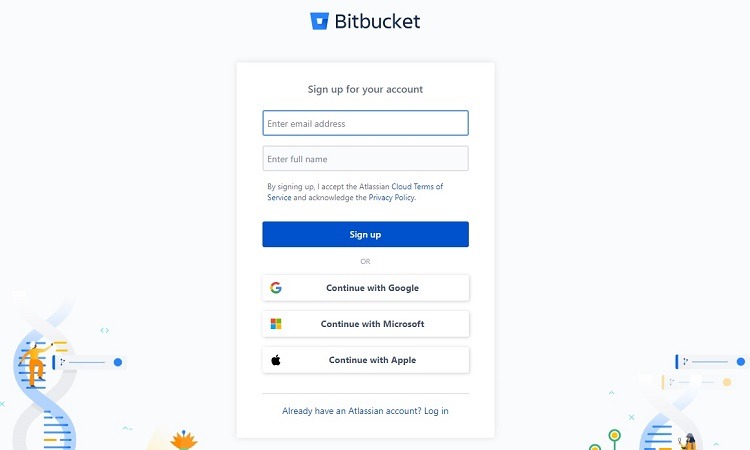
On the pricing page, click on the button for the cloud pricing tier you want to use. You can then create your own Bitbucket account user name and password or sign up through an existing Google, Microsoft, or Apple account. You also can sign up for Bitbucket through an existing Atlassian account if you have a subscription to another Atlassian software product.
3. Create Your First Repository
To begin using Bitbucket, you will need to create repositories. Think of these as containers that will hold all of your files and code. You can give others access to your repository, so they can collaborate on your project and contribute to the coding.
The central, or primary, repository exists with your Bitbucket cloud account on the Bitbucket server. You then can copy the files and code to your local system whenever you need to work on them, giving you access to your files at all times.
To create a repository for the first time, click on the + (plus icon) along the left side of the main window and click on Repository.
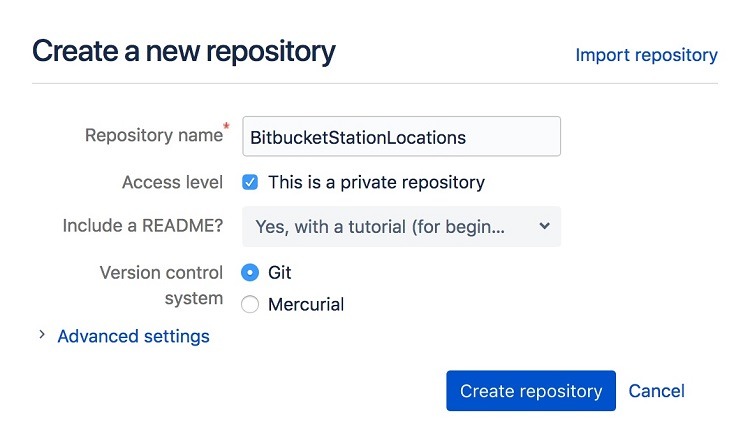
In the popup window, you can enter a name for the repository. The name you select here will appear as part of the URL address for this particular repository.
Next, you can determine whether you want to make this a private repository. Add a checkmark to this box to make the repository private, which means you can decide exactly who will have access to the files and the code stored in the repository. Leave the check box blank to create a public repository where anyone can view it.
You can include a ReadMe file as part of the repository. Even if you don’t really want to have a ReadMe file, by including the ReadMe file in this first repository, you will immediately have a file in the repository. This can be helpful for learning how files work in the Bitbucket repository.
The majority of users will want to select Git as the repository type. After making your selections, click the Create Repository button. Bitbucket will open the source page for the new repository.
4. Clone the Repository to the Local System
The repository you created in the previous step resides on the Bitbucket server in the cloud. When you are ready to begin working on code and add files to the repository, you will want to create a copy of the repository to your local system from which you can work. Bitbucket calls this process cloning the repository.
You will not actually be saving a copy of the repository on your local system. Instead, you will be making a connection with the Bitbucket server and working on your files locally before saving them back to the Bitbucket server.
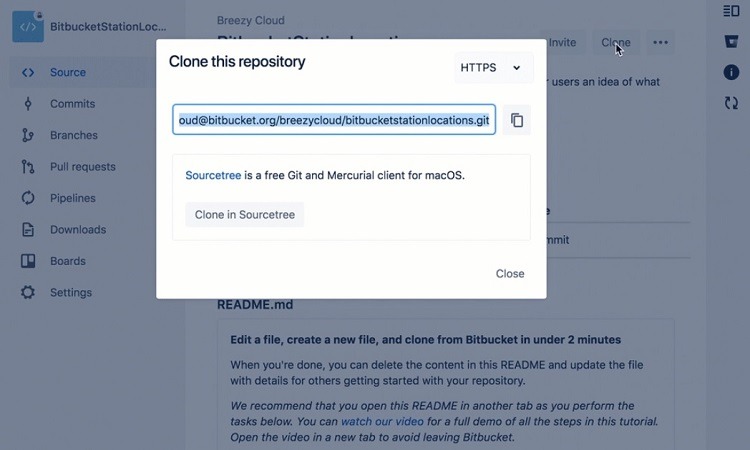
Open the browser window for the repository you want to clone in the Bitbucket software. Click on the Clone button in the upper right corner of the window.
Bitbucket will open the Clone This Repository popup window. In the upper right corner of this popup window, Bitbucket will display the protocol currently in use, either HTTPS or SSH. (With SSH, you’ll have a public and private key for encrypting the data as it moves back and forth from the Bitbucket server.)
You should leave the default protocol in place when you are initially learning to use Bitbucket. As you gain more experience with Bitbucket, you may decide you need to change the default protocol to meet the needs of certain projects.
The clone command for the repository is part of the text box near the top of the popup window. Click on the copy button to the right of the text box to copy this command.
Then open a terminal window. Use the cd command in the terminal window. Then paste the clone command you copied earlier into the terminal window and press Enter.
The terminal window may ask you to enter your app password. The terminal window then should provide a message that it is working on the cloning process and another message when the process completes.
5. Commit a File to Your Main Repository
Now that you can access your repository on your local system, you can begin working.
Start by moving to the top level of the repository you created. In the terminal window, use the echo command with a file name and the .txt file extension to create a text file in the repository.
After creating the file, use the git status command in the terminal window to see a message that shows you created the new file in the repository correctly.
Now you will want to use the Git add command with the same file name to move the file from your local system to a location that Bitbucket calls the staging area. The staging area gives developers a place to store their changes before choosing to save them permanently.
With the file in the staging area, you are ready to commit the information about the file and the file itself to the repository stored in the Bitbucket cloud.
Git and Bitbucket use the term commit to describe the process of sending notice of the changes you made in your local system to the main repository. Once you commit the changes to the main repository, anyone can view them and comment on them.
You must commit changes to the main repository, or they will not become part of the project. Bitbucket cannot pull the changes into the repository for you.
Use the git commit command to commit your changes to the project history. You can go back and review the project history in the future to see this commit and any other commits you make regarding this project.
Next, you’ll use the git push command to send the files with the committed changes to the main repository on the Bitbucket server. All of the changes you made are now part of the main repository.
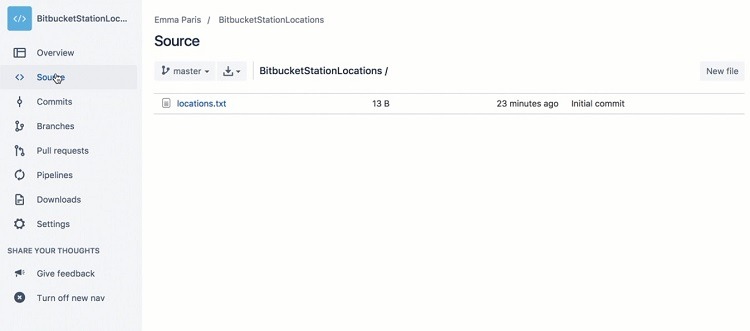
Back at the repository window in Bitbucket, you can click Commits in the left-hand sidebar to see the commit you just made to the repository. You can also click Source in the sidebar to see any of the files you added to the main repository.
Common Problems When Using Bitbucket
Although Bitbucket is a strong software program, developers will encounter some challenges when using it.
Problem 1: Limited Users in Public Repositories
Bitbucket limits the number of contributors you can place in public repositories. This can cause issues when trying to allow a large team to collaborate on an open-source development project.
Bitbucket works better for those who want to run projects in private repositories. It also works better for small and medium-sized businesses that have small teams working on projects together rather than huge groups of people.
If you truly need a Git interface software package that works well for large open-source development projects, you may want to consider subscribing to a Bitbucket competitor, such as GitHub.
Problem 2: Interface Is Challenging to Use
Some Bitbucket users find the software’s interface to be difficult to use. The interface’s design seems older, and some users describe it as clunky. Because of the challenging interface, some people who are new to the Bitbucket software may feel as though the software is running slow and they are struggling to complete projects.
The best way to work around this problem is to spend time with Bitbucket. The longer you work with Bitbucket’s interface, the better results you should have.
Problem 3: Limited Functionality for Creating and Tracking Bug Issues
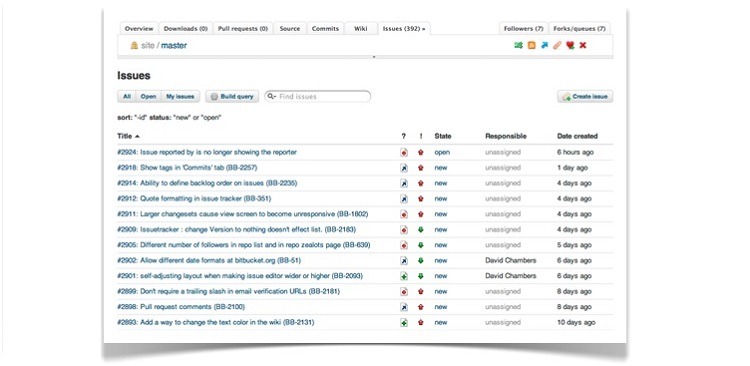
Each Bitbucket repository includes an issue tracker. You can use this feature to track bug reports and feature requests for the project. However, Bitbucket keeps its built-in bug tracking feature simplistic, not wanting to bog users down with complexities.
For those needing a higher level of functionality in bug tracking features, Bitbucket will integrate closely with Jira, a project management software tool specializing in tracking bugs. (Atlassian owns both Bitbucket and Jira.) Creating an integration between Bitbucket and Jira is an easy process, and it will yield advanced features for tracking bug issues.
Problem 4: Sluggish Performance Issues in Bitbucket
One of the most common complaints from Bitbucket users involves the sluggishness of the software in certain circumstances.
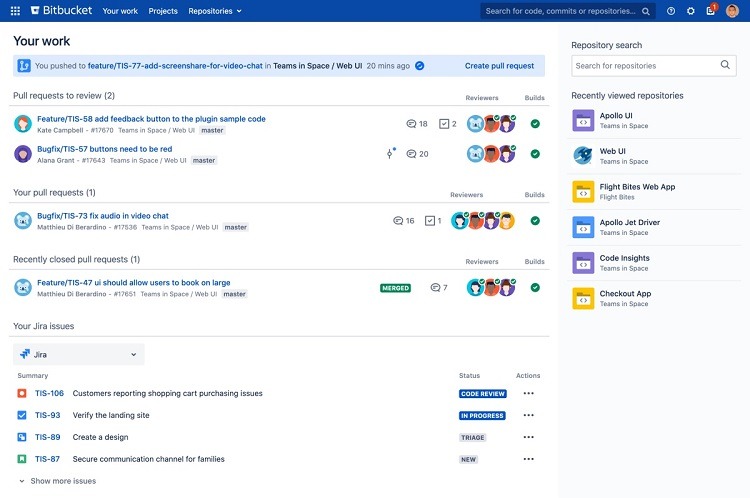
For example, if you are experiencing delays while waiting for the merging of pull requests, understand that the merging will occur in the background. You can continue working and even navigate away from the screen to perform other tasks while the merger continues in the background.
Large projects tend to have more frequent issues with sluggish performance than smaller projects that involve fewer people. If you have the opportunity to break up a larger project into small chunks, you may be able to work around some of the sluggish performance issues.
Those who find that Bitbucket runs too slowly for their needs also have the option of switching to a software package like GitHub, which tends to work better for large organizations and tends to avoid sluggish performance.

