How To Transfer Google Drive Data To Another Account
If you are considering transferring data from your Google Drive account to a different Google Drive account or another cloud storage account, you have four primary options you can follow. We will break down the steps required to transfer your data safely and efficiently for each of these options.
1. Transfer Your Google Drive Data and File Ownership to Another Account
You can transfer all your Google Drive data to another Google account and transfer ownership of the files to that account. You may want to do this if you have multiple Google accounts and you want to consolidate all your data in the Google account you are currently using before deleting the old accounts.
However, it’s important to note that this method can take lots of time and manual work to transfer ownership of every file from one account to another.
Step 1: Select Your Files and Folders
Start by signing in to your Google account. Click the Google Apps button in the upper right corner (consisting of a 3-by-3 grid of dots) and click the Drive button.
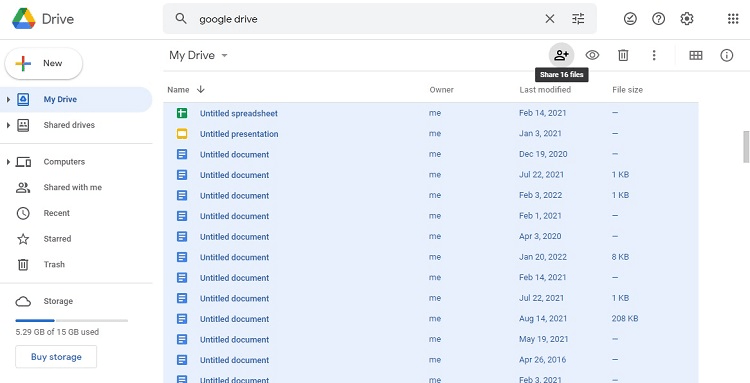
Now, highlight the files and folders you want to transfer. (This probably will be all of them.) Highlight the first file or folder in the list. Then scroll to the bottom of the list. Press and hold the Shift key before clicking on the final item in the list. This should highlight all files and folders. (Depending on the speed of your internet connection and the number of files involved, it may take quite a while for the entire list to load.)
Step 2: Share Your Files and Folders
With all the items highlighted, click the Share button in the upper center of the Google Drive window. (It looks like the torso of a person with a plus sign to the right of it.)
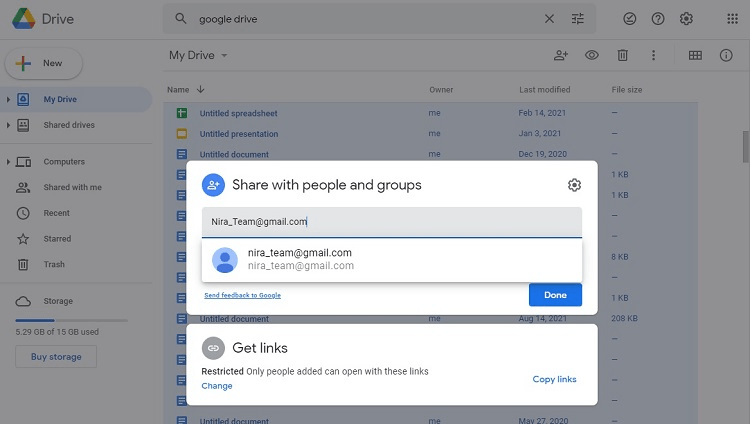
In the upper portion of the popup window, you can enter the Gmail address where you want to transfer the files. To the right of the text box where you entered the Gmail address, click the drop-down menu and select Editor from the list. You also have the option to notify the other account about the transfer, by selecting the checkmark for Notify People.
Finally, click the Send button. This shares the files with the other Gmail account.
Step 3: Transfer Ownership of the Files and Folders
Leave all the files and folders highlighted from Step 1. Click the Share button again. You may see the Gmail account with which you shared the files now listed. If not, start typing the name of the Gmail account in the text box, and you should see it appear in the list.
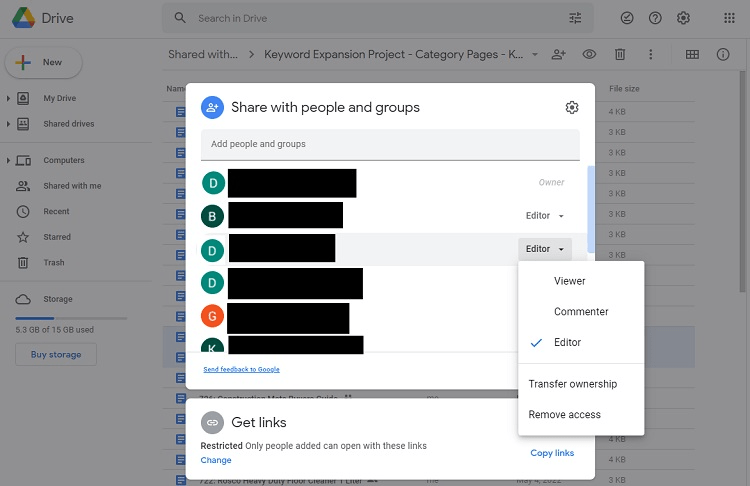
To the far right of the new Gmail account, click on the drop-down menu. You now should see a couple of new options that were not visible previously. You can either click on Make Owner or Transfer Ownership to relinquish the old Google account’s rights to the files and transfer them to the new Google account.
You may need to click the Send button again. This act will transfer ownership of all the highlighted files and folders to the new Google account.
Finally, depending on the configuration you have with Google Drive, you may need to remove access from the old Google account. In the list of accounts, to the far right of the old Gmail account, click on the drop-down menu. Select Remove Access from this menu, which should remove the old account from having access to these files.
Please note, if you transfer ownership of a folder, after the ownership transfer is complete, you will still own all the individual files inside the folder. You must also transfer ownership of all the individual files if you want their ownership to change. Follow steps 1 through 3 to transfer the ownership of these files inside each folder.
2. Transfer Your Google Drive Data and Files Using Google Takeout
The Google Takeout app will make a copy of any data you select in Google Drive. It will create a zip file containing all these files and send you a link to the zip file via email. You then can use that link to upload the files into the new account, whether that is a different Google account or another cloud storage account, such as Box.
Step 1: Access Google Takeout
Open the Google Takeout app. You may need to enter your Google account log-in credentials.
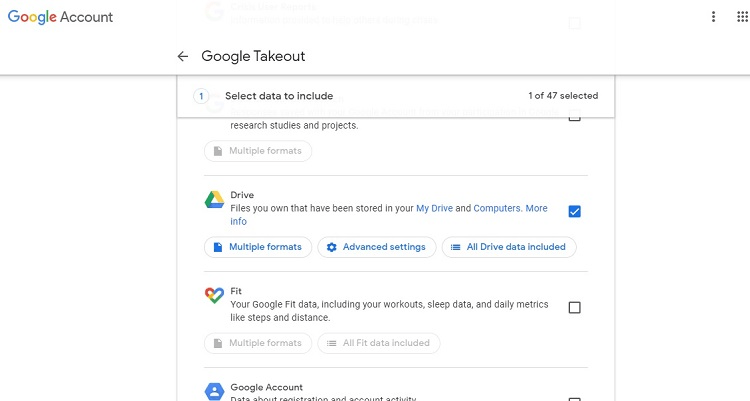
Once you are using Takeout with your account, you can select the data to export. Start by clicking the Deselect All text along the right side.
Then scroll down the list until you see Google Drive (which may only appear as Drive in the list). Add a checkmark to the checkbox to the right of the Google Drive entry. The default setting will include everything that is part of your Google Drive account in the transfer through Takeout. You can click on the All Drive Data Included button to exclude some files and folders from the transfer process.
Scroll to the bottom of the page and click the Next Step button.
Step 2: Select the Delivery Method
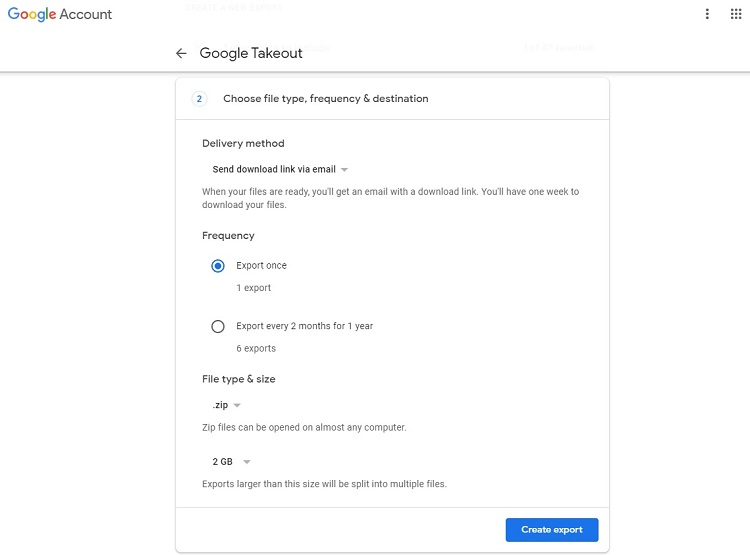
In this next step, you can choose exactly how you would like Google Takeout to create and send the compressed file. The majority of people will choose to leave the default settings for this step, but you can change them if desired. The options are:
- Send Download: Most people will have Takeout send a link to the zip file via an email message. However, you can choose to automatically add the zip file to a different Google Drive account, to Dropbox, to OneDrive, or to Box, if desired. The link to the downloaded zip file will expire after one week.
- Frequency: The majority of people will want to click on Export Once to transfer the files to a new account. However, if you are using Takeout to create a backup copy of your Google Drive files in another cloud storage account, you may want to click on the Export Every 2 Months for 1 Year button. This would create an automatic backup method.
- File Type: The easiest method of transferring such a large number of files is through the zip compression format to create a zip file. However, you also have the option of using the tgz compression format to create the file that contains all your current Google Drive files. Those using the Linux operating system may prefer the tgz compression format.
- File Size: Finally, you can select the maximum size of the final compressed file as 1 GB, 2 GB, 4 GB, 10 GB, or 50 GB. If the Takeout process must create a larger file than this size, it will break up the compressed file into more than one file. The default is 2 GB, as this is a convenient size to send over email.
Click the Create Export button to start the process. After you receive the email message with the compressed file in it, you can open that file in your new account and extract the files.
Later, you will need to return to your old Google account and remove that account’s access to the files to complete the transfer. Highlight all of the files in your Google Drive account, as you did earlier. Click on the drop-down menu to the right of your Google account name and remove that account as an owner of the file. You may need to repeat this process for files stored inside folders, depending on your Google Drive setup.
3. Transfer Your Google Drive Data By Uploading and Downloading
You can go back to the days before cloud storage accounts existed by downloading your Google Drive files to a hard drive in a computer, a thumb drive, or an external hard drive.
Google Drive contains a Download and Upload command combination that you can use for this process. However, this can run very slowly, so trying one of the other methods may be a better option. Additionally, this only works for transferring files from one Google Drive account to another Google Drive account, rather than going to another brand of cloud storage.
Step 1: Download the Google Drive Files in a Compressed Format
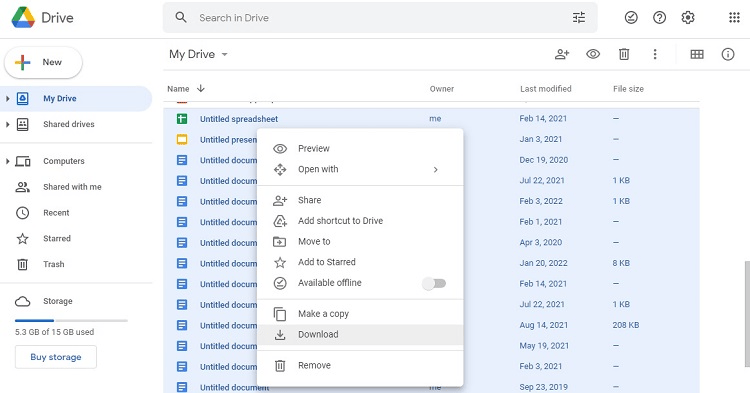
Highlight the files and folders in Google Drive that you want to transfer to the new Google account. (To transfer your Google Drive files to a new account, you will want to highlight all the files and folders.)
Right-click on the highlighted files. In the popup menu, left-click on Download. Google Drive will begin downloading these files and compressing them into a zip folder. This folder will end up on your computer’s hard drive. (If you are using Windows, the file should end up in the Downloads folder.)
You’ll see a message in the lower right corner of your Google Chrome browser window that updates you on the number of files and folders involved in the download process.
If you have thousands of files, this process could take a few hours or longer. You will need to maintain an internet connection during this process and leave the computer powered up and running. You can work on other things while the download takes place.
After Google Drive completes the download, it will change the message in the lower right corner to indicate that the download is complete. In the lower-left corner of the Chrome browser window, you will see a button for the zip folder that contains the downloaded files and folders. (Don’t click on this button.)
Step 2: Upload the Google Drive Files to the New Account
Next, sign in to your new Google account where you want to transfer the files. Click the Google Apps button that looks like a 3-by-3 grid of dots in the upper right corner of the Google account window. Then click the Drive button in the popup menu.
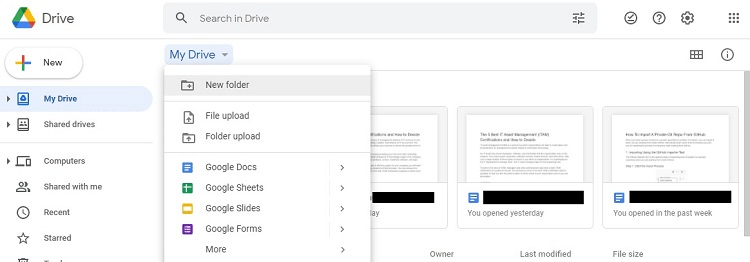
From the My Drive window, click on My Drive in larger text near the upper left area of the window. (Do not click on My Drive in smaller text on the far left of the window.) In the popup menu, click on File Upload.
In the popup window, you will need to navigate to the storage location for the compressed zip file from the download process earlier. Google Drive will then begin uploading the file’s contents. You will see a message in the lower right corner of the Google Drive window, giving you a status update on the upload process.
When the upload finishes, the message will change to show the completion. From your My Drive window in your new Google account, you then should see the zip folder listed. Double-click on it to extract the files. You may have to select the type of zip extractor that you want to use on the file.
Once the files are in the new account, you may need to go back and transfer ownership away from the old Google account to the new Google account.
4. Transfer Your Google Drive Data and Files Using a Third-Party Tool
Tools like Nira can help with transferring your Google Drive files and folders to another account if you’re a Google administrator at your company. Nira, for example, allows for bulk transfer of ownership for all documents. What may have taken hours to manually transfer ownership of every file from one employee to another can be done within minutes. Meanwhile, for migration services to another cloud service, an option like VaultMe can help.
Common Problems When Transferring Google Drive Data To Another Account
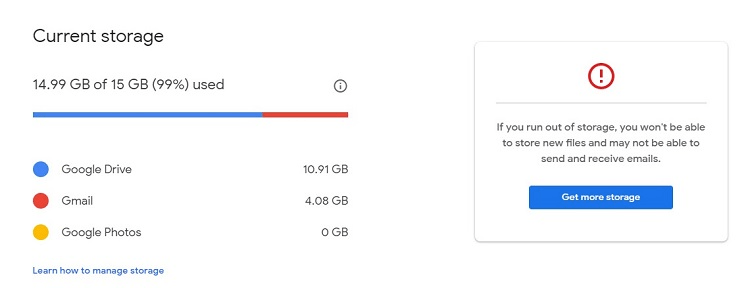
Data Limits
If you are transferring data from a paid version of Google Drive to a free version of Google Drive, you could run into problems with data limits. The free version of Google Drive has only 15 GB of storage space available. If you try to transfer more data to the Google Drive account than you have storage space available, you will see a data transfer error.
Lack of Free Space
If you are using Google Takeout to create a zip file with all your data in it, you may run into free space issues. To create the zip file, Google Takeout will need free space available in the account equal to the amount of data stored in Google Drive.
In other words, if you have more than half of your Google Drive space occupied with files, you may not be able to use Google Takeout. The process of creating the zip file requires at least 50% of free space for Google Takeout to work properly under normal circumstances.
To work around this problem, you can delete some files to create free space, pay for a larger storage limit in Google Drive than what you have currently, or only transfer a small chunk of files at a time.
Antivirus or Firewall Errors
If you are running a highly restrictive antivirus program or firewall on your computer, downloading files may be a difficult process. When transferring data from the Google Drive cloud through a download to a local storage system, the firewall settings may block this process.
If you are receiving errors related to transferring your Google Drive data and blocking the files because of security issues, you may want to disable the firewall or antivirus temporarily. After performing the transfer from Google Drive, reinstate the firewall or antivirus immediately.
Connection Reliability or Speed
When transferring a large number of files and a significant amount of data from your Google Drive account to a new account, you will need a highly reliable internet connection. If you are using WiFi, and if other people are streaming or gaming on the same connection, your Google Drive transfer may struggle to maintain a sure connection. This can cause interruptions to the process and can cause it to take far longer than you expect.
If you are planning a large transfer from Google Drive to another account, consider waiting to start the process until you know that you will have a secure, reliable connection. Wait until other people are not using the connection for data-intensive processes.
For more unreliable WiFi connections, consider connecting the computer directly to the router or server with an Ethernet cable. This hard-wired connection may allow the transfer process to go smoother without interruptions that can occur on a shaky WiFi network.
When thinking about shifting your data from one Google Drive account to another or even a different cloud storage service, it’s crucial to grasp the available choices and steps to pull off a safe and smooth transfer. Picking the right option will let you manage your data effectively in the storage setup that works best for you. For information on using Nira to transfer ownership of documents with ease, visit here.

