Guide to Google Labels & DLP Rule Creation
Google Drive’s labels feature provides administrators and users with a way to categorize and secure sensitive information. This feature can be utilized in concert with Google’s data loss prevention (DLP) tooling, to automatically apply DLP labels.
Using Google’s DLP, administrators can create rules where when a specific condition is met, a DLP rule is triggered, and a label is applied.
These rules are used to safeguard sensitive data and include several steps and possible options you can implement. We’ll briefly highlight each step and for more details, you can visit the Google Workspace Admin Help Center.
Note: Supported editions for this feature are Enterprise, Education Fundamentals, Education Standard, Teaching and Learning Upgrade, and Education Plus.
Step 1: Plan your rules
Before creating DLP rules, it’s a good idea to plan out the conditions you will add to your rules. For example, you could choose to protect sensitive information like a social security number through a predefined classifier or you might want to safeguard personally identifiable information through a rule template. Once you’ve identified your conditions, you can start creating your rules.
Step 2: Create a custom detector
Note: this step is optional.
One way to plan out rule conditions is by creating a custom content detector. This step is not required but can be a good tool if you have a super administrator account or a delegated admin account with these privileges:
- Organizational unit administrator privileges
- Groups administrator privileges
- View DLP rule and Manage DLP rule privileges
- View Metadata and Attributes privileges
Here’s how to create a custom content detector:
- In the Admin console, go to “Menu” > “Security” > “Access and data control” > “Data protection.”
- Click “Manage Detectors.”
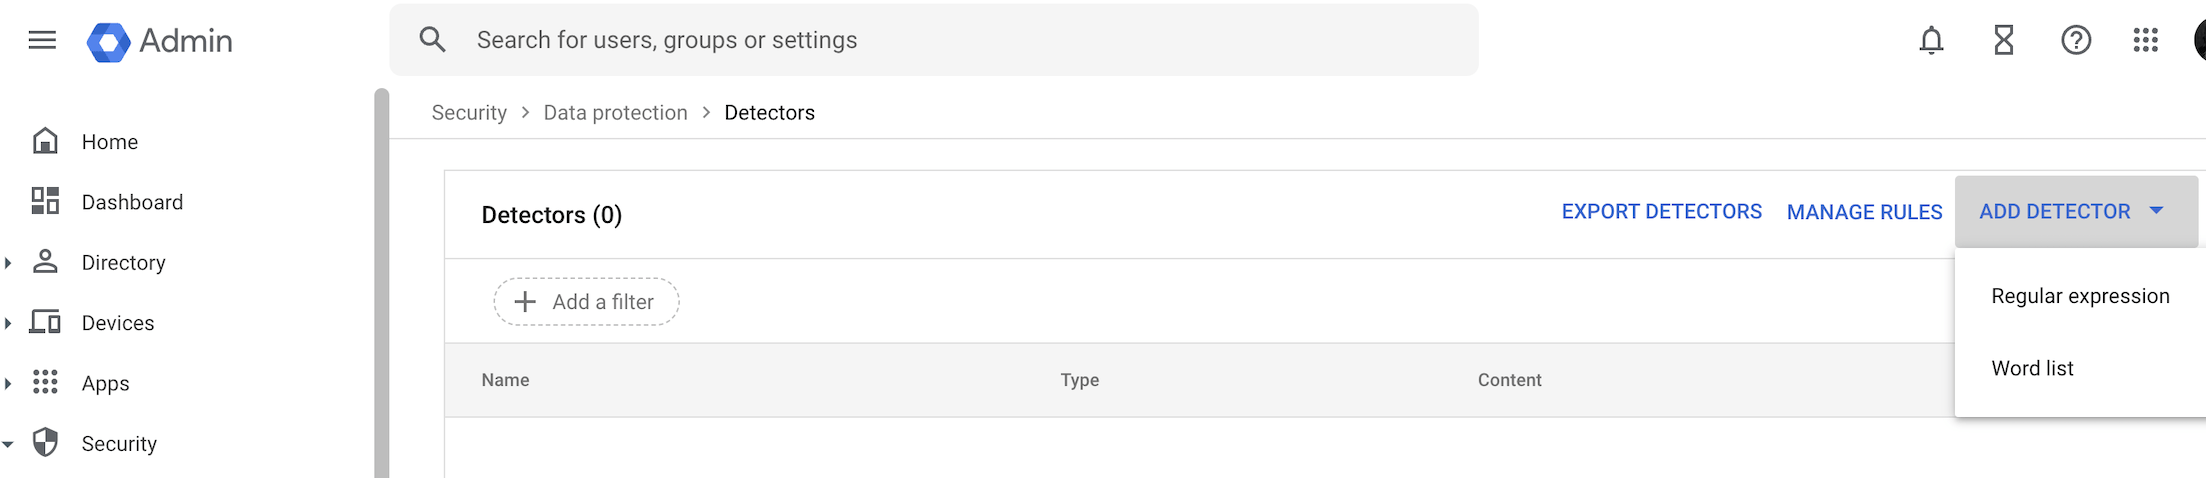
3. Click “Add detector.” Add the name and description. You may select a “Regular expression” also known as a “regex” or a “Word list,” which is a custom list of comma-separated words you create that can be detected.
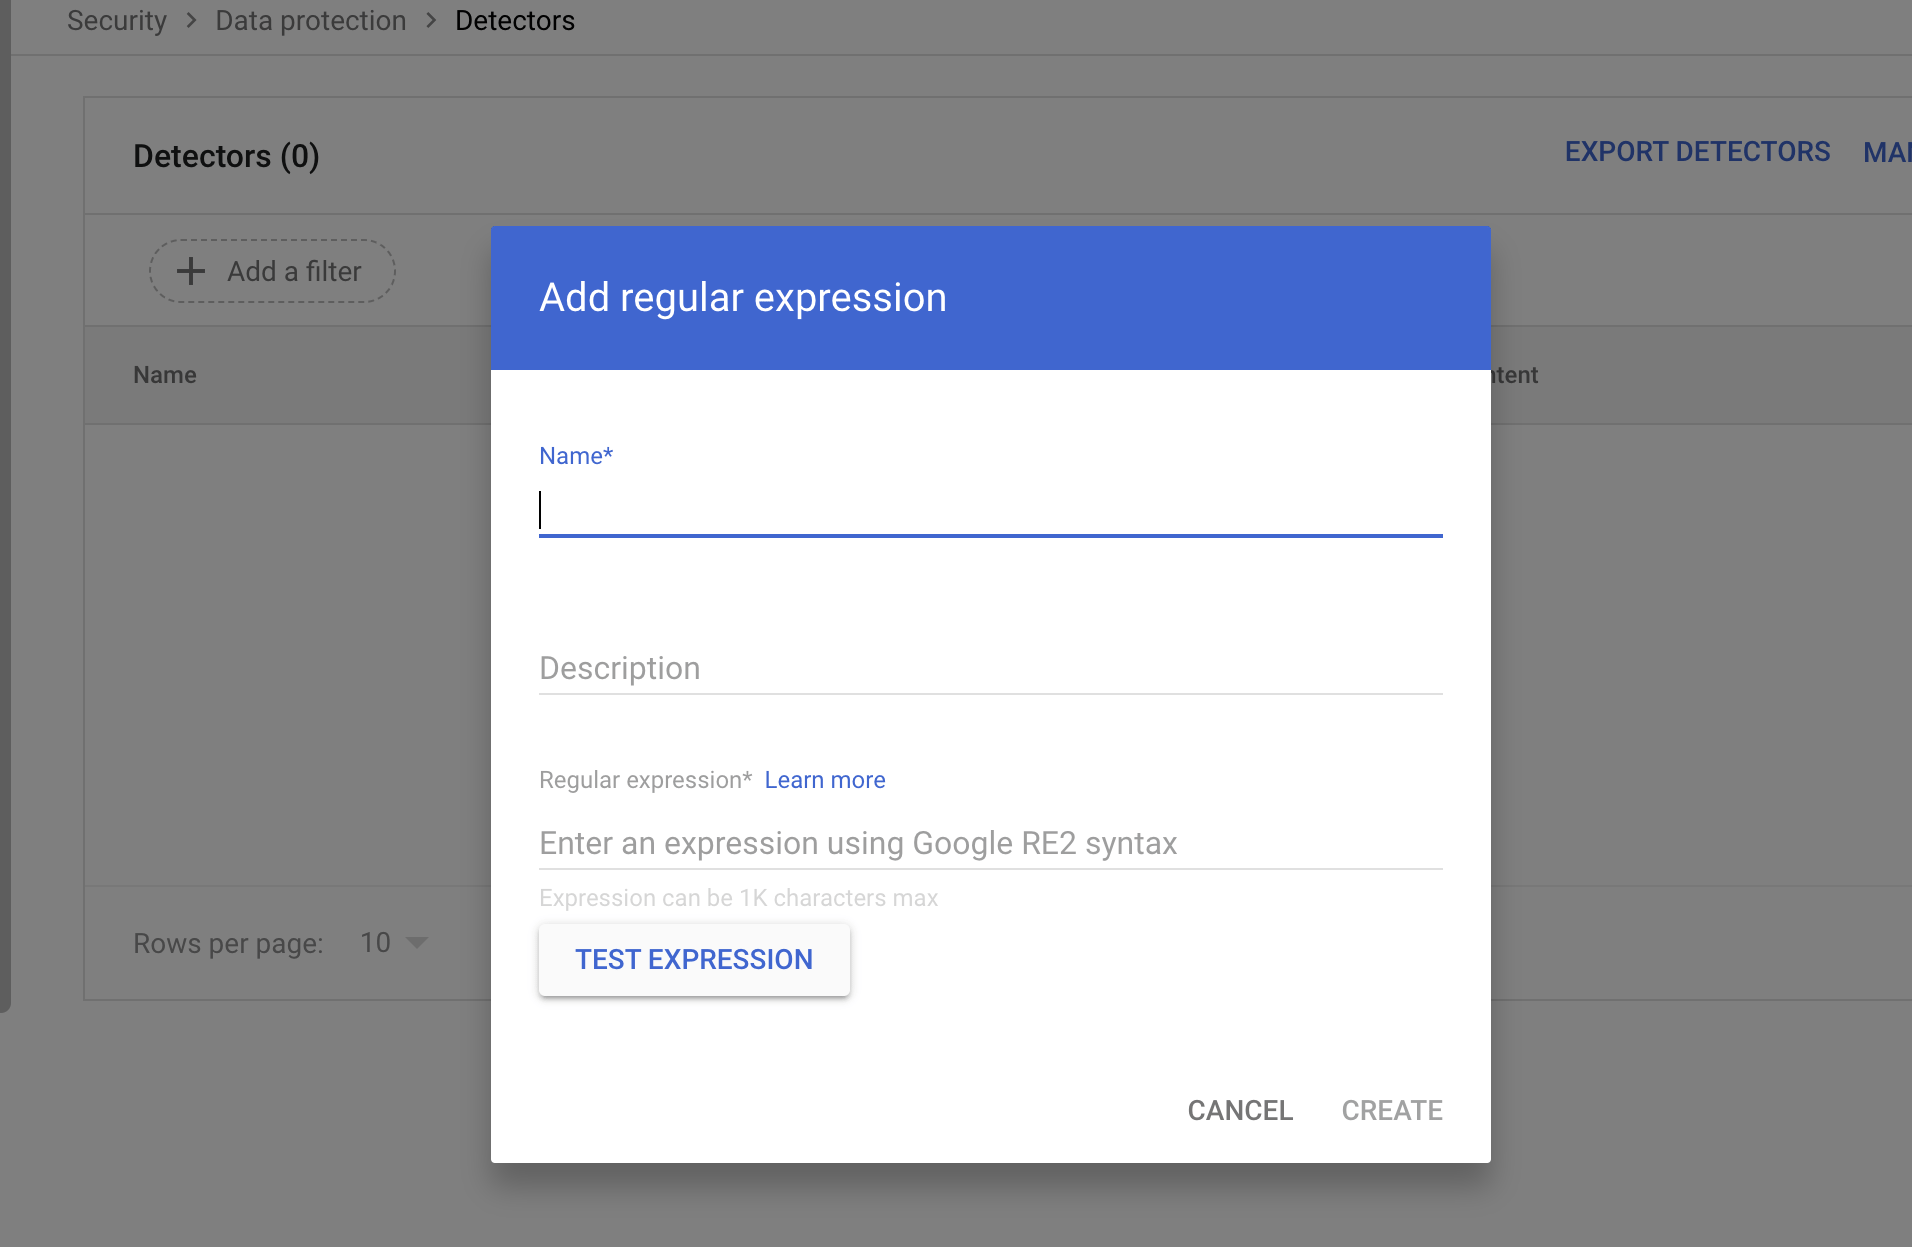
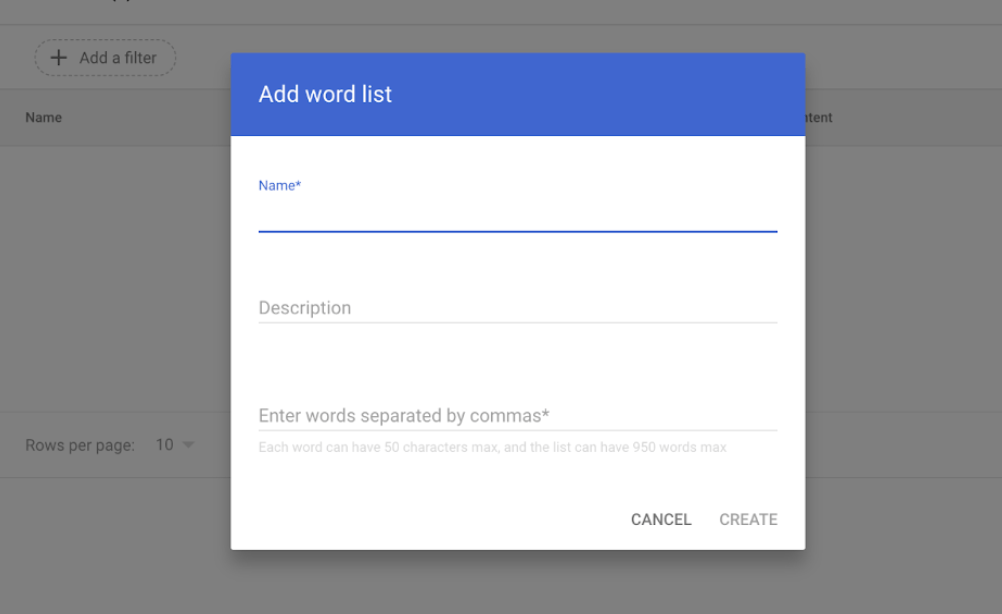
4. Click “Create.” Now you can use the custom detector when you add conditions to a rule.
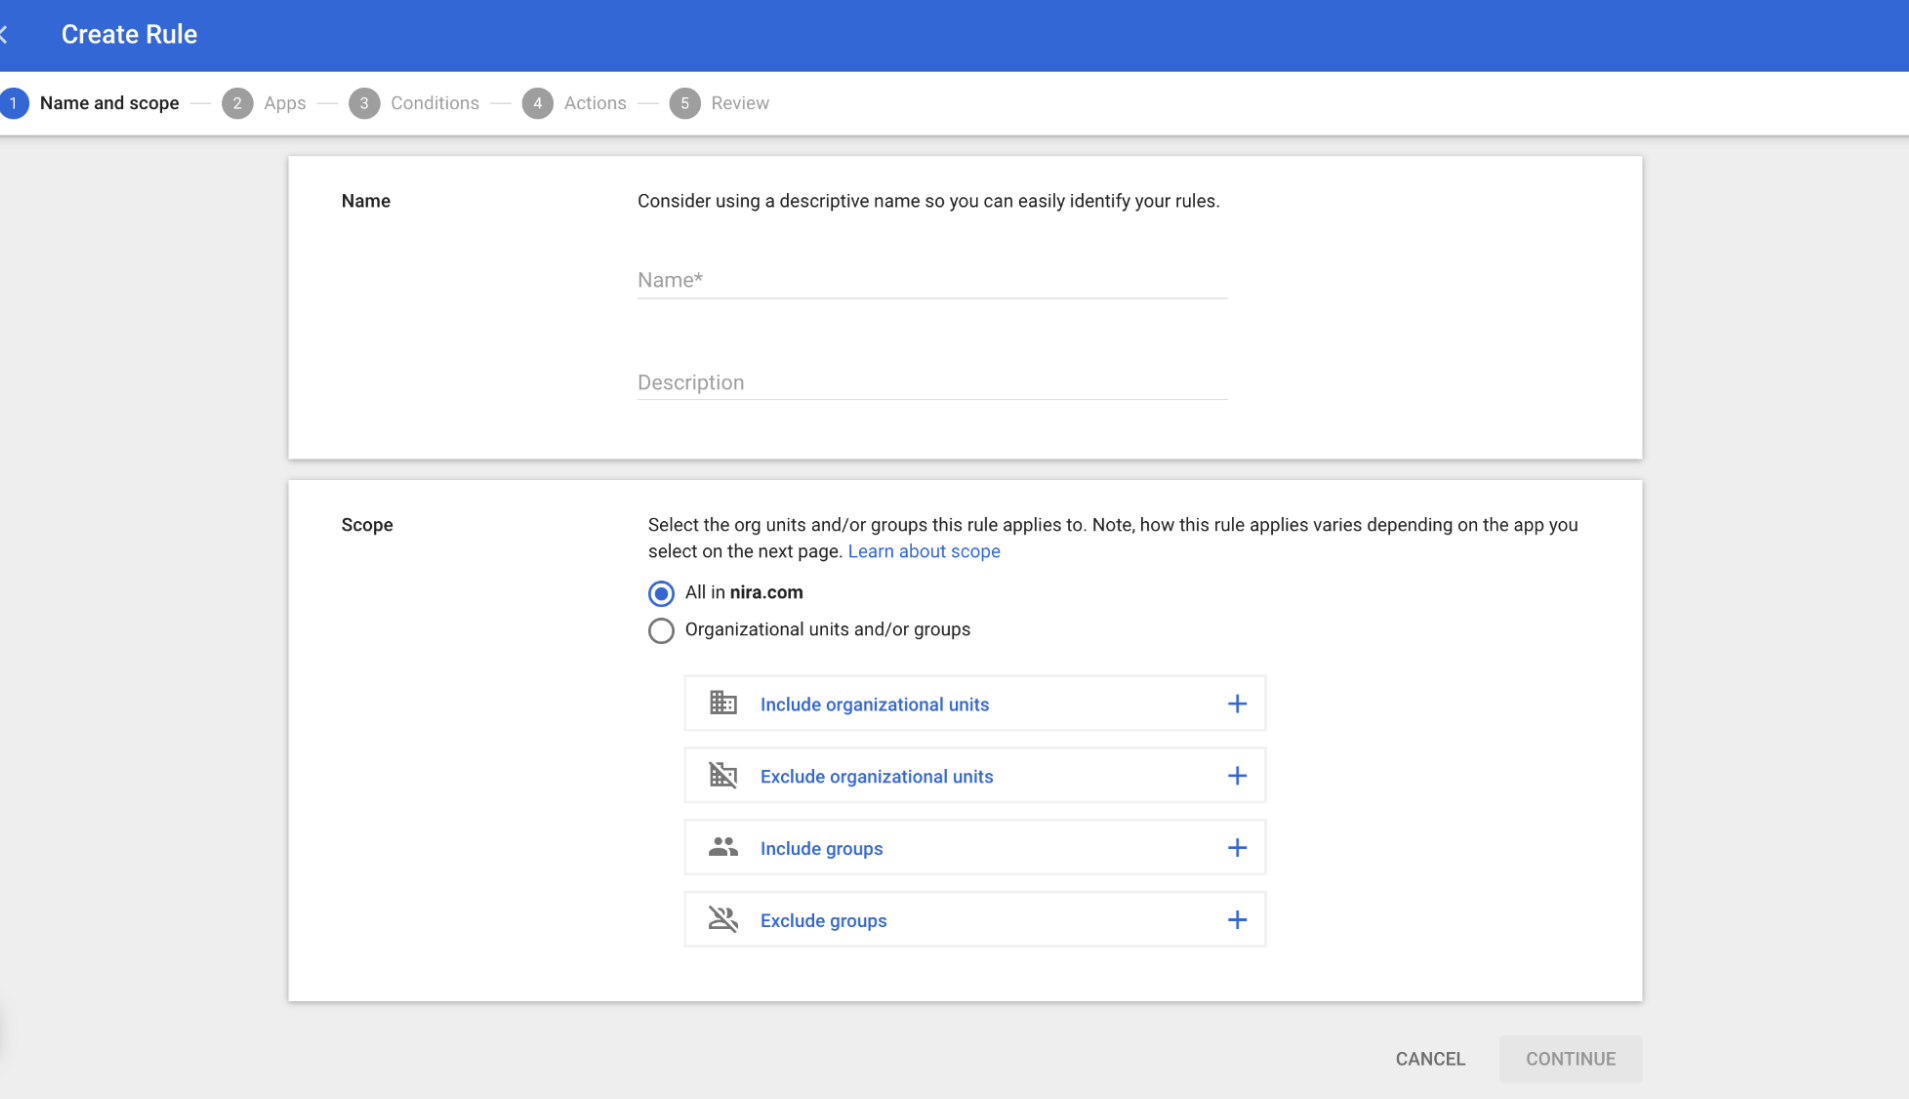
Step 3: Create a DLP rule
Once you’ve planned out your rules and conditions, it’s time to create them. Administrators with these privileges can create DLP rules: Organizational unit administrator; Groups administrator; View DLP rule and Manage DLP rule; and View Metadata and Attributes.
- In the Admin console, go to “Menu” > “Security” > “Access and data control” > “Data protection.”
- Click “Manage Rules.” Then click “Add rule” > “New rule.” Or click “Add rule” > “New rule from template.” You can select a template from the Templates page.

- In the Name section, add the name and description of the rule.
- In the Scope section, choose All in <domain.name> or choose to apply this rule only to users in selected organizational units or groups. If there’s a conflict between organizational units and groups in terms of inclusion or exclusion, the group takes precedence.
- Click “Continue.”
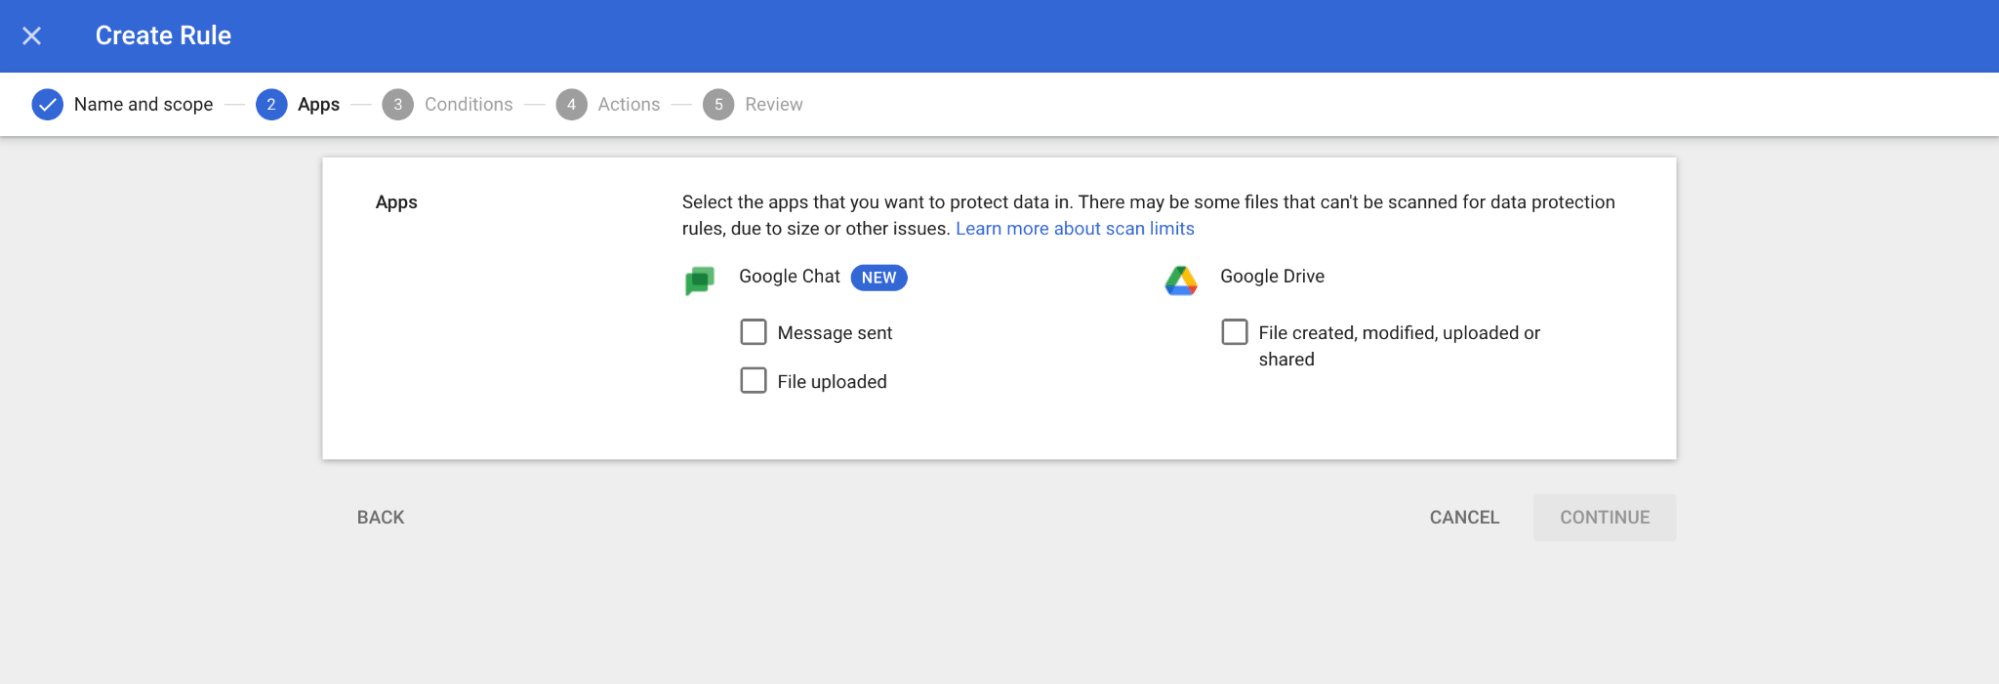
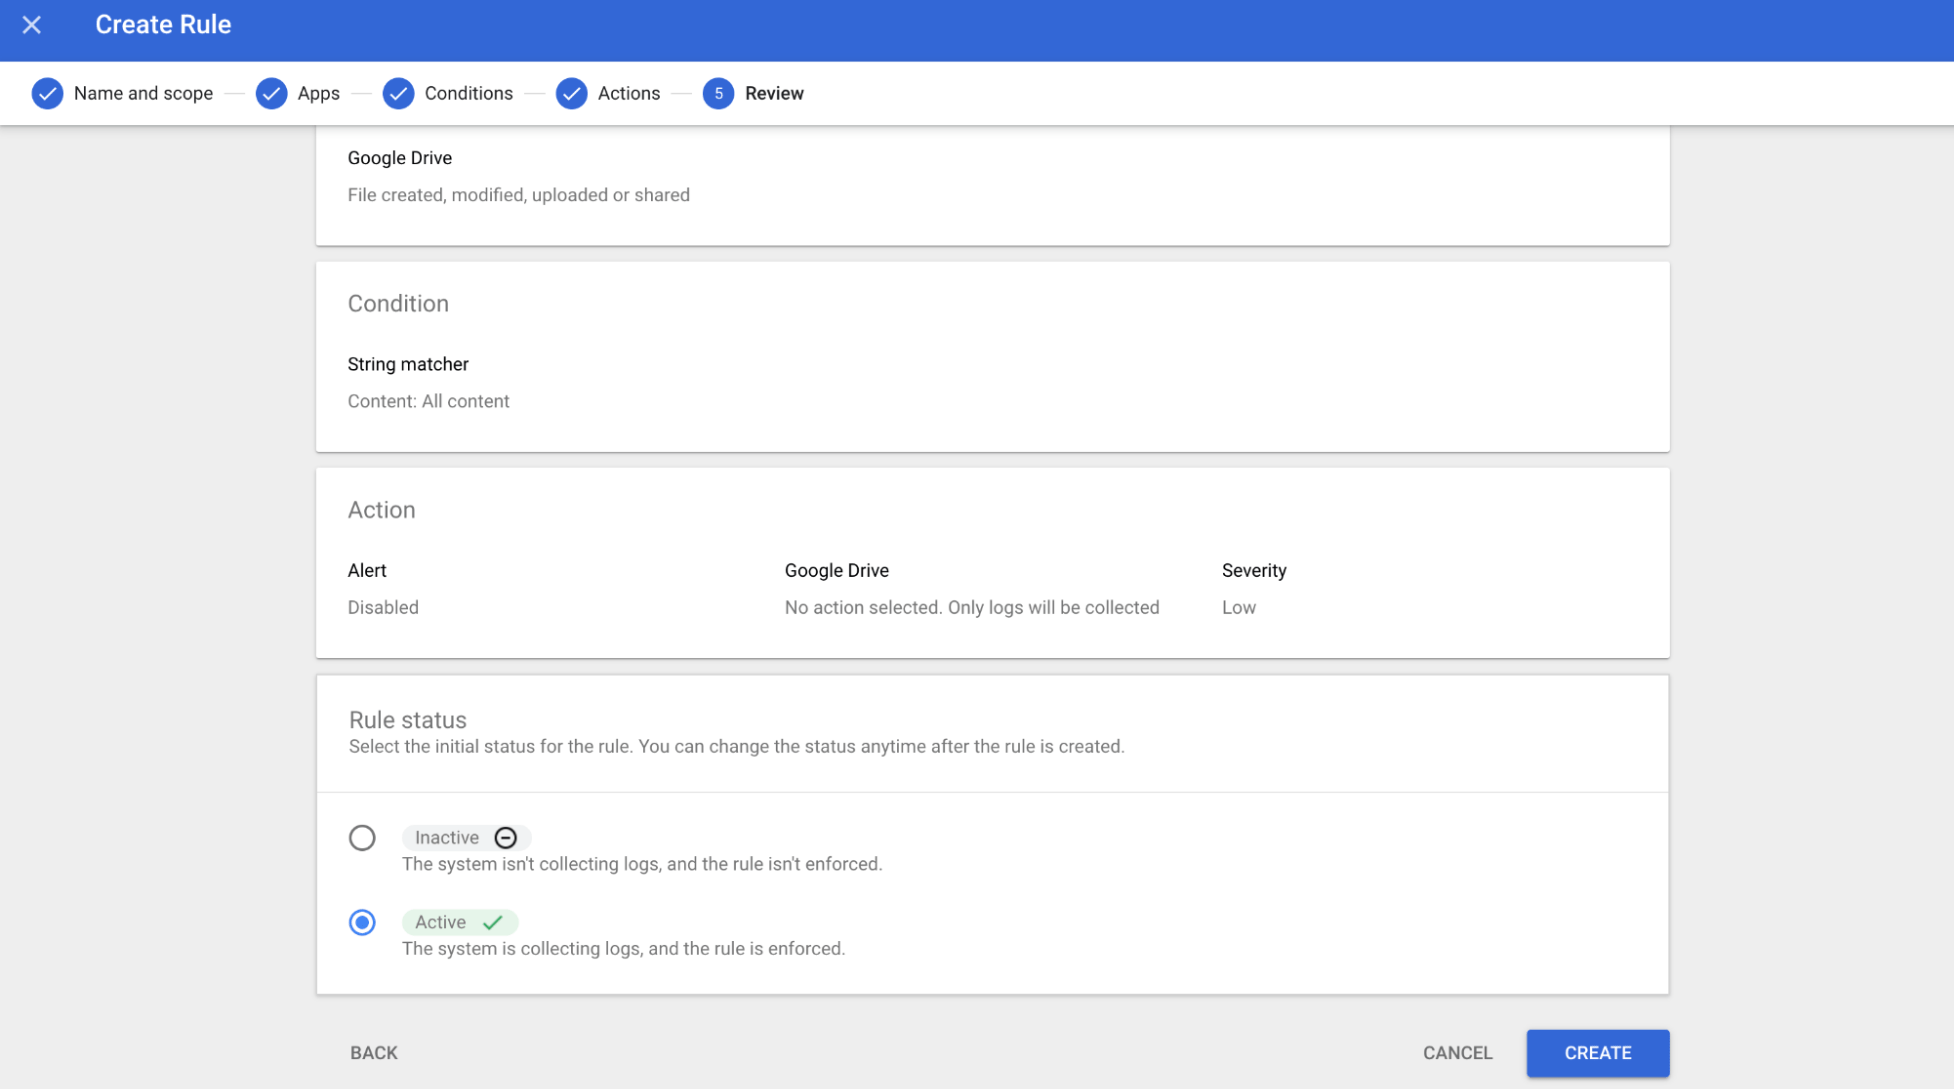
- In the Apps section, choose the trigger for Google Drive: “File created, modified, uploaded, or shared.” Then click “Continue.”
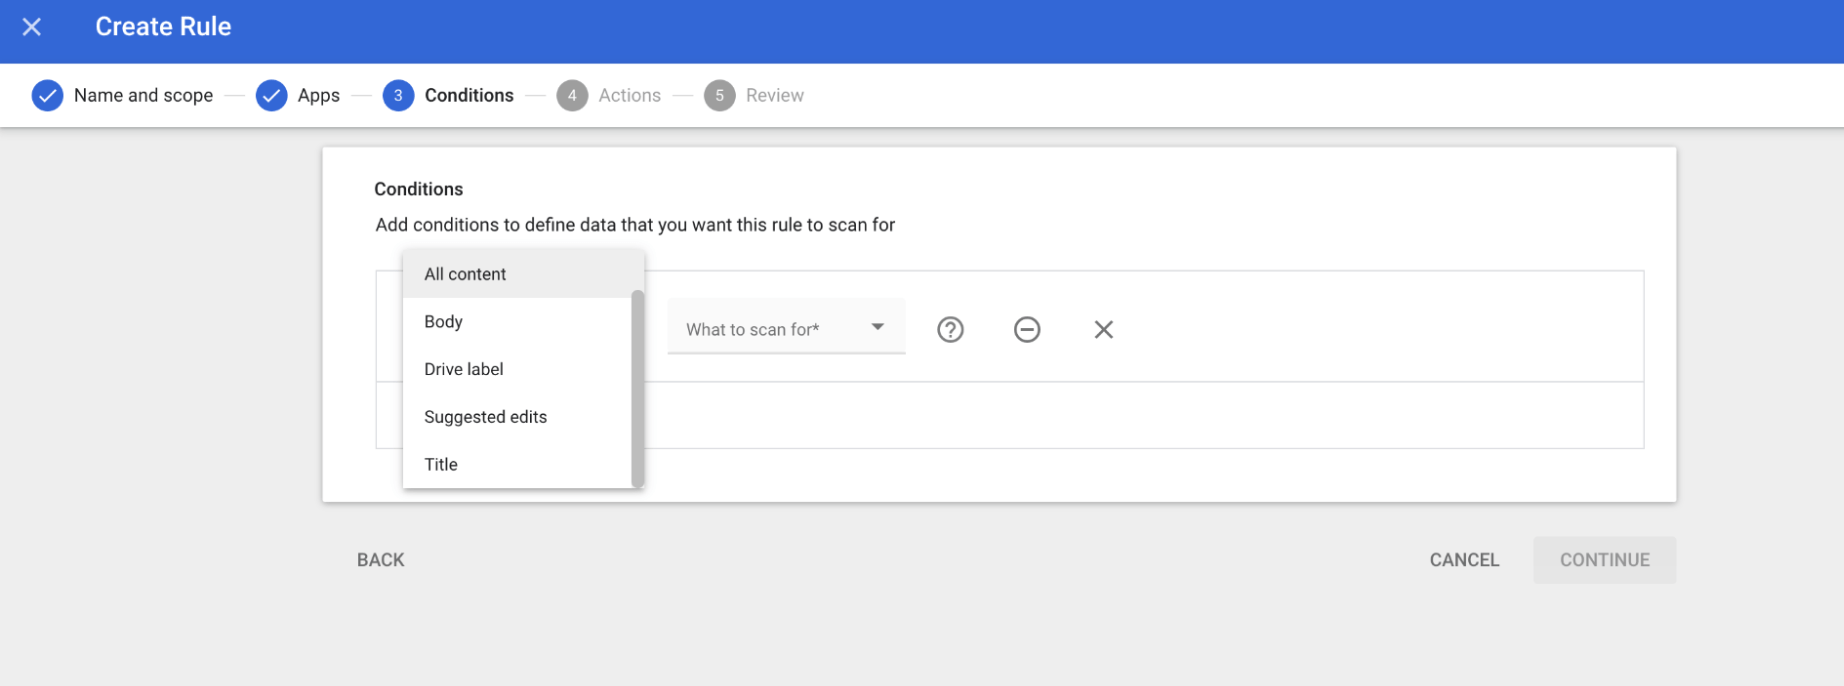
7. In the Conditions section, click “Add Condition.”
8. Choose the Content type to scan. You have a few options, including
-
- All content
- Body: The body of the document
- Drive label: All labels applied to the document
- Suggested edits: Any content added to the file when in “Suggesting” mode.
- Title
9. Choose “What to scan for,” then fill out the needed attributes for that type of scan. For more details on these attributes, view the table in the Google Workspace Admin Help Center.
10. Click “Continue.”

11. In the Actions section, you can select what action will take place if sensitive data is found during a scan. You will select from these options:
-
- Block external sharing: The document cannot be shared.
- Warn on external sharing: The document can be shared, but the person sharing it will receive a warning message.
- Disable download, print, and copy for commenters and viewers: Only users with Editor permissions will be able to download, print, or copy the document.
- Apply Drive labels: This will apply an existing Drive label to matching files. To configure this action, you must first:
- Choose a label from the Drive label dropdown list, then select an available Field and Field option for the label.
- You have the option of adding additional labels by selecting “Add label.”
- You can choose whether to allow users to change labels and field values applied to their files.
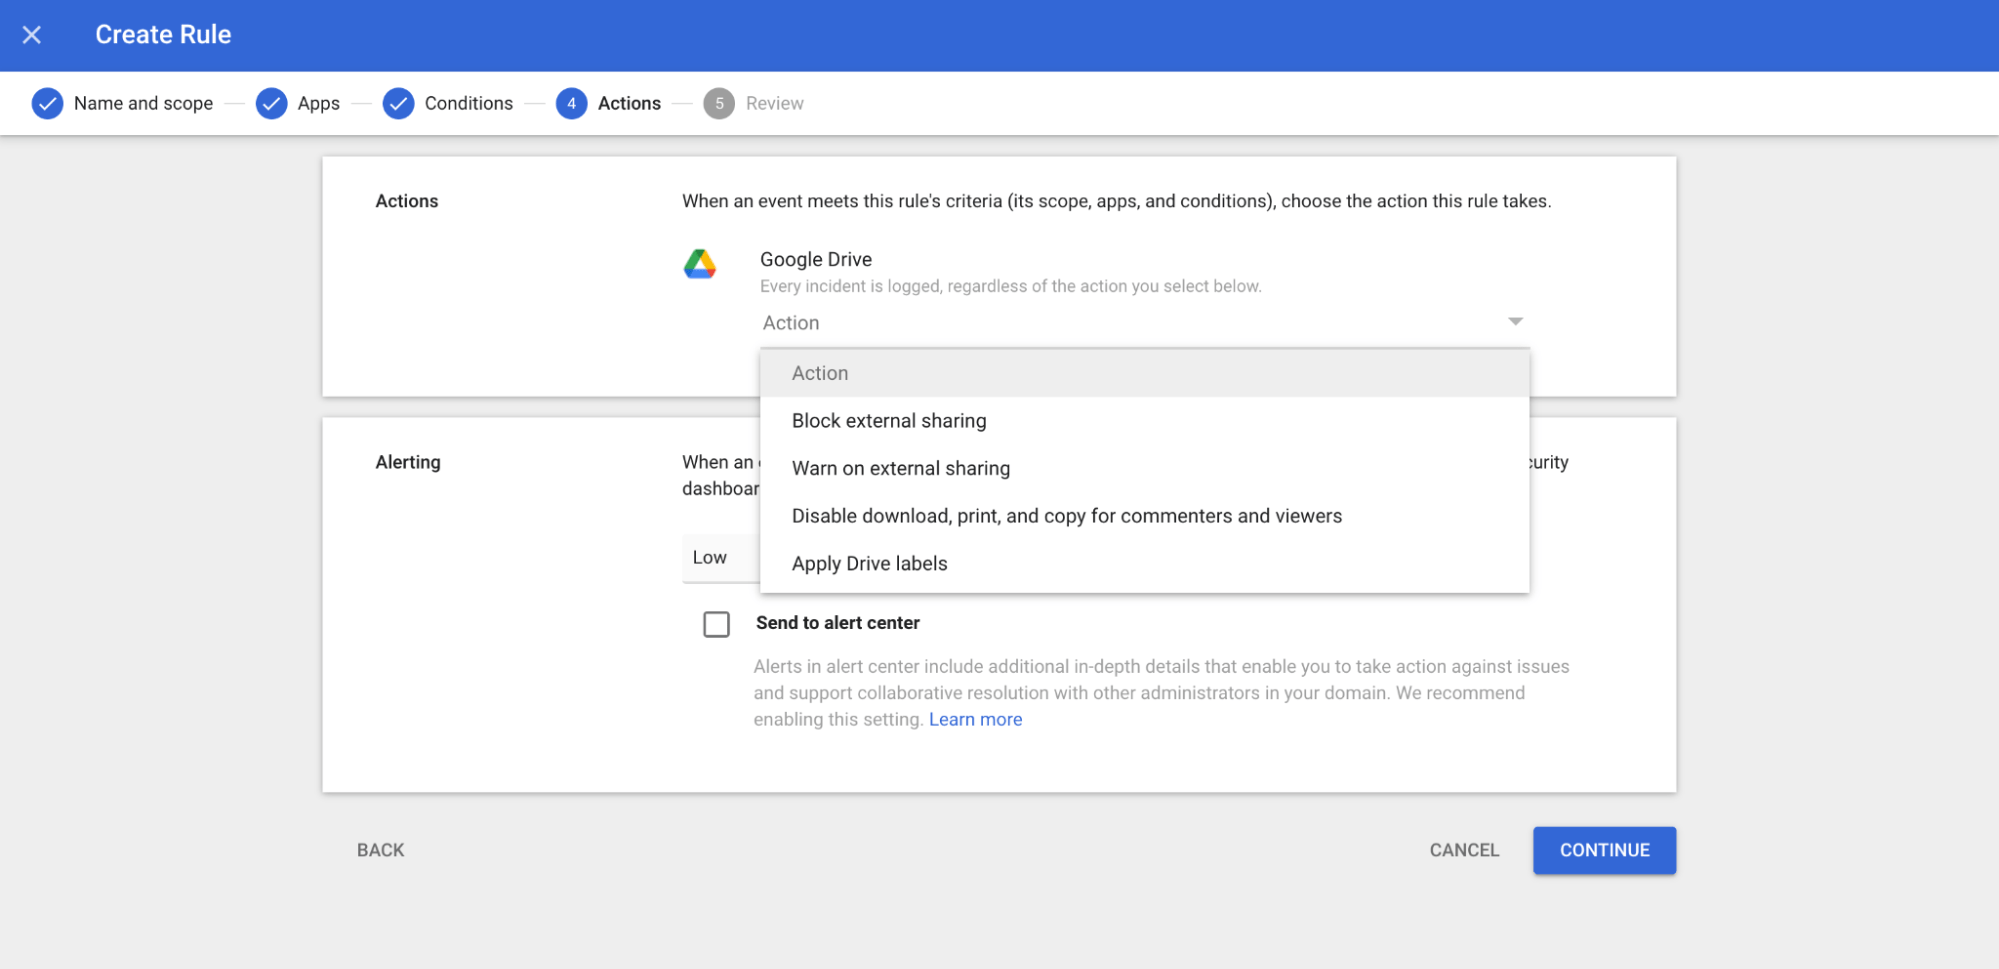
12. Under Alerting, you are able to choose a severity level of Low, Medium, or High. This information will show up in your DLP incident dashboard, letting you know the number of incidents and their severity level over time.
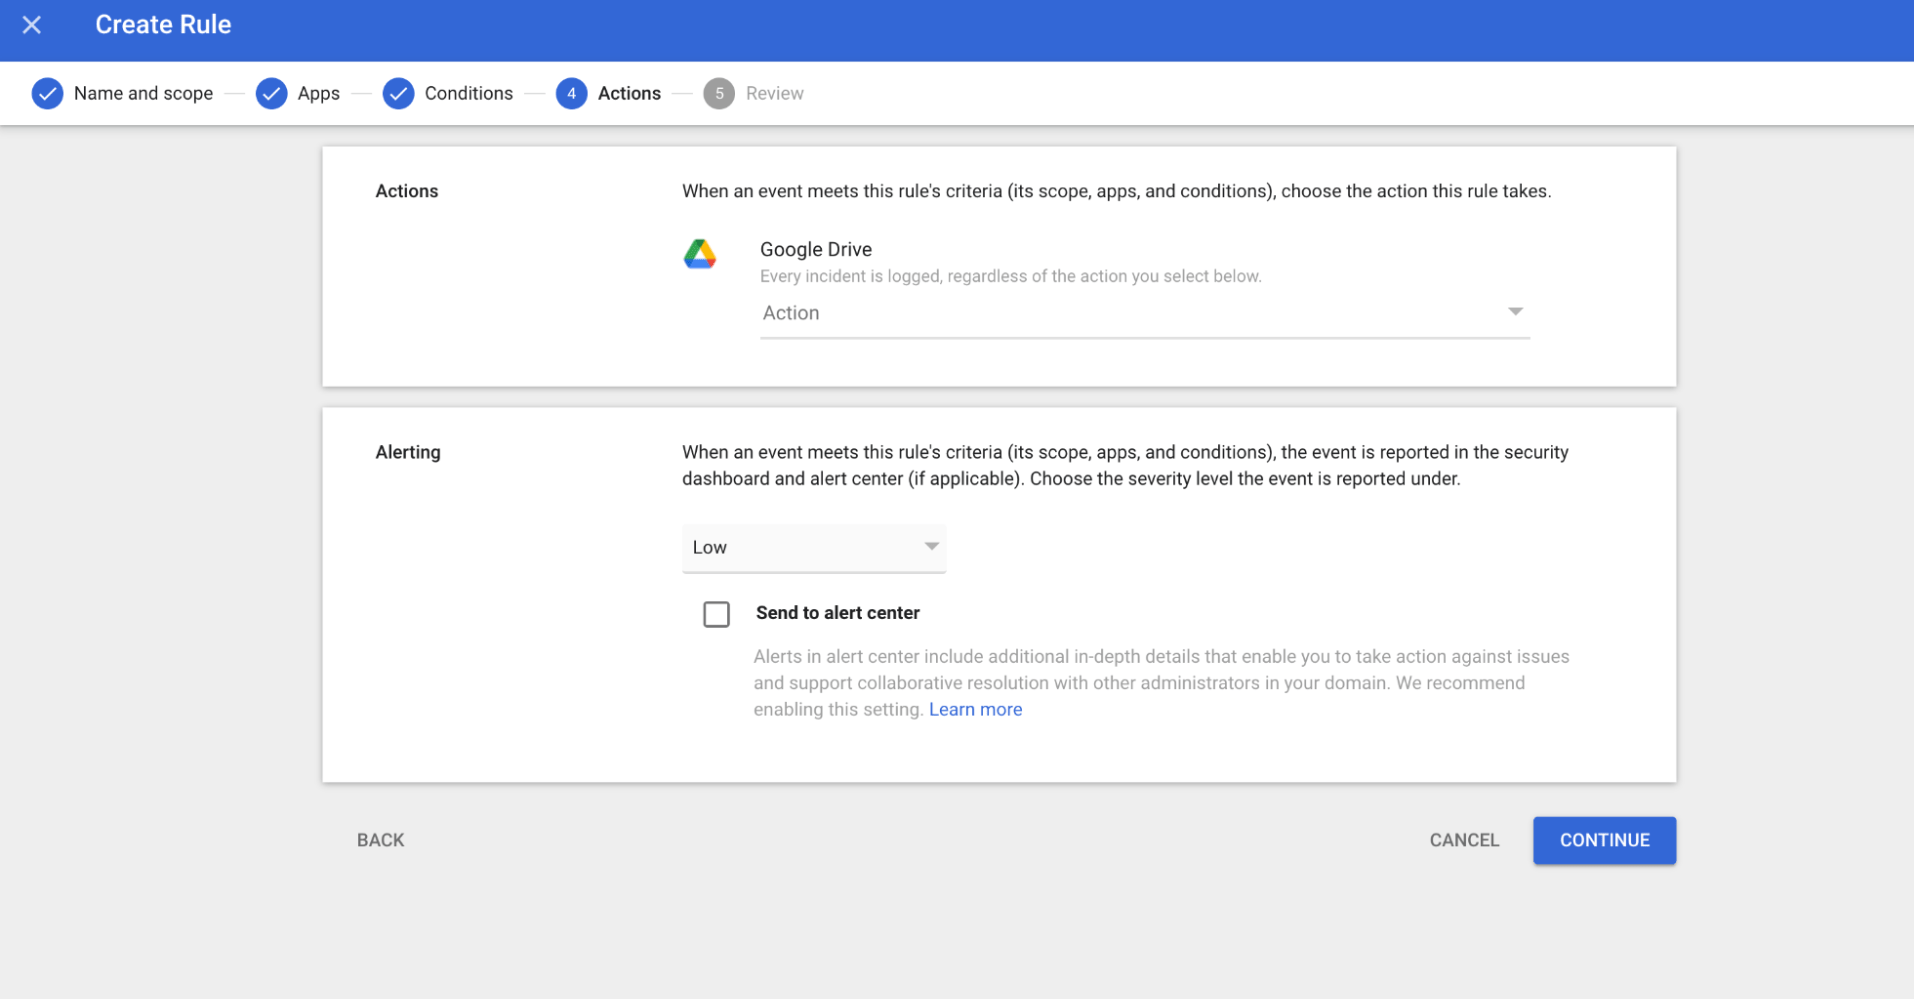
13. You also have the option to check “Send to alert center” to trigger notifications. This will send alerts to all super admins or you can add the emails of additional recipients. Please note that there will only be up to 50 alerts per rule per day.
14. Click “Continue” and review the rule details.
15. In Rule status, choose a status for the rule of “Active” or “Inactive.” “Active” rules will run immediately. “Inactive” rules can be activated later by going to “Security” > “Data protection” > “Manage Rules.” You’ll then click the “Inactive” status for the rule and select “Active.”
16. Click “Create.”
Please note that changes can take up to 24 hours to activate.
Step 4: Inform your users about the new rule
It’s vital to let your employees know about any new DLP rules you create. For example, if you block external sharing of sensitive information, let your end users know why they may not always be able to share files. This way they understand why they may be blocked from taking certain actions and won’t seek out risky workarounds.
Google Drive labels are a useful tool for administrators to categorize content, implement policies, and assist their employees in discovering and organizing files. Labels also boost information security by enabling admins to pinpoint sensitive or confidential documents, enhancing their protection.
The evolution of automated classification and DLP rules has made labels even more critical for data security and classification. While the use of Google labels continues to develop, there is still much to discover about managing them effectively, particularly in data loss prevention and governance.
To manage Google labels efficiently, administrators must understand the organization’s data security, data loss prevention, and data classification policies. They should develop procedures for creating and implementing labels to ensure consistency across organizational units, groups, and the organization as a whole.
For more information on managing Google Drive labels, read the full guide.

