How To Manage Labels In Google Workspace
In Google Workspace, labels are metadata that admins can define to help their employees better find and organize documents. They can also be used by admins to apply certain policies in Drive, as well as classify content and find files more quickly.
Managing labels is a newer feature that was recently introduced to Google Workspace, and admins are still learning what they can do with it.
Although using labels helps with reporting and auditing, it can lead to Access-Risk issues if label names that anyone in the organization can view contain confidential information.
In this post we’ll do a deep dive on labels in Google Workspace, letting you know how best to use and manage them for your organization. We’ll also cover applying classification labels based on organizational unit or group membership.
Why Use Labels?
Please note: Supported editions for the Labels feature are Enterprise, Education Fundamentals, Education Standard, Teaching and Learning Upgrade, and Education Plus
Labels related to the classification of sensitive data help admins understand what types of audiences documents should have. For example, if a document is classified as Confidential using a label created by an admin, then access to that document should be limited. They also work with Google’s DLP capabilities and will eventually work with Vault retention rules, too.
Labels related to a company’s data classification policy are essentially a way for employees to help admins know how sensitive files are. Admins can then put more focus on the sensitive files with the highest risk.
Labels can also be used to help classify files based on the departments that own them or based on the project the files are related to. These labels make finding those documents easier for employees since they show up for employees when they search for documents within Drive. They also help organize and group files without needing to put them all into the same place, like a specific folder or shared drive.
How To Turn Labels On Or Off For Your Organization
What is it?
As an admin, you have the power to turn labels on and off for your employees. If labels are on, admins can create labels, and employees can add them to their documents. For example, any admin can create new labels and manage the label taxonomy. When labels are on, users with Edit access can edit labels, apply published labels, and even edit the fields for those labels. People with Viewer access can’t edit, but they are able to view labels applied to files. Both users with View and Edit permissions can search for specific labels or fields to find content in Drive.
Why it matters
Turning labels off could help combat Access-Risk issues like accidentally writing confidential information in a field name, but it also keeps users and admins from being able to easily organize and find files in Drive. It’s better to be aware of best practices like making sure labels are properly named and ensuring the right employees have editing or viewing permissions.
How to do it
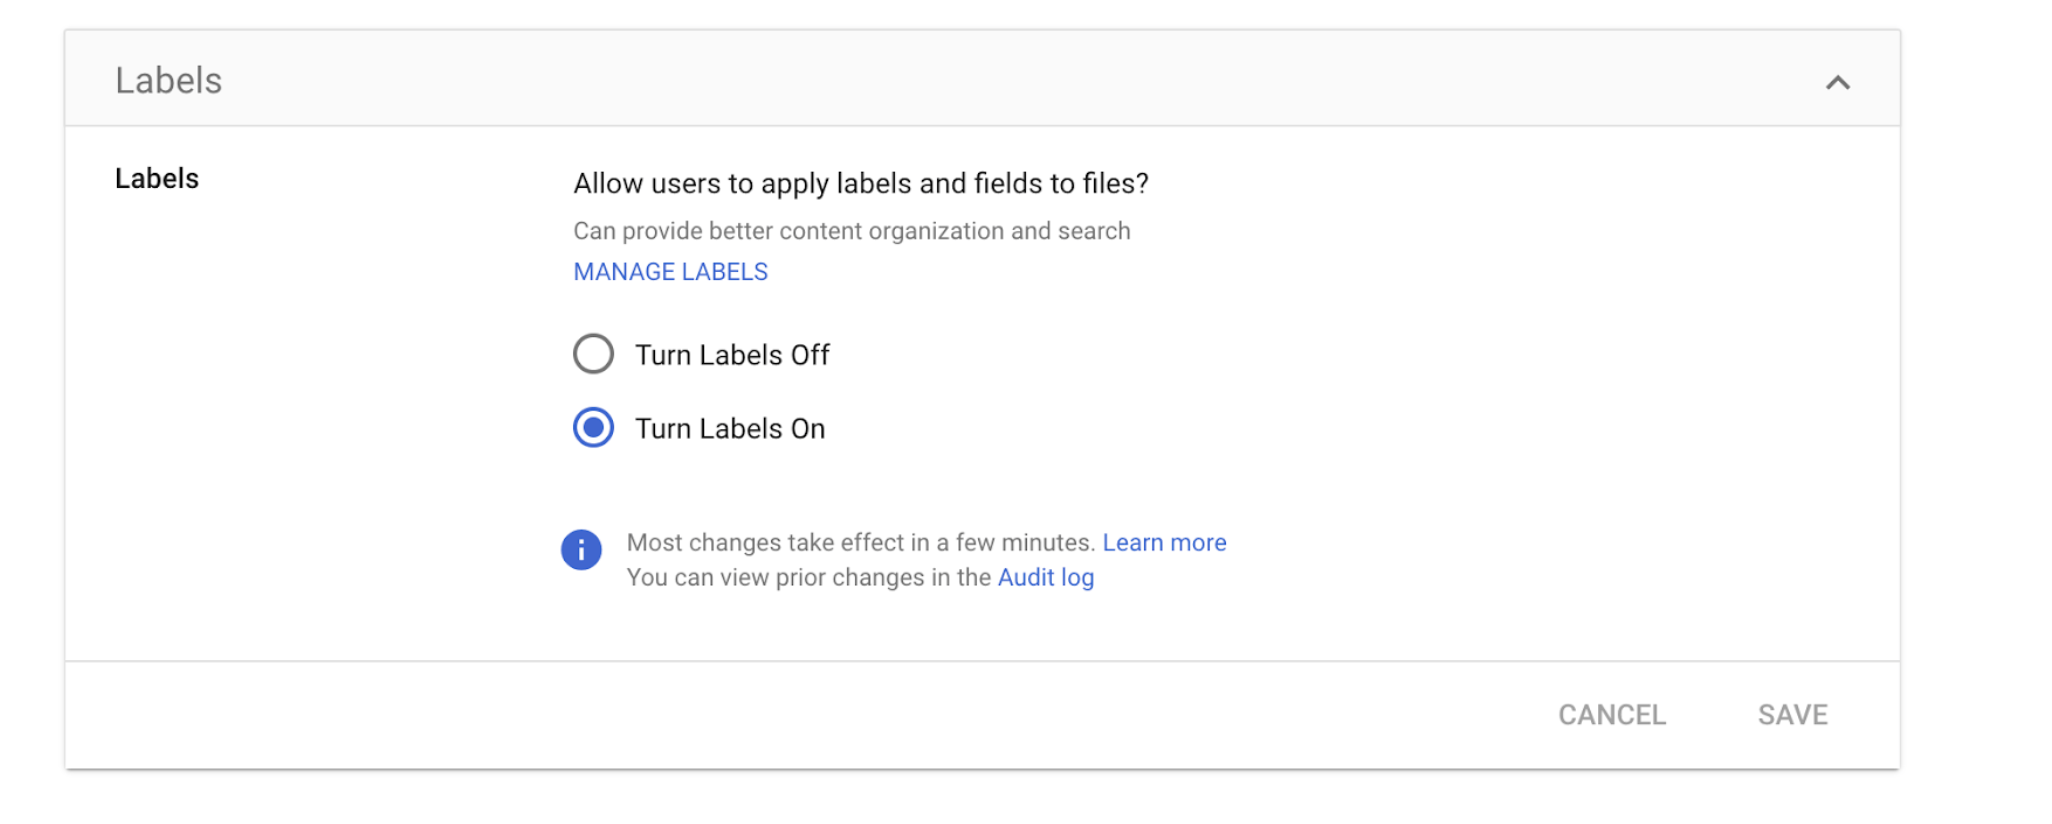
- From the Admin console, go to “Apps” > “Google Workspace” > “Drive and Docs.”
- Click “Labels.”
- Turn labels on or off.
- Click “Save.”
 Note: You can let certain people manage metadata without any other admin privileges, by creating a custom administrator role for only the Manage Labels privilege.
How to Create Labels
What is it?
When creating labels, admins can choose to either create Badged labels or Standard labels. Badged labels relate to classifying files based on their confidentiality level. Standard labels relate to projects, departments, or those with multiple fields.
Why it matters
Labels help organizations classify their information so they can then add rules using DLP functionality. Creating labels for your organization will also help employees find and organize information faster.
How to do it
-
- Once labels have been turned on for the organization, labels can be created by visiting drive.google.com/labels and clicking on “New Label.”
- From there, you’ll need to select the type of label you’d like to create. You can either create a Badged label or a Standard label.
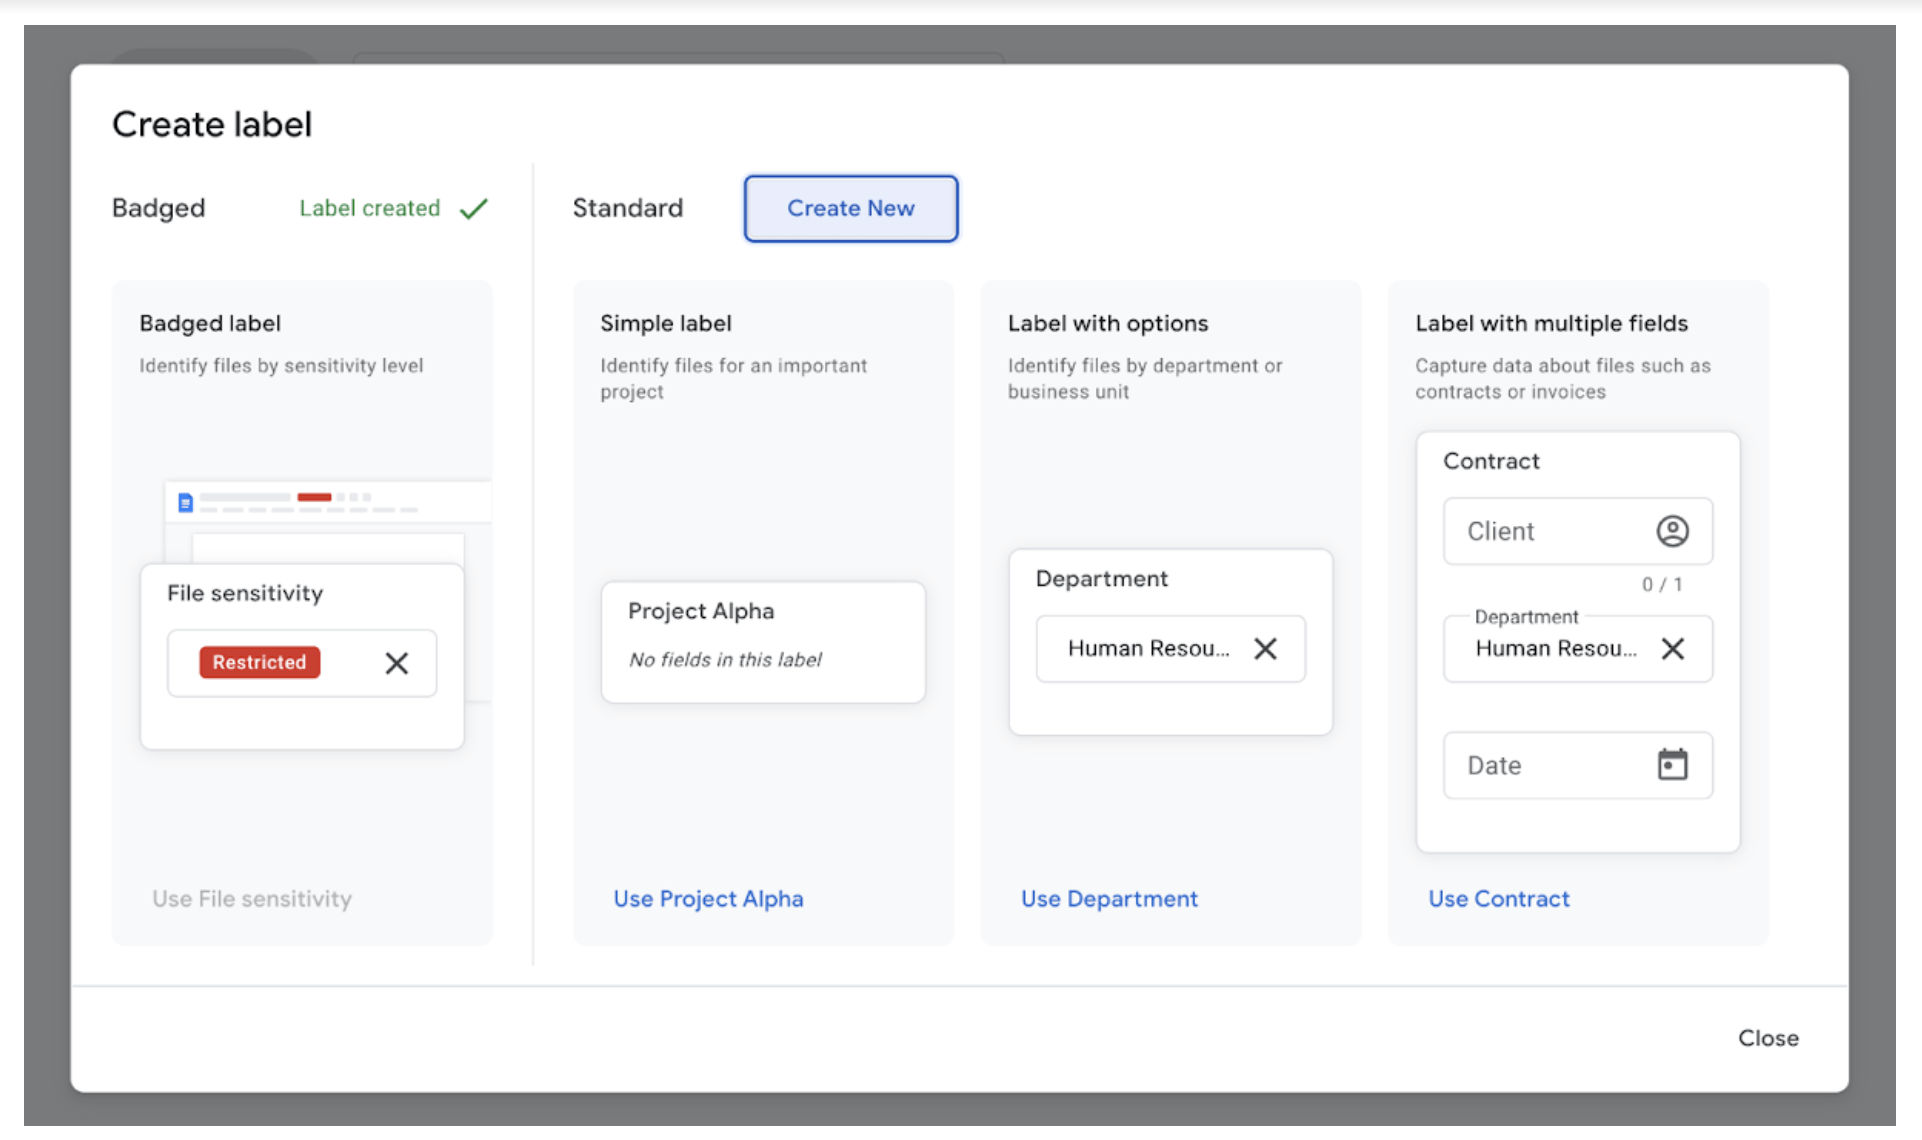
How to create Badged labels
Organizations can only have one Badged label. These labels are related to data classification policies as they explain how sensitive or confidential a file is.
- Click “New label” and choose “Badged label.”
- Choose to start from the example provided by Google or start from scratch.
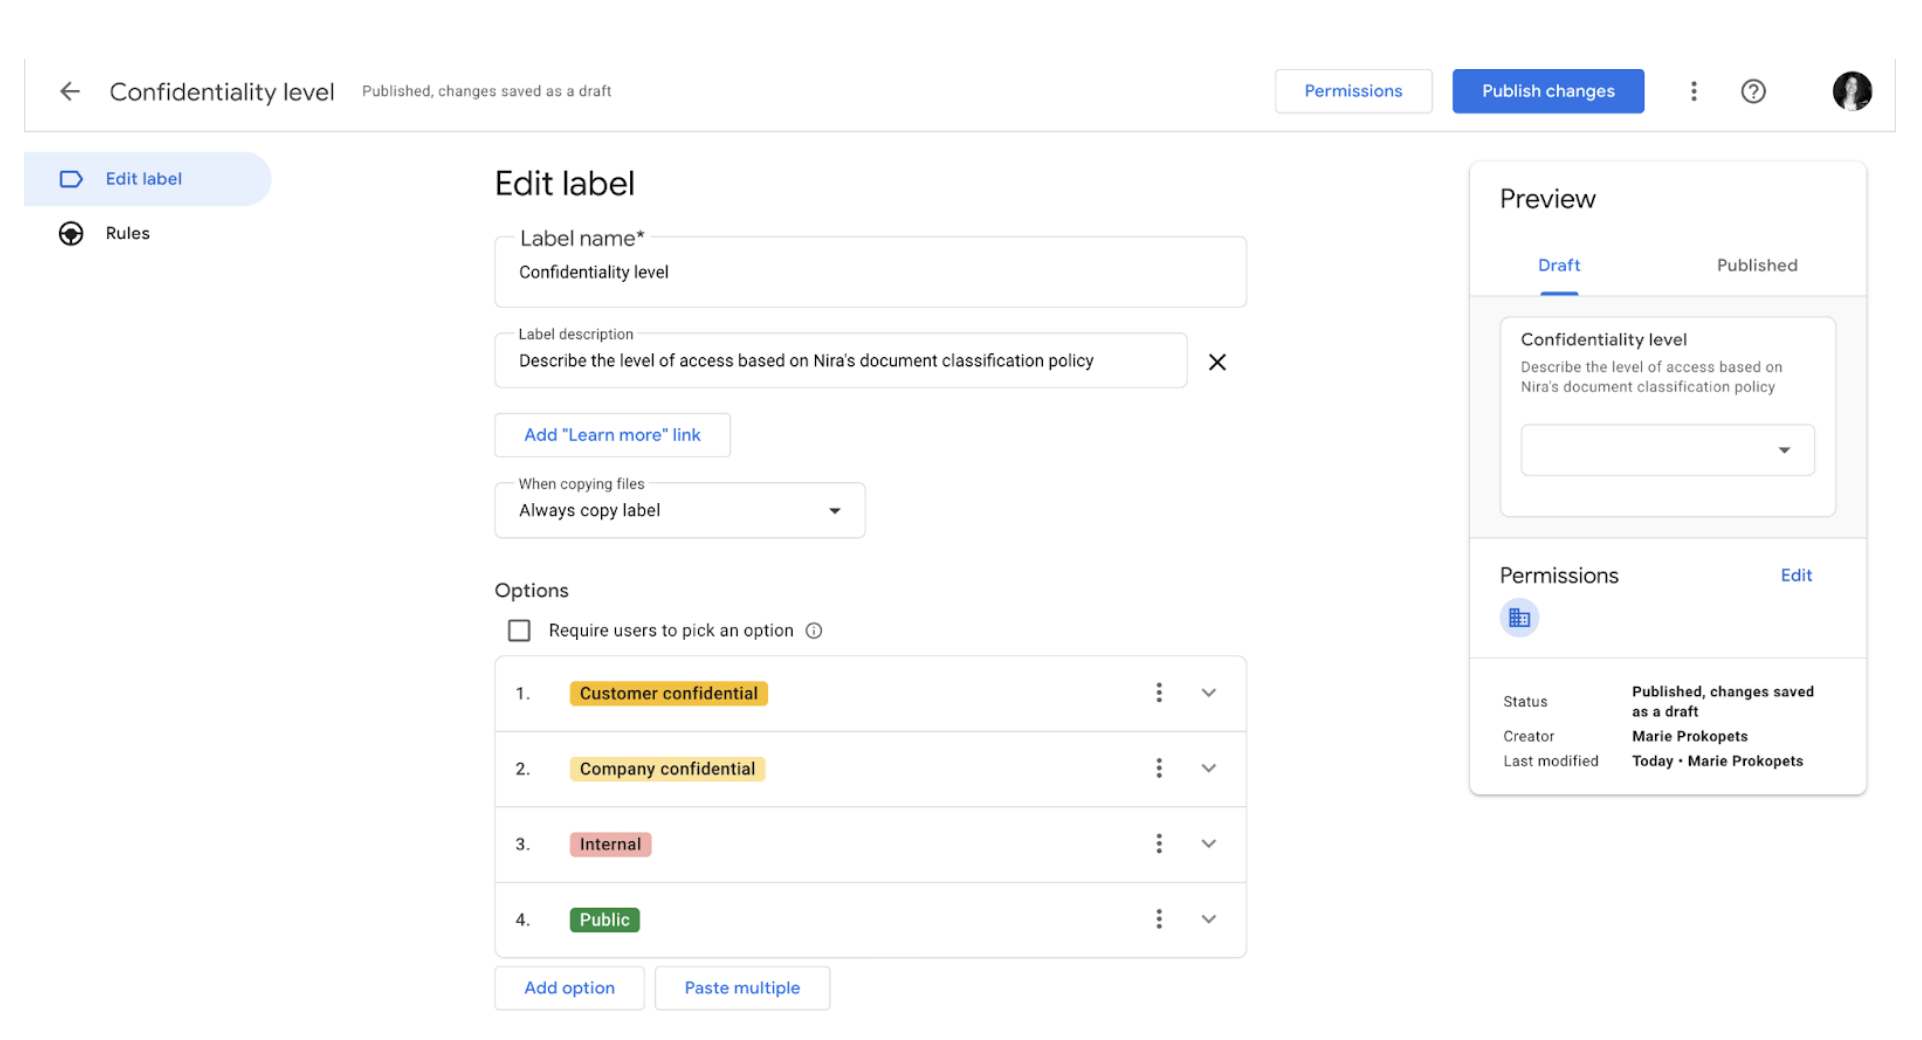
- Update the label’s title. You can also optionally add a description or a URL to share internal documentation about the label. For example, your data classification policy.
- Choose whether employees will be required to fill out the label.
- Customize the options and colors.
- Click “Publish.”
Here’s a sample Badged label:
How to create Standard labels
- If you’d like to create a Standard label, click new label from drive.google.com/labels.
- Click on “Create New” next to “Standard.” You can “Create New” or use one of the label templates such as “Use Contract.”
- You’ll be taken to a screen to edit the New label.
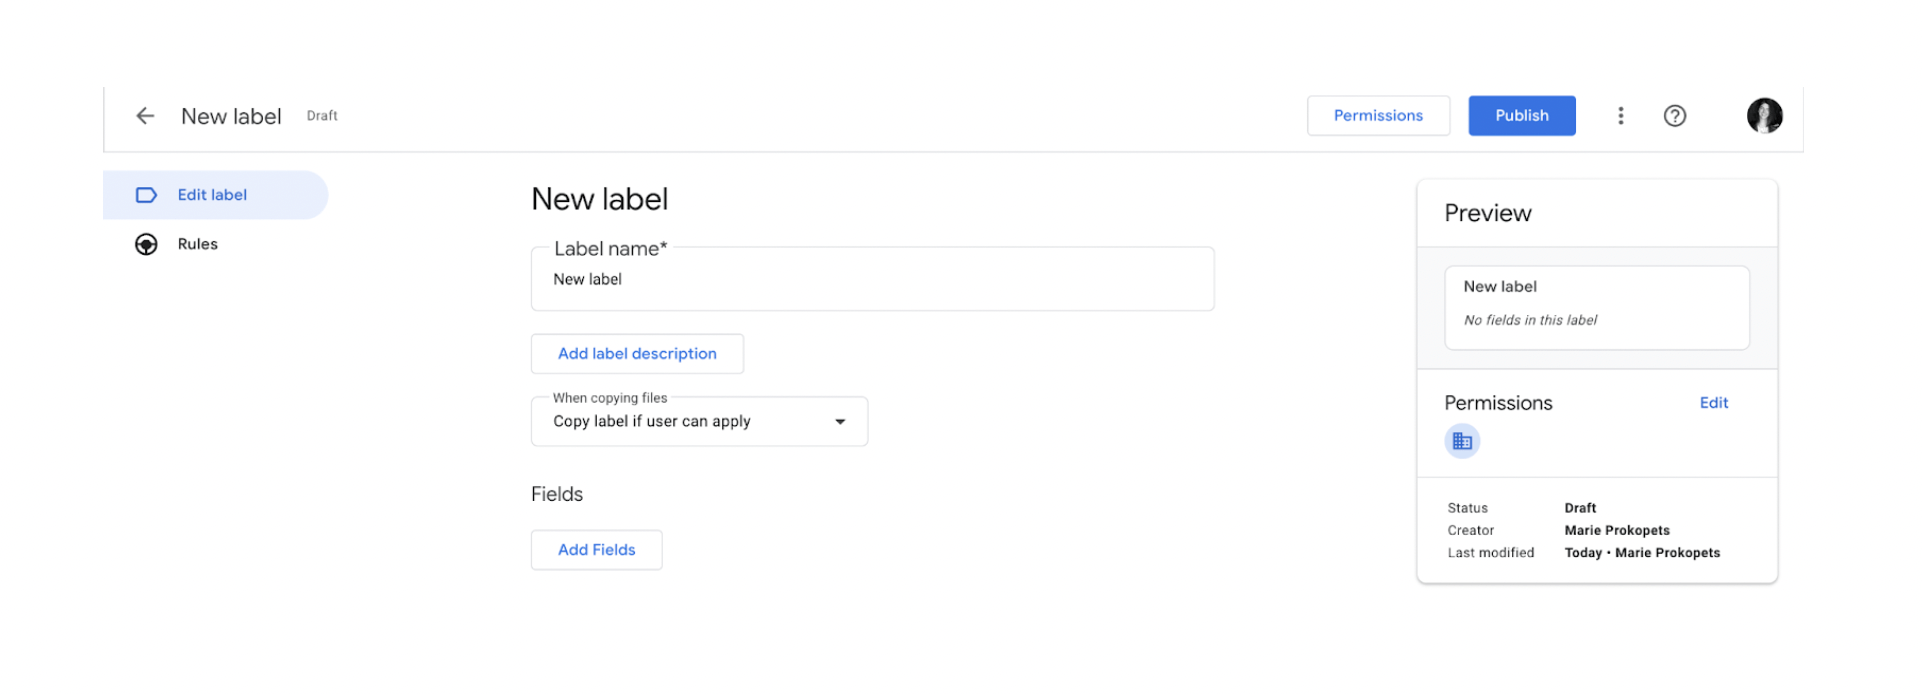
- Add a label name and add an optional label description (this is what people with permissions to add the label will see).
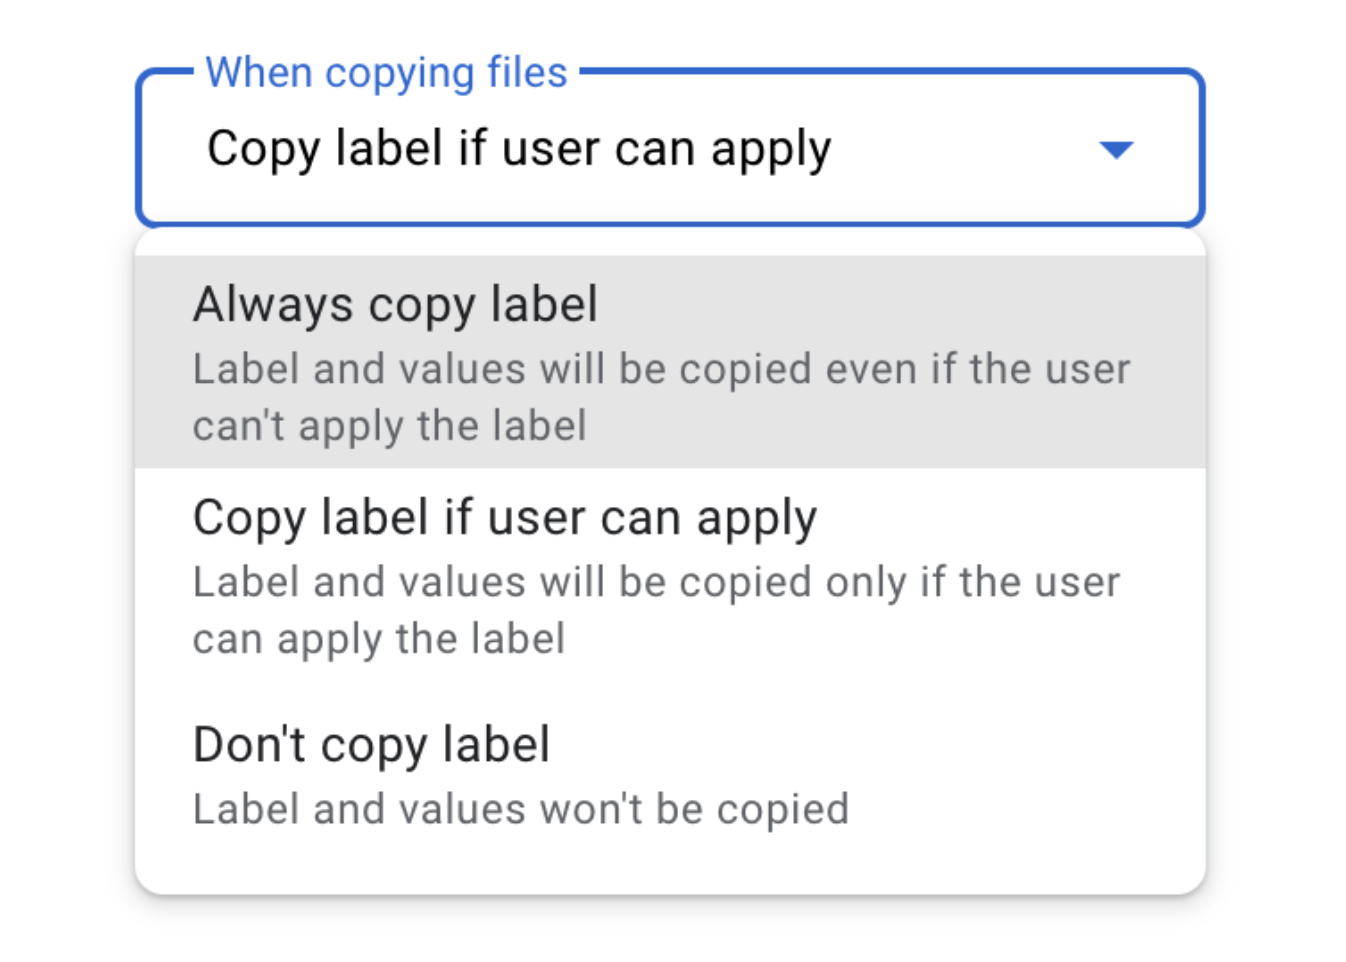
- Next, select what happens when files are copied. You’ll be able to select from three options:
 6. You’ll then be able to add optional fields for employees to fill out when they add the label to documents. These fields include Options, Number, Date, Text, or Person. Labels can have a maximum of 10 fields.
 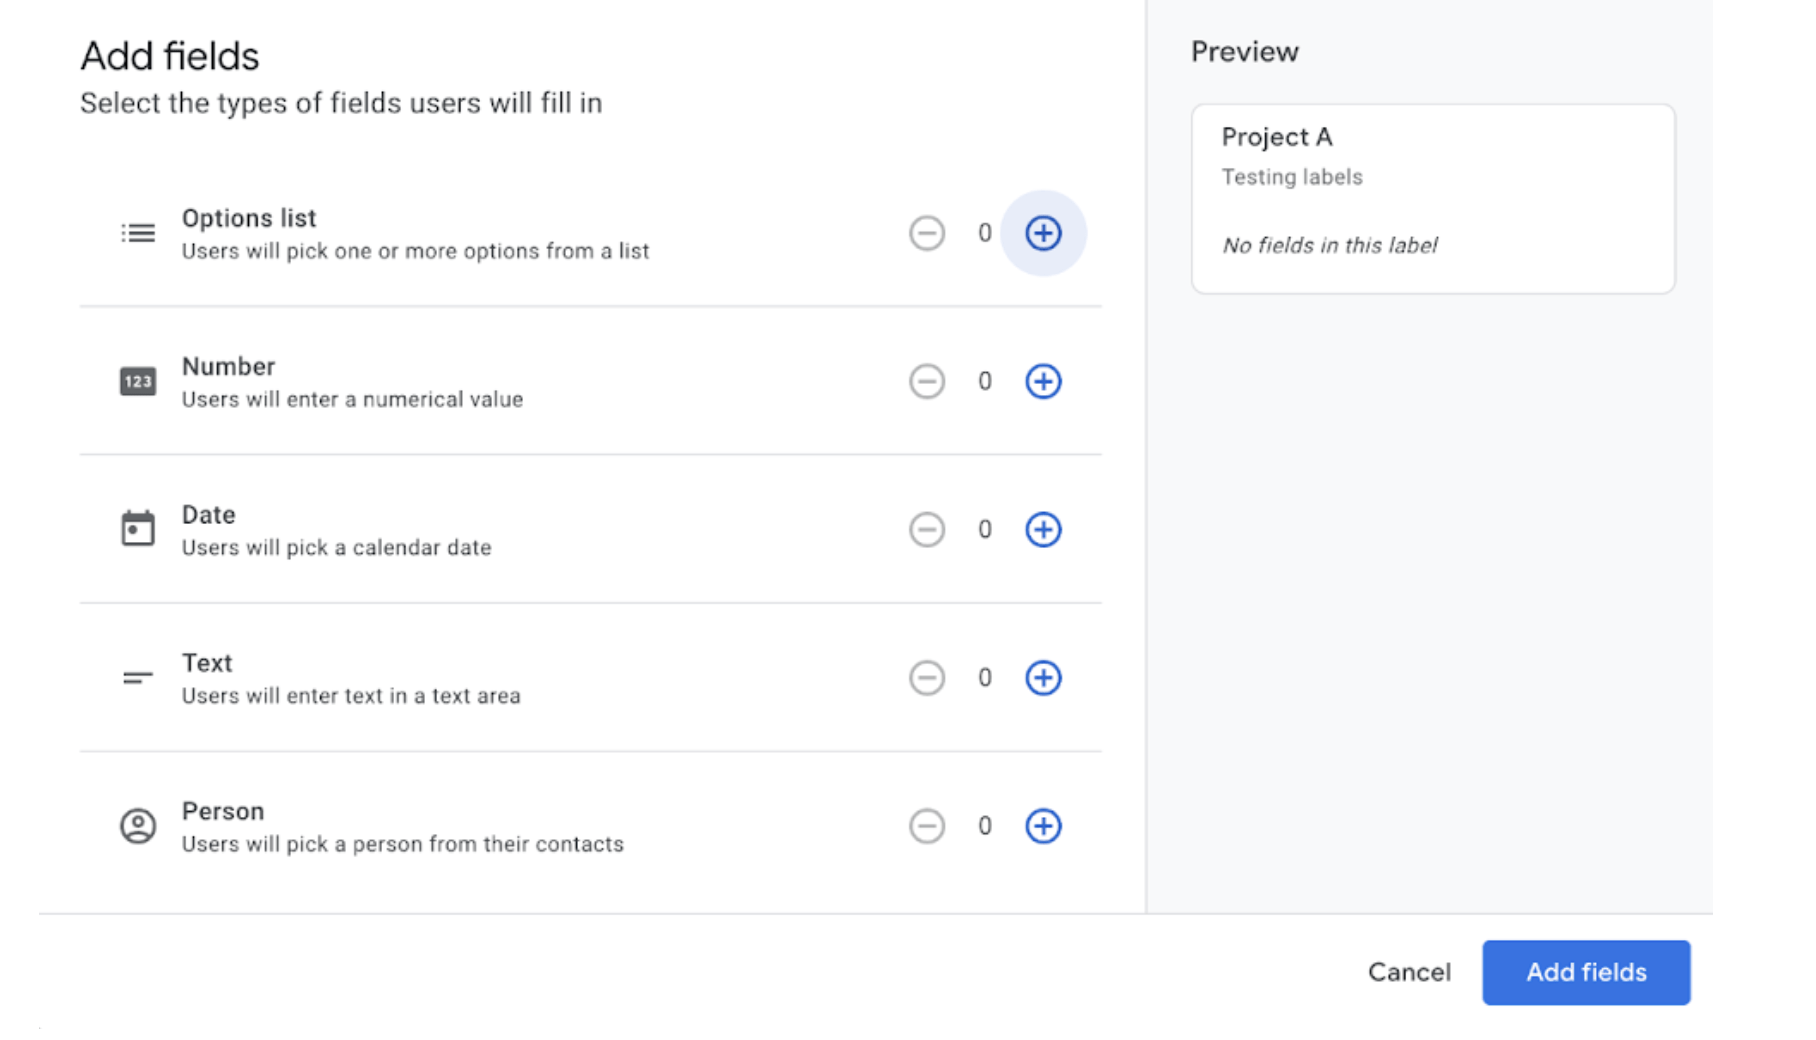 7. Once you’ve finished customizing the label and setting permissions (see How To Manage Label Permissions below), click “Publish.”
- Note that if you added any fields, the field types cannot be edited once you publish the label.
- If you’d like to edit the labels you created at any time, click on the label you’d like to edit from drive.google.com/labels.
- To delete a label, you must first disable it by clicking the three dots on the right side of the labels and selecting disable. Once the label is disabled, you can either enable it or delete the label.
How Employees Can Use Labels
What is it?
Employees have the ability to apply or remove labels that were created by admins in Google Drive. Employees can do this in several places including in the side panel and context menu in Drive, and the Labels panel in Docs, Sheets, and Slides. They can also search for files with labels that they have access to from their Google Drive.
Why it matters
Trying to find documents can take up a lot of time. If an employee can’t find a document, they often end up asking others where the document is, wasting even more time. Labels cut that time by allowing employees to group information and find it more quickly. Labels are also helpful for data classification policy compliance, where employees can add a label (either as an option or required) to define how confidential the document is. Although labels can be useful, admins should make sure that employees don’t have permissions to labels they shouldn’t, such as labels related to an acquisition or a confidential project.
There are several ways that your employees can apply, remove, view, and search for labels in Google Workspace:
How to apply labels
Using the side panel in Drive:
-
- Go to drive.google.com.
- Single click the file, then click the “Info” icon (view details) in the top right corner above the list of files. A Details panel will open.
- In the “Labels” section of the Details panel, click the “Apply label” button
- Select a label from the drop-down menu.
- If the chosen label contains one or more fields, optionally choose or enter values.
- Note: Employees may remove a label from a file by clicking the “Remove” trash icon.
Using the context menu in Drive:
-
- Go to drive.google.com.
- Right click on a file, and choose “Labels” and then “Apply a label” from the menu. You can also choose from suggested labels.
- Use the dialog to choose a label by searching, and select or enter in field values to apply to the file.
- Note: Employees can also bulk apply labels by selecting multiple files at once and following the steps above.
-
How to view and apply labels
Use the Labels panel in Docs, Sheets, Slides
- When viewing or editing a file in Docs, Sheets, or Slides, click the “File” menu and choose “Labels.”
- View existing labels and apply new labels in the side panel.
- To apply a new label, click “Apply label.”
- Search for the label or select a suggested label.
Use the Labels panel in Drive Preview
- Go to drive.google.com.
- Single click on an item.
- Click the preview icon (eye icon) at the top of the screen right above the list of files.
- Once in preview, click the three dots at the top right corner of the screen (“More actions”) and choose “View labels.”
- View existing labels and apply new labels in the side panel.
Note: You can add multiple labels to each file. Labels can only be applied to files. They cannot be applied to folders or Shared drives.
How to search for files with labels
- Go to drive.google.com.
- At the top of the screen, next to “Search in Drive,” select the “Search options” icon on the right. A detailed search dropdown will appear.
- Next to “Labels,” select a label from the drop-down menu or search for a label.
- Below the label, you can optionally select a field from the drop-down menu if the label has any fields, and specify a value.
- Click “Search.”
How To Manage Label Permissions
What is it?
Admins can decide which users have what permissions: regulating who can view, apply, edit field values, and search for labels.
By default, everyone in the organization has the ability to view and apply labels. Admins can also allow people outside the organization to have these label permissions, as well as groups who may have outside members.
Why it matters
Labels can be tricky because most people don’t immediately think of them when they think about document security. But in reality, labels can help organizations comply with their document classification policies, which dictate how different types of documents should be labeled and what level of permissions they should have. However, when working with labels, you should always avoid writing confidential information in label names, field names, and selection options, as they may become visible to everyone in your organization. For example, if there’s a secret acquisition in the works, a code name should be used for the label, and not the word “acquisition.”
Remember that any other admin with “Manage Label” permissions could edit these labels, even if they didn’t create them.
Remember to be cautious when changing labels that have been published as it will affect all the other files previously using the label.
How to do it
-
- Go to the labels manager at drive.google.com/labels.
- Click on the label you want to manage.
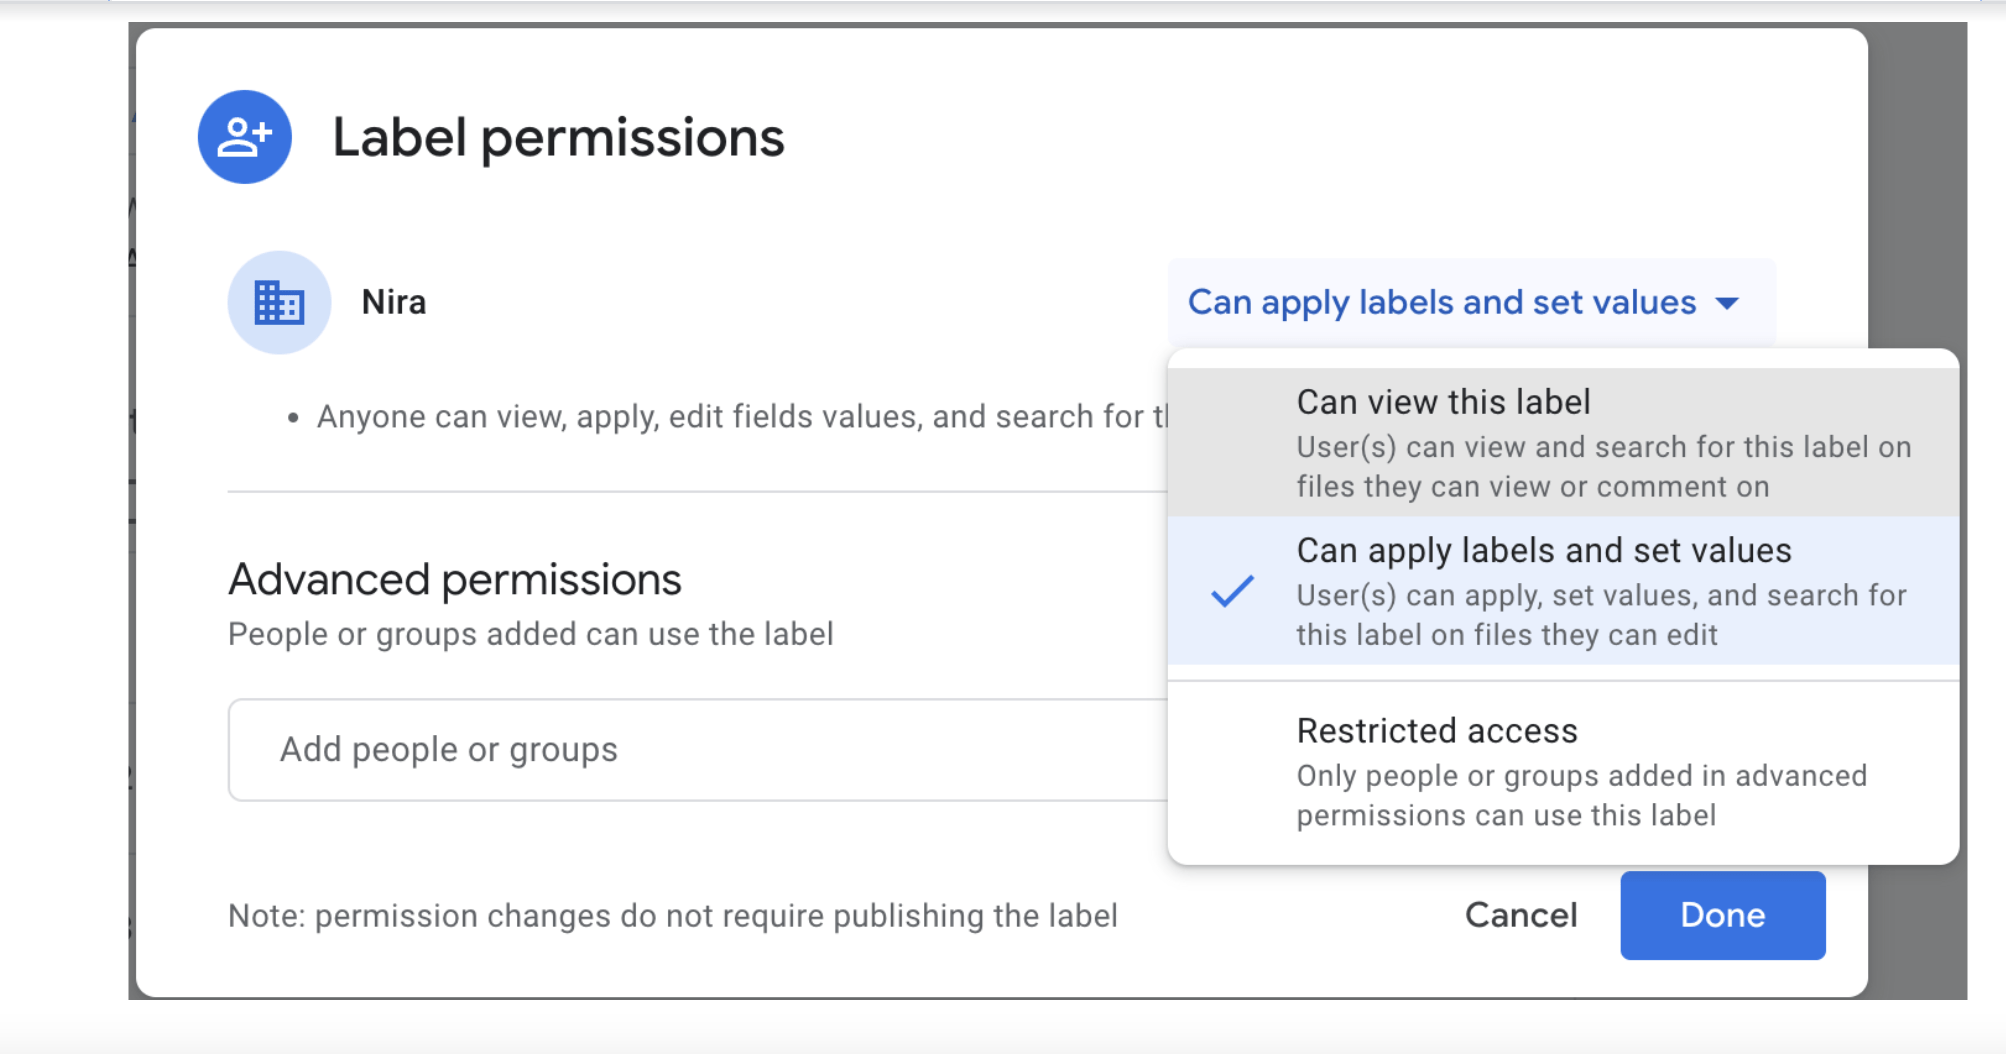
- In editing mode, click the “Permissions” button in the header.
- In the Label Permission dialog, use the selection drop down to choose the right permission level for your organization.
- To restrict access to specific people or groups, select “Restricted” access next to your organization name. Then specify the individual users or groups and their permission levels.
How to apply classification labels to new files based on organizational unit or group membership
What is it?
According to the Google Workspace Admin Help Center, admins can create policies to apply labels to Drive files to support company data security needs. These labels are applied through automated Data classification settings based on organizational structure. In this example, we’ll show you how to apply classification labels based on organizational units or group membership.
Why it matters
Organizational units and groups are often created so that administrators can apply settings to a specific set of users. For example, you can have a group called Marketing that comprises members of the Marketing team. In this case, admins will set up classification labels based on these units or groups. Labels will now automatically be applied for members of these groups. It’s another way to keep metadata organized and easy to manage.
How to do it
- In your Google Admin console, go to “Security > Data classification.”
- If there are no labels created in the label manager, click “Create labels,” then create the new labels. You might have to click “Turn on labels” to activate labels in the label manager.
- Under “Apply labels,” click “Drive and Docs.”
- Search for and select the organizational unit or group to include user members to automatically apply labels for. For example, if you select the group Finance, you can then select the labels to be configured for Finance.
- Click “Select labels.”
- Select the labels you want to use. These labels are applied to files when a user creates a new file in Drive. These labels can have fields associated with them that users can modify. Ensure that the users in the selected organizational unit or group have permission to use the labels in the label manager so they can see the labels and modify the label fields.
- Click “Continue.” Review the selected labels.
- Click “Save.” The Apply labels page lists the labels applied under Configuration.
Here’s What Employees Should Know
- You can apply, remove, or search for labels that can save you time and help you organize information. Adding labels to your documents will help you find them faster.
- Adding labels related to how confidential your documents are will help your IT and Security teams better protect company information.
- You can check with your administrator to make sure you have the right label permissions.
- If you’d like labels created, check with your administrator.
Labels are a newer feature in Google Workspace that admins can configure to help their employees search for, find, and manage files more quickly and efficiently.
Admins have several capabilities in Google Workspace including turning labels on or off for their companies, creating labels, managing label permissions, and applying classification labels to new files automatically.
To learn more about what you can do to keep your sensitive information safe in Google Workspace, download the full Google Workspace document security practices ebook.

