The Beginner’s Guide to the G Suite Setup Wizard
From choosing a domain to being ready to start creating documents and sending emails with Gmail, the G Suite Setup Wizard has you covered. But the process can still be daunting and filled with setbacks.
In this post, we’ll show you what to expect from the Wizard and how to use it.
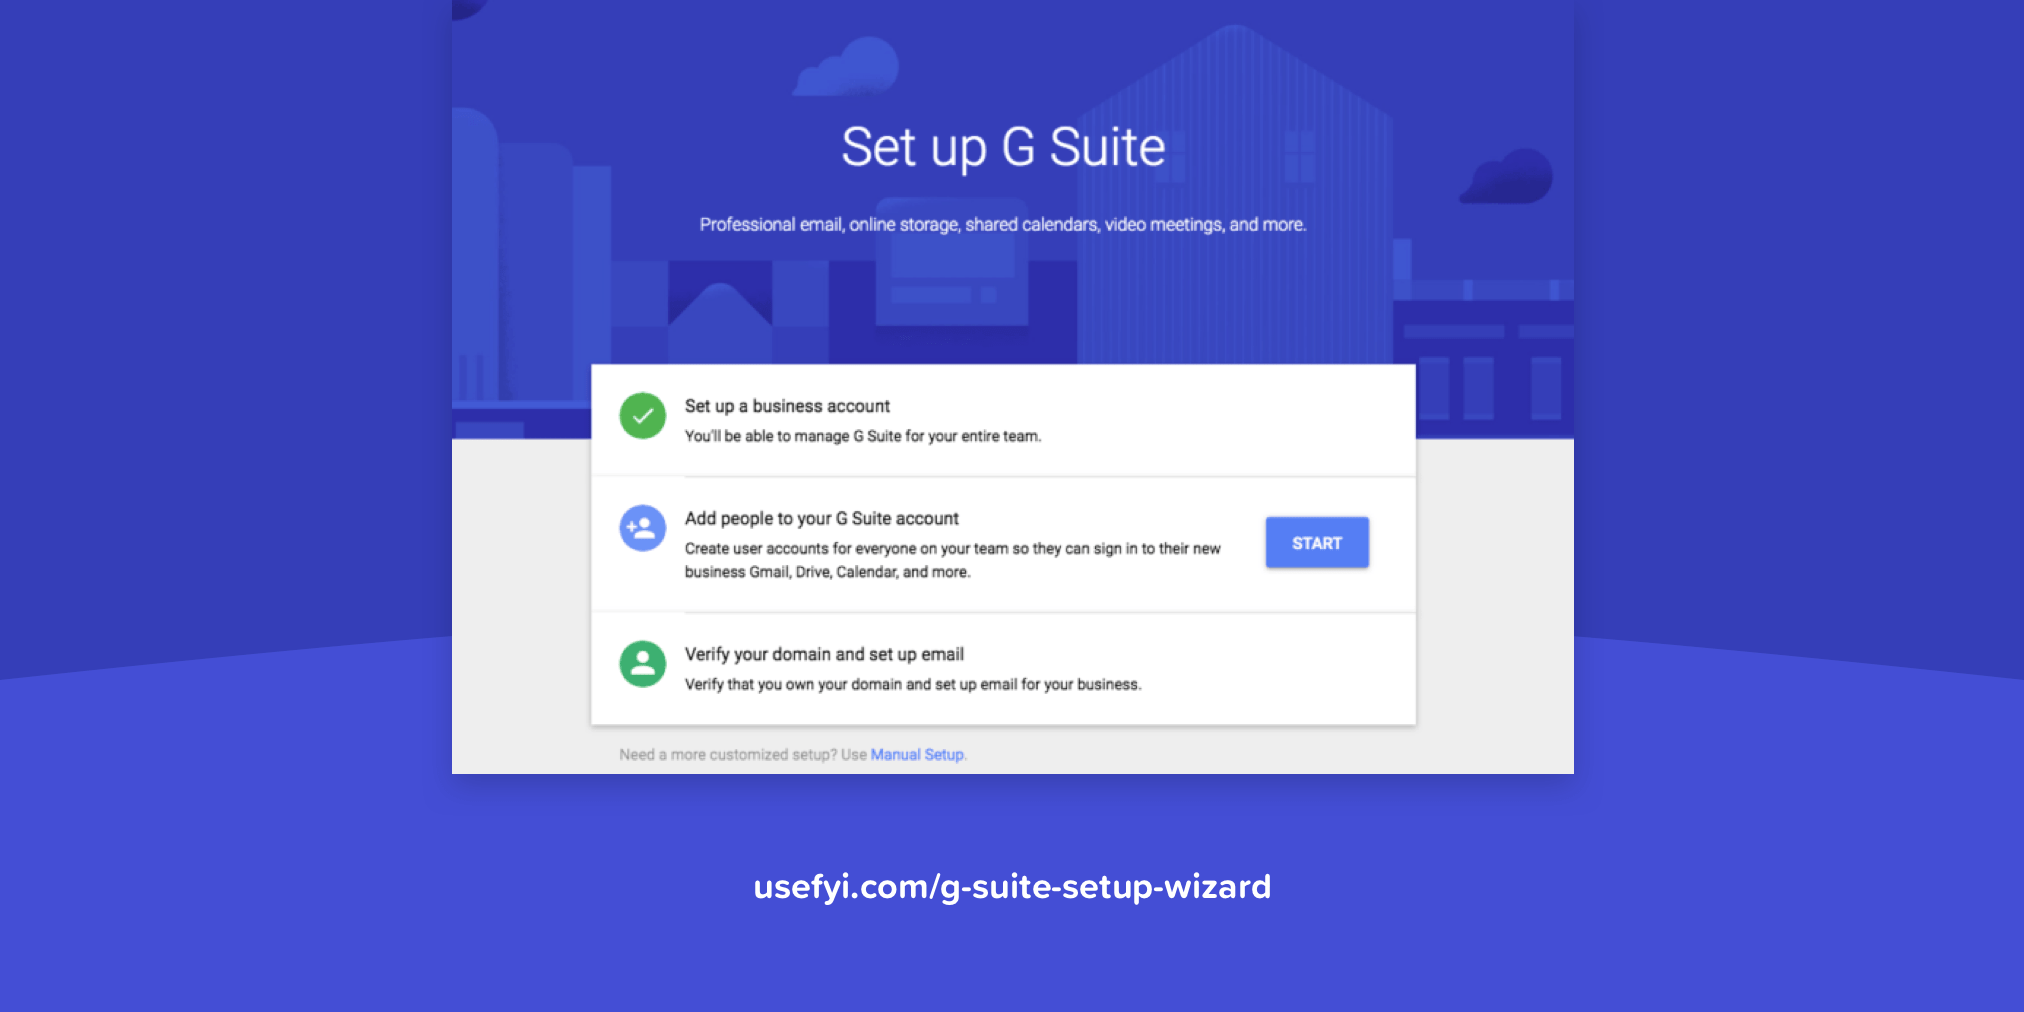
What is the G Suite Setup Wizard?
G Suite’s Setup Wizard is an automated tool to walk you through the process of setting up G Suite.
While G Suite is very simple to use, it has to interface with other systems in order to work and it requires permissions from you to do that. Rather than leave you to guess how to do things like migrating users or verifying your domain, G Suite provides an interactive guide to get you up and running as easily as possible.
How long does the process take?
Most businesses that have less than fifty employees can be up and running in less than an hour. Your exact timeline depends on the services you have and process that you’ll be using for the transition. For example, organizations with a large number of users might start by moving team leaders onto G Suite to train them in its use and then migrate other staff afterward.
Should you use G Suite Setup Wizard, or skip it?
The Setup Wizard makes it easy and simple to set G Suite up on your domain. But what if you just want to get started without using it?
If you purchase your domain from Google during your G Suite signup process, the MX records and verification happen automatically. In this case, you can skip the G Suite Setup Wizard since most of it has already been done automatically.
And if you purchased your domain through another domain registrar, you can do all this manually in G Suite if you’re comfortable with it. The G Suite Setup Wizard is entirely optional.
How to use the G Suite Setup Wizard
There are five steps to the Support Wizard process:
- Access the Wizard
- Create User Accounts
- Verify your Domain
- Set up Gmail and other services
- Migrate mail, mobile devices, and more
Let’s start with accessing the G Suite Setup Wizard.
If you’re starting at signup, you’ll see the G Suite Setup Wizard automatically, after you finish signing up:
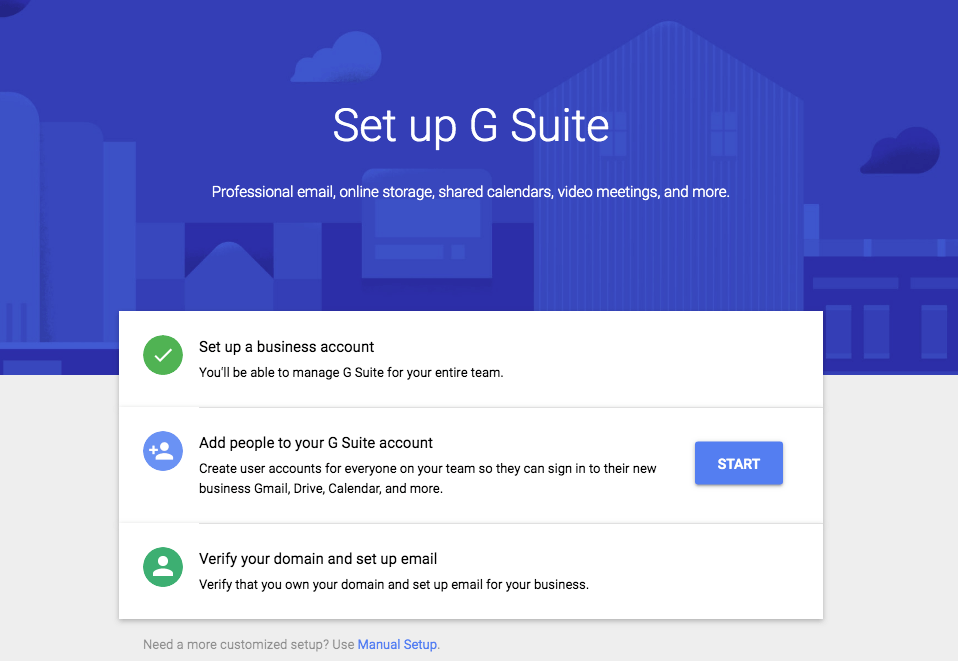
If not, you can go find it in your admin console.
Where to find the G Suite Setup Wizard
Go to your G Suite admin console at admin.google.com, then go to Domains.

You’ll find it under Account at the bottom of the menu on the left of the page.
Click on add/remove domains, and you’re in!
Setting up user accounts with the G Suite Setup Wizard
The first task the Wizard will guide you through is setting up user accounts. This is the first page you’ll see after you start using the Wizard:
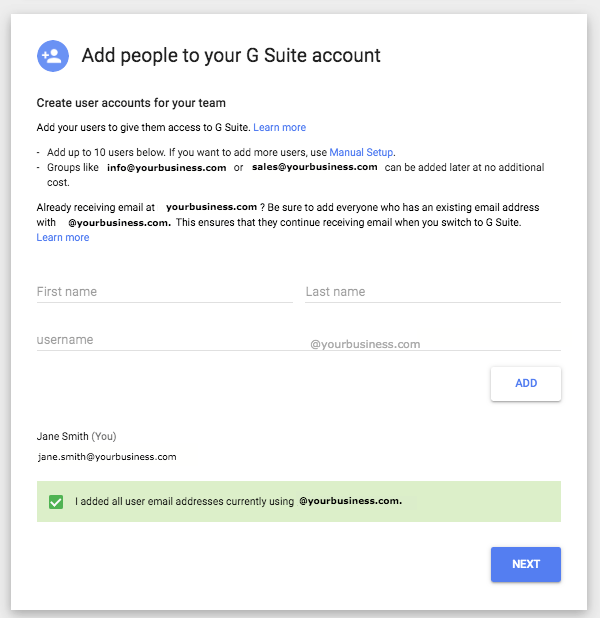
Because I’m just setting up a dummy account, I haven’t added any users. If you want to skip this step or add some users later, you can always add more users through the admin console later.
Once that’s done, it’s time to verify your domain.
Verify your domain with the G Suite Setup Wizard
If you bought your domain through Google when you signed up to G Suite, you can skip this step. Your domain is automatically verified.
If you didn’t, Google needs to know you’re the owner before it attaches its services to your domain.
If you’re doing this through the admin console, you’ll need to click on the domain you want to activate in the Add a Domain page. Then you’ll add your new domain manually.
Inside the Setup Wizard, you’ll see this:
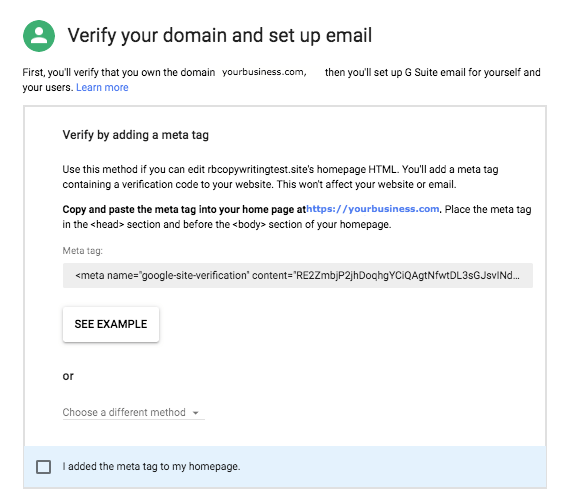
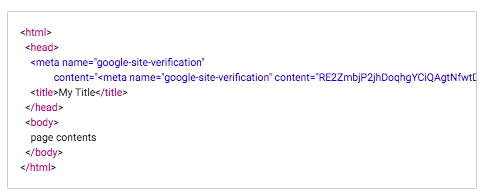
This is one of three methods you can use to verify your domain. You’ll go to your host, open the code to your homepage, and paste the meta tag into the code between the <head> and </head> tags, like this:
Once you add this text, Google can crawl your website’s homepage, recognize this meta tag, and positively ID you as the site’s owner.
If you can’t do that or you’re not comfortable getting under the hood of the actual code on your site, there are two other main options available to verify your domain.
Adding a domain host record
You can verify your domain using a TXT file. Here are the steps you’ll have to complete:
- Go to the control panel for your domain
- Add a new TXT record to your domain
- Save the TXT record.
During the G Suite Setup Wizard, G Suite will identify the hosting company you’re using automatically in most cases. For example, we’re using HostGator which G Suite detected.
Next, you’ll be prompted to go to the domain management section of the control panel at your web host’s site, and upload a new TXT record there.
The location of these varies. In HostGator, the host we used for our dummy site, DNS tools are listed under Domain Tools.
The next step is to drop a TXT record into your DNS tools panel.
G Suite Wizard will give you instructions similar to this:
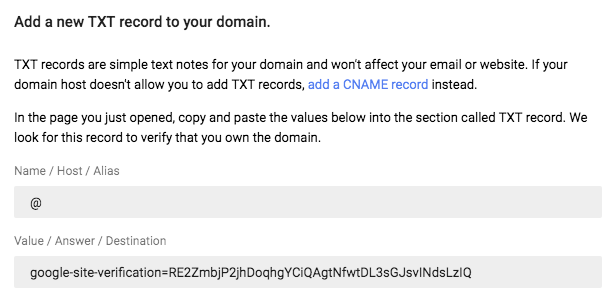
Save the TXT records and you’re done: Google will verify your domain using those records.
This is the method I wound up using, as it’s the most convenient. There are host company-specific instructions for domain verification here, and it’s probably best to go with the option Google recommends.
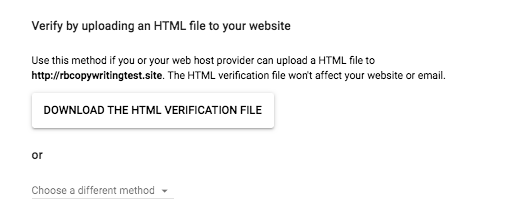
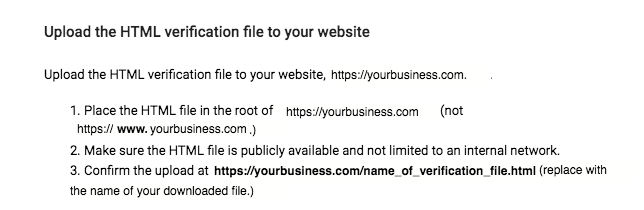
Uploading an HTML file
Another way to verify your domain is to upload an HTML file to your domain which Google can then read. All you have to do is upload a file to your site. If you’re comfortable doing that, this method will be really easy for you.
First, download the HTML file from the G Suite Setup Wizard:
The file will be a small .html file. Open it and you’ll see something like this:
![]()
Upload that file through your website hosting company’s dashboard, making sure not to upload it to the www. version of the site’s URL.
Then you’ll be able to finish the verification in the G Suite Wizard.
Setting up Gmail
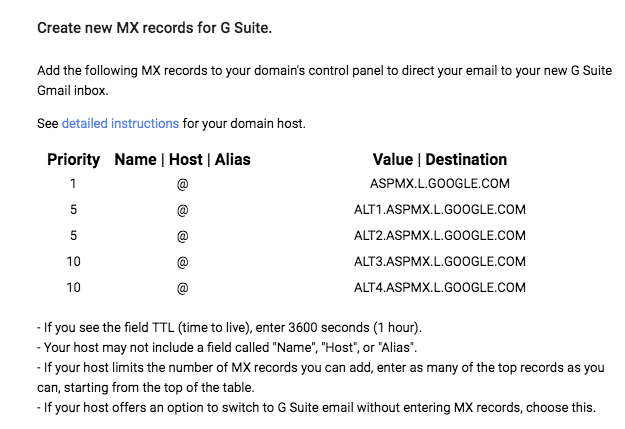
You’ll also have to set up new MX records to link your G Suite account’s business email address with your domain. This makes sure that any emails sent to your domain will end up in your G Suite email accounts.
Adding a domain host MX record
Here are the steps:
- Log into your domain registrar
- Create new MX records for G Suite
- Delete any old records
- Save the new settings
Start in your domain’s control panel. You’ll need to find the domain management settings. These may be under Advanced Settings, Account Management, DNS Settings, or something similar. You can get exact instructions for your domain host here.
Next, add new MX records to your hosting domain.
These are the MX records for G Suite:
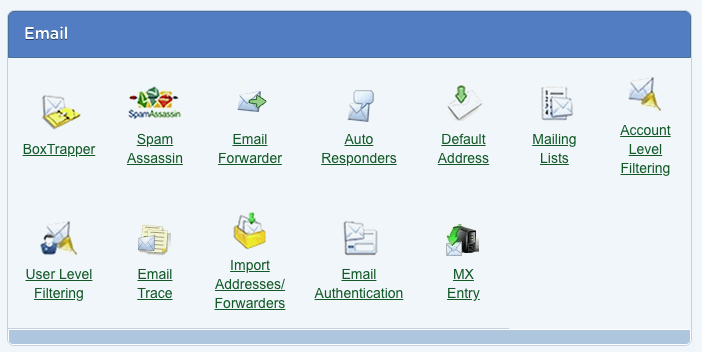
Again, I’m using HostGator, so I scrolled down to the Emails tab and found the MX records there.
On a similar note, make sure you add the MX records from the G Suite Setup Wizard itself, not the ones from the Google help pages or other sites. These records easily go out of date even in Google’s official documentation. Grab the MX records directly from the G Suite Setup Wizard.
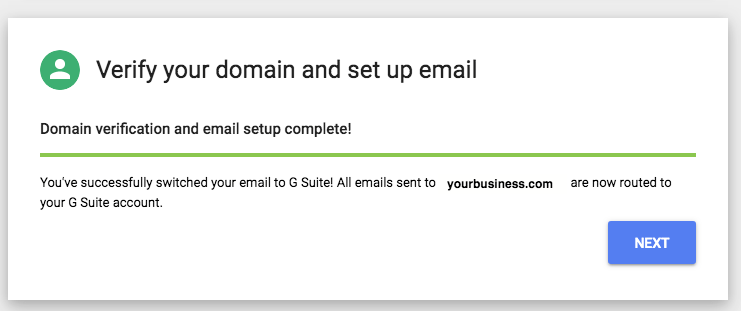
You’ll need to delete the old MX records, too. When you’re done, your MX records pane should look like this: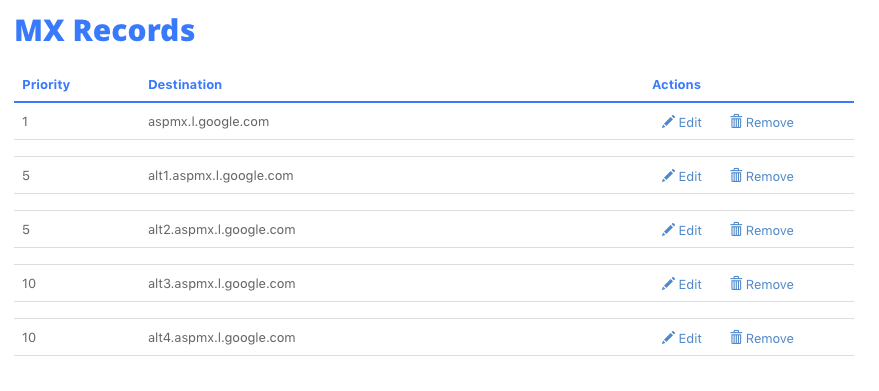
You’ll typically wait 24 to 48 hours before mail sent to your new business email address starts coming through from your domain. You’ll see a message like this when everything is working:
Once you’ve finished the basic setup process, you’ll find yourself at the G Suite admin console, ready to set up services and do more advanced setup tasks.
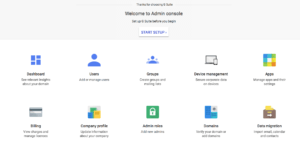
First, you’ll be prompted to add accounts for your users. There’s also a tour of the Admin console.
Wrapping Up
G Suite’s Setup Wizard is comprehensive, and it automates the process of providing support to first-time G Suite users. As long as you have access to the domain registrar for the domain that you want to use with G Suite, everything is fairly easy to complete. You can also rely on Google’s excellent support team whenever you get stuck.

