How to Use the Evernote Web Clipper – Plus 3 Tricks
Anyone who has done just about anything on the internet has at some point been overwhelmed with the stampede of open tabs from blogs, news articles, social media sites, and the like that feel too important to close but not urgent enough to read. Bookmarking them would only delay the inevitable. The deluge of web pages would make the bookmarks manager just as impenetrable as the tabs were.
Evernote’s web clipper promises to create a home for those tabs. An extension for Chrome, Safari, Firefox, Opera, and Microsoft Edge, and Internet Explorer, it allows you to quickly and easily save any webpage to a notebook in Evernote. The web clipper is unlike the cruder methods of saving webpages that exist in those browsers natively. It extracts data like images and comments and converts them into a readable format.
What’s more, saving clips rather than racking up bookmarks or cobbling together pdfs will help streamline the pages you save. It will strip away ads that otherwise crowd the space and keep formatting as simple as you need it to be.
How to Install the Evernote Web Clipper
Installing the web clipper is fairly simple. Navigate to evernote.com/features. There, under the “features” dropdown menu, click the web clipper icon. On the web clipper’s page, click the “get web clipper,” which will route you over to the app store that matches your browser. Depending on which browser that is, the store page will show you a “get” or “add to chrome” button or something of the sort. Once you step through the store’s process, you’ll be ready to start clipping webpages.
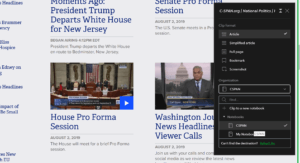
With the extension installed, clipping a page is a simple matter of clicking the green elephant icon in the upper right. That icon will bring up a menu with a “save clip” button that will make a new clip from either the whole page or a block of selected text.
How to Clip in Article Format
Clips come in many shapes and sizes. Depending on what sort of webpages you’re saving and what you plan on using them for, you will want to save different bits of information. Using the web clipper’s various options allows you to fine tune the structure of a clip to meet your specific needs.
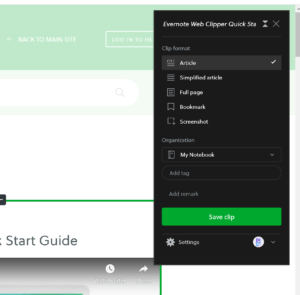
When you click on the web clipper icon, it will pull up a menu of choices on how to save the page you’re looking at.
The article format is the most straightforward variety of clip the extension provides. It includes a balanced set of information that will tend to work for the broadest range of cases. Saving a page as an article will extract graphics and main text. Saving clips that way gives you a version that looks mostly like the original.
That recipe you saved from a food blog will keep the step-by-step instructions as well as visual guides and menus of other entries you might want to explore later.
The article format, of course, does not look entirely like the original webpage. The web clipper will hone in on highlighted text to make busy pages readable.
Opting for a simplified article will yield something cleaner than the regular article format. To change the clip format, click one of the alternatives underneath “article” in the “save clip” menu. Article should be selected by default.
As with the article format, the web clipper will extract text and images for a simplified article. The simplified article format, though, will also cut out ads and menus as well as reducing text formatting to its simplest form.
Saving a clip this way would serve you better if you wanted to save a news article without carrying over menus to subscribe to various magazines or visit sponsors’ websites.
How to Save Full Pages
Alternatively, you may need to scoop up as much information as possible from a web page. In that case, the full page option will better suit your needs. On this setting, Evernote grabs not just text images but items like headers, footers, and sidebars as well.
You might want to see the chat sidebar attached to a particular article to document what other users are saying or take a look at what gets weeded out by moderators and what does not. This option still gives you the advantages over a regular bookmark that the other settings do. You won’t need to worry about moved or delete pages. You can access the clips you save even when you’re offline.
The full page format, however, gives you just about all the information that you would get from visiting the web page itself. If you’re looking to save more than just the core content of a page, taking a full page clip will suit you better than the other options.
How to use Evernote Bookmarks
In some cases, extracting information from a page will not be what you want. You could be interested in digging through the archives of a blog. You might want to return to a store page to buy an item you found or look for similar deals. Here, only something akin to a bookmark will do.
Of course, regular bookmarks are still rife with inconvenience once you build up too many. They are usually unwieldy to search. It is usually difficult to attach any sort of context to them so you can remember why you saved any particular one in the first place.
The web clipper’s bookmark format solves both these problems at once. The name can be deceptive. While an Evernote bookmark performs the same basic function as a traditional one, it adds extra features to keep the pages you saved organized. Being saved in Evernote rather than in a browser, this sort of bookmark is searchable and taggable, making it easier to find later.
Evernote also tacks on an image from the site and text from its meta description. Having that extra tidbit of information can help you keep track of what each bookmark is for. When you finally do have time to dig back through all the pages you’ve saved, you can map each one to the project or task you originally associated it with. With either a chain of open tabs or a pile of context-free bookmarks, that information can easily get lost in the shuffle.
How to Use Evernote Screenshots
Sometimes what you want to save will not be core information on a page or the menus to navigate elsewhere. You might want to document exactly what a particular dialogue showed at the precise time that you viewed it or document a step-by-step process to use a particular web app.
In those cases, clipping in the article or full page format would only get you part of the way there. What you really need is a screenshot. The Evernote web clipper’s screenshot format takes everything valuable about a traditional screenshot and adds a host of additional features.
When you save a page this way, the web clipper provides crosshairs you can click and drag to select a particular area to include in your screenshot. Once you’ve marked out the par of the screen you want to save, it provides a set of markup tools to highlight the most important tidbits.
You can highlight the timestamp on a busy page to remind the viewer that it’s important. You can add arrows to point out key elements of the page’s UI. You can pixelate sensitive information. You might, for instance, want to show posts on social media from a particular point in time without revealing the names and faces of the people who wrote them.
![]()
Saving screenshots to Evernote makes them easier to organize than the conventional variety. Tagging and searching frees you from stitching together directory trees from scratch to remind yourself which screenshot goes where.
Three Tricks to Maximize Efficiency
1. Use Tag and Search to Keep Track of Clips
Once you save a clip, Evernote lets you slot it into a notebook. Not only does that feature keep all your clips in one place, but it makes them easier to access after the fact. You can add tags and comments to specific clips or notebooks. You can use Evernote’s powerful search tools to find clips easily. You can highlight and annotate text and images in the clips you save.
2. Share Clips with Your Team
You can share and email clips, as well as create unique URLs to let other people view your clips. This way, you can cut down on redundancy. If everyone on the team should see that article saved to your notebook, using a custom URL will mean fewer messages to chase down as you share.
3.Integrate the Web Clipper with Other Apps
On top of its general formats, the Evernote web clipper is smart enough to tailor-make clips from specific applications. On services like Youtube and Linkedin, the web clipper will add a special option to its raft of formats. What information you want from a Linkedin page might be similar to what you want from a news article and it might not. Having a purpose-built tool to read a Linkedin page means you don’t need to rely on trial and error to find the settings that mesh with it.
A Force Multiplier for Memory
A tool like the web clipper is a natural fit with the founding vision of Evernote. The app was originally intended as a tool to multiply users’ memory. By providing a fast and intuitive way to collect and compile notes, Evernote promised to turn the average person into the cocktail party savant who remembers the name of each and every person she meets.
Nowhere is the cause of extended memory more critical than in the information monsoon of the modern internet. Recalling why you decided to suspend each and every one of those open tabs quickly becomes practically impossible. The Evernote web clipper helps remind you not just what information was contained in those tabs but why it mattered to you in the first place.

