The Ultimate Manual to Airtable as a CRM
Airtable is causing waves in the tech world and has a massive list of enviable clients, including Netflix, Shopify, and Penguin Random House. Of course, you probably already know that Airtable combines the analyzing power of spreadsheets with the storage and modification capabilities of a database. But there is a lot more than meets the eye. Airtable is a versatile tool that you can use for almost any type of workflow, including basic customer relationship management (CRM).
What is Airtable Anyway?
Airtable is primarily a cross between a spreadsheet and a database. Users can easily create visually appealing spreadsheets, which happen to have the capabilities familiar with databases. Users can also create and edit databases for any number of tasks, including tracking inventory, task management, and project planning.
The platform is also very flexible and can be used to build apps, collaborate, and customize workflow. Moreover, Airtable’s features and capabilities make it perfect for use as a lightweight CRM.
How Airtable Works
For many people, there’s little difference between a spreadsheet and a database. However, the two tools actually serve different purposes, just like a steak knife and butter knife are used for different things. In short, a spreadsheet is primarily used to keep track of data and perform calculations. A database, on the other hand, is used to store information that can be altered later.
Many people still use spreadsheets where a database would be the more appropriate option. In this case, compiling too much information in a spreadsheet can make it challenging to track and understand data. It is equally cumbersome to compare data and track relationships between the data.

But, most databases require some SQL scripting knowledge. These databases can also be hard to use for people who are less tech-savvy. It is no wonder that many people prefer to power through spreadsheets despite their shortfalls.
This scenario is where Airtable shines. The platform allows users to create databases with zero SQL knowledge or experience easily. You can create and collaborate on a database within minutes. And, you get the best of both worlds, since the database also doubles up as a spreadsheet.
From a practical perspective, Airtable is like Excel or Google Sheets on steroids. For example, Excel is a terrific tool for performing calculations. But imagine if you could also link records, view your data on a Kanban board, and apply a formula to an entire field on your Excel spreadsheet. That’s Airtable in a nutshell.
Below are two real-world examples of what you can do with Airtable.
Example 1: Using Airtable as a Database
One of Airtable’s most impressive features is the ease of creating databases. You can create a database for anything, including tracking employee data, controlling inventory, managing a sales pipeline, or creating a content calendar.
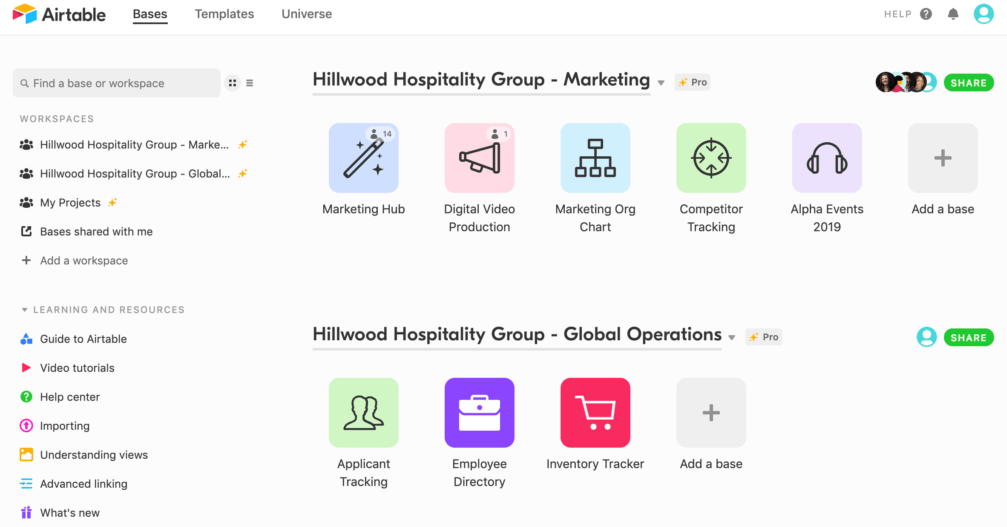
Your database in Airtable is simply called a Base. It will be the first screen you see after logging into your account. After that, you’ll have the option of using Airtable’s templates, creating a new base from scratch, or importing data from sources like Excel or Google Sheets.

You can also create separate bases for your various clients, departments, or projects. Equally, you can create individual workspaces to organize multiple bases. A workspace is essentially a collection of bases that you share with others.
For this example, we’ll look at how to create a base using Airtable’s templates. This is the easiest route to learn the ropes. The software offers hundreds of templates already pre-populated with a structure and even sample content. Thus, you can get a template for virtually anything you need to create a database for.
Simply go to the workspace where you want your base to go. Then, click Add a base and select Start with a template. Finally, choose your ideal template from the gallery.

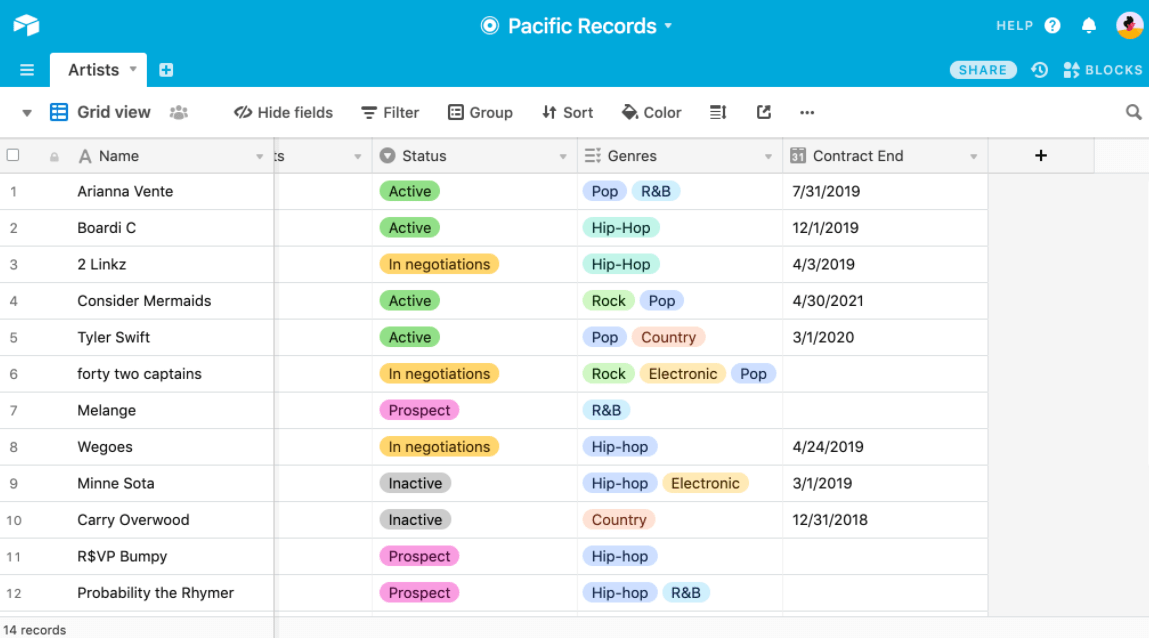
You’ll get a grid table, complete with rows called records and columns called fields. A record is basically an individual item, such as a particular lead or customer’s first and last name. On the other hand, a field allows you to provide the relevant information to structure your data. For example, a field could indicate where the customer’s name, phone number, etc. goes.
All you need to do is fill out the required information to create your database. You have the freedom to customize the records and fields as you wish to reflect precisely the kind of information you want to compile. Airtable offers many customization options, including adding attachments, making notes, using a checkbox, and rating information on a numeric scale.
Example 2: Using Airtable for Project Management
Airtable is incredibly versatile, and its feature set makes it suitable for use as a project management tool. The software even comes with project management templates to get you started. Or, you can quickly build your own from scratch if you have specific fields you need for your workflow.
Airtable also has multiple view options to help you get a quick visual of your project’s progress. You can find this feature on the left side of the page, marked Views.
For example, the Gallery View displays each row as a separate card. Additionally, you can sort the cards according to the desired field, such as due dates. Similarly, the Grid View lets you see all of your raw data in one place. This flexibility allows you to track your projects visually, depending on the information you need to see at any one time.
Finally, like all good project management tools, Airtable lets you add team members to your project. This collaborative feature is crucial for ensuring that everyone is on the same page. You can even set varying permissions for viewing.
Airtable will seem very familiar and intuitive if you already manage your projects using spreadsheets. Plus, you get to enjoy additional features like attaching and sharing files, customizing your fields, and assigning work to resources right from your spreadsheet.
How to Get Started Using Airbase as a CRM
You’ve probably heard of organizations using Airbase as their preferred CRM. It’s worth mentioning again that Airbase isn’t actually a CRM, strictly speaking. But, it is set up such that you can use it as a CRM. This is especially true for small to medium-sized businesses that don’t need full-blown CRM software with all the bells and whistles.
Depending on your business needs, you may even be able to avoid paying for a spate CRM tool if you’ll be using Airtable for other workflows like project management or event planning. If nothing else, you’ll be able to create a searchable database for all your client information easily.
Here’s how to use Airtable as a CRM:
Step 1: Sign Up for Airtable
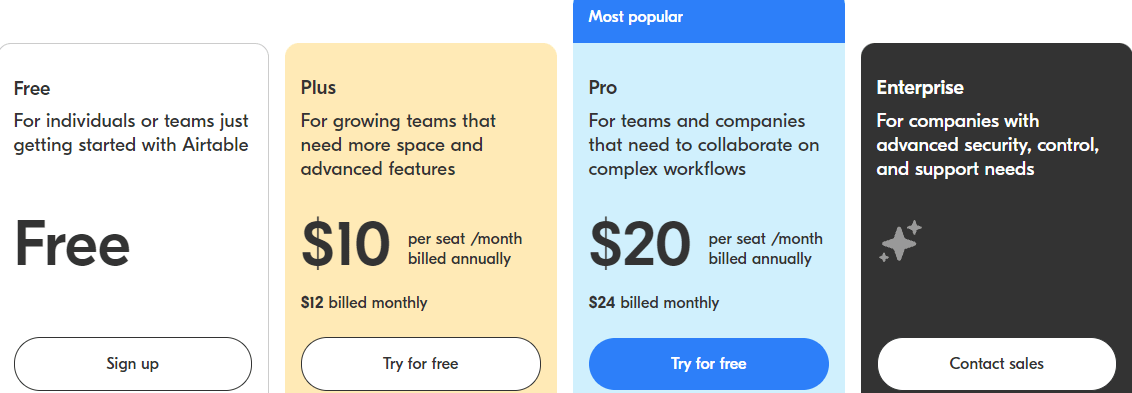
Head over to the Airtable website to sign up for the platform. Another superb offering by Airtable is its free plan. It comes with some limitations, such as limited storage and the number of records you can have per base. But, you still get access to the essential features with the free plan.
Either way, Airtable has three more paid plans, including:
Plus – This plan costs $10 per seat/month. However, you get extra features not available with the free plan, including automatic table syncing and 6-month revision & snapshot history.
Pro – This plan costs $20 per seat/month. You get all the features in the Plus plan and some more add-ons. These extra features include personal & locked views, 1-year revision & snapshot history, and field & table editing permissions.
Enterprise – This plan is recommended for organizations that require custom support, security, and control. You have to contact the sales team to get your pricing.
You can always start with the free account and upgrade as needed. You need little more than your name and email to set up your account. The free account will give you a first-hand feel of how the platform works without committing your money. So, I highly recommend starting with the free version and upgrading later.
Step 2: Collect Your Sales Information
It helps if you have your sales information handy before creating your database. This step will ensure the rest of the process goes smoothly. So, collect all your data, including customers, leads, and prospects.
It is also worth thinking about the fields you’ll use to create your CRM database. Some essential fields include:
- Contact name
- Contact position
- Contact email
- Contact phone number
- Account name
- Opportunity name
- Lead source
- Deal probability
- Deal value
- Date of last interaction
Once you have your data together, consolidate all your customer interactions via websites, social media, business cards, and email lists to include in your CRM database. Next, create a spreadsheet with this data, which you’ll later import to Airtable. You’ll be able to spot errors early, and you won’t need to enter this information manually in your CRM database when it’s time to migrate to Airtable.
Then, create a separate spreadsheet or table for your customer interactions. For example, the second table might include fields like who the customer interacted with, the date of the interaction, and specific notes about that interaction. A great thing about Airtable is it allows you to link two or more records in different tables together. So, you can automatically pull up or view interactions from your contacts list.
Step 3: Create Your Contact List
You’ll essentially be creating a base for your clients. We covered the basics in Example 1 above. Fortunately, Airtable already has a CRM template to get you started.
The template is highly customizable, so I suggest taking this route. Of course, you can always build your base from scratch once you’re familiar with how the platform works. You might even find that you don’t need to!
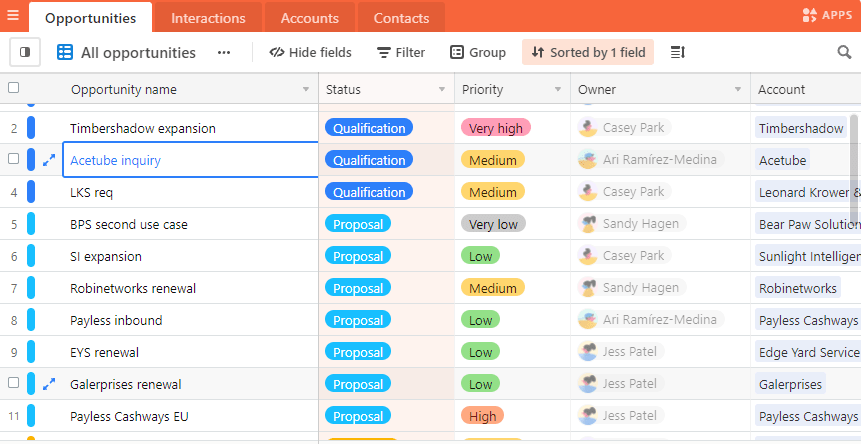
The CRM template comes pre-populated with all the essential fields you might need. These include Opportunity Name, Status, Priority, Owner, and Account. You can also rename these fields or add new ones depending on your sales process.
The Airtable Universe is also worth mentioning at this point. The Universe is basically a marketplace where designers share their templates. As a result, you’ll get thousands of CRM-specific templates to choose from, just in case you don’t find a suitable one from Airtable’s list.
Alternatively, you can go right ahead and create your CRM template from scratch. This option offers total freedom for how you want your CRM. This is especially useful if you have a specific CRM strategy that doesn’t quickly adapt to generic fields.
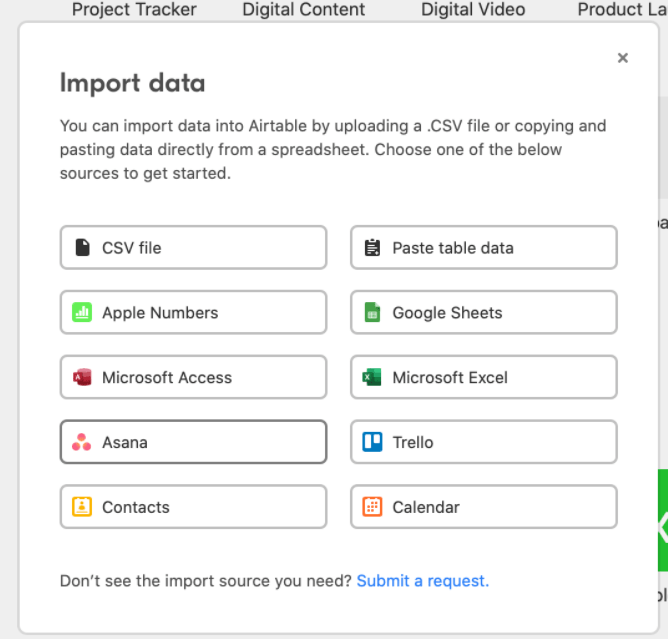
Step 4: Import Your Data
Now it’s time to import your data. To this end, Airtable lets you import data from Google Sheet, Excel Workbooks, or CSV files. Simply open your base and click the + button. Next, click Import Data, where you’ll be presented with your import options. Finally, simply click where you’ll be getting your data from.
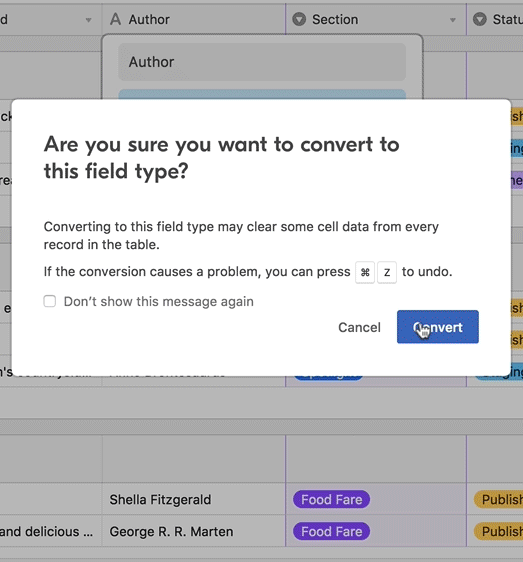
By default, your table will be made up of single-line text fields. However, this format isn’t optimal since your table likely contains different fields. So, it is worth converting the single-line text fields into the appropriate fields.
For example, you can choose the number field for rows where prospects’ phone numbers go. Similarly, you can change your notes to the long text field and choose multiple select fields for fields containing tags. You can do this by double-clicking on the appropriate field’s header.
Step 5: Set Up Your Views
Don’t forget to take advantage of Airtable’s views feature. This is another one of Airtable’s exceptional features. It is like having Trello, Google Sheets, and Google Calendar in one place.
For example, you can use the Kanban view to monitor each client as they progress through the customer journey. Similarly, you can use the calendar view to get a snapshot of upcoming client meetings, demonstrations, or follow-ups.
Also, remember that you can invite collaborators to your workspace or base. They too can choose their preferred view. You can now track your sales activities and update your database as prospects move through the different touchpoints.

