The Ultimate Manual to Zoom Filters
Some Zoom users are familiar with virtual backgrounds. But many people still don’t know that you can use filters on Zoom, just like on social media. Aside from fun and playful filters, Zoom also offers more professional filter options to help you look your best during your Zoom calls.
What Are Zoom Filters Anyway?
Zoom has proved instrumental in supporting the work-from-home revolution. But looking at the same old serious faces or cookie-cutter headshots can get boring. And there are those mornings when you simply aren’t looking your best.
To spice things up a little, Zoom offers built-in filters on its platform. If you are familiar with Snapchat, the concept is the same. Zoom allows you to overlay your video with fun, goofy, cool, or plain weird animations or graphics.

The filter feature is different from the Zoom virtual background. Where a Zoom virtual background changes the appearance of what’s behind you, the filter feature customizes your actual look. For example, you can use the filter to add a hat, sunglasses, or mask to your face.
The filters also work for meetings that don’t quite promote quirkiness. For example, the “touch up my appearance” filter helps make your skin look smoother and even hides some blemishes. While this filter won’t instantly transform you into a Hollywood icon, it does help you make you look more professional during those rough mornings.
How Zoom Filters Work
Video filters work pretty much the same way whether you are using Zoom, Facebook, or Snapchat. The use of these filters started with a Ukrainian startup called Looksery. Snapchat acquired the company in 2015 for $150 million. Snapchat then grew the filter’s popularity exponentially, with users worldwide loving funny, silly, and border filters.
Today’s filters are far more advanced than their predecessors. Initial filters came with many issues, including glitches, low-quality graphics, failing to detect faces, and not staying on users’ faces when they moved.
Filters use augmented reality (AR) technology combined with facial recognition software. This way, users can instantly incorporate digital elements into the real world to create a digital, 3D experience.

In short, Zoom filters work by first detecting the user’s face. Then, the software overlays AR virtual components on the user’s face and surroundings. The result is adding a digital element to your appearance, such as virtual bunny ears. You can even transform your entire face into an animal, vegetable, or other cool animation.
Here are a few examples of how you can incorporate Zoom filters into your meetings.
Example 1: Look More Professional With Zoom Filters
We alluded to this in the previous section. Zoom filters can help you to touch up your look when you’re just not feeling yourself. Sign in to zoom and go to Settings > Video > Touch Up My Appearance.
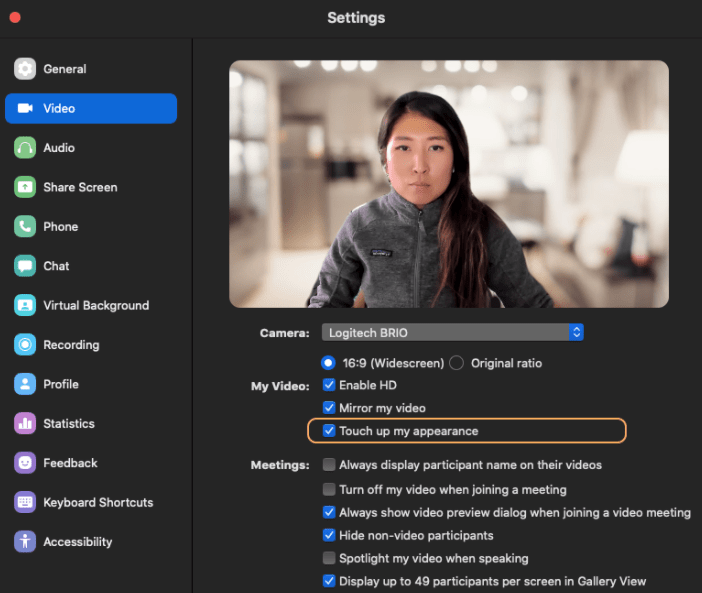
The filter will help smooth out your skin, such as removing wrinkles and blemishes. The software uses a real-time algorithm to trace your face. Then, Zoom applies soft focus to your camera feed. The result improves your appearance instantly. You can even adjust the soft-focus intensity to get the precise look you want.
Example 2 :Make Zoom Meetings More Fun With Filters
Not all Zoom meetings are serious. You may be hopping on a call with a few friends on a Friday evening to catch up. In this case, Zoom filters can add an exciting element to your discussion or meeting.
Zoom offers bountiful built-in filters, ranging from a halo, pizza hat, pirate eye patch, crown of flowers, and of course, bunny ears. Again, you can choose your filter before or during a meeting. You can also change your filters seamlessly mid-call for some variety. Simply click the ᶺ button next to the Stop Video icon. Next, select the Choose Video Filter option.
You’ll be presented with multiple filters to choose from. Or you can find a specific one using the search bar. Be sure to try out a few different filters to find the ones that you like. This feature certainly makes mundane meetings more fun and exciting or video chats with your friends more silly.
The best part is that you can get even more filters by integrating Zoom with Snapchat. You can easily download the Snap camera app for free and connect the two. Then, any filters you choose instantly show up in Zoom, too. Snapchat offers considerably more filter options than Zoom.
You’ll have a great selection to make your meetings more interesting, so it’s worth looking into this option. We’ll cover how to get Snapchat filters on Zoom in another section.
Example 3: Adjust For Low Light
Zoom has an “adjust for low light” feature. While not technically a filter, this feature does filter/adjust your appearance on video. It is not always possible to find a well-lit workstation for Zoom meetings. This feature is heaven-sent for people with poor lighting.
You can access this feature by going to Settings > Video > Adjust for low light. You’ll have the option to stick with Auto, which is the default. In this case, Zoom automatically senses your lighting conditions and adjusts appropriately. This option should make a significant difference in most cases.
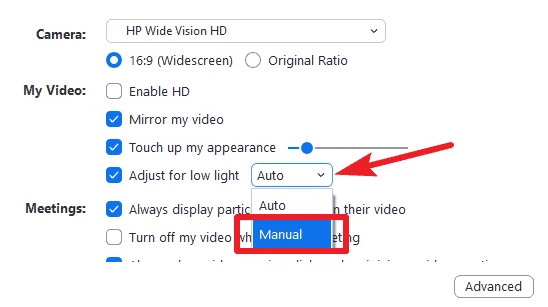
Alternatively, you can choose the Manual option from the drop-down menu. This option lets manually modify the lighting from a slider. Simply move the slider back and forth until you find the lighting adjustment you are happy with.
While this feature is just a quick fix in a bind, there’s no true alternative for good lighting. Whenever possible, move to an area with better lighting. Natural lighting works best for video calls. You can also look into lighting options such as ring lights or a studio lighting kit. A lighting kit is an excellent investment if you’re creating video content.
How to Get Started With Zoom Filters
Zoom calls don’t have to be boring. And Zoom filters are easy to use. If you’re ready to get started, here is how to go about it:
Step 1: Upgrade to the Newest Zoom
If you can’t find filters or Studio Effects in your Zoom account, you probably have an older version. You will need version 5.2 or later to take advantage of the filters. In any case, now’s a good time to upgrade to Zoom’s latest version.
You will automatically get Zoom’s latest version when signing up for a new account. If you already have one, you can upgrade an existing account to get the latest version. As of November 1, 2021, you will be required to update Zoom at least once every nine months anyway. You’ll receive a prompt to update your software when one is available.
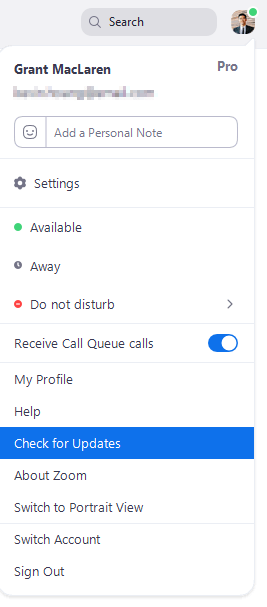
For now, sign in to your desktop client. Then, click your profile picture. Next, click Check for Updates. Zoom will automatically download and install the newer version if one’s available.
Make sure to update your Zoom desktop client regularly. You’ll get access to all new Zoom features, including important security updates.
Step 2: Play Around With Zoom Filters
We already covered the basics of using Zoom filters in the examples above. But just a quick recap on how to use Zoom filters:
- Open the desktop version of Zoom
- Click your profile picture
- Click Settings
- Click Background & Filters
- Click the Video Filters tab
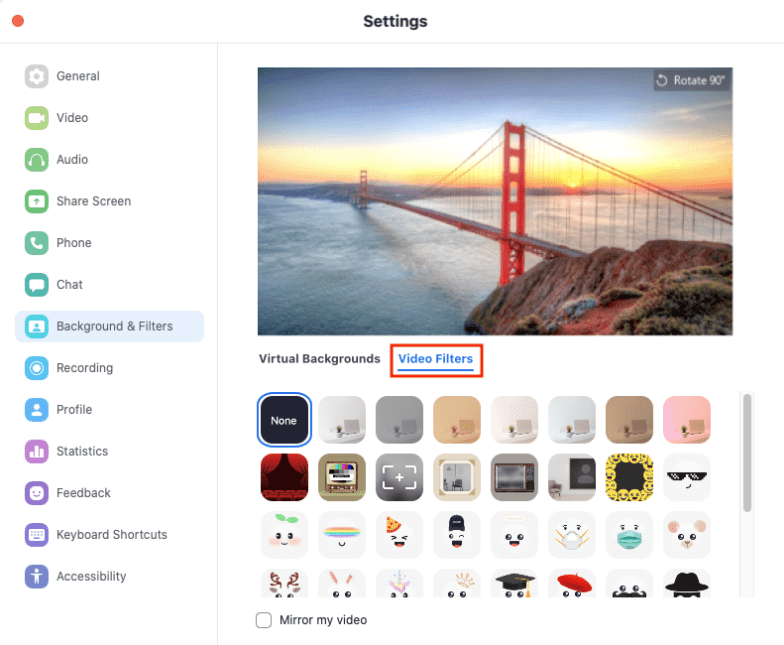
You’ll have a list of filters to choose from. Try them out for size to explore the ones you like. When you click on a filter, it will show you what it will look like in a Zoom meeting if your webcam is on.
Zoom’s Studio Effects is also worth trying out. These are filters that let you add a beard, eyebrows, mustache, or lip color. To get to the Studio Effects:
- Click on your profile picture
- Click Settings
- Click the Backgrounds & Filters tab
- Navigate to the lower right corner and click Studio Effects
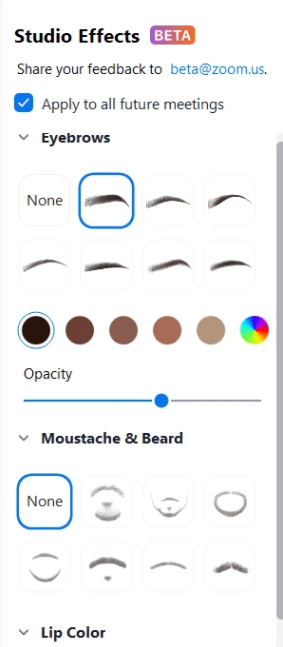
From here, simply choose the effect you want, such as eyebrows, a mustache, or lip color. There’s also the option to apply your preferred effect for all future meetings. Be sure to check or uncheck the box appropriately.
Additionally, you can change the effects to any color you like. The Studio Effects is a fun tool to spice up meetings. But the effects can also work to touch up your face before a meeting. So, it can work a little like virtual makeup.
Also, don’t forget to try out the Touch up my appearance. It’s a handy and thoughtful feature from Zoom. We don’t always look our best. So, it is nice to get a little help from technology sometimes.
You’ll need to:
- Click your profile picture
- Click Settings
- Click the Video tab
- Click Touch up my appearance
Navigate the slider to get the effect you want.
You’ll get an airbrushed look to help smooth your skin’s appearance. Remember, you can still use this feature even if you are already in a meeting.
It’s worth noting that you need good lighting for this feature to function optimally. Ideally, you should have lights pointing at you from behind your camera. Otherwise, you might not see much of a difference when using the touch up my appearance feature.
Step 3: Add Snapchat Filters
The fun doesn’t have to stop just because you’ve gotten familiar with Zoom filters. You can also use Snapchat filters on Zoom to broaden your options. For this, you will need a Snap camera app. Snap camera is software that you can use as a third-party integration for Zoom or other video calling platforms.
Snap camera comes with almost all the filters you’d get with the Snapchat mobile app. To start using Snapchat filters on Zoom:
- Download Snap camera from their website here
- Install the app and open it
- Try out the filters to get familiar with the options. Choose a filter you like.
- With Snap Camera still open, launch Zoom
- Join or start a meeting
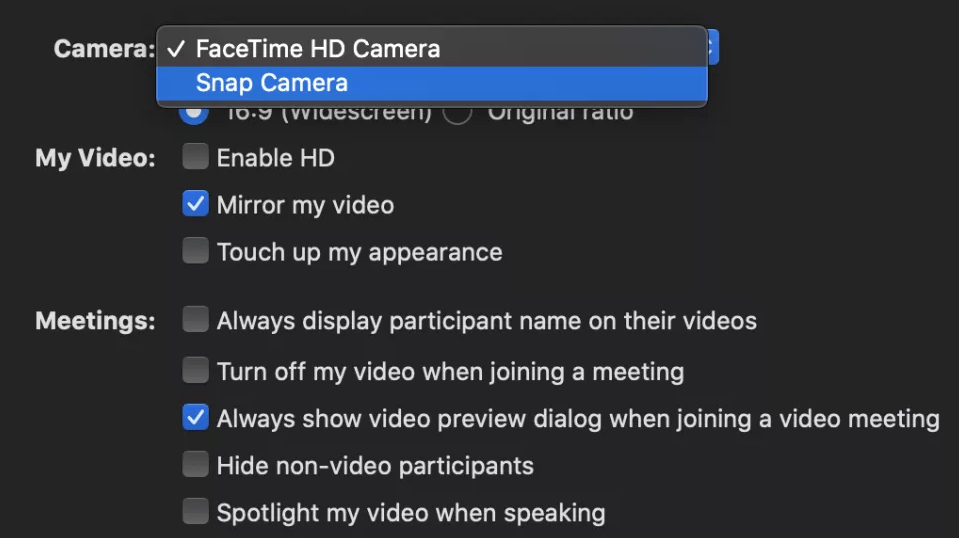
- Click Menu > Video > Camera
- Choose the Snap camera option
Now, any filter you choose on the Snap camera also shows in Zoom. Essentially, your webcam is picking up the feed from the Snap camera. This feed, or filters, in this case, will automatically apply in your Zoom meeting. You can change the filter in the Snap camera any time you’d like to change your Zoom filter.
Snap camera even lets you save your favorite filters so you can access them quickly during your Zoom calls.
Step 4: Learn How To Turn Off Zoom Filters
Zoom filters are fun for informal meetings or catching up with friends. But you don’t want to show up to a serious meeting as a cat or a with dog ears. You’ve probably heard of incidents where a professional shows up to a meeting with a silly filter.
This shouldn’t be a problem if you stick with Zoom-made filters. Any built-in filters you use expire immediately after your meeting. So, you should be back to normal for your next call. However, the same doesn’t apply to Studio Effects. So, make sure that you haven’t checked the “Apply to all future meetings” box. Otherwise, the virtual makeup will appear during your next meeting.
And you need to turn off your filters manually if you are using a Snap camera. By default, Zoom uses the most recent camera for all future meetings. So, be sure to switch back to your regular camera immediately after leaving the call if you are using a Snap camera.
You can still turn off the Snap camera just in case you accidentally carry filters over to your next meeting. To do this, hover your mouse over the Stop Video tab. Then, click the ᶺ symbol and choose your primary camera. You’ll immediately go back to your usual meeting view.
Alternatively, you can close the Snap camera app from your desktop or laptop. This way, Zoom won’t be picking up the feed from the Snap camera. But your screen will display the Snap camera logo with no video. This option is a great way to buy time, just in case you forget how to switch back to your regular camera.

