Windows 10 Network Commands: The Ultimate Manual
When your network is not operating as you expect it to, Windows 10 network commands can help. These commands provide a means of troubleshooting the problem or of measuring and improving performance.
We’ll break down the most important functions you can perform with these Windows 10 network commands, helping you figure out when and where you should use them.
What Are Windows 10 Network Commands Anyway?
Windows 10 (Win10) network commands run from the command line. This is a text-based command window that resembles the way DOS worked. For IBM-based PCs, DOS was the text-based operating system that these computers used before the graphical Windows operating system came into being.
Dozens of Win10 network commands exist. Running these commands from the command prompt window often is the most efficient way of using them. However, some of the commands do have equivalent functions within the graphical Windows 10 interface.
For those who only are familiar with the GUI (graphical user interface) in Windows, typing in the command prompt window may seem a little odd. The black background with white text over the top yields an old-school look.
Because of its basic interface and simple design, however, you can deploy these network commands quickly and efficiently in the command prompt window.
Additionally, the majority of TCP/IP utilities operate through the command line window. TCP/IP is the protocol standard that manages device connections on the internet and manages how data packets move across the network.
Some of the functions that the Win10 network commands can perform for you include:
- Measuring the efficiency of the network by sending test data packets
- Finding information that helps with troubleshooting network communications and connections
- Discovering errors within the network
- Measuring statistics about the network connections
- Revealing the name of the host server
- Matching IP addresses with URL addresses
How Windows 10 Network Commands Work
Making use of Windows 10 network commands is an easy process. You simply open the command prompt window, type the command at the prompt, and hit Enter. Windows 10 then executes the command, displaying the information as lines of text within the command prompt window.
You have two options for entering Windows 10 network commands at a prompt.
Command Prompt Window

To open the command prompt window in Win10, press and hold the Windows key before pressing the R key. In the Run box, type cmd and press Enter.
The command prompt window is a very basic text display. Windows does not include any menu commands for this window. Beyond typing commands at the prompt, your only option is to resize the window.
Occasionally, it may be helpful to save a copy of the text that appears in this window after you run a command. You can take a screenshot of the command prompt window by pressing and holding the Alt key before pressing the Prt Sc key. This copies whatever you have displayed on your screen. Then paste this image into another software package, such as Paint, where you can edit the image.
If you simply want to copy and paste the text that appears in the command prompt window, open the window. Right-click on the title bar across the top of the window. Left-click on the Properties command in the popup menu.
In the Properties window, remove the checkmark from the Use Legacy Console checkbox at the bottom of the window. This should automatically place a checkmark in the Enable Ctrl Key Shortcuts checkbox. (If not, you will need to add this checkmark yourself.) Click the OK button.
You may have to restart the command prompt window. You then should be able to use your keyboard or mouse to navigate through the text in the command prompt window and to highlight segments of the text. Use the CTRL-C keyboard combination to copy any highlighted text. Then paste it into a new software window, such as Notepad or Google Docs.
PowerShell
You also can use PowerShell to run your Windows 10 networking commands. PowerShell works adequately for this purpose, operating similarly to the basic command prompt window. However, it also offers more features, including the ability to automate tasks on your Windows network like adding a new server in a virtual environment.
To open PowerShell and use it for entering Win10 networking commands, click the Start button in the lower-left corner of the taskbar. Scroll down the list of software packages and apps before clicking on Windows PowerShell. If you see a Windows PowerShell folder, click on it first before clicking on the Windows PowerShell command.
To copy the text on the screen in the PowerShell window, you can take a screenshot of the window, as we described earlier.
As another option, use your mouse or keyboard to highlight the text you want to copy from the PowerShell window. Press the Enter key or right-click on the highlighted text. These actions copy the text to the Windows Clipboard. You then can paste the copied text into another software window using the CTRL-V keyboard combination.
Example #1: How to View Statistics About the Network
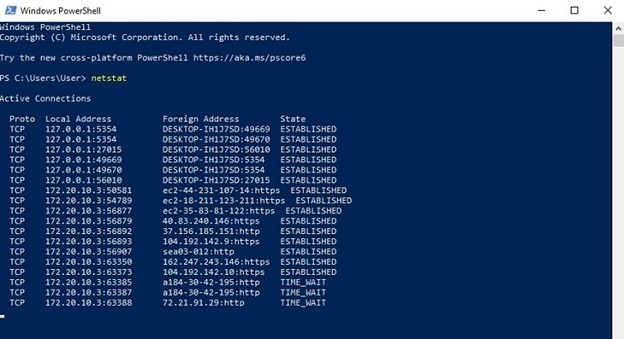
You can use Windows 10 network commands to view statistics about the various connections your computer has to the network. The netstat command is the most common way to view statistics about the network. This command exists in Macintosh and Linux as well as in Windows.
The netstat command provides information about the ports on the computer that are in use. Should these network statistics show that a certain port is open that shouldn’t be, you may have a clue as to a malware infection being active. Some types of Trojan horse malware will open a port without your permission, waiting to give the hacker access to the network.
To use the netstat command, open your command prompt window of choice and type netstat before hitting Enter. Over the span of around a minute, you’ll see a list of the network connections you have available along with the status of the connection.
Parameters to Use With Network Statistics
The netstat command has several parameters you can add to provide extra information. Use a hyphen followed by the letter of the parameter you want to use to activate the parameter. Some of the parameters include the following.
- netstat -a: This parameter will list all of the active and inactive network connections.
- netstat -b: Use this parameter to see a list of executable files linked to a certain connection.
- netstat -e: For a list of the number of bytes received and sent through the network connections, as well as a list of the number of errors and discarded packets, use this parameter.
- netstat -n: This parameter displays all of the ports in a numerical format.
- netstat -o: Use this parameter to see the PIDs (or process IDs) for the connections. You then can use the PID displayed here to match the PID displayed in the Windows Task Manager window. Within the Task Manager window, you then can see the application associated with operating the connection, which can be helpful in troubleshooting.
Example #2: How to View Website and DNS Server Information
When you type a URL address into your web browser, a DNS (domain name server) translates the common name into the numerical IP address. This process greatly simplifies using the internet, as it’s easier to remember a name like nira.com than trying to remember the IP address.
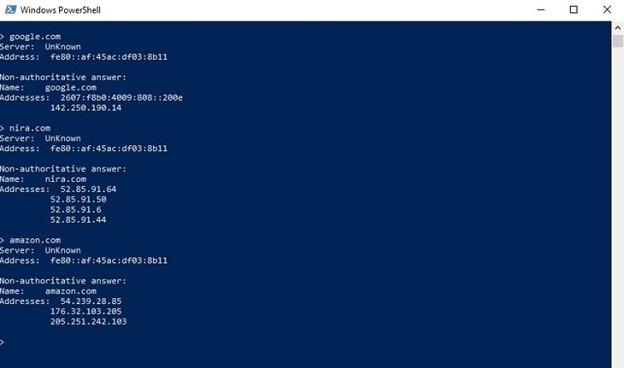
The nslookup command allows you to see this connection between the URL address and the IP address. You may need this information when using a Win10 network command like tracert, which provides an IP address. You then could use nslookup to see the URL address associated with the IP address and to provide the full picture of the information.
To see the current name server in use with your connection, type nslookup at the command window prompt and hit Enter. The command window will return the name of the default server as well as the website address.
You’ll notice that the prompt in the command prompt window changes. Rather than providing a C: address followed by a chevron, it changes to a chevron only. This means that the nslookup command remains active, and you simply can enter another URL address to see the server name and the IP address. You also can enter the numerical IP address and see the associated URL.
Continue entering URL addresses or IP addresses as long as you see the chevron alone, as the nslookup command will continue to remain active.
When you want to deactivate the nslookup command and return to the C: address prompt, type exit at the chevron and hit Enter.
How to Get Started With Windows 10 Network Commands
Perhaps the best way for you to start using Windows 10 network commands is just to jump right in and try these five commonly used commands. Open the command prompt window or Windows PowerShell, as we described earlier, to test these commands.
1. IPconfig
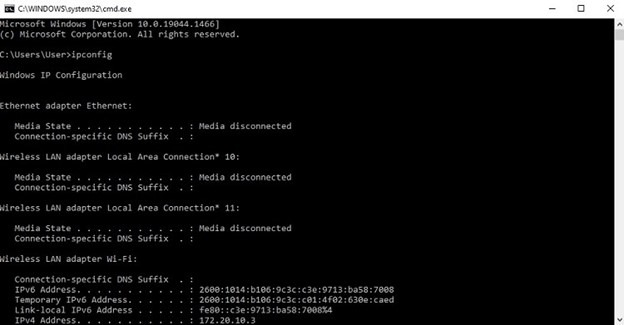
If you ever want to know what IP address your computer currently is using for its internet connection, the IPconfig command gives you this information. It also provides some other information about your network connection.
To use the IPconfig command, type ipconfig at the command prompt and hit Enter. You’ll see the IP address, the subnet mask, and the default gateway. You’ll see the status of your LAN and Ethernet connections as well.
As another option, you can type ipconfig /all at the command prompt before hitting Enter. You’ll then see the status of each network adapter in the computer, including the network adapter’s MAC address, the computer’s IP address, the IPv6 address of the computer, and the router to which the computer has a connection.
2. Ping
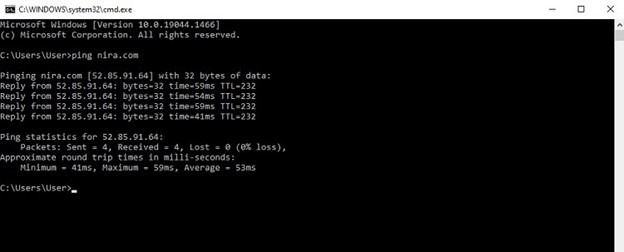
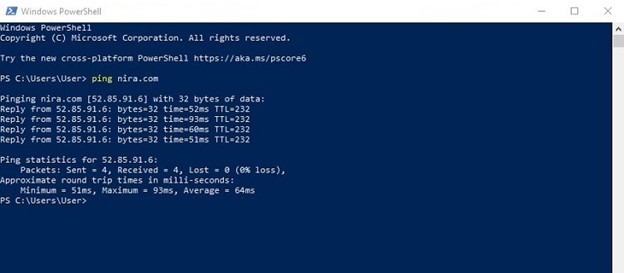
The ping command allows you to check on the status of a webpage or an IP address on a network. Ping also checks the latency of a device on the network.
Ping is easy to use, and it gives you valuable information about whether the network is operating properly.
To use the ping command, type ping at the command prompt followed by the name of a website or an IP address and hit Enter.
After a few seconds, the screen will display four lines that show the amount of time required to respond to the test request for data. The time measurement tells you how long the request took in milliseconds.
Along the bottom of the window, you’ll see a summary of the four test packets and whether any packet became lost. You’ll also see the average amount of time each test packet needed to arrive. As long as the time measurements are similar and no packets became lost, the connection is operating properly.
If the connection suffers a major error, you should see an error message that gives you a clue as to the problem.
3. Tracert
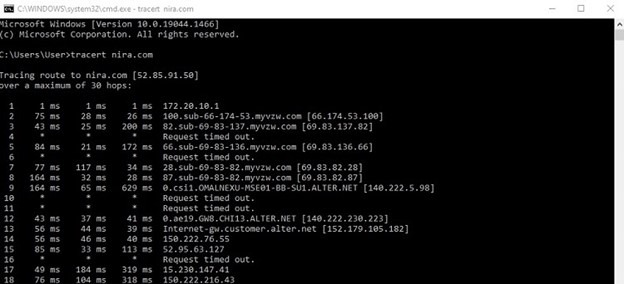
When you are experiencing problems with your TCP/IP performance, use the tracert command to try to diagnose the issue. The tracert command will create a trace for a random IP packet as it travels from your computer to its destination. Tracert is short for trace route.
At the command prompt, type tracert followed by the IP address or the website address you want to test. Then hit Enter.
The screen then will show the number of different IP addresses that the data packet is passing through before reaching the destination. It also will show the amount of time in milliseconds required for the packet to travel between each IP address.
The tracert command is useful on a large network where it may be difficult to determine whether the packets are moving properly along the destination path. If you see multiple messages that indicate the request timed out, it may indicate an issue with the network.
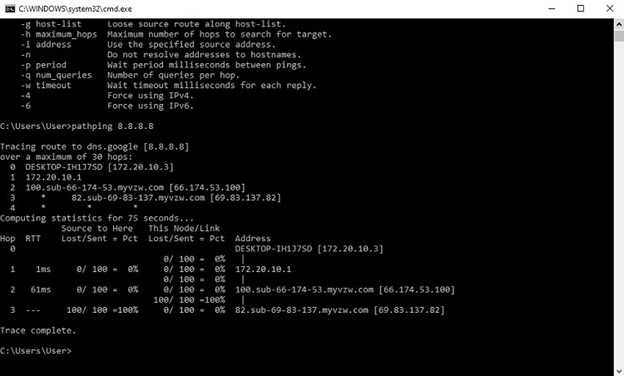
4. Pathping

For those who want more information than the tracert command provides regarding the path of a data packet, the pathping command is a good choice. It measures the performance at each step along the path. It also will tell you exactly where network latency occurred and whether any loss of packets occurred along the network.
To use this command, type pathping at the command prompt followed by an IP address or a website address and hit the Enter key.
After showing the path the data packet followed in the upper section of the command prompt window, the pathping command then displays detailed information about each step along the way. This information includes the number of dropped packets each step experienced. If one step is dropping a significant number of packets, it could indicate that the step is experiencing more traffic than it can handle and may need tweaking or replacement.
5. Systeminfo
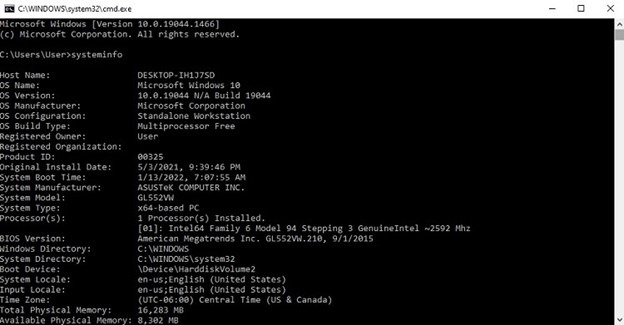
When you want to learn detailed information about the Windows 10 computer you’re using, the systeminfo command will provide this information.
To deploy this command, type systeminfo at the command prompt and hit Enter.
The command prompt window will return a wide range of information, including:
- Host name
- Windows OS version
- Product ID
- Original installation date
- System boot time
- System manufacturer
- Processors installed
- Physical memory installed and available
- Virtual memory in use and available
- Network cards installed
You can use parameters with the systeminfo command to obtain the system information about a remote computer or to see the account permissions.

