Windows 10 File Search: The Ultimate Manual
A Windows 10 file search lets you search for information on your Windows computer using the built-in search functionality of the Windows 10 operating system. Finding your files in Windows 10 is quick, and there are several ways you can do it. Our guide will detail everything you need to know.
What Is a Windows 10 File Search Anyway?
A Windows 10 search is a way for users to quickly search through their computer for a specific file or anything else they need to find, such as an app or hard-to-find setting. You’ll be able to carry out narrow searches to find particular files and even search across the web if required. It’s a simple yet powerful tool that can save a lot of time, so it’s worth using.
We’ve all been in a situation where an important file—typically one created some time ago—is needed again, but we can’t find it, whether it’s stuck inside a folder or has got moved to someplace else. Windows 10 has a dedicated feature for just that.
How Windows 10 File Search Works
Windows 10 allows you to search for content using the search tool on the taskbar. In a sense, it’s like searching for information when you use a web browser, except that it’s targeted at all the files on your computer instead.
It’s possible to search for files directly using File Explorer too. You type a keyword into the search field, and File Explorer suggests files for you based on the search term you used. The File Explorer part of the search feature was added via an update, and almost all Windows 10 users can use it right away. Both ways of searching are helpful, but File Explorer was explicitly designed to search for files.
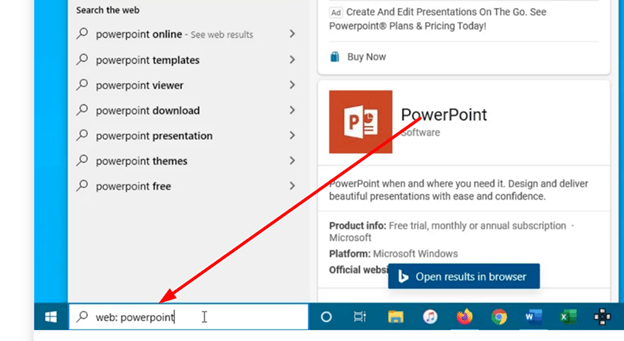
The image below shows what a general search looks like using the taskbar at the bottom of the Windows 10 OS:
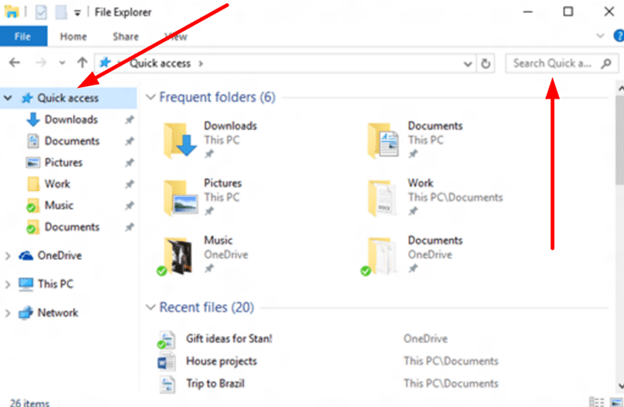
Alternatively, this is what using File Explorer looks like:
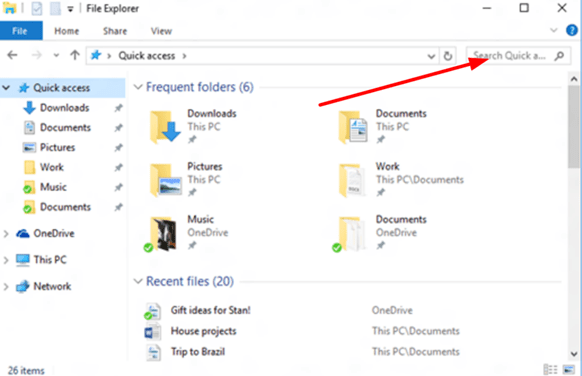
You’ll be able to view frequently used folders and recently used files to help narrow down your search using the File Explorer route. You can also search using the top right search box to narrow things down further if required.
Example #1: You Need To Find a Specific File
Let’s say you’re looking for a specific file on your computer but haven’t got the first idea of where to find it. You could try aimlessly opening up your folders and attempting to find it, true, but most of us don’t have the luxury of spending hours doing that. By using the search functionality on Windows 10, you’ll be able to quickly write in a precise search term and find what you’re looking for in a matter of minutes.
While searching for files this way won’t always bring you the results you want—it’s not a 100% guarantee—it gives you a much greater chance of finding the elusive file or at least narrowing down where you should look. Best of all, it’s built straight into the Windows 10 OS, so there’s nothing else you need to download or install.
Example #2: You Want To Check if You Moved Files and Folders to Another Device
Most of us don’t just have a single device for our files these days. Whether it’s a second computer or something more portable like an external hard drive (HDD), files get moved around all the time and then forgotten about, and down the line, that can catch us out when we need them. For instance, you might have moved some of your files that were taking up space on your central computer to another device with more room—it happens all the time.
Using File Explorer will give you a good indication of whether your files are on the device you’re using or not, and by typing in your terms, you’ll be able to narrow down your search. Employing it can save a lot of time—the trick is using the search functionality the best way you can, which we’ll look at in the next section.
How To Get Started With Windows 10 File Searching
It’s all very well just searching, but there are some key steps you can take to maximize your chances of finding what you need.
Step 1: Understand the Difference Between Searching From the Taskbar and Searching with File Explorer
We mentioned earlier the two main ways of searching for your files using the Windows 10 OS, and it’s important to understand how to do both.
Method 1:
To start and perform a regular search from the taskbar, you need to click on the bar at the bottom of your screen on the left-hand side where the magnifying glass icon is, like so:
Keep in mind that this search bar sometimes gets hidden, and only the magnifying glass icon will show up—in that case, you need to click the icon itself.
After doing that, type in the name of a document or a few keywords you think might help locate the file. Under where it says best match, you’ll see the most relevant results for documents across both your PC and in cloud storage via OneDrive. That’s it for the first method.
Method 2:
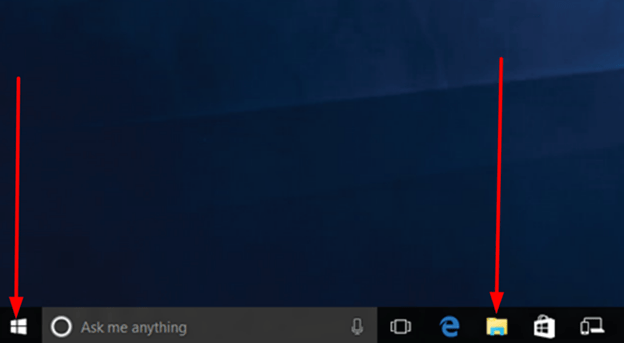
The second way of file searching is via File Explorer. To do so, open up File Explorer from the taskbar—click the folder icon—or right-click on the Start menu, as shown below:
Either way, you’ll end up looking at the File Explorer, which will list your most recent files, like so:
Both ways to search have their advantages—for example, the File Explorer method is frankly a bit easier to learn, but the taskbar method allows you to search more thoroughly and customize your searches, as we’ll see in the next step.
Step 2: Learn How To Search by Categories
The menu that appears using the first search method features several categories, from Email and Web to Apps and Documents. There’s even a drop-down menu that includes Folders, People, Settings, and more. By clicking on a category, you’re helping filter down the results and make the search process more manageable. Here’s what it looks like on the Windows 10 OS:
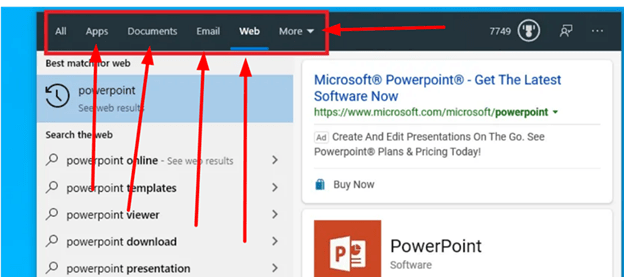
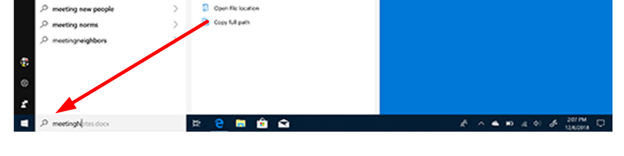
In this case, as we’re using the search feature to find files, we want to click where it says Documents. From there, the search window shows you the direct results in two different panes. The first pane shows the documents found, and the second on the right shows you more details about a particular document, including the last time you modified it, the author, and the file’s exact location. Here, we can click on the document to go straight to the document’s location or copy its path.
You can also speed things up further by typing the category into the search box yourself. To do so, just type the category name, followed by a colon and some chosen keywords, like so: documents: business invoice for October. This is a powerful and flexible way of searching for specific apps, settings, and emails, too, so it has multiple uses.
Step 3: Learn How To Change Search Settings and Control Your History
Sometimes we need to control our search to ensure it has the best chance of finding what we need. The good news is that you can actually adjust the search settings yourself, and it’s easier to do than you might think.
Using the taskbar search method again, we need to click on the search box and then the three-dot icon in the top-right corner. From there, we need to click where it says Search settings. Doing so will take you to a new page that looks something like this:
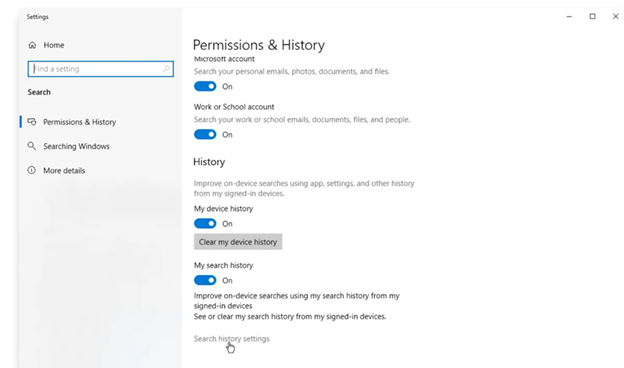
We can customize the search results to include or exclude adult content on this settings page and choose from strict, moderate, or no filtering options. We can also adjust our Cloud content search, deciding whether we want to include content from Outlook and OneDrive during our searches or not.
Perhaps most significant of all is the ability to adjust our search history. You can choose whether Microsoft collects certain information related to searches or not and can fully disable Windows from viewing your device and search history altogether. As an extra, you can also view and clear any search history you have with Bing. Finally, under where it says Searching Windows, we are able to exclude specific folders from our search.
Step 4: Know Your Windows 10 File Search Best Practices
By now, you’ll have a good understanding of Windows 10’s file search functionality, the two primary methods to carry it out, and just how useful it can be. With that said, we’ve listed some best practices to help you get that little bit more out of your searches:
- Keep in mind that libraries won’t show up in File Explorer unless you want them to. Select the View tab > Navigation pane > Show libraries to add libraries to the left pane. Libraries are groups of stored content and do not replace your folders—they are handy to have around. Quite a few of the more helpful search options get hidden away and stay out of sight, so spend some time exploring to improve your searches on Windows 10.
- Most of the time, you won’t know the exact file name of what you’re searching for but might know part of it—that’s to be expected. Something worth using here is what’s called a “wildcard syntax.” A wildcard syntax is a symbol, typically a * or ?, that takes the place of an unknown character or set of characters. For example, “c?mp” matches both “camp” and “comp.”
- Using File Explorer, you can resize the search box if you find it’s too small—by default, it will be for most users. To do so, move your cursor to the box’s left edge until it turns into an arrow with two heads on either side, then click-and-hold while dragging to the left or right.
- When using File Explorer, you can type in any of these date-related parameters in the search bar before a query: date, datemodified, dateaccessed, datecreated, and datetaken. Be sure to include the colon at the start, or the search command won’t work.
- If your content gets indexed in advance, your computer can return your search results much faster, regardless of how you search. You can adjust indexing options under the Searching Windows tab under Search settings. The first time Windows runs the indexing process, it can take a few hours to complete, depending on the amount of data, so we don’t recommend doing it until you have a quiet moment and time to spare.
- When you perform a File Explorer search, the Search tab appears on the ribbon, providing access to numerous search tools that get grouped in different sections. These tools include the ability to search subfolders, by date modified, see recent searches, save your search, and even search by file size alone. For the latter, you can click on any of the values in the drop-down menu to choose a size range to search by—this goes up to 4GB and beyond.
- It’s best to use descriptive file names to help out your future searches whenever possible. Windows 10 can support file names up to 260 characters long, which is far lengthier than previous versions could, so make good use of it. Tagging your documents also helps, and adding category and subject metadata tags improves the results of a search.
- If you’ve had a lot of trouble finding a particular file or folder, it’s best not to leave it like that, as you may struggle again in the future. Instead, move and rename the file after finding it—you may want to move it to a related folder for easier access. Having a hard drive or USB memory stick dedicated to specific files and folders can help keep things organized.

