How to Track Changes in Word
In the old days, every time I submitted a report to my boss, it came back with crossed paragraphs and a ton of feedback with his red pen.
This meant I first had to figure out his handwriting and then redo the whole thing.
So it’s understandable why I love the track changes option in MS Word.
When it’s turned on, every comment, feedback, or change to your document is tracked and displayed clearly.
If you accept the changes, they instantly become apart of your document. If you reject them, your document goes back to its original form.
In this article, I’ll tell you how to track changes in Word and the ways you can utilize this option.
Keep reading.
What Is ‘Track Changes’ In Word?
Track changes is an editing feature in Microsoft Word which allows you to track, monitor, approve, and reject any changes to your documents.
It’s a useful feature for writers, editors, students, corporate professionals, or anyone who regularly works on documents with multiple stakeholders.
For example, if you write an article in MS Word, enable ‘Track Changes’, and send it for review to your editor, this is how their feedback will appear in your document.
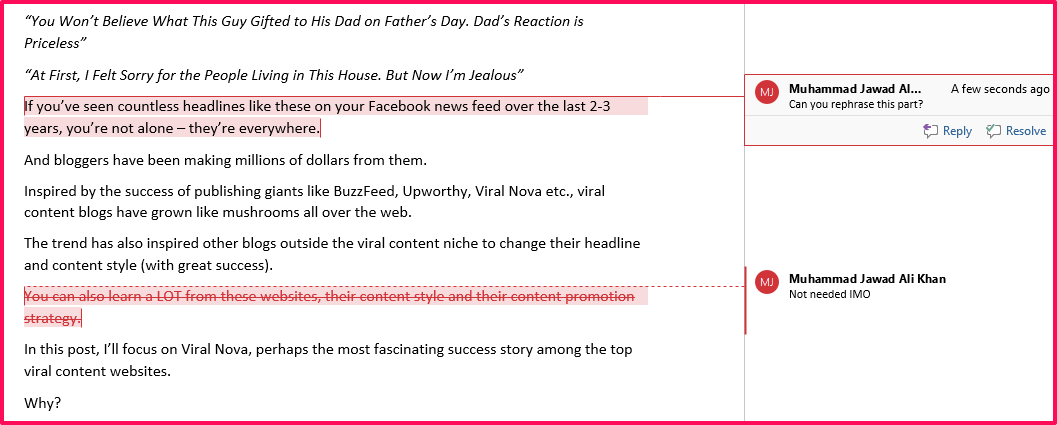
Every change to the original version of your document is highlighted, along with any comments from the editor. You can respond under each comment to share your perspective or click on the Resolve button to close the comment thread.
If multiple users edit your document, their changes are highlighted in different colors so that you can easily identify them.
You have the choice of approving or rejecting the changes with a single click.
In short, with ‘Track Changes’ in Word, no one can permanently change anything in your documents without your approval.
How to Turn On Track Changes
You can easily track changes in Word by following these steps.
Step #1: Open MS Word and go to the Review tab in the main in the top menu.
Step #2: Go to the Tracking section and click on Track Changes to start tracking changes to your document.

Step#3: If you want to disable the Track Changes option, click on the Track Changes button again to turn it off.
Step #4: You can choose how the tracked changes are shown in your document from the display menu next to the Track Changes button.
You have four display options
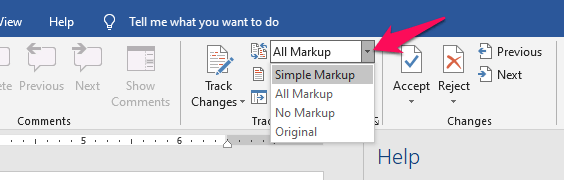
Simple Markup: This is the default option in which you see the updated version of your document with small red lines showing where the changes are made.
All Markup: In this view, the changes are visible and highlighted in different colors for different users.
No Markup: In this view, you only see the changed version of the document without any indication of where the changes are made.
Original: In this view, you see the original unedited version of your document.
That’s it, all changes to your document will now be tracked.
How To Prevent Other Users From Turning Off Track Changes
If you enable Track Changes in a document and share it with other users, MS Word will show you any changes that they make to the original content.
But what if they disable Track Changes and change your document?
That’s a real possibility.
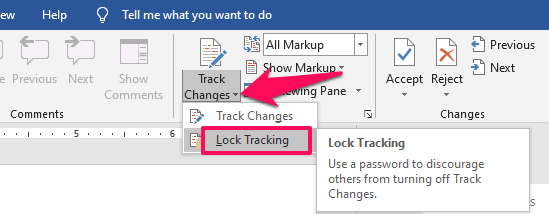
But you can easily avoid it by using the Lock Tracking option. When you enable Lock Tracking, other users will need to enter the password that you’ve chosen to disable Track Changes.
If they don’t have the password, they can’t disable Track Changes.
Here’s how to do it.
Step #1: Go to the Review section in the top menu of MS Word.
Step #2: In the Tracking section, click on the small arrow next to the Track Changes button.
Step #3: Click on Lock Tracking.
Step #4: Choose a unique password and re-enter it in the next field.

Step #5: Click on Ok to set your password and enable Lock Tacking.
That’s it! No one can disable Track Changes in your document without the password. So only share it with the people you trust.
The Keyboard Shortcut Key For Track Changes
If you’re a shortcuts guy like me, you can easily enable and disable Track Changes with the following keyword shortcuts.
Enable/Disable Track Changes: Press CTRL+Shift+E to directly enable Track Changes from your keyboard. Use the same shortcut again to disable this option.
Enable/Disable Track Changes (Alternate Shortcut): You can also enable and disable Track Changes with an alternate keyboard shortcut, ALT+R+G, G.
Enable Lock Tracking: To enable Lock Tracking press ALT+R+G, L.
How To Show/Hide Comments And Tracked Changes
There are three different ways you can choose to view the comments and changes made by other users to your document.
The default setting in MS Word is to show all the changes and comments by other users in separate balloons in the margin of your document.
I like this view because it shows you both the changed text and the comments by users together. This makes it easier to review the changes.
But you have three other options as well.
Display All Changes Inline
In this view, all the changes to your content will be displayed inline (in your document) instead of balloons in the document margin.
The deletions are shown with strikethroughs and any additions to the content are shown in different colors for every user.
The comments are shown in the document margin next to the changed part.
Here’s how you can choose this view.
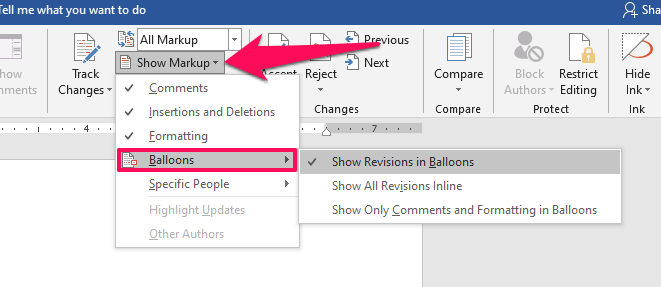
Step #1: Go to the Tracking section in the Review tab.
Step #2: Click on Show Markup next to the Track Changes button to display the dropdown menu.
Step #3: In the menu, go to Balloons→ Show all revisions Inline
In this view, you can also view the comments by hovering your mouse pointer over the changed text.
Display Changes By Reviewer
Let’s say three different people edited your document but you want to see the feedback from only one of them.
Using this option, you can choose to view the feedback from specific users.
Here’s how to do it.
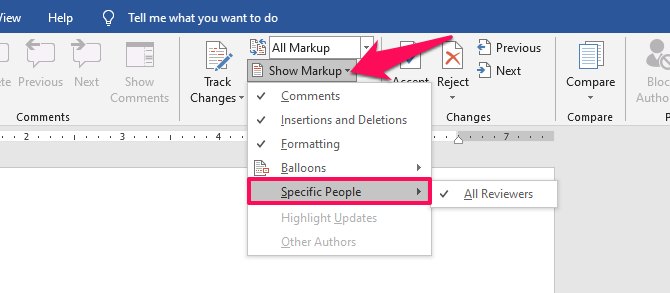
Step #1: Go to the Tracking section in the Review tab.
Step #2: Click on Show Markup next to the Track Changes button to display the dropdown menu.
Step #3: In the menu, go to Specific People → Choose your desired user.
Display Specific Changes
Edited documents usually have multiple types of changes like comments, additions or deletions, or formatting changes.
If you want to view any specific type of change, use this option.
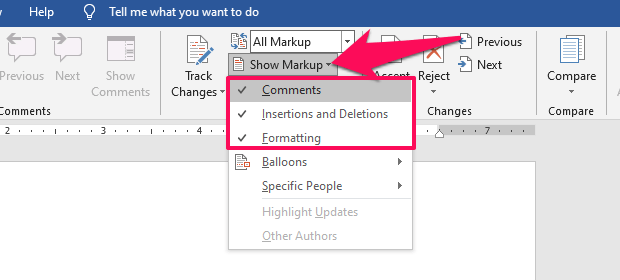
Step #1: Go to the Tracking section in the Review tab.
Step #2: Click on Show Markup next to the Track Changes button to display the dropdown
Step #3: Choose the change types you want to see. By default, all three change types are selected.
Review And Hide Comments And Tracked Changes
Once you’ve received feedback from different users, it’s time to review and approve/reject the changes to prepare the final version of your document.
There are three different ways you can review and manage the tracked changes in your document.
Use The Reviewing Pane To Manage Tracked Changes
The Reviewing Pane in Word is a useful tool for managing and reviewing all the changes to your document in one place.
It gives you a summary of all the changes made by different users along with their comments.
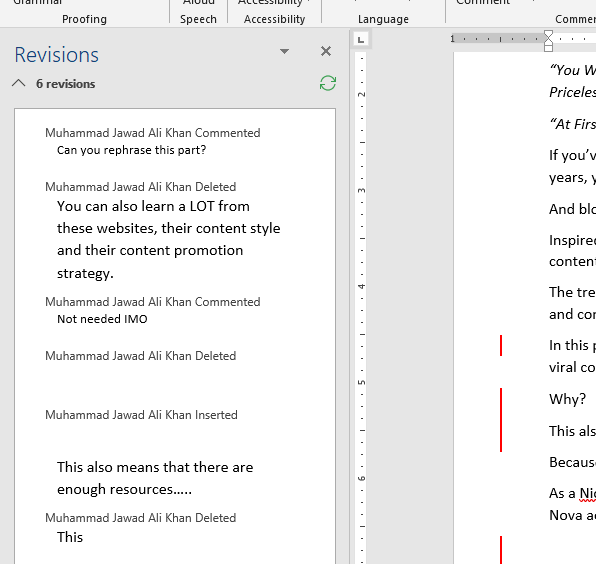
To approve or reject a change or to resolve a comment, just right click on it in the Reviewing Pane and choose the action you want to perform.
Reviewing Pane is also a useful tool in ensuring that no tracked changes are left unresolved in your document.
You can enable it from Review → Tracking → Reviewing Pane
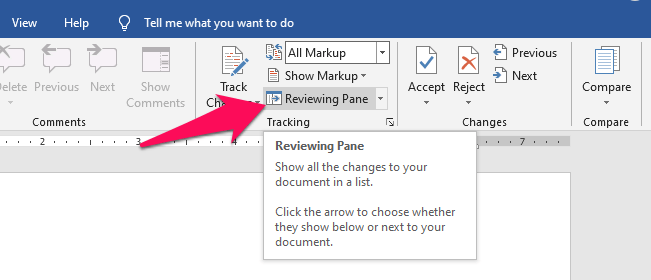
You can also choose the vertical or horizontal view for the Reviewing Pane.
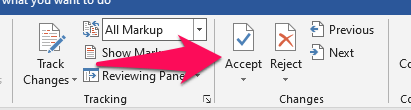
Review Tracked Changes By Sequence
You can also review and manage the changes to your document one by one in a sequence.
Here’s how to do it
Step #1: Go to Review → Changes
Step #2: Click on Next to highlight the next change inline
Step #3: Choose Accept or Reject
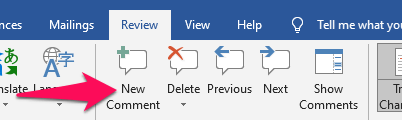
Step #4: To manage user comments, go to Review → Comments
Step #5: Navigate between the comments using the Previous and Next buttons.
Step #6: Continue doing this until all the changes and comments are resolved.
Review Tracked Changes By Reviewer
You can use the Reviewing Pane or the sequential review method for individual reviewers as well.
Just choose the specific user view as I described earlier and choose the Reviewing Pane or sequential review method. This time, you’ll only see the changes and comments by specific users.
Resolve all of them and move to the next user.
How To Hide Tracked Changes When Printing
If you print a document with Track Changes enabled, all the comments and changes will also be printed with it.
Even if you hide them in the document, they will appear in the print version.
There are a couple of ways to resolve this.
- Accept/Reject all the changes and resolve all the comments as I’ve described earlier.
- Or disable the Print Markup option from Print Settings
Here’s how to do it.
Step #1: Go to File → Print → Settings
Step #2: In the Settings menu, scroll down and uncheck the Print Markup option.
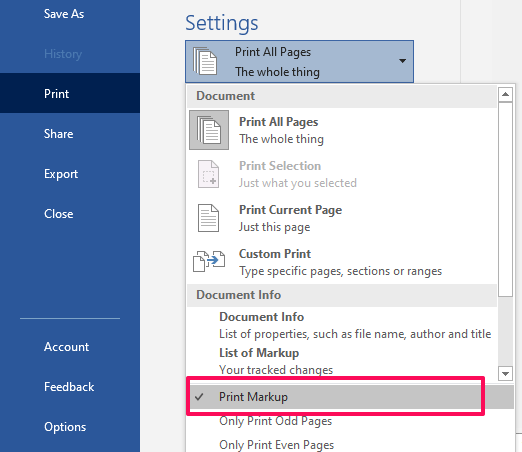
Now your printed document won’t show the changes by other users.
Best Practices for Using Track Changes
Here are some of the best practices for using Track Changes in Word.
– Make sure Track Changes is turned on before you start editing a document or sending it for peer review.
– Use the Lock Tracking feature if you’re sending your document to someone you don’t trust.
– The Reviewing Pane is the best way to view all the changes and comments to your document.
– Before finalizing a document, use the Accept All feature to incorporate all the changes to your document.
– Make sure you’ve resolved all the comments before finalizing it.
Why Track Changes Aren’t Showing
Sometimes users can not see tracked changes in Word despite enabling it in their document.
In most cases, the changes are tracked but are not visible because of your document settings.
Here’s what you should do if you’re facing this issue.
- Make sure that all the change types are selected in your document settings. You can do it from Review → Tracking → Show Markup. In this menu, choose all the change types if they’re not already selected.
- Sometimes users can’t see the changes because of the wrong markup type. Go to Review → Tracking and make sure that “Simple Markup” is selected in the display markup menu.
- The changes to your document will only be tracked AFTER you enable the Track Changes option. Any changes before enabling it, won’t be tracked. So make sure you’ve enabled this option from the start.
Who Should Use Track Changed In MS Word
Track Changes is a super useful feature for all kinds of users but the following professionals use it most frequently.
- Professional Editors
- Writers and Authors
- Bloggers
- Marketers
- Corporate Professionals
- Teachers and Academic Professionals
- Researchers and Educationalists.
Are You Ready To Track Changes In Word?
Track Changes is an easy-to-use feature in MS Word that makes editing and monitoring documents a breeze, especially in collaborative projects.
Whether you’re giving feedback on a project or seeking input on your own work, using Track Changes will help you save time and edit your documents without losing their original form.
Plus, the different display views and reviewing options in Word make it a complete editing solution.
Let me know if you have any questions about it.

