A Real Retrospective Example That You Can Copy
Recently, the FYI team was proud to launch the largest-ever directory of the best free product management templates and resources on the web. And it was a huge success.
Why?
In part because we product geeks are always on the hunt for templates and wanted easy access to them in one place. Also, because we’re always iterating like crazy to make FYI better for our customers, who ask us for resources all the time. It was a no-brainer.
But we knew this would be a living, breathing collection we’d need to update regularly, which we wouldn’t be able to do without arguably the most important part of our iteration process: productive retrospectives.
I’m pretty passionate about the power of retrospectives and have written before about how to get them right. Today, I want to share with you a particularly lucrative meeting that led us to expand our collection into a complete one-stop-shop that users found even more useful. If you want to get value from your own retrospective meetings, this is a good example to copy.
And having hosted and learned from a fair share of retrospectives over the years, I can tell you what works and what doesn’t.
Let’s start with a proven meeting format, which we adapted from the industry-standard model published back in 2006:
- Set the stage
- Gather data
- Brainstorm ideas
- Pick a solution
- Close with purpose
I’m going to break them down to the finer details–using our own meeting as an example–so you know exactly what to do. No need to follow this retrospective example to the letter, but feel free.
A quick note: ours was a lean 30-minute meeting. It might take some getting used to, running through everything this quickly, but I find the time crunch forces us to get more done in less time. And we’re quite a small team. You can always scale each step to your own time if you need more–for a larger team or to include fun team-building exercises, for example.
Ready to get down to it?
What you need
- Whiteboard (or for remote teams, a virtual corkboard like Lino)
- Markers
- Sticky notes, three colors
- Camera
- Timer
Before the meeting
A few important tips on prep:
- Invite the right folks. Everyone on the team gets a seat at the table, but I’ve seen some teams make the mistake of including managers. That can add pressure to the situation. Skip managers, but do invite stakeholders from other teams if necessary.
- Appoint the right scrum master. They should be someone who is close enough to the project to be able to address relevant questions and prioritize good solutions while remaining judgment-free and facilitating open discussion. I find it helps to appoint a new scrum master for each meeting to give folks a chance to share leadership.
- Decide on your exercises and activities in advance and set up your whiteboard as necessary. Below you’ll see the exercises we did in our meeting but I’ve also included a few alternatives, which you can refer to in this post. Again, it’s important to switch these out from time to time to keep your meetings interesting.
- Acknowledge and thank the team as they arrive. A little recognition for dedicating their time goes a long way to making attendees feel like valued contributors to the meeting. Oh, and give them a bunch of sticky notes each.
Now for the complete agenda. I’ve distilled the instructions into templates your scrum master can steal (because templates. I warned you I love them).
Step #1: Set the stage (5 mins)
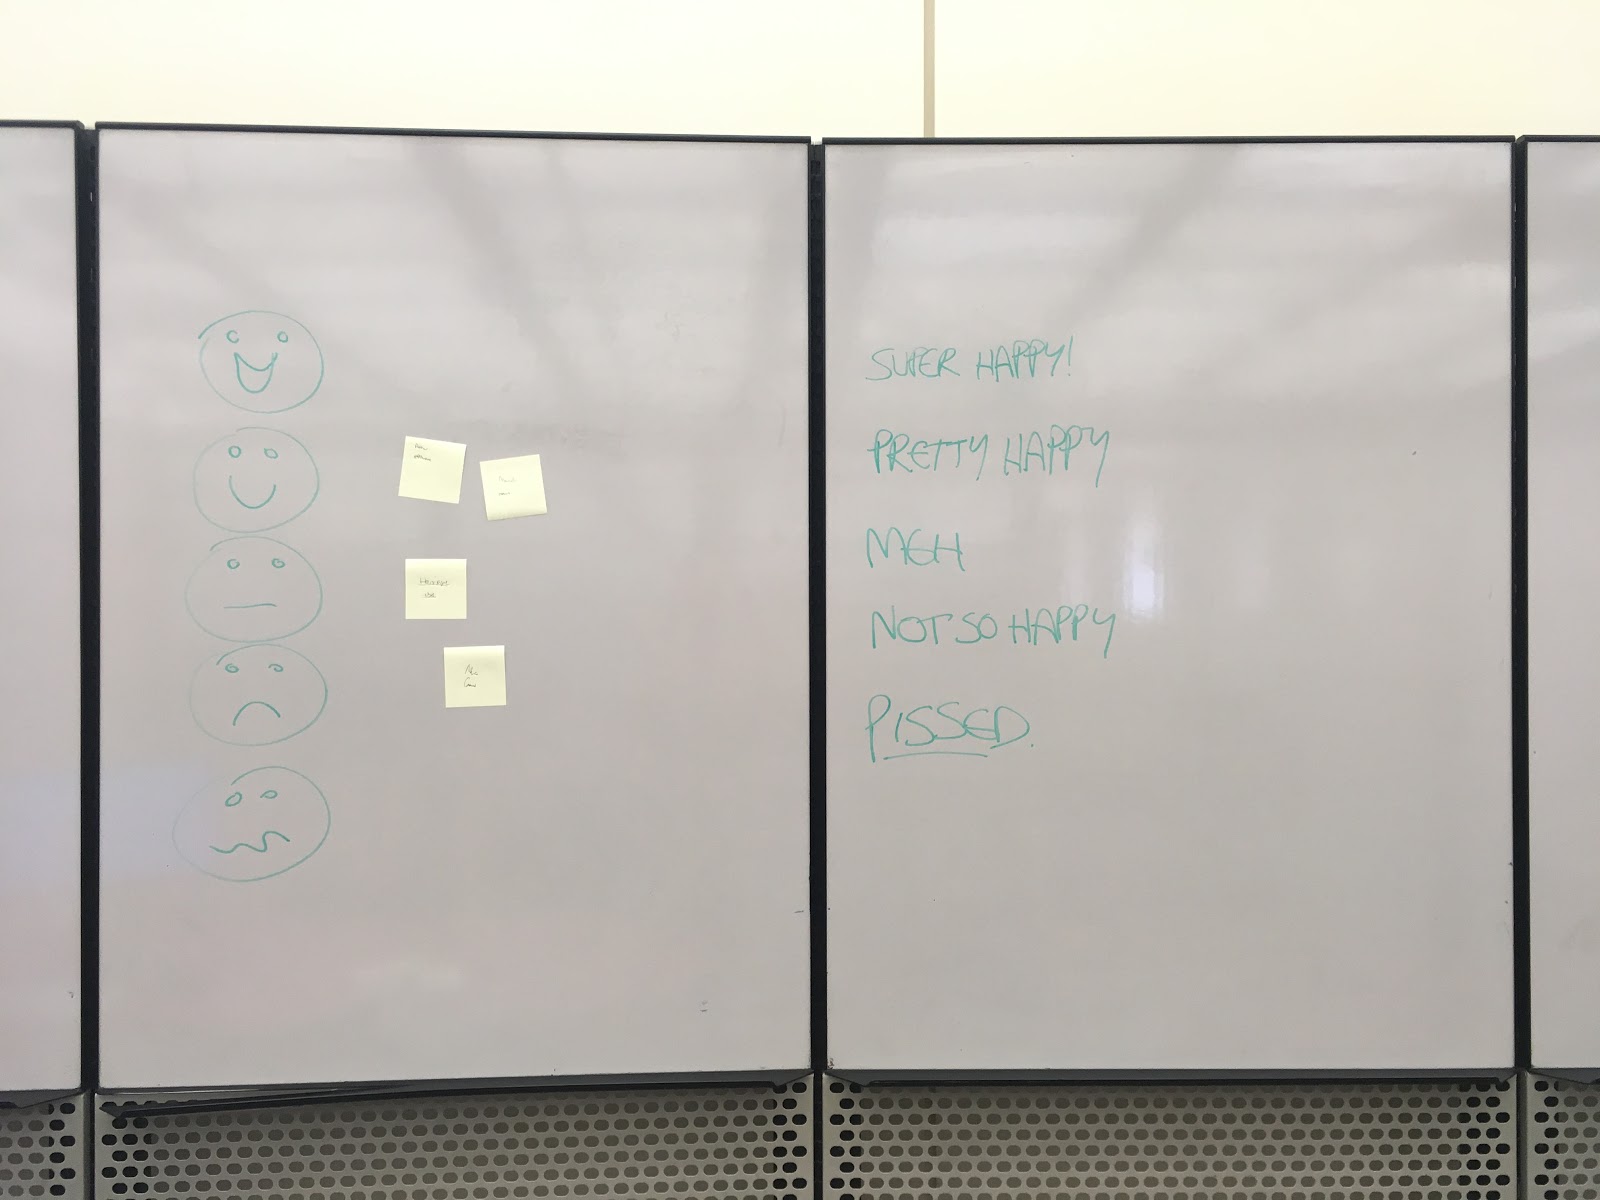
The first few minutes of your retrospective meeting are about setting expectations and getting the team warmed up. A low-stakes exercise can help. For this session, we borrowed consulting company Crisp’s Team Happiness, an exercise I love for gauging the overall mood of the room.
Prep
On the whiteboard, draw five smilies ranging from happy to sad, and if needed, the scale for reference:
- This sucks! I want out.
- I’m not so happy right now.
- I can live with this, but many things need fixing.
- Pretty happy, but I think some things need fixing.
- Super happy! I wouldn’t change anything.
How?
- Run through the agenda for today’s session, including your chosen exercises, and then your minutes from the last session. (2 minutes)
- Based on any outstanding action points or pressing issues, identify goals for the session. Write them on the whiteboard. (1 minute)
- Optional: A warm-up exercise. For Team Happiness, we asked everyone to add stickies to the board indicating how they felt about their part in the sprint. The sticky notes included their name and their area of work. (2 minutes)
Why?
The point of this sort of exercise is to identify sticking points and who needs help. You might even start to see patterns in areas experiencing the most problems and start thinking about how to make the team happier and the project more successful.
Observations
Turns out we did find a pattern. The team had been getting resource suggestions from users outside our target market (product) and were struggling to categorize them in a way that made sense. This provided a quick first impression of a problem more prevalent than we thought.
Tips
- We kept things non-anonymous because our team encourages judgment-free openness, but you can anonymize if it makes the team more comfortable. Comfort is everything in retrospectives.
- We also kept the exercise specific to the sprint in question, but you can add other dimensions to your happiness index (like company or team) to get a broader sense of team morale. Crisp explains how.
- Throughout the meeting, take photos of the whiteboard before moving on. Not just to store for reference, but also to track trends over time.
Other Retrospective Examples
Other exercises you might want to try include Car Brand, ESVP, One Word, and Mad, Sad, Glad. Or you could simply go around the room and have everyone explain briefly what they hope to get out of the session.
After adding names, your whiteboard should look something like this:
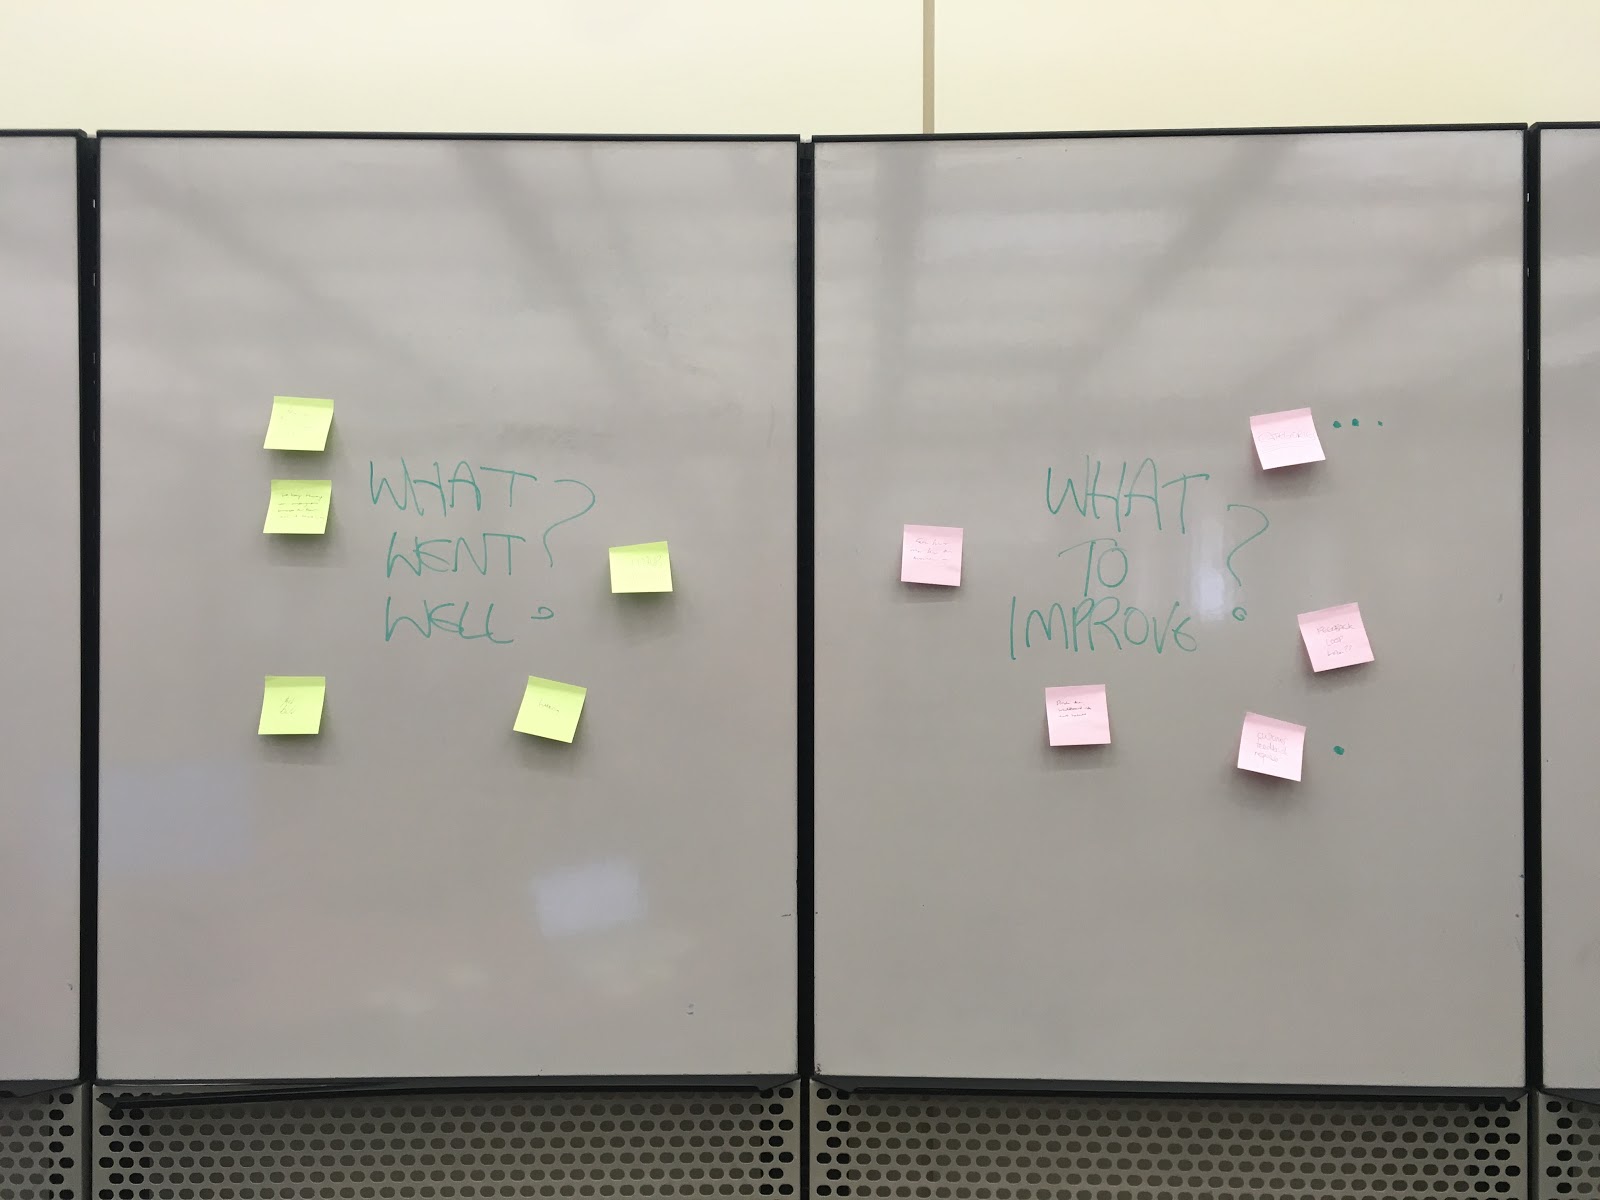
Step #2: Gather data (10 minutes)
Here’s where you start to paint a picture of the sprint you just completed, collecting data on its results. Choose an exercise that gets people thinking about what went well and what needs improving.
Use stickies of two colors for an easy visual of the good and the bad. Then add a dot vote:
Prep
Divide the whiteboard into two halves. In the middle of one, write “What went well?” and in the other, “What to improve?” Leave plenty of free space around each header for mind mapping.
How?
- Give the team some time to brainstorm as many items as they can think of, good or bad, and to stick them under the appropriate header. One item (plus context) per sticky. (3 minutes)
- Take a few minutes to congratulate individuals on their wins, noting down anything to discuss with them in more depth later (results, learnings to take forward, etc.). (5 minutes)
- Now turn to “What to improve?” Ask the team to nominate the top three problems they want to solve through a simple dot vote (everyone marks a dot next to their chosen problems). Tally up the results. (2 minutes)
- Take a photo and remove all but the top one or two problems.
Why?
It’s important to start with achievements to kick things off on a positive note, but also to gather as much intel as possible on key areas for improvement. This step takes the biggest chunk out of your meeting because discovery, reflection, and recognition all deserve serious time.
Observations
Things can get messy! We used a timer and tried to concentrate on only the most significant issues to keep our brainstorm focused. In this case, we’d already identified the problem, so used this step to gather more context.
Tips
- If a larger team, you can also focus your brainstorm by restricting folks to two stickies each (one per header). Ask the team: If you could make only one observation about what went well and what didn’t, what would those be?
- On the same vein, the fewer problems to address, the better. One per retrospective is best practice. Only pick two if they’re equally significant. Any more than that, and you’ll overwhelm the team.
- I’ve found some people need prompts on the kinds of items to add. Add a few ideas to the board: action items and results, decisions made, milestones achieved, new technologies implemented… and anything else relevant to your sprint.
- Sometimes ideas for action points come to the fore naturally at this stage. Make a note of those for the next step.
- The context added to each item will also inform the next step, so ask the team to be as specific as possible about why things went well/not so well.
Other Retrospective Examples
Letters to the Future and The 4 Ls are also good exercises for starting this thought process.
Step #3: Brainstorm ideas (5 minutes)
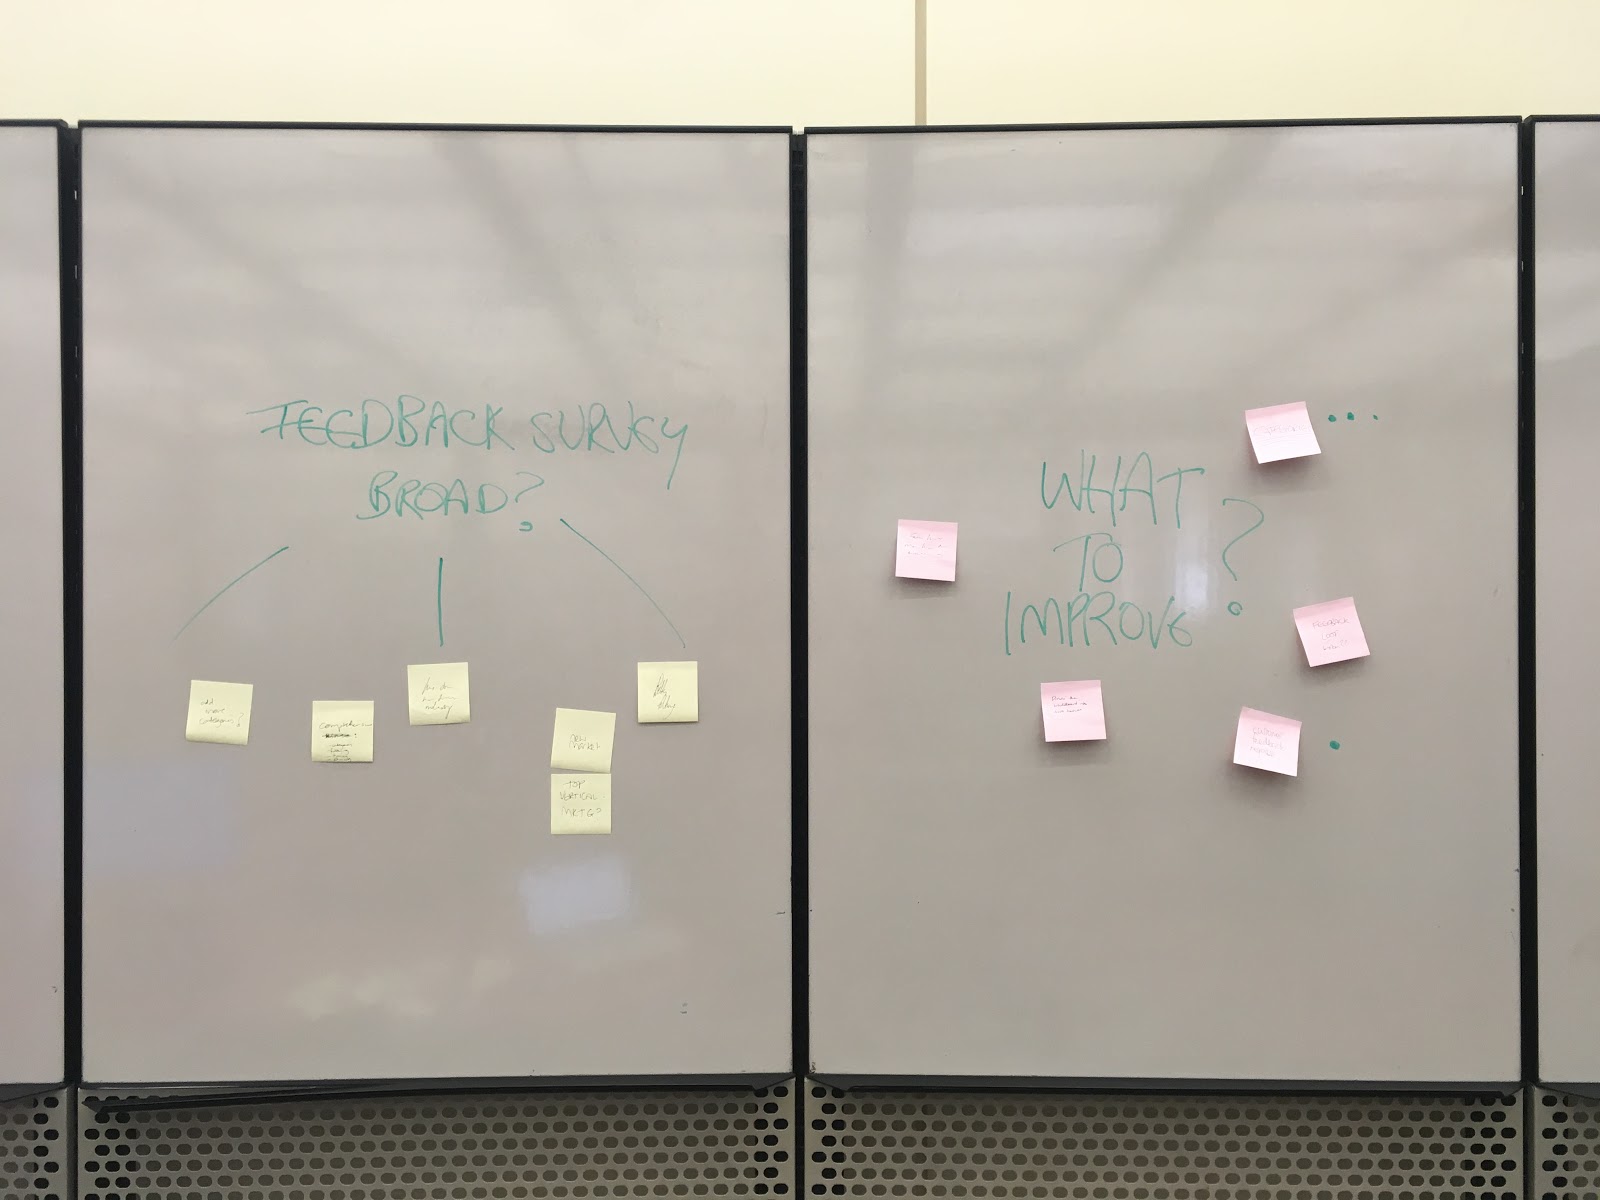
This stage puts data into context, focusing specifically on what needs improving and linking cause to effect. Choose an exercise that helps unearth the root cause of your top problem(s).
Prep
Your whiteboard is ready with your top problem(s). Ready your troops with sticky notes in a third color.
How?
Start a discussion to go deeper on the problem (2 minutes). This is where a lot of teams use 5 Whys, which in my experience can be overkill. We made do with two:
- Why did we get so much unexpected feedback? Because our feedback survey is too broad.
- Why is the feedback survey broad? Because we want to provide the most comprehensive resource out there.
Write your findings on the board. Based on the final level of your Why analysis, have the team brainstorm as many potential solutions as possible. (3 minutes)
Why?
Digging deep ensures your solution prevents the same problems from happening again. And doing it together achieves a common understanding of the problem.
Observations
Why analyses can be equal parts insightful and hilarious when you have meatier problems to dissect. But I found that ours needed only two levels of analysis to reveal the gold. That extra level made all the difference–if we’d stuck with one, the solution might have been to narrow our focus, which would have violated the tool’s original purpose.
Tips
- Remind folks to brainstorm solutions not to the superficial problem you identified originally, but to the root cause you identified in your analysis.
- Also assure them that at this stage, there are no right or wrong answers. Jot down any and all ideas that come to mind. You’ll narrow down and refine them later.
- The most valuable ideas lead with outcomes. Ask folks to first consider what success looks like. Then, how do you get there?
- This is where finger-pointing can become an issue if you’re not careful. Scrum masters: be ready to intervene.
Other Retrospective Examples
Mad, Sad, Glad also works well here, by providing emotional context. Fishbowl Conversation allows everyone equal input if you have more time to play with. Or go ahead with 5 Whys if it works for you.
Step #4: Pick a solution (5 minutes)
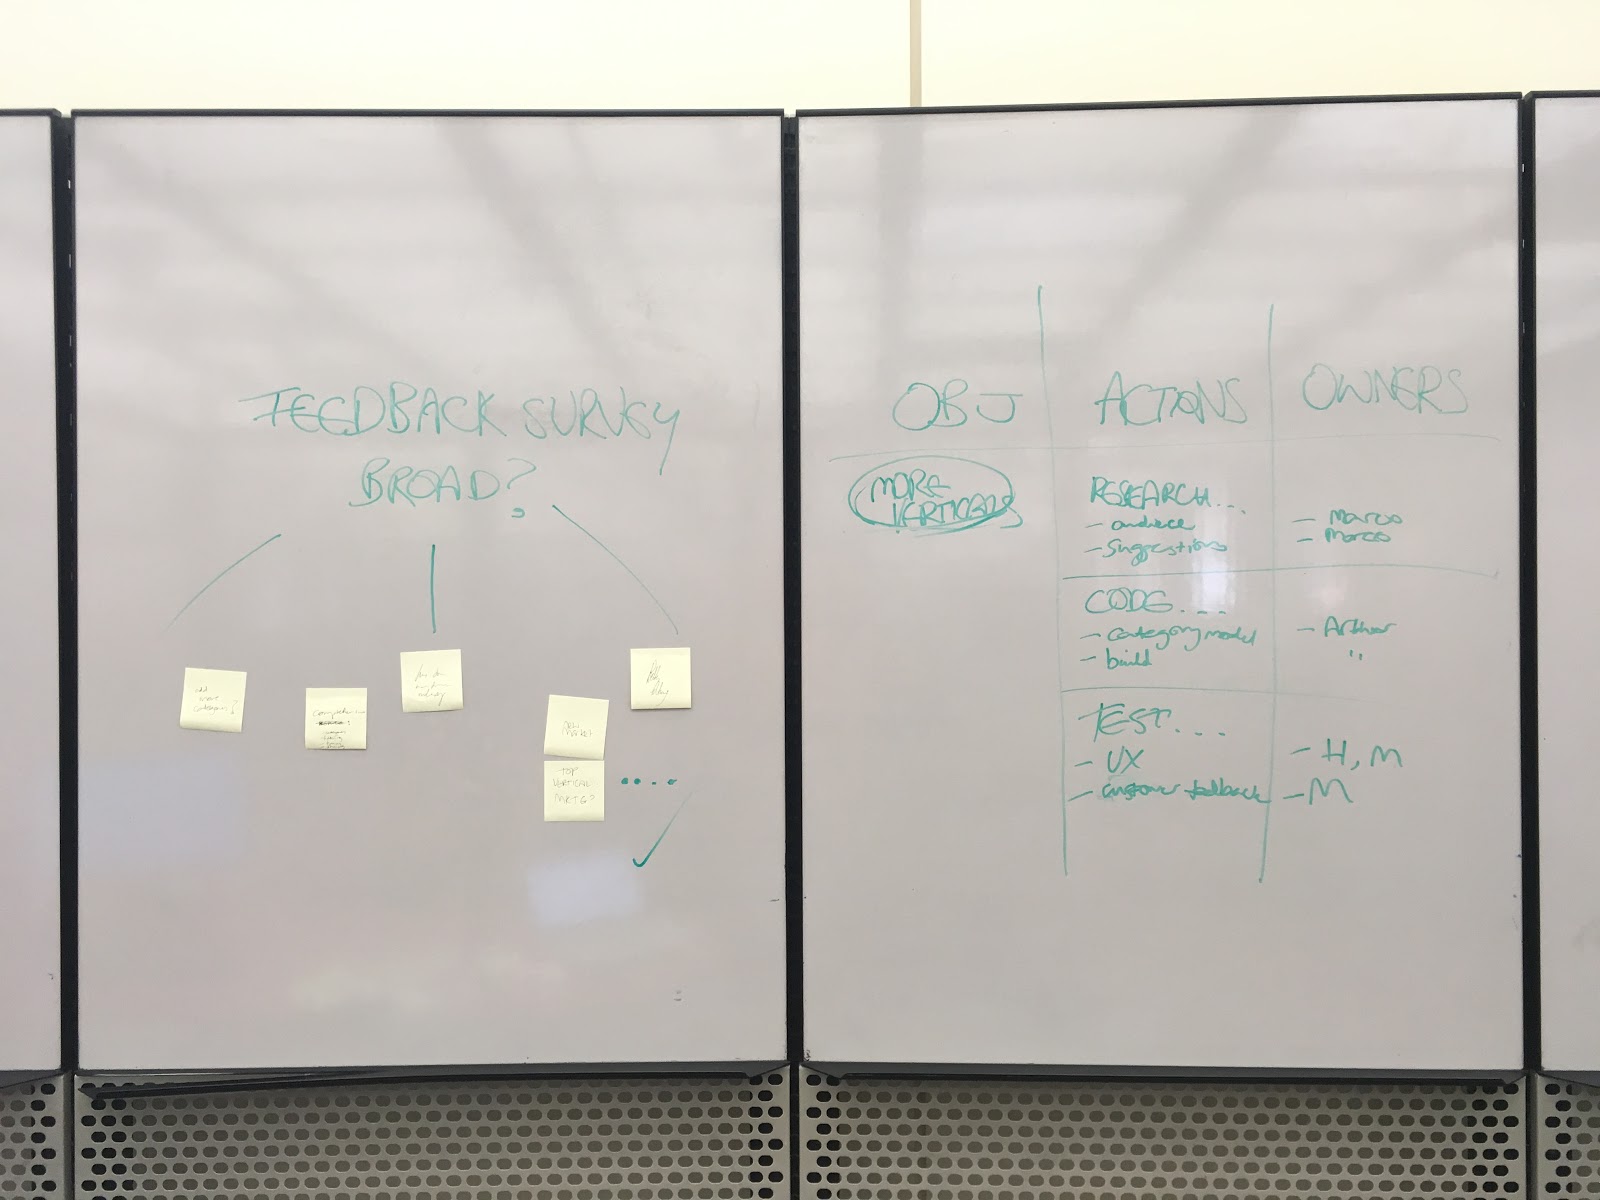
At this point, you simply narrow down your handful of ideas to a few workable solutions to try. Choose an exercise that aids the decision-making process. Here’s what a quick action plan looks like:
Prep
On another area of the whiteboard or a separate Flipboard or a projected Excel sheet, create a table with three columns: Objectives, Actions, Owners.
How?
As a team, look at your solution brainstorm with a critical eye and assess which ideas are most actionable (2 minutes). A few key questions we asked ourselves to decide:
- What changes need to be made in order to implement this solution? Can we make them?
- Do we have the resources?
- How long will it take to implement this solution?
- Can we easily measure its progress and results?
Again, hold a dot vote to prioritize one to three solutions. Add these under the Objectives column of your table. (2 minutes)
As a team, break down your objective(s) into specific action points and decide who will take responsibility for each. (1-2 minutes)
Why?
The idea is to turn ideas into solutions and solutions into concrete actions. Without concrete steps, solutions can seem abstract and aren’t easy to assign or measure.
Observations
Of all the decision-making models out there, I’ve found dot voting to be the quickest and most effective for rapid-fire retrospectives like this. That’s all it took to decide that our best route was to add categories for more verticals.
Tips
- Seriously–take no more than three solutions into your next sprint. For the same reasons as above. Too many solutions generate too many tasks and (when you can’t complete them all) disappointment.
- On the other hand, you can go wild with action points. The smaller or more granular, the easier they are to implement and the less likely they’ll lead to disappointment.
- Do take a thoughtful, data-driven approach to assessing solutions rather than jumping to a decision right away. Your first instinct might not be the most logical.
- Feel free to come up with your own questions for evaluating solutions, or use the trusty SMART framework below.

Other Retrospective Examples
Check out MindTools for other decision-making techniques and exercises.
Step #5: Close with purpose (5 minutes)
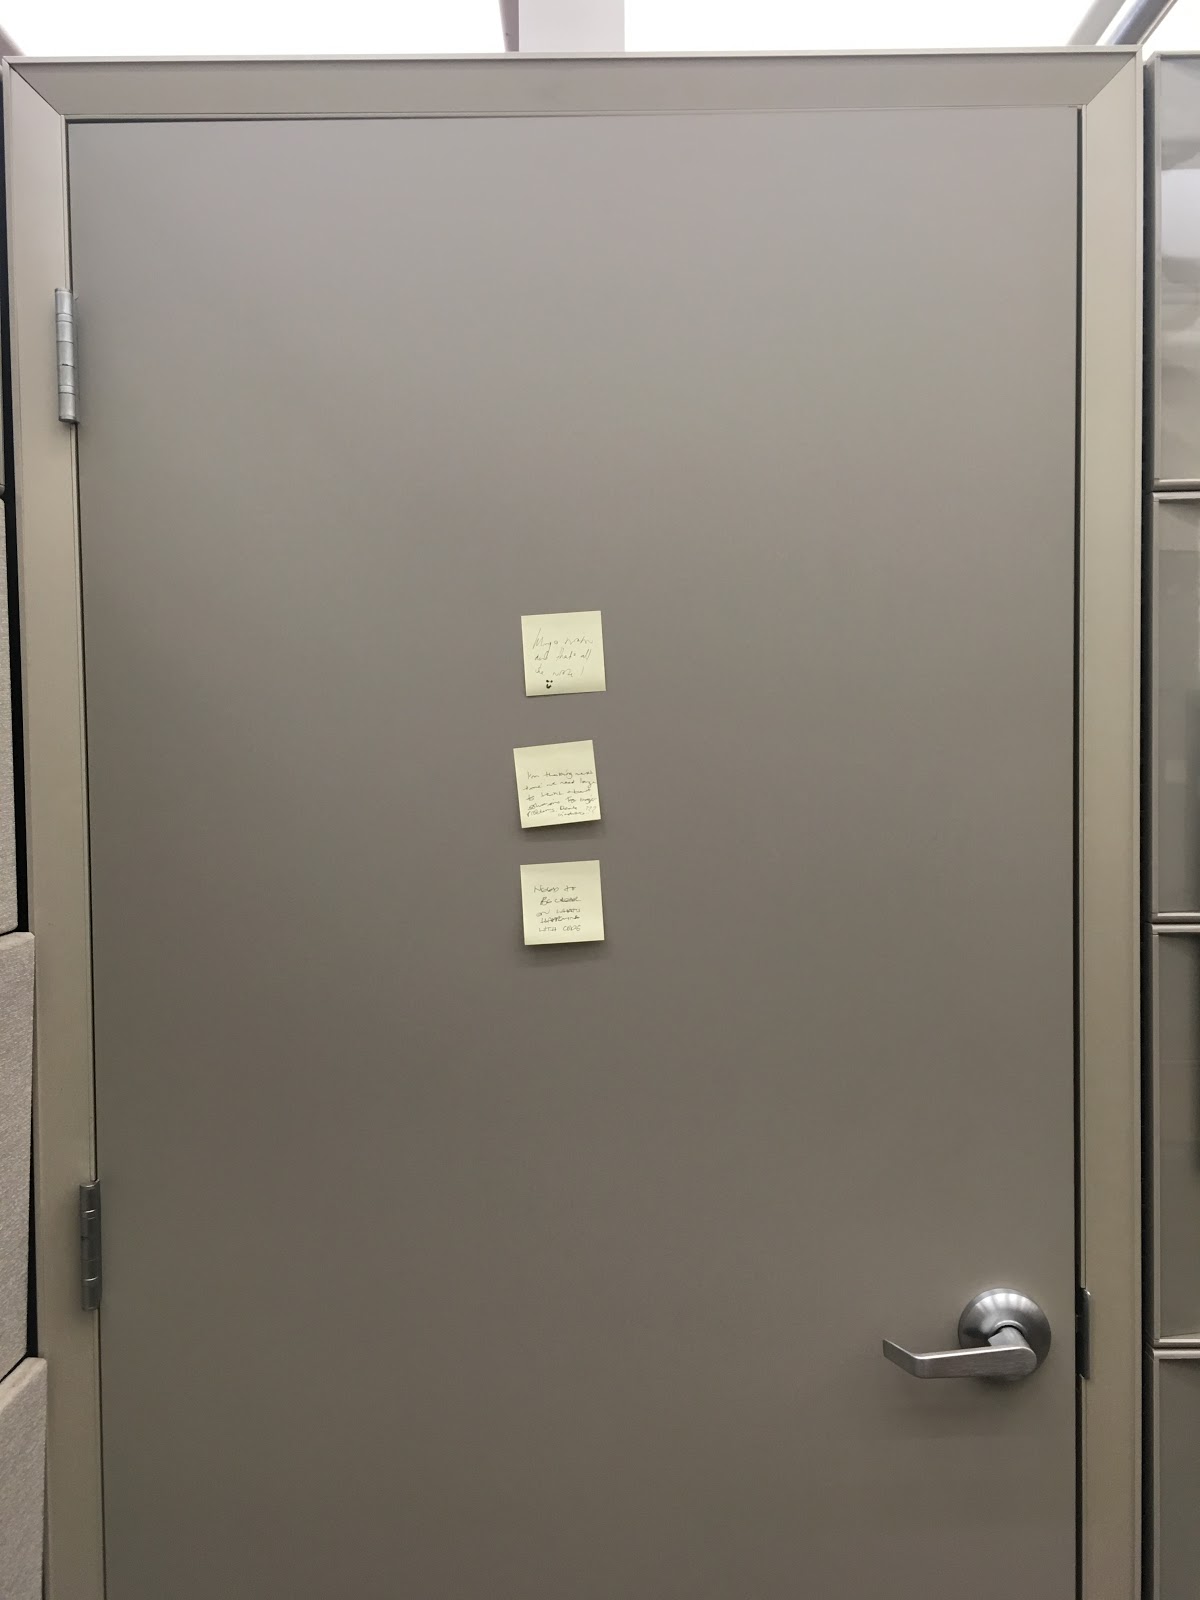
As your meeting draws to a close, you have two critical responsibilities: ensure shared understanding of the plans you discussed and have everyone leave on a positive note. Bonus points if you can get feedback on the retro itself. The Feedback Door is an excellent exercise for this.
Prep
For our final exercise, Feedback Door, we just took one sticky each.
How?
As a team, on the whiteboard or in a document, record the following three items (5 minutes):
- Meeting summary, including your goals from step one, key takeaways from the session, and your agreed plan for the next iteration.
- Action items, including clear, measurable steps, owners, due dates, and if applicable, necessary changes to current processes or working agreements.
- Methods of measurement, including what to measure, metrics to track, tools needed, and a plan for feedback and follow-up.
Then thank folks for attending and have them complete the Feedback Door by asking the team to jot down one piece of feedback and stick it on the door as they leave.
Why?
Everyone needs complete clarity to take proper ownership of your plan. And retrospectives need retrospectives, too! This exercise is a fast and anonymous way to get insight on how to improve your meetings.
Observations
I’ve seen some teams rush through this step, but I found folks appreciated taking the time to recap and confirm what needed to be done.
Tips
- Open the floor for all types of feedback: positive or negative, about the meeting or any last words about the sprint. It’s all useful.
- However, avoid the trap of asking for ideas for improvement. It takes too much time and confuses people. Now that the meeting is over, let them just observe how it went and concentrate their energies on the next sprint.
Other Retrospective Examples
When time allows, I also like to use an exercise agile expert Luis Gonçalves calls the return of time invested (ROTI) to get both qualitative and quantitative feedback on our sessions.
After the meeting
All that’s left now is to share your meeting notes with the team. If you’ve used a retrospective tool like MindMeister or even just a Google Doc to record ideas as you go, you’re halfway there.
Finally, make sure all notes (including this retrospective example) are stored in a way the team can easily access them. These will be your guiding light for the next iteration.

