The Ultimate Manual to Recording Zoom Meetings
Recording Zoom meetings is a convenient way of saving meeting content to review later. However, there can be some uncertainty over how and why to record your meetings. Fret not; our guide is here to help.
What Are Zoom Meeting Recordings Anyway?
Recording in Zoom meetings is when you use the platform to create a copy of your meeting, allowing you to rewatch it and review any details later. Most video conferencing tools on the market let you record meetings, and Zoom is no different in this department.
After the recording, you’ll receive a file containing the recording. Recordings are either stored in the cloud or locally on your personal computer. Both free and paid Zoom users can record their meetings with little hassle, although it’s worth knowing that cloud storage for your meetings is only available on the premium Zoom plans.
How Recording Zoom Meetings Works
Recording Zoom meetings lets you turn your conversations with call participants into practical information resources. Few people can remember every detail discussed during a video meeting, regardless of what platform they’re using. Recording your meetings allows you to capture these details.
It also means that your call participants don’t have to focus on taking notes, which can slow down discussion points. By recording the meetings, you’ll be able to easily share them with others so they can refer back to the conversation. The result is a more engaging call that everyone can access when they need it.
For instance, if every email you received in your inbox deleted itself after reading it, it’s fair to say most of the information would be lost soon after. Our working memories can only hold onto information for 10-20 minutes and around five to nine pieces of information at any one time, so it’s crucial to take steps to move that short-term information into a place of storage. In fact, on average, an hour after a meeting ends, attendees can only recall around 44% of it.
Many companies don’t record their video meetings, which means a great deal of the information and discussion generated during them is lost. Think about it like this: there’s no way to retrieve an unrecorded call, and the data inside it effectively ceases to exist. While you and your participants will remember some details from the meeting, not every piece of information will be accessible.
Recording your Zoom meetings changes this, allowing everyone to access the information whenever they need it. It couldn’t be easier to store the meetings in the cloud—something Zoom enables on the higher plans. Recording a session doesn’t take long either, but there are many long-term benefits of doing so for your business.
Example 1: Stay on Track With Meetings Related to a Project
It’s essential to keep track of discussions related to an ongoing project, customer, or client. By recording the Zoom meetings, you’ll be able to review the previous session before the next one takes place—ensuring any urgent questions from an earlier appointment get answered or addressed.
Recording Zoom meetings in this situation allows everyone on the team to check their responsibilities and see what actions they should take. In other words: it keeps everyone accountable and on track, and the next meeting can act as a deadline, with the previous one becoming a valuable resource to refer to in-between.
On a more individual level, you can also use the recordings as a tool to see how you conduct yourself in meetings. Over time, this allows us to improve our responses and how we represent our company. For example, did you handle yourself well with those customer objections, or could your responses be improved? Do certain statements sound like questions when they are not? What is your body language saying? Regularly reviewing these meetings can do wonders for self-improvement and keeping projects moving forward.
Example 2: Keep Everyone Updated, Including Absentees
You can’t always make every meeting, whether you’re ill, double-booked, or an unavoidable situation gets in the way. Missing key meetings can leave team members feeling disconnected from projects, hurting both productivity and motivation. It’s not something any company wants to deal with frequently.
Recording your Zoom meetings helps address this problem and allows everyone to stay up to date and on the same page, whether absent or not. They can quickly go back and watch or listen to the meeting, catching up on what they missed.
There’s a second part, too: recording your meetings allows them to act as a reliable source of truth for everyone involved. It’s not uncommon for participants to walk away from a meeting with different ideas of what was said; after all, our minds can sometimes alter events and conversations without realizing it. Or maybe the message was not clear to some people.
The last thing you want is a back and forth between employees over specifics, and recording your meetings prevents this, allowing them to verify the details and take action from there without the unnecessary confusion and loss of project momentum.
Example 3: Collaborate Outside the Conference Room
We’ve all become accustomed to collaboration outside the conference room through shared documents, emails, and productivity hubs, especially in a post-pandemic world.
While these are all good communication solutions, they don’t make it easy to reference exact discussions and require you to create a new resource from scratch, taking up precious time better spent elsewhere.

When you record your Zoom meetings, you’re effectively creating a document of your own, which gets shared via a direct link for everyone to review action items. You can share this link through other messaging channels of your choosing, and the advanced cloud recording settings of Zoom give you the ability to add timestamps to refer to specific sections of the meeting.
What’s more, you can repurpose your Zoom recordings to rapidly create new content for further collaboration or even training purposes. The result is a cost-effective way of boosting your communications, making them more complete overall and less wasteful.
You could also have the recordings transcribed for a written transcript of the meeting.
How to Get Started Recording Zoom Meetings
Below we’ve listed the key steps to follow to get the most out of recording your Zoom meetings.
Step 1: Let Your Team Know
While recording Zoom meetings is useful for multiple reasons, it’s crucial to let your team know of your intentions, not only because it’s a considerate thing to do but also for ethical and legal reasons.
Letting your team know in advance builds trust, allows you to explain why you’re recording meetings in the first place, and avoids putting people on the spot where they may decline or feel uncomfortable.
It’s worth mentioning we don’t recommend recording all meetings, especially those concerning areas such as performance challenges or individual reviews. While it is legal to record meetings, generally speaking, you should focus on recording sessions to boost collaboration, foster teamwork, and keep track of projects.
Step 2: Think About Storage
Zoom meetings take up a lot of space. For instance, screen sharing recording uses around 20MB of storage per hour, while video recording needs at least 200MB of storage per hour. As you can imagine, this can quickly add up, so it’s wise to think about where your recording will be stored and how much space you think you’ll need before doing any actual recording.
It also helps to decide in advance whether you’ll store your Zoom recordings locally or in the cloud. On Zoom’s starting free plan, you won’t be able to save your meetings to the cloud, and will only be able to store them locally, so you’ll need a good deal of physical storage. To share your recording locally, you can use tools such as OneDrive or Dropbox.
The paid Zoom plans allow you to save meetings to the cloud and come with 1GB of cloud recording per license—the Enterprise plan is the only exception here and has unlimited cloud storage. However, while cloud storage is the superior option for easy access, 1GB on those initial plans won’t last long. In that case, Zoom offers additional cloud recording storage for users, as shown below:
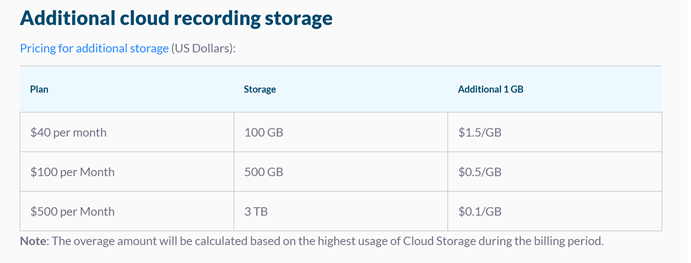
For $40 per month, you get 100GB of cloud storage, which will allow you to record quite a few meetings averaging a recording duration of around an hour each. The second plan costs $100 per month and provides 500GB of storage, and the third is $500 per month for 3TB of storage–-the latter storage amounts are more than enough for most small businesses. Think carefully about the right storage amount for you.
Step 3: Adjust Your Recording Settings
With those starting steps aside, we can move on to the recording settings themselves.
While you can start recording Zoom meetings as soon as you’ve decided where you’ll store them, it’s better to tweak the settings first for the best recording results. This allows you to edit and repurpose your recordings more easily in the future, too.
To do so, you will need to adjust a few different settings through Zoom’s desktop app, like so:
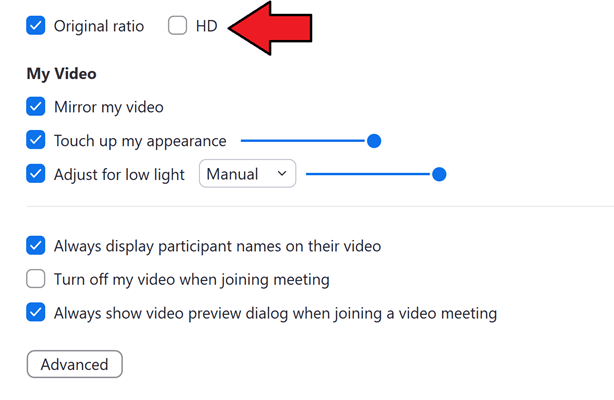
Under Video, you want to enable HD and allow for a 16:9 widescreen aspect ratio. These settings will ensure you get much higher-quality recordings.
From there, head over to where it says Recording. You’ll see this screen:
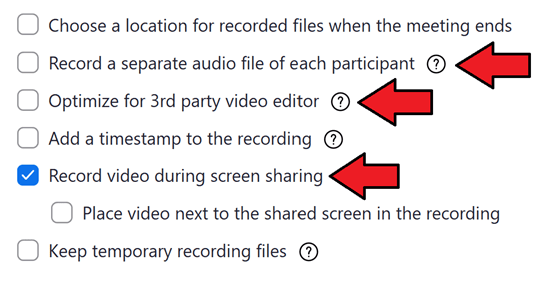
We want to make sure there are blue ticks for Record a separate audio file of each participant, Optimize for 3rd party video editor, and Record video during screen sharing.
It’s worth noting that you can record in different modes such as Gallery mode, Active Speaker mode—where only the active speaker gets shown on screen—and other shared screen modes that offer different size thumbnails of the speaker. Using these modes is by no means crucial, but take some time to explore them and see what works best for your recordings.
The recording resolution defaults to 640 x 360 at 25 frames per second for most users. You can record in higher resolutions such as 1280 x 720p and 1920 x 1080p, but file sizes will increase accordingly—try to aim for 720p as a sweet spot and check that your camera can output at that resolution first.
Keep in mind that, by default, the meeting host is also the only one that can initiate a local recording. If you want to allow other team members to do so, you’ll need to give them permission. The good news is that this is very easy to achieve. While in a meeting, it’s as simple as clicking Participants, picking a participant, clicking More next to their name, and selecting Allow Record.
Step 4: Know Your Zoom Recording Best Practices
Before you go, there are a few Zoom recording best practices that are worth knowing.
We’ve listed them here for you:
- Where possible, you should use a wired internet connection when recording your meetings as the connection is more stable, and the recording quality will be higher.
- To capture the best audio, use a headset or a directional microphone and ensure you mute all non-speaking participants to minimize background noise.
- When recording, you’re pretty much only capturing what you see on the screen in front of you. If you want the recording to concentrate on just one person, it’s best to pin their video. However, if you’re going to show the current person talking, use Active Speaker mode.
- If you are using an external camera and microphone, be sure to plug them in before you start—this issue occurs more often than you might think.
- Think about enabling audio transcripts in the recording settings as they provide an automatically generated video transcript. These transcripts are editable, too.
- If you prefer to use a wireless internet connection while recording your meetings, turning off the Wi-Fi on other devices that are not in use can free up vital bandwidth, leading to a smoother call and recording.
Ready to go? Click the Record button during a meeting, and choose where to store the recording!

Before long, you’ll be recording your Zoom meetings like a pro.

