How To Migrate From Dropbox To OneDrive
Whether you want more storage space for your business or need to consolidate, migrating from Dropbox to OneDrive can help solve your problem. You can use one of three different methods to complete the task.
First Method
The first method of migrating from Dropbox to OneDrive involves the most steps. However, it’s also the most effective. It ensures that you have all your files where you want them and involves minimal manual effort.
1. Sign in to Dropbox
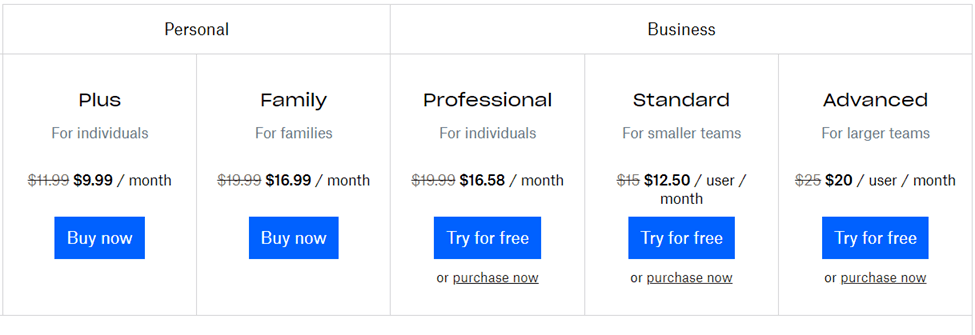
Go to your Dropbox account and sign in to start the process. You can migrate files from Dropbox, no matter which plan you have. Dropbox has five plans to choose from:
- Plus: $9.99 per month billed annually
- Family: $16.99 per month billed annually
- Professional: $16.58 per month billed annually
- Standard: $12.50 per user per month billed annually
- Advanced: $20 per user per month billed annually
The first three of these plans are intended for individuals. Standard and Advanced work best for small and large teams, respectively.
If you have Microsoft Suite and Dropbox, it makes more sense to use OneDrive, as it allows you to keep all your files in one system. Plus, both Dropbox and OneDrive have the option of unlimited storage with their most advanced plan.
Dropbox only gives you storage and related features, while OneDrive has plans that offer other apps. In other words, transferring from Dropbox can mean you save money for your business.
2. Create a Folder
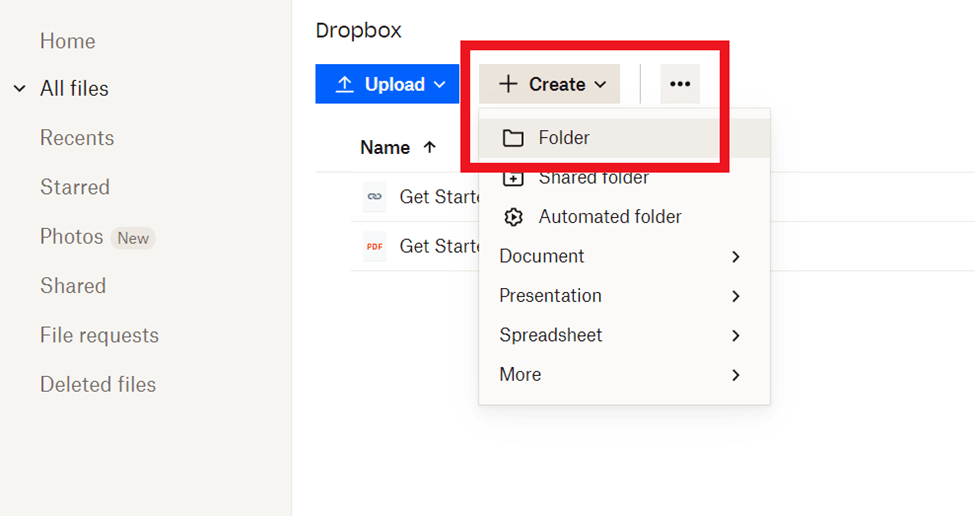
Create a new folder in Dropbox. Then select all the files in your Dropbox account that you want to move.
Drag the files to the new folder or copy and paste them there. Make sure they all show up in the right folder before you start migrating.
If you have several separate folders you want to move, make sure you organize them appropriately. That way, they look the same when you transfer them to OneDrive.
3. Click to Download
Next to the new Dropbox folder, you’ll see a button containing three dots. Click those three dots.
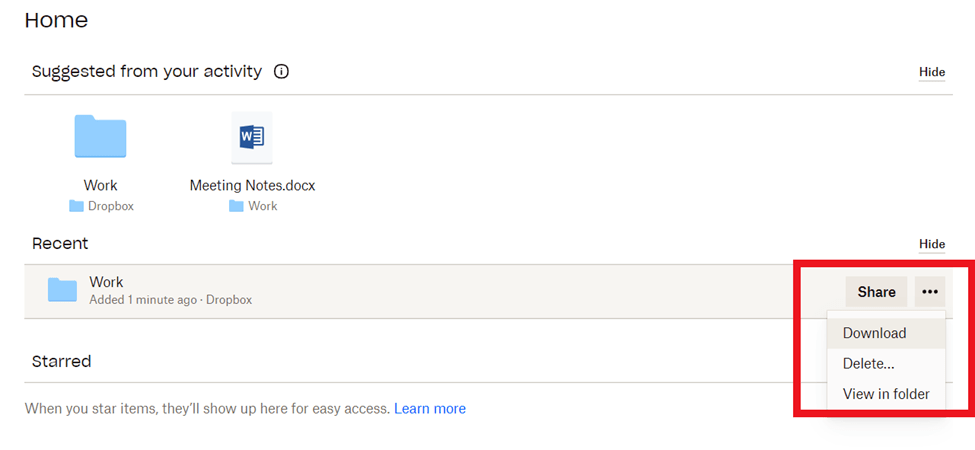
A dropdown menu will appear with two options—Download and Delete. Click Download to start transferring all your files to your computer’s local drive.
Wait for the download process to finish. The amount of time this takes varies depending on how many files you have and how large they are. The computer will tell you when it’s done transferring, but remember not to close the page until it finishes. If you do close it, that will interrupt the process and you may have to start over.
4. Log in to OneDrive
Once your files have downloaded, sign in to your OneDrive account. You should already have OneDrive if you have a PC. If you don’t, you can get it with any Microsoft 365 plan or purchase it on its own.

You can choose from four different plans with OneDrive:
- OneDrive for Business (Plan 1): $5 per user per month
- OneDrive for Business (Plan 2): $10 per user per month
- Microsoft 365 Business Basic: $6 per user per month
- Microsoft 365 Business Standard: $12.50 per user per month
Both OneDrive for Business plans only come with OneDrive storage and file sharing. Plan 1 comes with 1TB storage at a much cheaper price than Dropbox.
Plan 2 has unlimited storage at a lower cost than even the most advanced Dropbox plan. It’s worth getting, especially if you already use Microsoft Suite in your business. Plan 2 also comes with advanced security tools and compliance capabilities, which means more protection for your files.
Both Microsoft 365 plans come with several other Microsoft apps to help grow your business, including Teams. Basic omits the desktop apps, but Standard includes them, as well as other tools to help your team stay connected, like Yammer.
Standard also comes with a business-class email. If you have one of the Office 365 packages, it saves you time to transfer storage to OneDrive, as it gives you everything you need in one place.
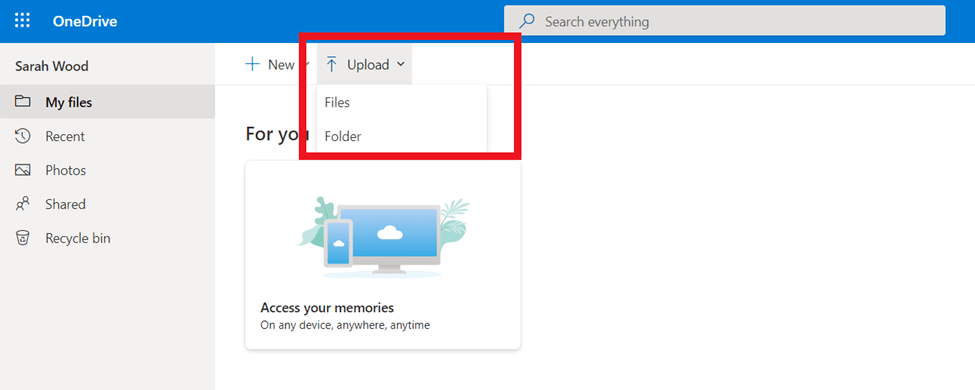
5. Click Upload
At the top of the screen, click the Upload button to lower the dropdown. It gives you two options—Files or Folder. Click the one that matches what you want to transfer, whether you have individual folders or a whole .zip file.
If you use a .zip file, you’ll need to extract the file on your computer before you upload it to OneDrive. Then, after you start uploading the files, simply wait for the process to finish.
Don’t close the page while your files are uploading, or you’ll interrupt the migration and lose your progress. To avoid this frustration, make sure you’ve got enough time to complete the process, so you don’t risk having to start over.
The whole process may only take a few minutes, depending on how large they are. Once it’s done, the process is complete.
6. Check to Make Sure All Files Transferred
This step may seem basic, but it’s an easy way to make sure you have all your files when and where you need them. Make sure you check that all your files are transferred, as technology isn’t perfect.
Check to see that all Dropbox files you selected were transferred to OneDrive. Taking a moment to do this now saves time later and prevents delays in your team’s workflow.
Second Method
This method is just as effective as the first, but it requires that you download both Dropbox and OneDrive to your computer. It may be easier to complete, depending on how many files you have and how they’re organized. However, it can also take longer, so if you need a more efficient method, stick with the first one.
1. Install the Dropbox and OneDrive Apps
This method requires you to have purchased both the Dropbox and OneDrive apps, or downloaded their free versions. Windows 10 automatically comes with OneDrive, but if you don’t have it, you’ll need to download it manually.
You can install either app with just one click. They only take a moment to download and give you access to your storage.
2. Open Windows File Explorer
Once downloaded, you’ll find your apps in the Windows File Explorer. You can access the Windows File Explorer by clicking on it in the taskbar.
If it’s not in the taskbar, click the Start button and select File Explorer. You can also search for it using the search bar, and it will come up.
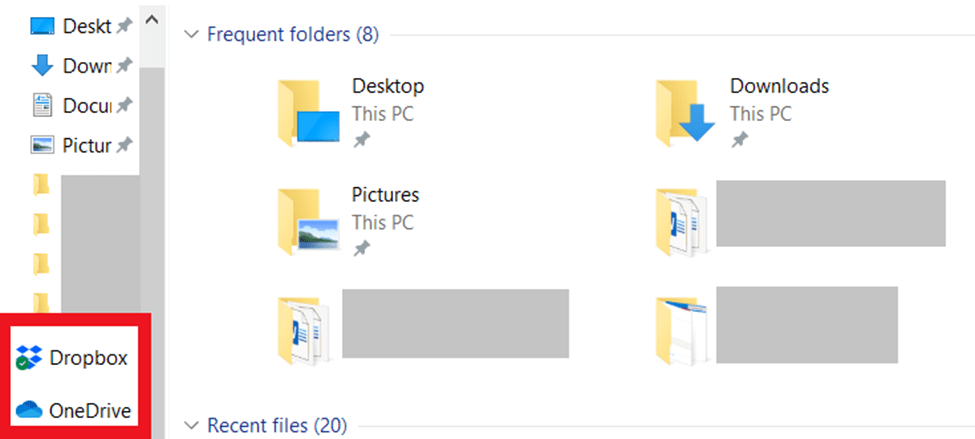
Both programs appear in the sidebar. When you click on them, they’ll show the folders you’ve stored in them and display them in list format. Because they appear beside each other, they’re easy to find, and it makes transferring easy.
At this point, open Dropbox first, since that’s where you’ll start transferring files.
3. Cut and Paste
Use cut and paste to move your files manually from Dropbox to OneDrive. You can do this in a few different ways.

To avoid moving files one by one, you can highlight several at once. Then right click, choose cut, and then right click to paste into OneDrive.
You can also use CTRL+X as a more efficient shortcut to cut your files. Then, use CTRL+V to paste them into the new folder.
Repeat these actions until you’ve migrated all your files.
The benefit to this process is that, unlike the first method, you can interrupt it and come back to it anytime you want. However, it does involve more work on your part and will likely take longer than the other method, which has the computer and software do most of the work for you.
Third Method
This method is one of the simplest and most convenient ways to transfer your files. However, it involves using separate file migration software, which is more expensive and may have a learning curve.
If you don’t often need to migrate files or don’t migrate large files, this method may not be worth it. But if you do meet these conditions, it might increase your migration efficiency.
1. Download Migration Software
You can find several kinds of migration software. They all have the same basic function, but the one you choose is based on preference and what serves your business best. You can start with popular options like ShareGate, Cloudsfer, and Office 365 Migration Planner, though there are many others available.
This type of software isn’t necessary for transferring files, but it can work better for large files. You can find free migration software, but you should decide whether you want to spend any extra money to migrate your files when you can do it manually.
Migration software has its advantages, but it’s an extra step during transfer. You may also need to add Dropbox and OneDrive apps to the software permissions before you start.
2. Follow Migration Software Instructions
Each migration software solution works differently. Learning how to use them is typically not difficult. Still, it may take more time than simple downloads and uploads. If you want to avoid that, don’t use this method.
Once you download your migration software, follow the instructions for transferring your files. The files will go through the migration software without you having to log into your accounts and migrate manually.
The methods the software uses vary, so you may want to do some research on the best file migration software to make sure the one you choose serves the right purpose.
Common Problems When Migrating from Dropbox to OneDrive
While migrating files from Dropbox to OneDrive is typically a simple process, you can run into problems along the way. Most of them are fairly simple to resolve, but it helps to know what to look for and how to avoid them before you begin migrating your files.
File Size Limits
OneDrive has a file size limit of 250GB when migrating files. If your file is larger than that, you can try reducing the size by breaking up the file, if possible. If you can’t, this is where file migration software may help.
Migration software migrates your larger files and sometimes puts them into a transferrable .zip file to reduce their size. That doesn’t always work, especially if you have an exceptionally large file. Before you start migrating, check the size of your files to ensure they can transfer to OneDrive.
Unsupported Files or Invalid Characters
OneDrive and Dropbox don’t block any specific type of file. However, sometimes the admin of the account creates settings that block them to maintain security.
If you know of any blocked file types you plan to transfer to OneDrive, make sure you unblock them first. While blocking files can protect your business, it can get in the way of file migration. It goes without saying, but make sure all filetypes are safe before you transfer them.
Invalid characters are an easier fix. You can’t save files with certain characters in the file name when you use OneDrive. If OneDrive won’t let you migrate your files, check the file name. The fix may be as simple as changing a few characters.
Restricted characters differ files and folders in OneDrive. There are also a few abbreviations that OneDrive doesn’t allow, so check to see if you’ve used any of them if the migration gets interrupted.
Slow Migration Speeds
Both OneDrive and Dropbox will throttle your migration speed if you upload or download too many files at once. Throttling can look like a sudden slow down or pause during migration.
This mechanism prevents people from abusing the software, but it can be inconvenient when you genuinely need to migrate that many files. The software may pause or slow for anywhere from a few minutes to a few hours.
Eventually, it will speed up again, so you may just have to be patient. Other times, it’s easier to stop the process and start over with fewer files.
To prevent this issue, don’t transfer excessively large files and keep an eye on how many you migrate at once.
Migration software comes in handy here, as it handles the process for you. Many of these solutions show you when the throttling stops and will even retry migrating for you, so you don’t have to wait around for it.
Migrating from Dropbox to OneDrive is a quick process, most of the time. There are a few different ways to do it, but the best one for your time depends on what you plan to migrate. However, each of these solutions is an effective way to ensure that all your files get from point A to point B safely.

