The Ultimate Manual to Jira Automation
Jira is among the world’s most popular project management and workflow management tools for agile software development teams and tech startups.
Jira’s main strengths are its automation features that allow users to automate their tasks and project updates using if-then-else conditions.
Automation speeds up your work and frees up resources, and reduces the chances of any mismanagement in the project lifecycle.
This detailed guide reviews Jira’s core automation features and how they can help you improve your project management efficiency.
Let’s dive in.
What is Jira Automation Anyway?
Jira Automation is a feature in Jira Software and Jira Cloud applications that allows users to fully automate their project management processes using if-this-then-that conditions based on different events in Jira.
It helps you automate routine tasks that collectively eat up hours of your time every week and allows you to focus on value creation and problem-solving tasks.
Jira Automation is a “no-code” feature meaning anyone can create automation rules in Jira irrespective of their technical or coding knowledge.
You can use Jira Automation for various tasks, including:
- Automatically close the parent task if its sub-task is completed.
- Assign all tasks from a board to a specific team member.
- Import customer issues from other Jira apps, create an issue in Jira, and assign it to a team member.
- Send periodic task status updates to the relevant stakeholders.
These and numerous other automation possibilities in Jira enable users to completely automate their workflow, minimize human dependencies, and streamline routine activities.
Automation comes with all of Jira’s subscription plans (paid and free). Jira’s Free and Standard plan users get access to single project automation features.
The users in Premium and Enterprise plans get global and multi-project automation features.
What is the difference between a single project and global automation?
In a single project automation rule, you can only create automation rules for a specific project. If you want to make the same rules for other projects, you’ll need to create them separately.
A global and multi-project automation rule can be applied to multiple projects at the same time. You can create an automation rule once and use it for any project.
Who can create automation rules in Jira?
Jira automation is available in all Jira plans. However, not every team member can create automation rules. To create, edit, or delete automation rules, you need to be a Global or Project Admin.
Let’s dive into the specifics of how Jira automation works.
How Jira Automation Works
Jira’s automation features are fundamentally based on if-then rules triggered in response to different events in Jira.
For example, you can set up an automation sequence to create alerts to relevant team members if your in-progress tasks exceed a certain threshold.
Or automatically create sub-tasks for every new issue made in your Jira boards.
However, all automation sequences in Jira rely on certain factors. You must understand what these factors mean to utilize automation in Jira fully.
Let us explore these factors one by one.
Rules
Rules or automation rules in Jira allow you to automate tasks and processes based on your defined conditions.
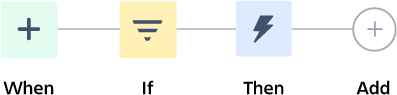
Every automation rule consists of triggers, conditions, and actions.
Triggers activate a rule, conditions define the criteria to narrow down a rule, and actions are the resultant actions it takes.
You can combine these three factors to create countless different automation sequences and workflows.
To make your job easier, Jira has an excellent library of automation templates listing some of the most popular automation rules worldwide.
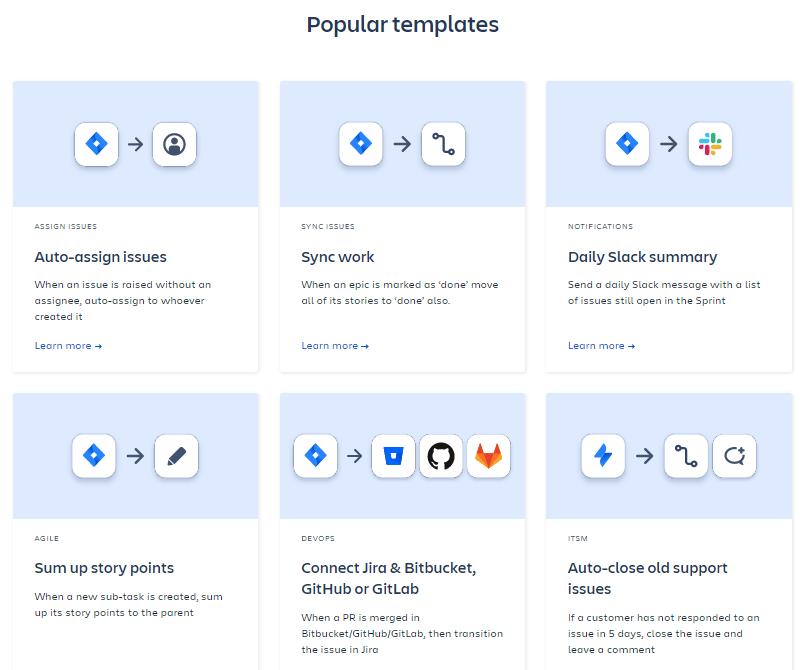
On every template page, you get detailed step-by-step instructions about using it with your Jira account.
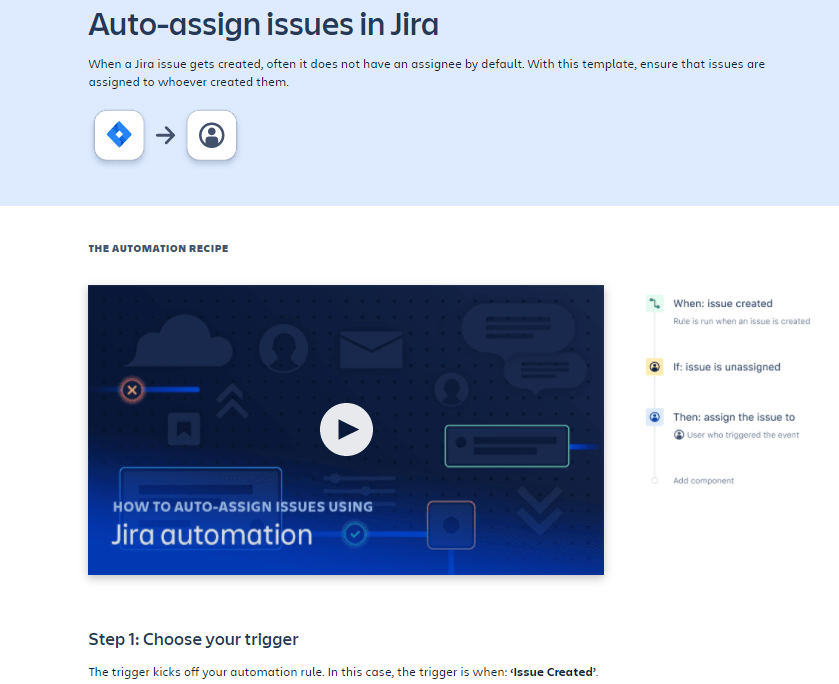
If you think a template is relevant to your business but doesn’t entirely fit your workflow, you can customize it in any way.
There’s also no limit to the number of automation rules you can create as long as there’s no overlapping between the rules.
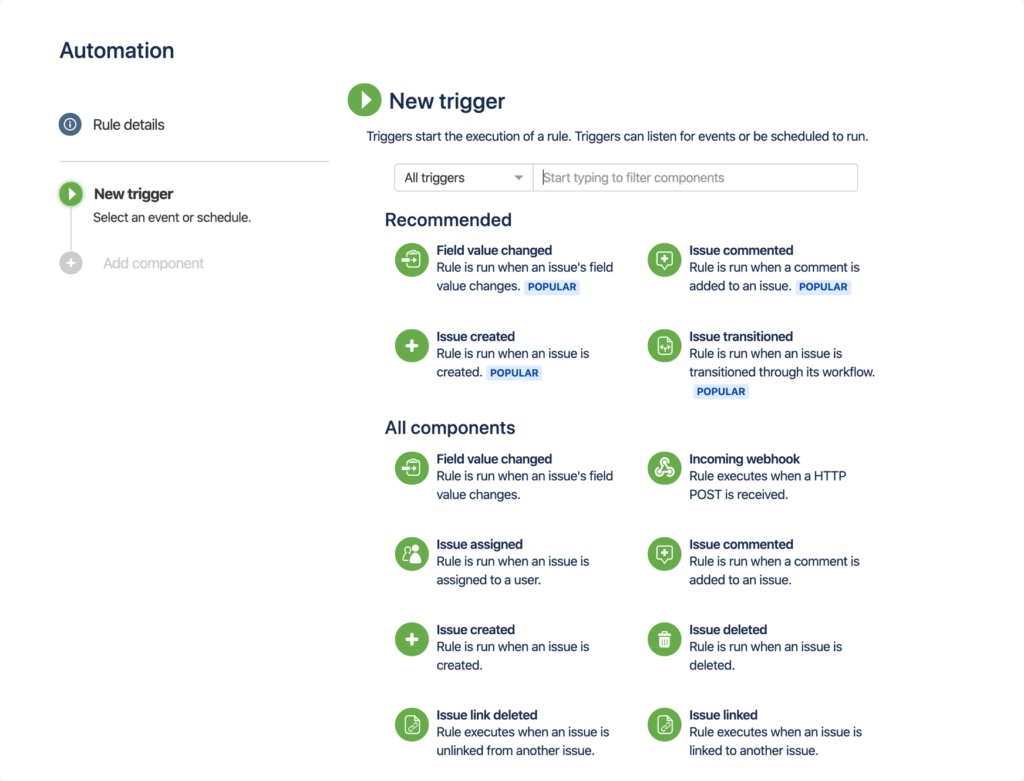
Triggers
A trigger is the starting point of an automation rule in Jira. Any event in Jira can be a trigger. For example, when a new issue is created, a subtask is completed, or a field’s value changes.
When a trigger occurs, it executes its automation rule.
Jira offers time-based and event-based triggers.
Event-based triggers launch an automation rule when a particular event happens. Time-based triggers are activated after the timelines you define. For example, you can choose to trigger an automation rule 24 hours after an event occurs.

There are various kinds of triggers, but some of the popular ones are:
- Field value changed
- Incoming webhook
- Issue assigned
- Issue commented
- Issue created
- Issue deleted
- Issue linked
- Issue link deleted
- Issue moved
- Issue transitioned
- Issue updated
- Multiple issue events
- Scheduled
- Work logged
You can view the complete list of triggers and their details in Jira’s documentation.
Conditions
Conditions further qualify your triggers and determine whether your rule should be executed or not.
Triggers activate rules, and conditions determine if a rule should con tui running.
For example, you could trigger an automation rule when a new issue is created. But to further qualify this, add a condition that the rule will run only if the issue is of high priority.
If a condition is false, its rule stop running immediately and does not perform any action.
You can create some pretty complex automation rules using conditions. For example, you can compare the values of two different fields and trigger a specific action if the values match.
You can also create if/else conditions based on which different actions are performed.
You can view the complete list of Jira’s automation conditions on this page.
Actions
Actions are the tasks that are performed when an automation rule is triggered and meets all the relevant conditions.
There are all kinds of actions you can perform as a result of an automation rule. For example, you could send an email to a specific team member when a sub-task is completed.
You can also assign issues, create new sub-tasks, clone issues from Jira integrated apps, or automatically comment on an issue.
You can view all the possible actions in Jira here.
Smart Values
Smart values are variables that allow you to add further complexity to your automation rules. You can use them to fetch real-time values to your fields and trigger rules.
For example, the smart value {{now.plusDays(5)}} references the current time and adds 5 days to it, while {{issue.summary}} will print off the summary of the issue.
Smart values in Jira work just like dynamic fields in email marketing. For example, you can use smart values to comment on tasks addressing the reporter’s name and issue assignee.

You can view the complete list of smart values in Jira’s documentation.
Let’s look at a few examples of how Jira automation can make your job easier as a project manager.
Example #1: Auto Assign Issues To Team Members
It’s common for software development teams to have unassigned or unattended tasks on their list. Leaving it to your engineers’ discretion to pick unattended tasks can result in confusion and miscommunication.
You can quickly resolve this by setting an automation rule in Jira.
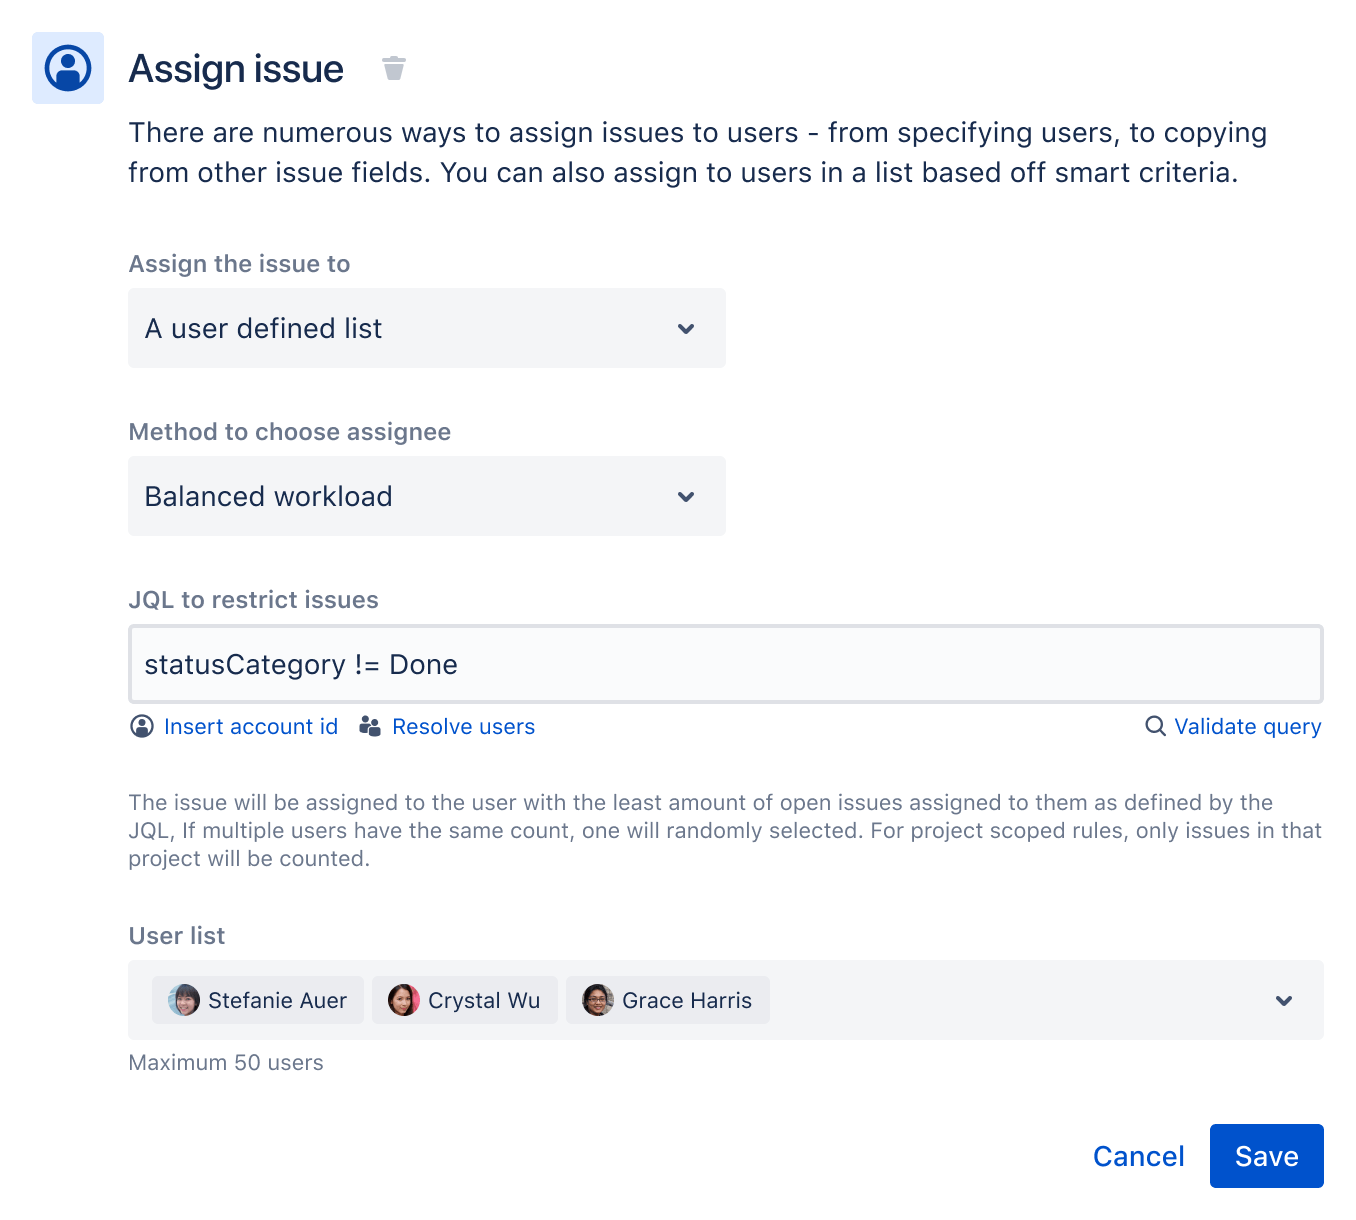
With this rule, Jira will automatically assign unattended issues to the team member with the least number of open issues.
Since this is a dynamic rule, the unassigned tasks will be assigned to a different team member every time, depending on their workload.
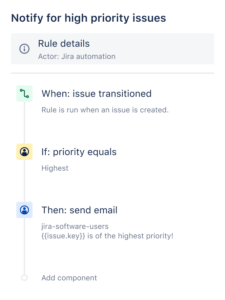
Example #2: Follow-up With Clients
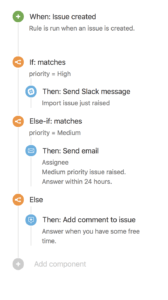
You can use scheduled triggers to automate many of your routine tasks like follow-ups and email communication.
For example, if a customer doesn’t respond to your query, you can send them an automated reminder and temporarily close their issue.
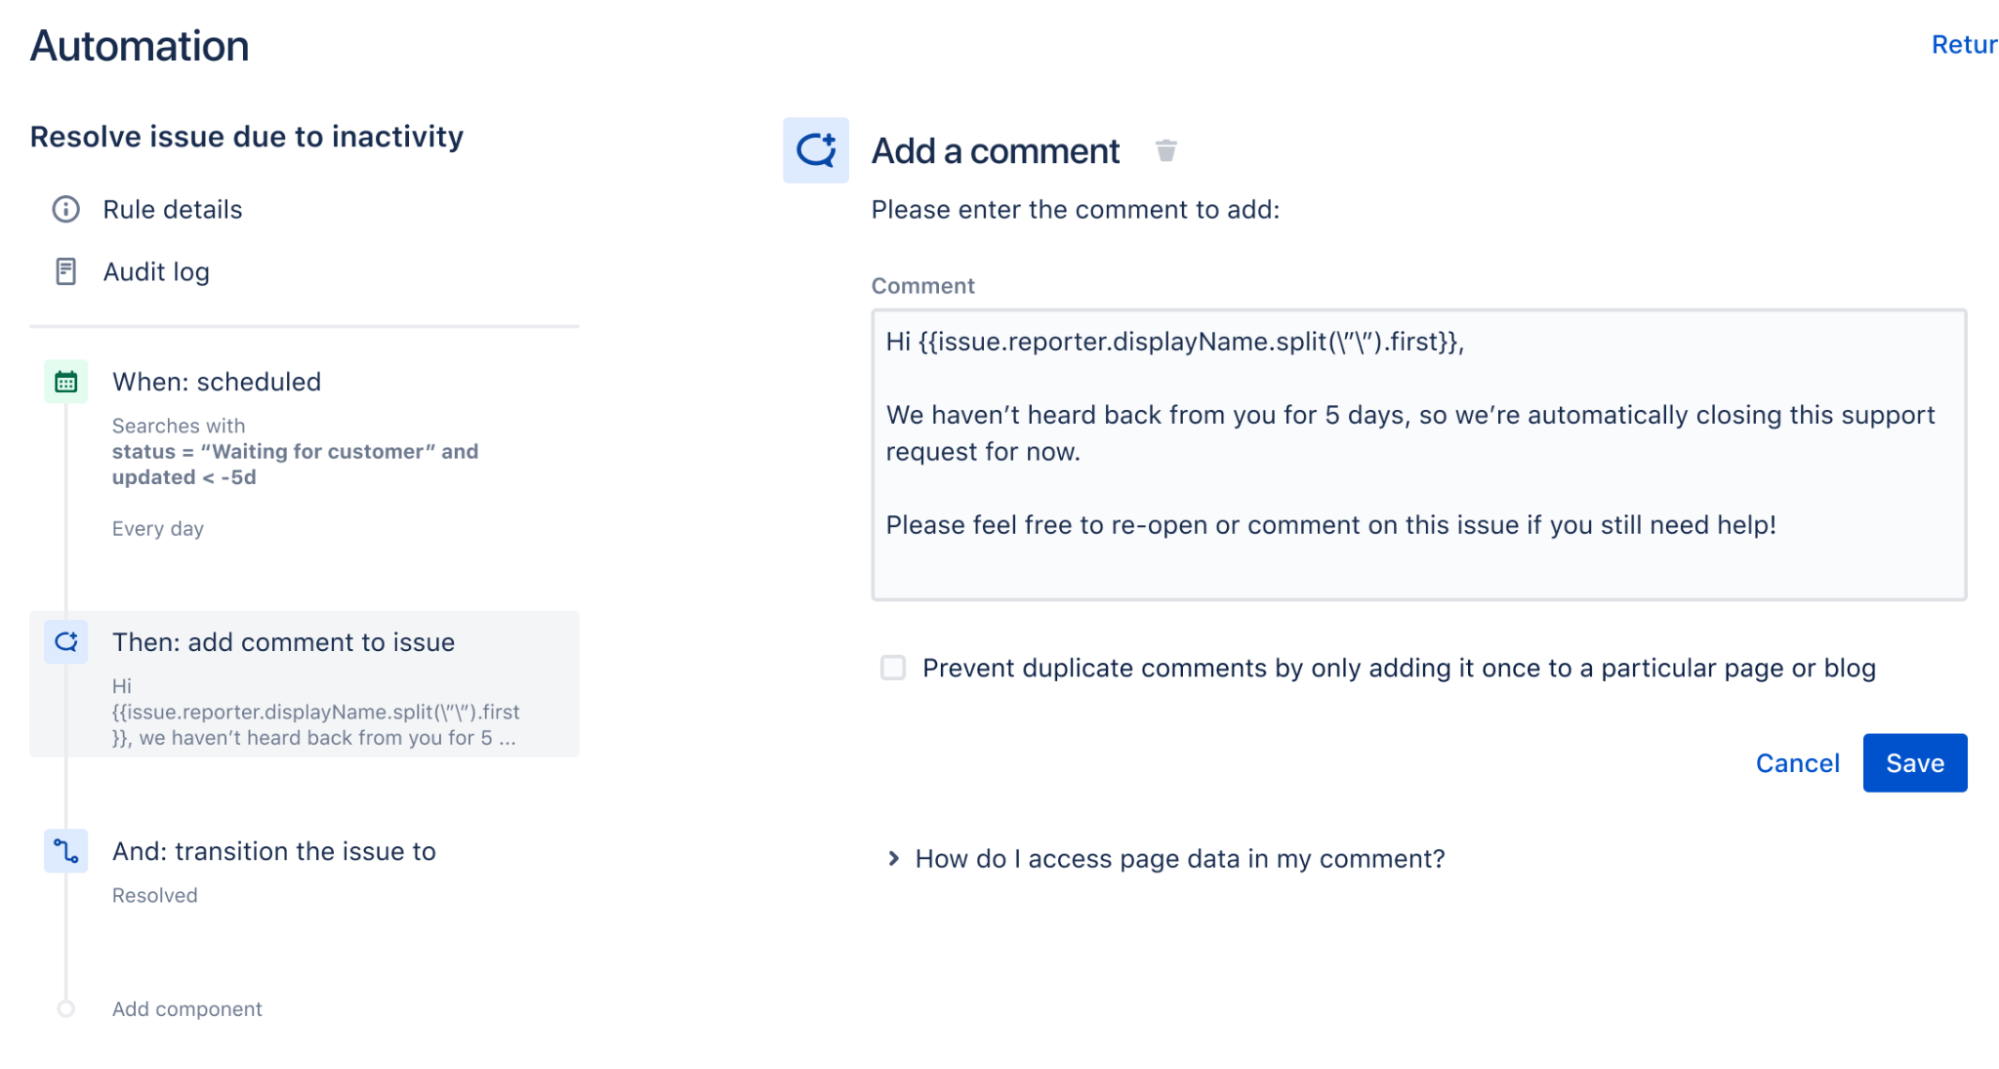
If you notice, the example in the screenshot uses smart values in the email content, which means that the client’s name will be automatically pulled from Jira’s database every time this rule is executed.
How to Get Started With Jira Automation
Now that you’ve understood the fundamentals of Jira automation, let’s dive into how to set up an automation sequence.
The process for creating an automation rule will be different every time based on your goals. For example, the automation process for setting up a rule to automatically comment on a task is different from an automation rule to close all sub-tasks when the parent task is completed.
For this post, I’ll show you step-by-step how to add new subtasks to any new bugs and assigns them to a team member. This is one of the most popular automation rules in Jira.
Here are the steps you need to follow:
First, sign in to your Jira account.
Click on Automation Rules in your Jira dashboard menu.
-
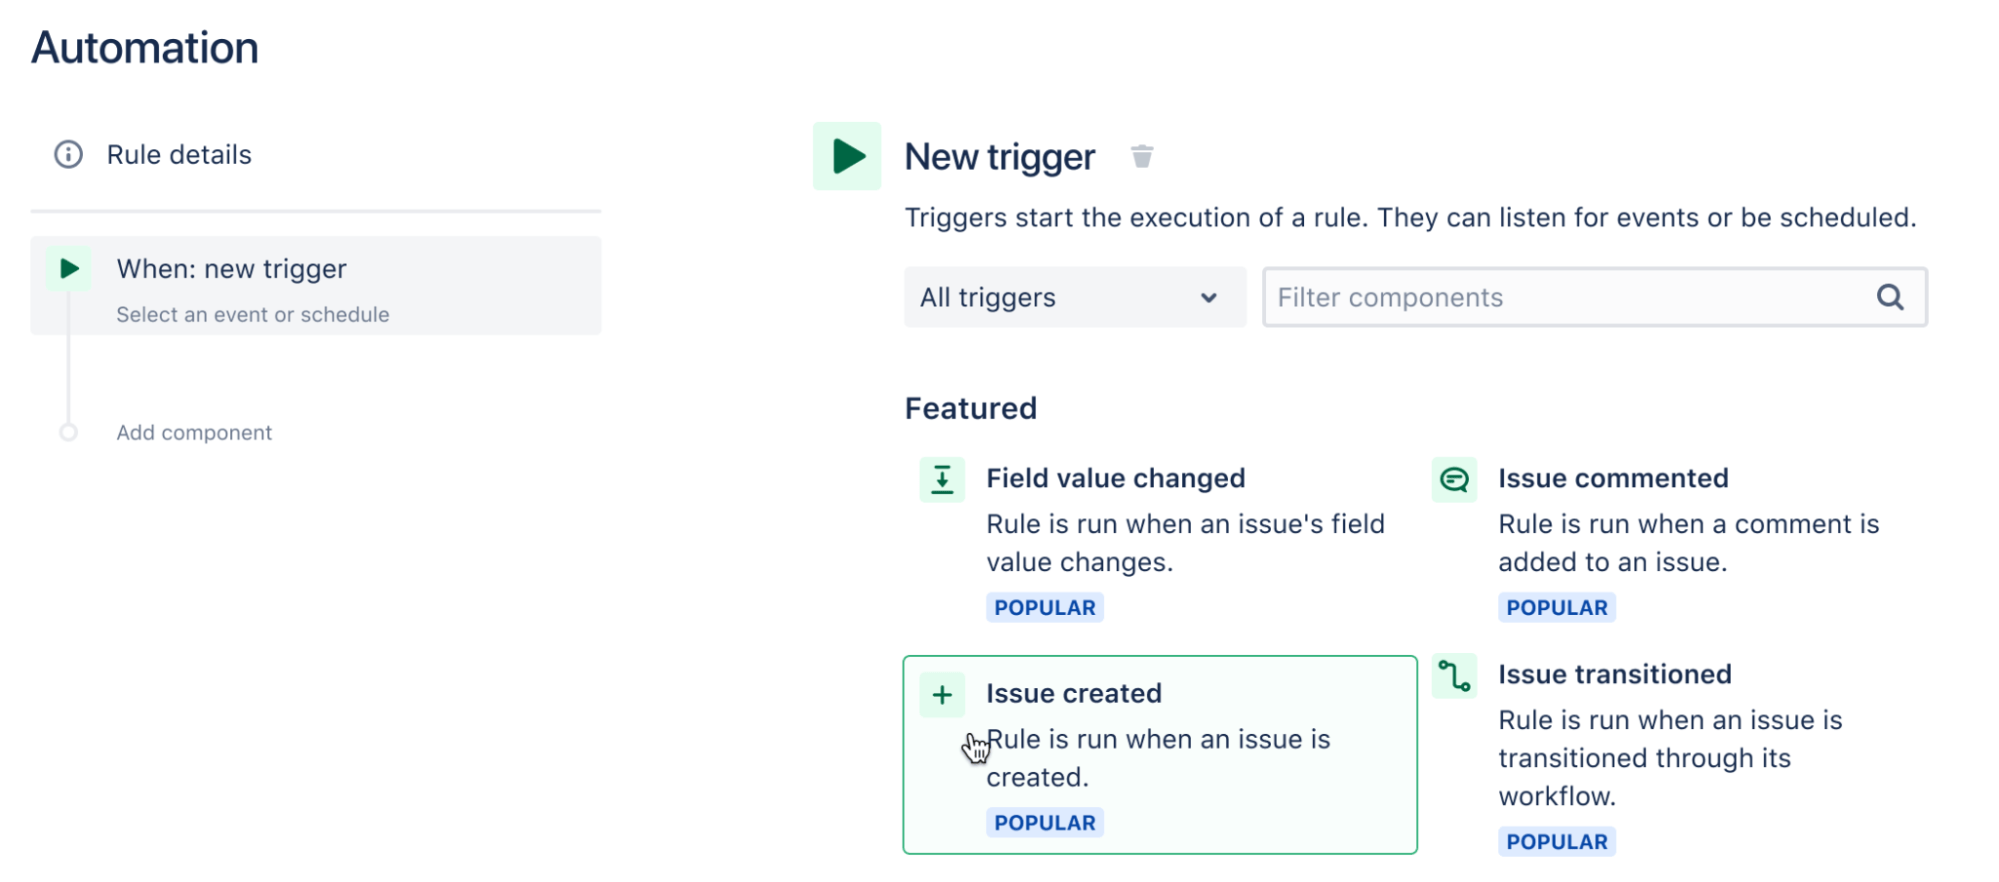
- To create a new rule, click on the Create button in the top right corner of your screen.
- Since you want to activate your automation rule when a new issue is created, choose Issue created as the trigger. Click Save to continue.
-
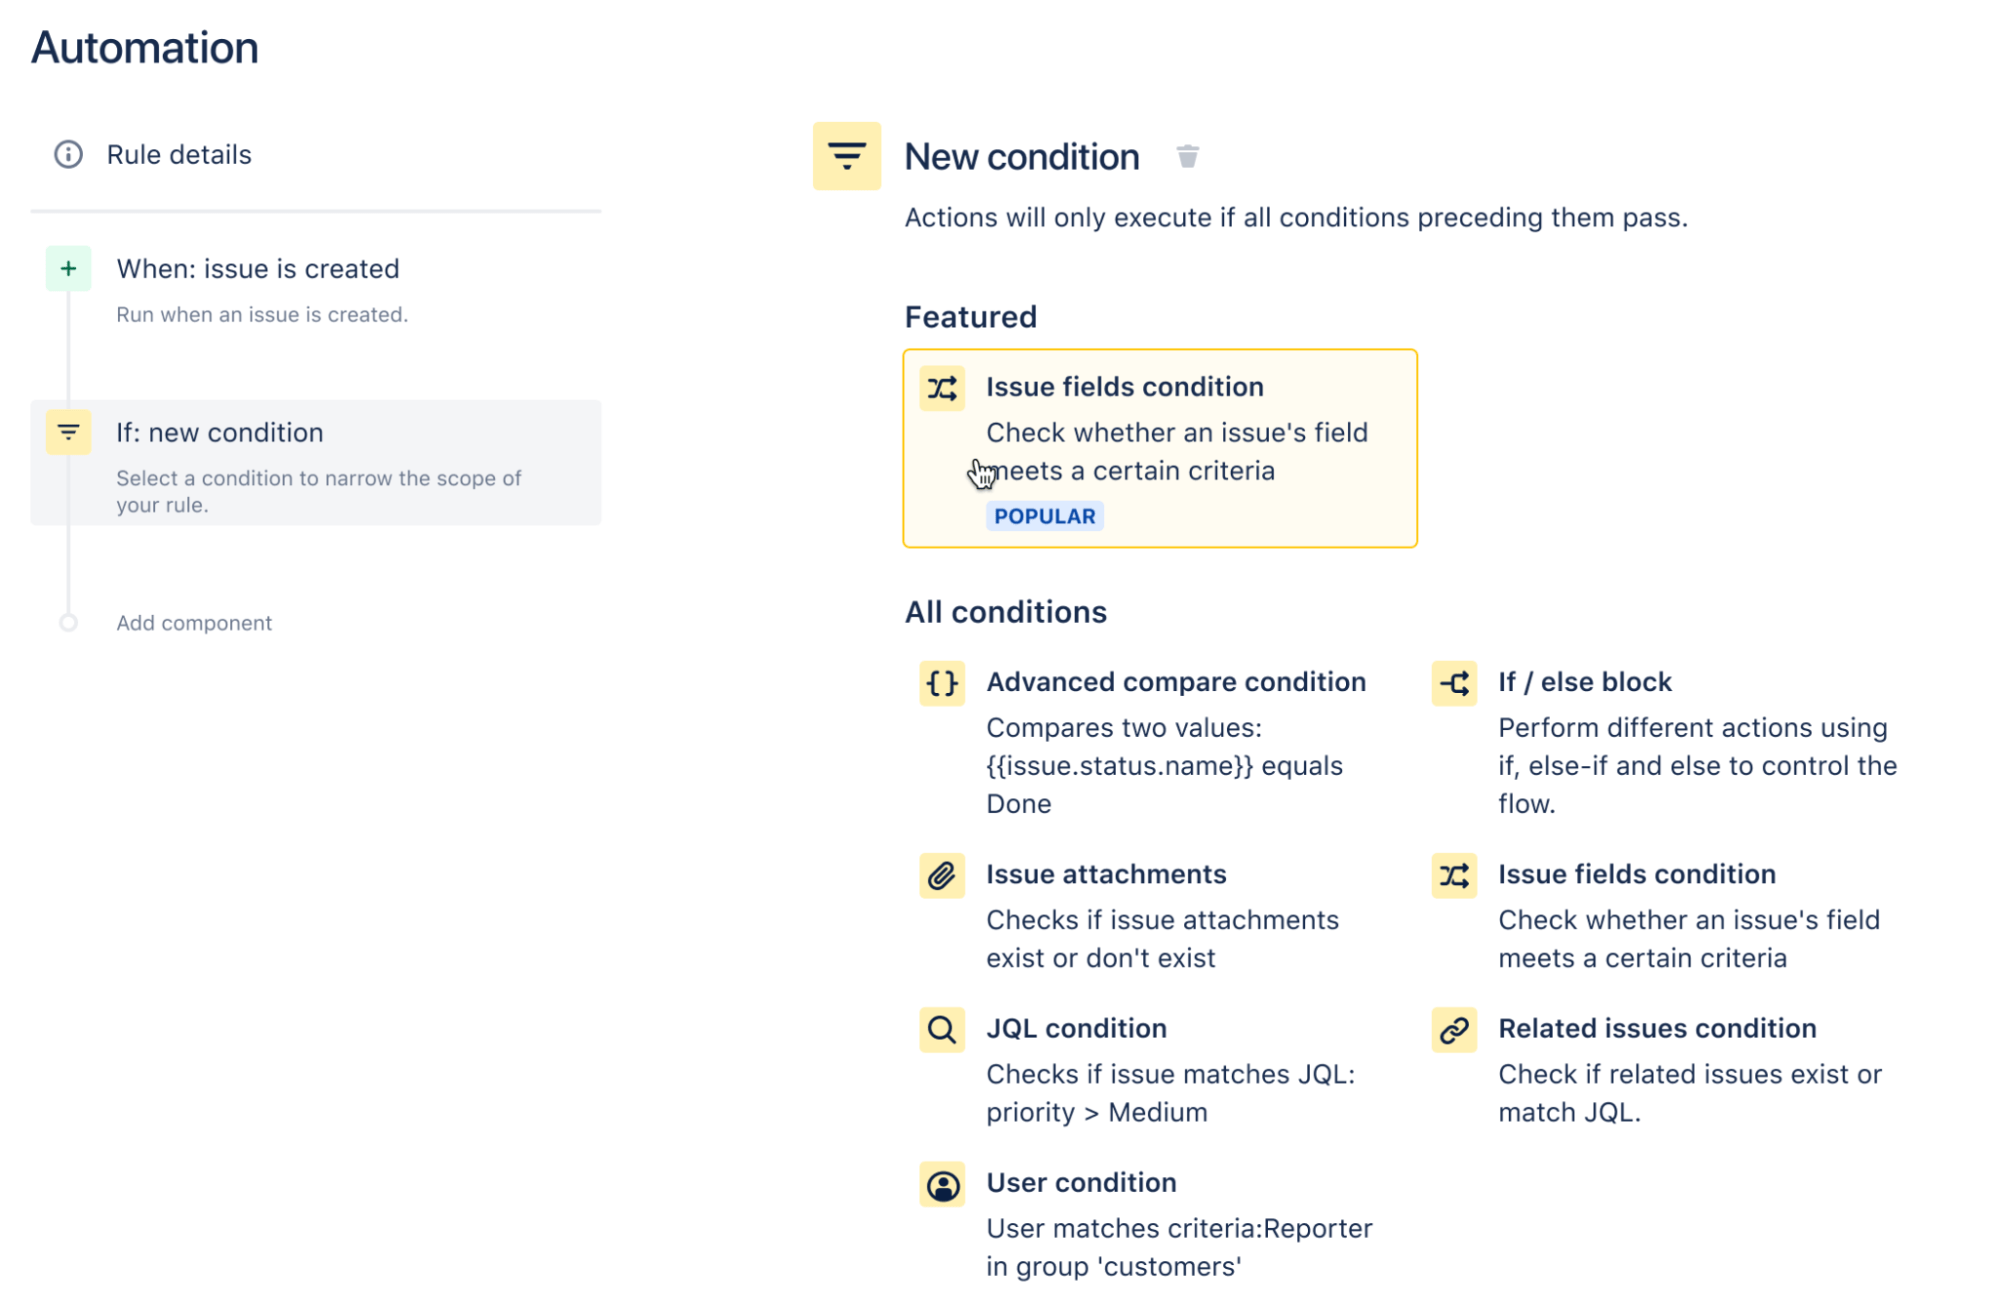
- After creating the trigger, add a condition to your rule by selecting New Condition.
- Select the Issue fields condition. Set the field to Issue Type and set the condition to equals since you only want to trigger the rule when a new bug is created. Set the value to compare to Bug. Click Save to continue.
- Now that you’ve configured the rule trigger and its condition, it’s time to select the action you want to perform. Click New action.
- Select the Create sub-tasks action.
- Add three sub-tasks, called Inspect code, Troubleshoot, and Resolve. You can add more or less if you want. Click Save to continue.
- Since you also want to assign the sub-tasks to a team member, you’ll need to set up an additional action for this rule. Click New action again.
- This time, select the Assign issue action. Select a user from the list of your team members to assign the sub-tasks. Now click Save to add this action.
- Finally, name your rule. If you’re creating this rule in a specific context, mention it in the title so that you can easily remember it later.
To activate the rule, select Turn it on or click the toggle next to it on the Automation → All rules page.
You’ve successfully created an automation rule that will be triggered when a new bug issue is created. Jira will automatically create three sub-tasks for the issue and assign them to a specific member of your team.
You can view all your active and inactive automation rules from Automation → All rules in your Jira account.
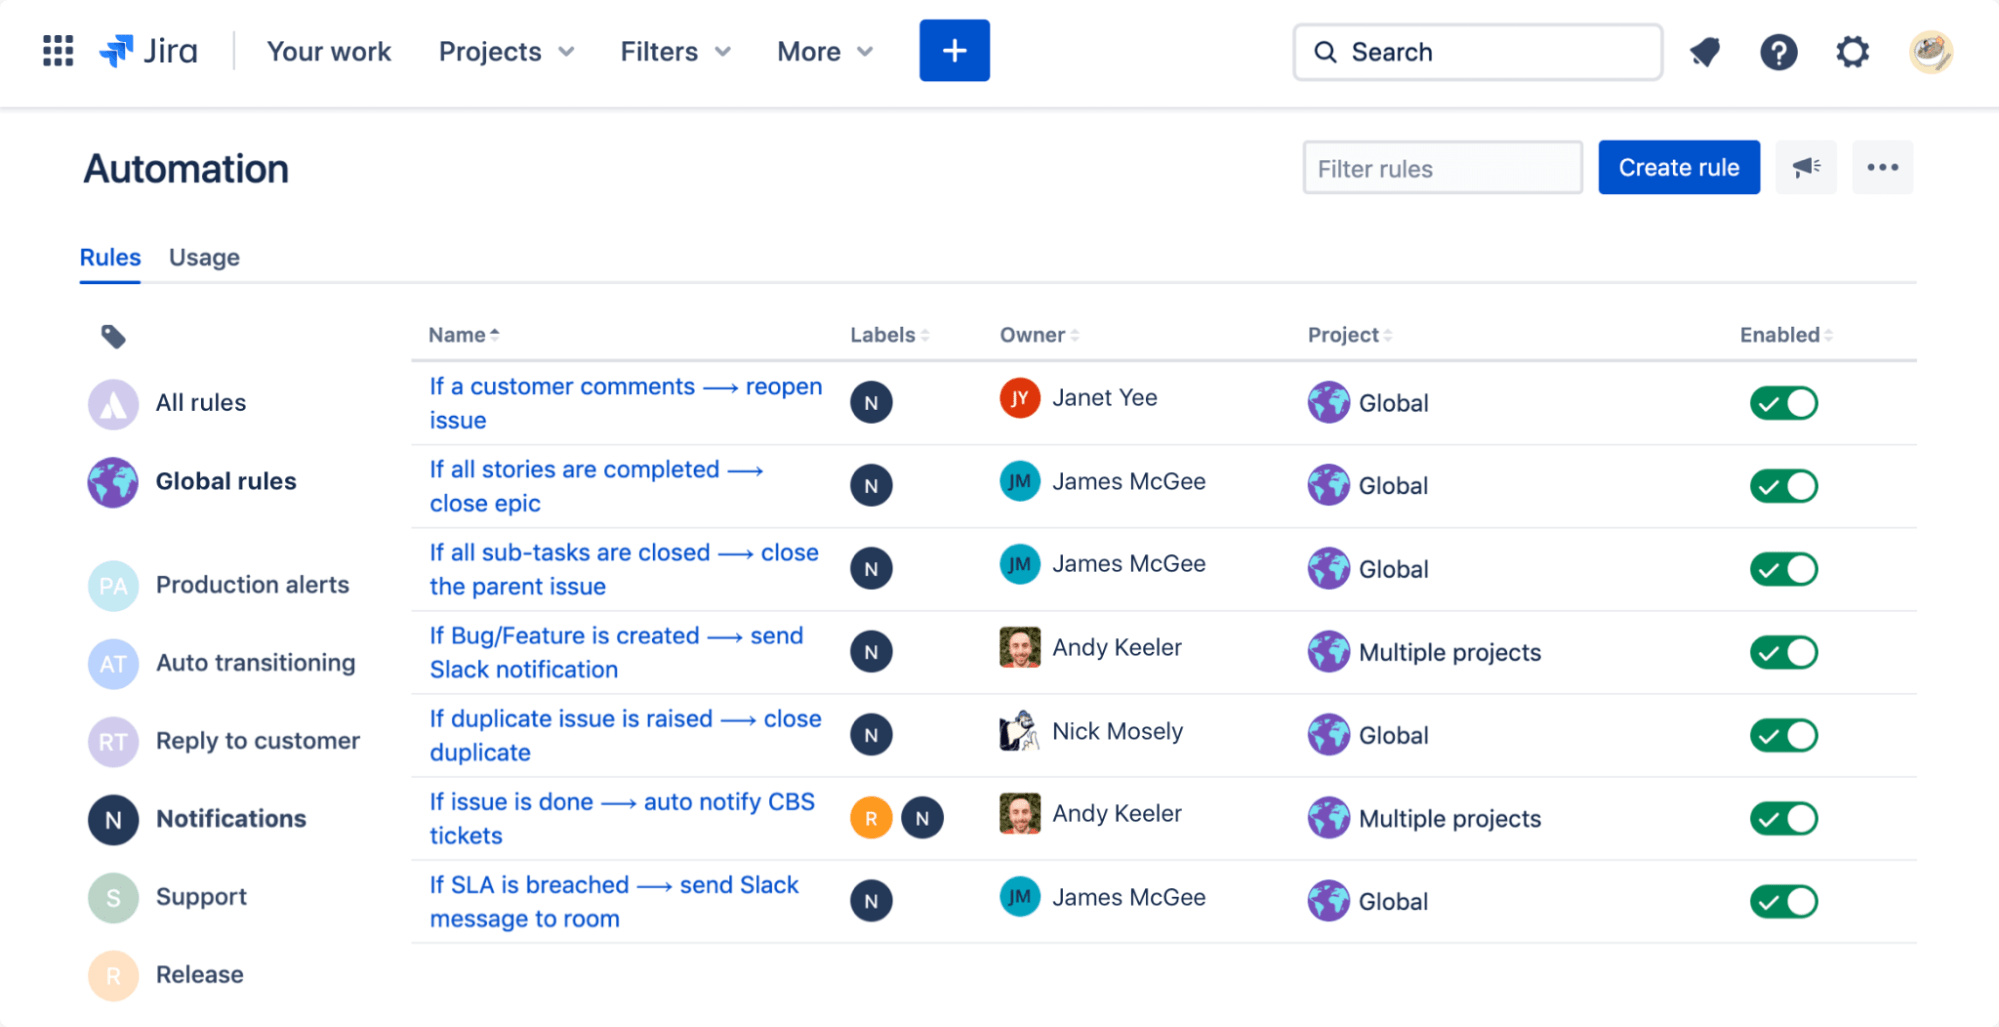
To edit an automation rule, simply click on it from the list and make the required changes.
To deactivate an automation rule, click the disable switch next to it.

