How to Use Jira to Create a Roadmap
One reason why Jira is such a popular project management tool is its ability to provide micro and macro project management features.
You can use its workflows and boards to track even the smallest of tasks in a project.
And you can use Jira Roadmaps to get a strategic bird’s-eye view of one or more projects, give your team a long-term vision, and keep the key stakeholders updated on your progress.
This article will discuss how you can create Jira Roadmaps and use them in different ways for more transparent project management.
We’ll also look at some of the common problems users face when using roadmaps and how you can resolve them.
Let’s dive in.
How Jira Roadmaps Work (Key Terminologies & Concepts)
To create Jira Roadmaps and use them effectively for project management, you need to understand the basic concept behind roadmaps, how they work, and the key terminologies associated with them.
What Is A Roadmap In Jira?
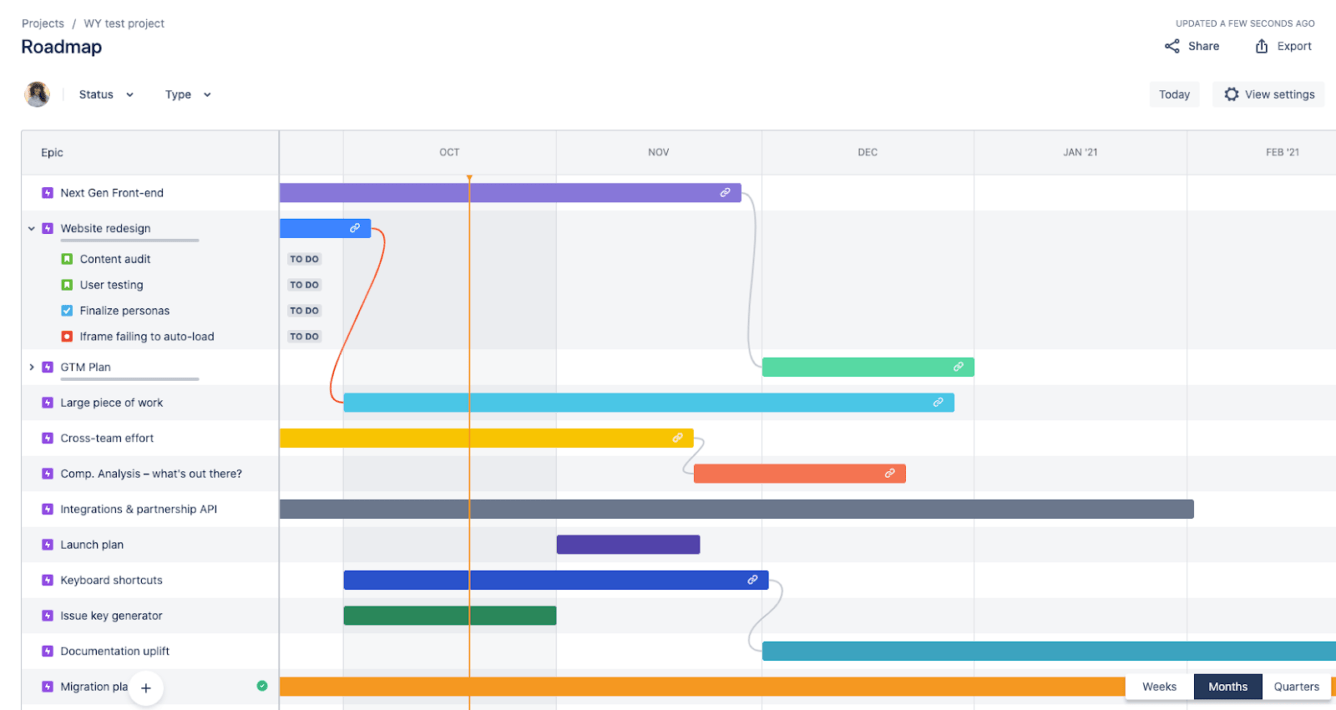
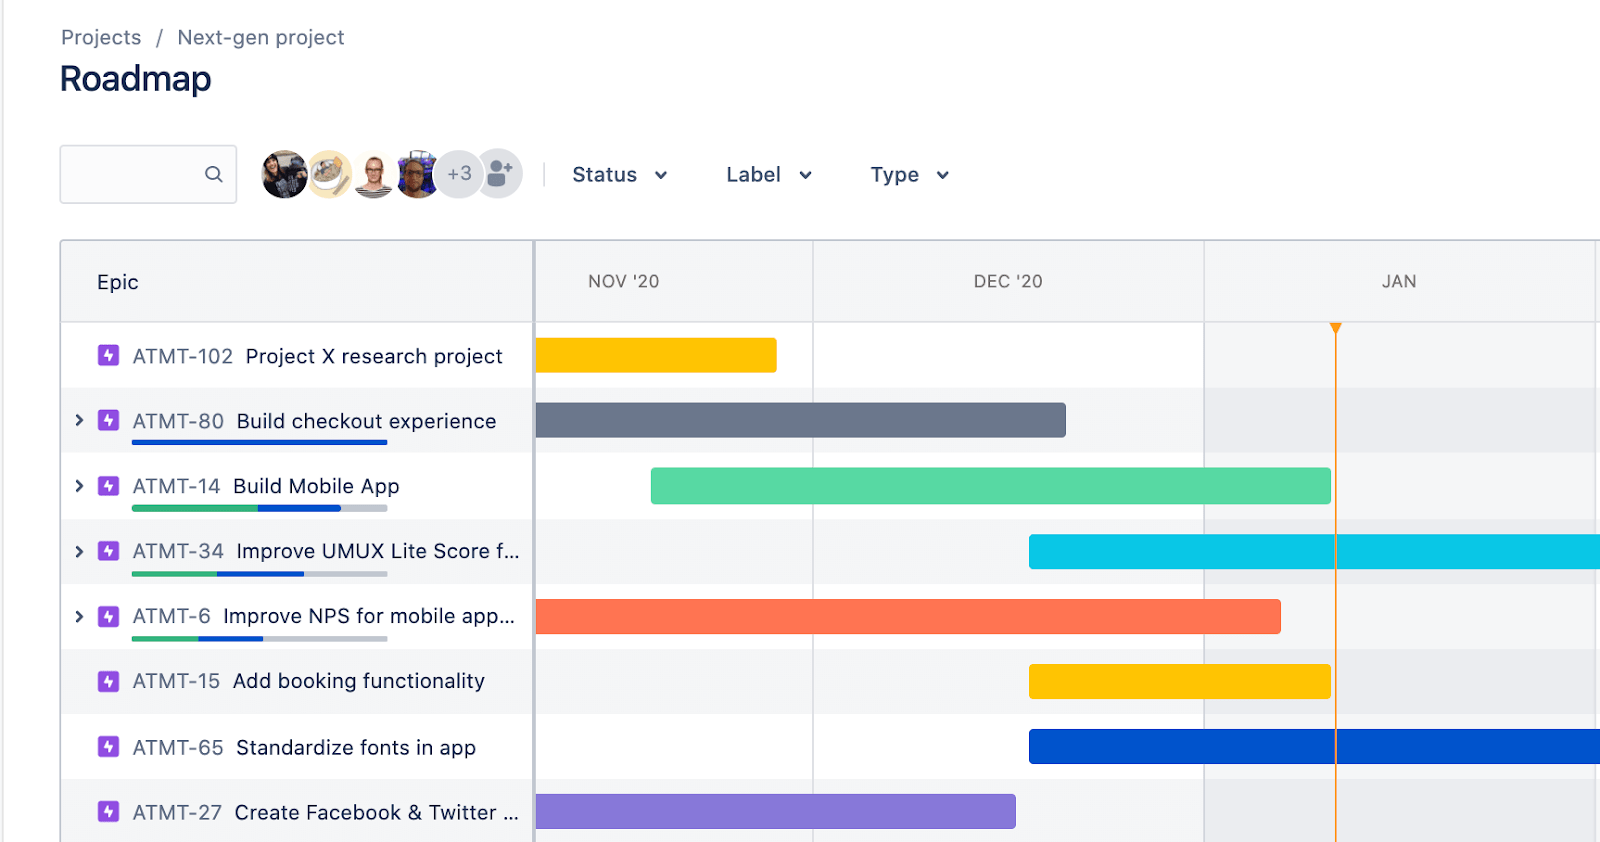
Jira Roadmaps is a tool that allows you to view projects and their related tasks from an organizational perspective.
Roadmaps give you a bird’s-eye of a project and allow you to share the long-term vision with your team and other relevant stakeholders.
It’s an ideal feature for managing long and complex projects spread over several months and involving multiple stakeholders.
It gives you a visual representation of your complete project timeline, its associated tasks, their dependencies, and the relevant team members responsible for each task.
This high-level project view helps you identify any potential hurdles or bottlenecks in your project plan and resolve them quickly. Roadmaps also help you identify any dependencies between tasks and ensure that all stakeholders are on the same page.
Roadmaps are an ideal tool to present technical project updates to non-technical stakeholders and decision-makers in your organization.
They share just the right amount of project details to keep all the stakeholders interested and not overburden viewers with unnecessary information. However, you can view additional information for any task or project by clicking it.
Types Of Roadmaps In Jira
Jira offers two different types of roadmaps.
Basic Roadmap: Designed for individual teams to track and manage their long-term projects. Basic Roadmaps are available to all Jira Software users.
Advanced Roadmap: Designed to help multiple teams track, manage, and collaborate on one or more long-term projects. It is available to Jira Software Premium users only.
Key Terminologies & Concepts In Jira Roadmaps
Jira Roadmaps follow a specific hierarchy for listing, tracking, and managing different projects and tasks.
Here are the key terminologies to remember while using Jira so that you understand how it works.
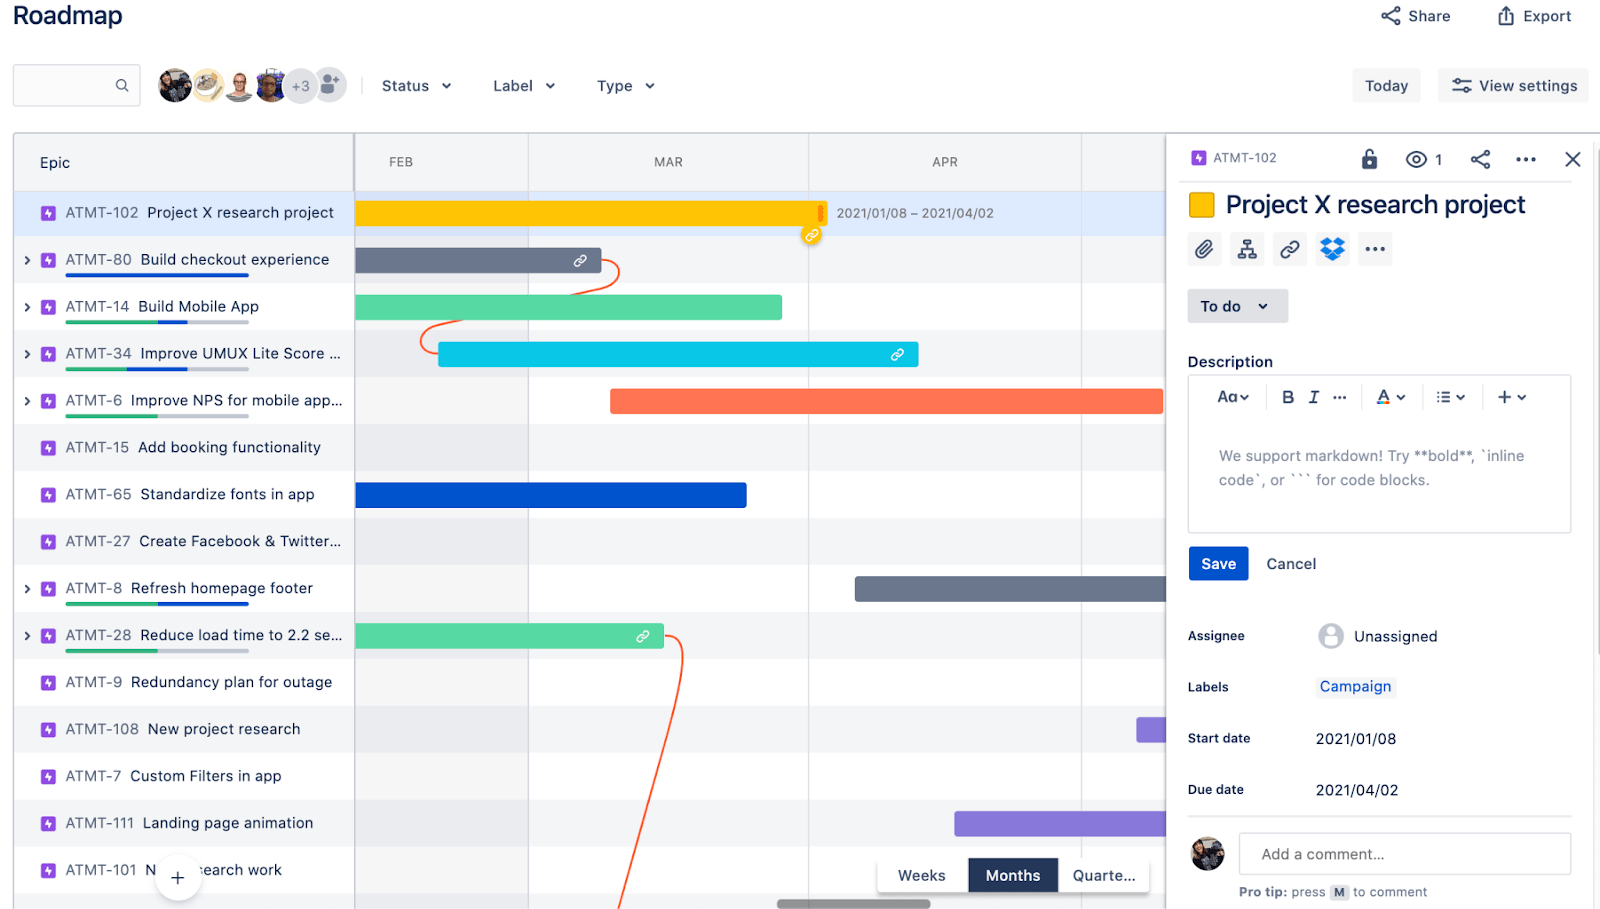
Epic: In agile project management, an epic is a large block of work or a long-term project that can be broken down into several tasks and sub-projects.
In Jira Roadmaps, epics are represented by large colored bars.
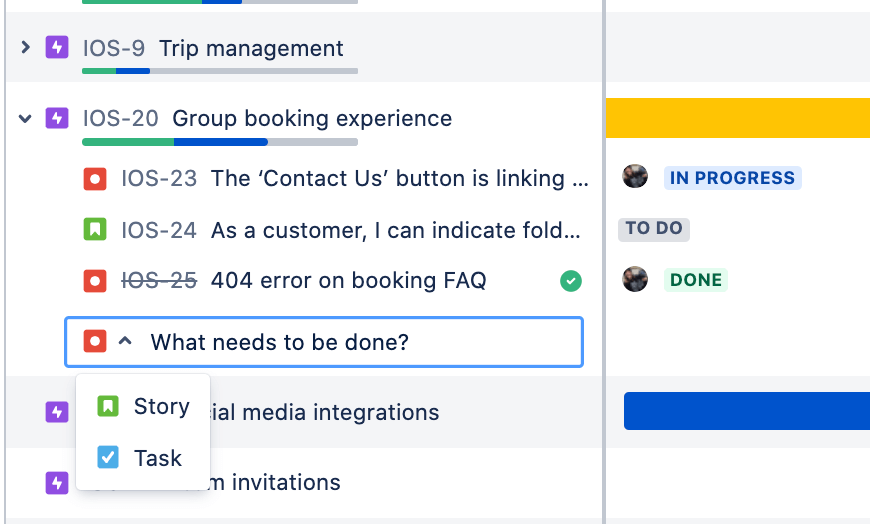
Child Issue: The tasks under an epic are called child issues. In Jira Roadmaps, you can add as many child issues to an epic as you want. For every child issue, you need to choose an issue type from the default list (stories, tasks, bugs) or create a new issue type if required.
Dependencies: When a company has several long-term projects in progress, one epic might be a prerequisite for another. Dependencies help you visualize all such relations between epic so that you can prioritize work better.
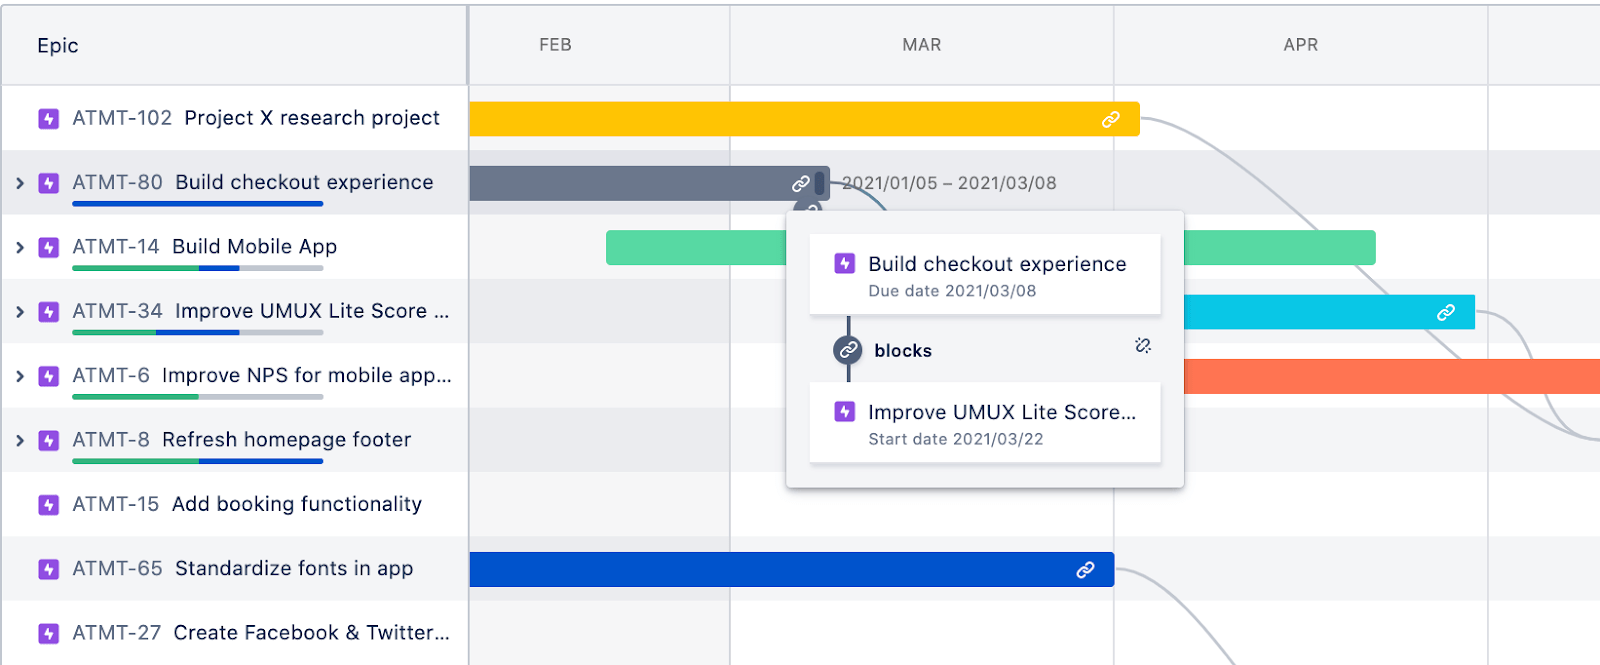
In Advanced Roadmaps, you can create and track dependencies between child issues and tasks.
Start and Due Dates: Every epic has a start date and due date determining its length within a roadmap. You can assign due dates to child issues as well. Setting the start and due dates for an epic helps you communicate deadlines and configure dependencies in your roadmap.
Plan: In Advanced Roadmaps, a plan combines the roadmaps of multiple teams of an organization and gives you a consolidated organizational view. It helps you visualize how the work of different teams in your company impacts each other.
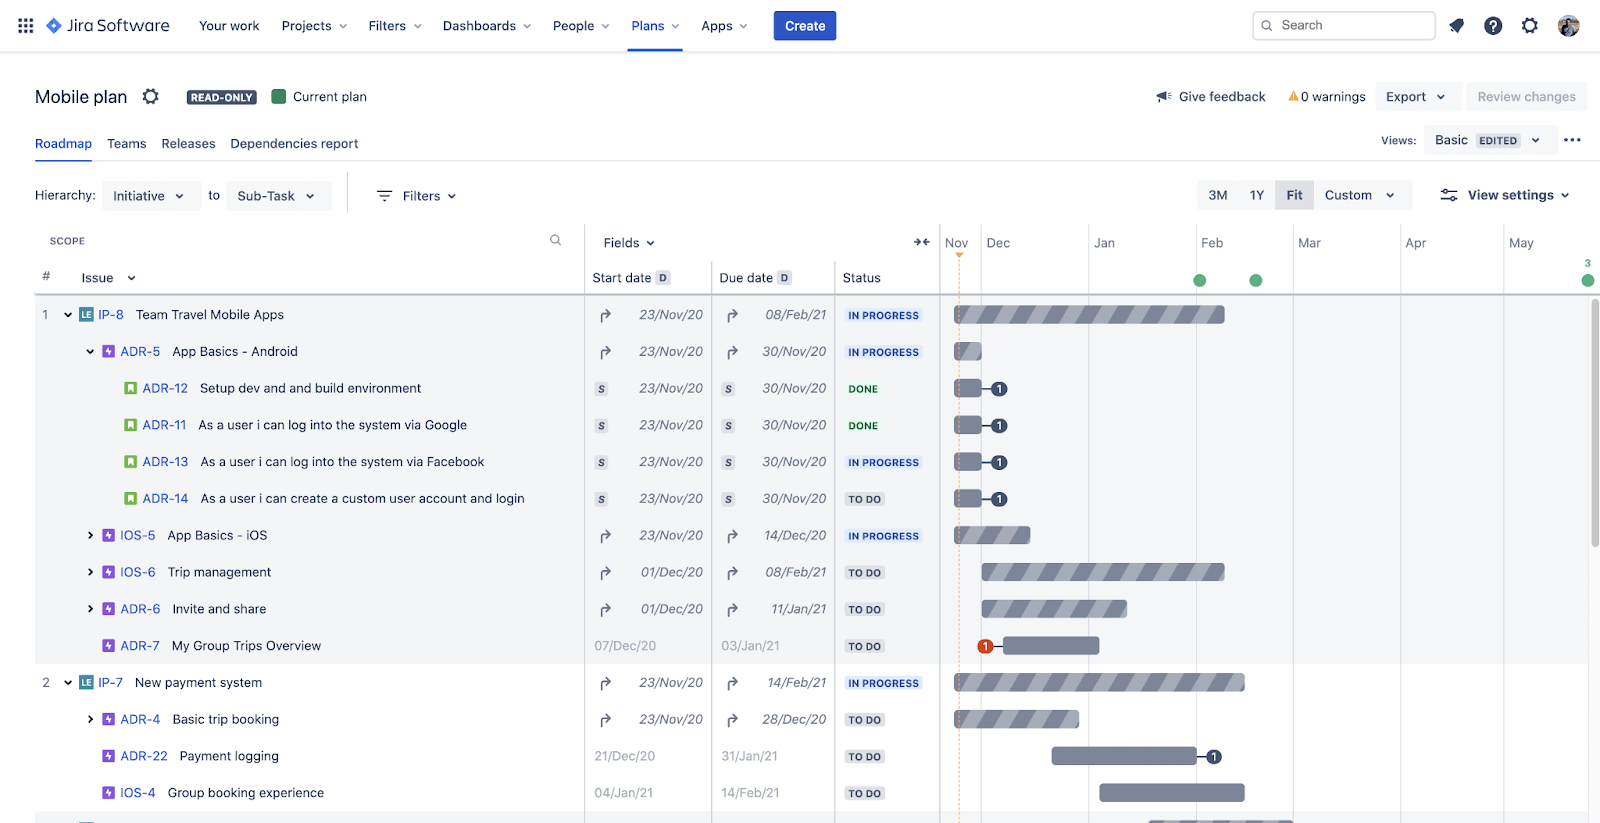
Issue Sources: Issue sources determine the data source for your roadmap plan. In Advanced Roadmaps, you can choose three types of data sources: Boards, Projects, and Filters.
Hierarchy: In Jira Roadmaps, the default hierarchy is epics → tasks → subtasks. However, in Advanced Roadmaps, you can add a hierarchy level on top of epics to group different epics together by organizational objectives. This way, your organization can have multiple strategic goals, each carrying its own set of epics under which smaller tasks and sub-tasks are tracked.
Now that you understand how Jira Roadmaps work, let’s see how you can use them for project management.
Create A New Jira Roadmap
By default, Roadmaps are enabled in all Jira Software accounts. Here’s how you can access them.
Step 1: Sign in to your Jira account.
Step 2: Choose the relevant project where you want to create/access the roadmap.
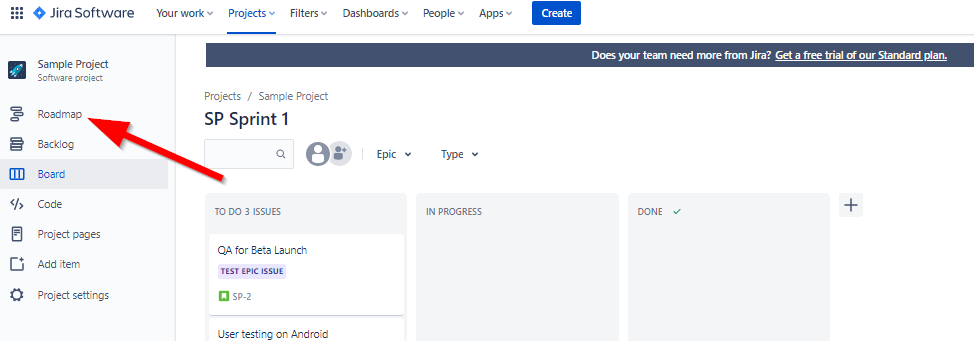
Step 3: Click on Roadmap in the left menu under your project.
If Roadmaps are not enabled in your Jira account, you can activate them by following the steps below.
Step 1: Sign in to your Jira account.
Step 2: Click on the relevant project from your main dashboard.
Step 3: In the menu on the left of your screen, click Project Settings.
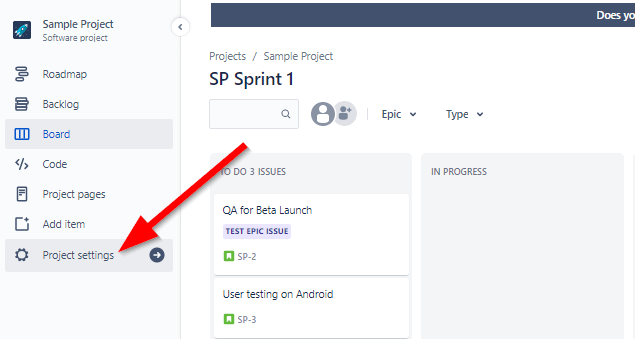
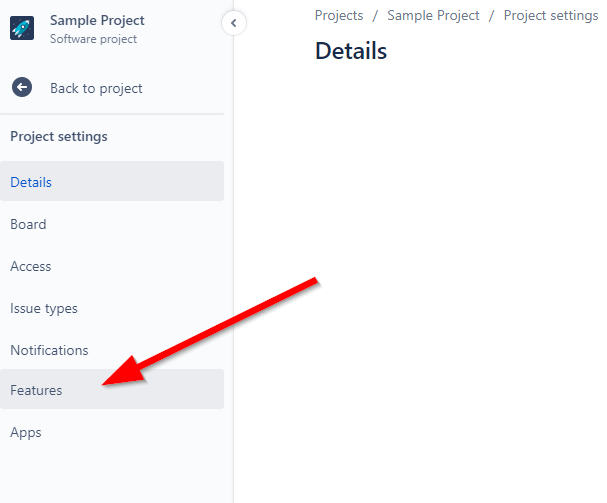
Step 4: On the project setting page, click Features in the left menu of your screen.
Step 5: All the main features of your Jira account are listed on this page. Toggle the switch next to Roadmaps to enable this feature.
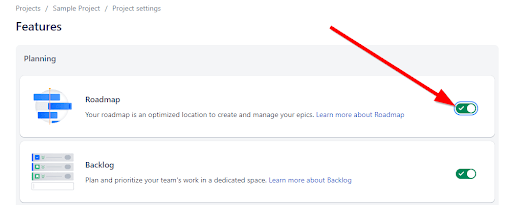
When enabled, the switch next to Roadmaps should turn green and show a check mark.
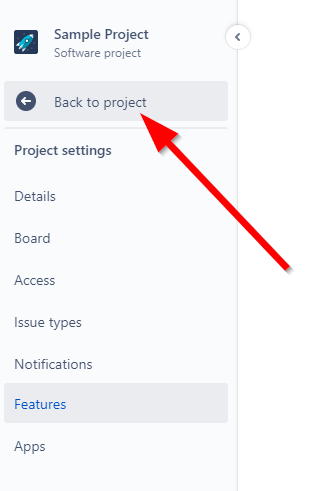
Step 6: Now click Back to project to return to your project dashboard.
Step 7: Click on Roadmap in the left menu of your screen to access your project roadmap.
You have now successfully enabled Roadmaps for your project.
If you have multiple projects in your Jira account, you’ll need to enable Roadmaps for all of them separately (if they’re not already enabled.)
Create An Epic In Your Jira Roadmap
Creating epics is the first step to using Jira Roadmaps. An epic represents a long-term project with several tasks and sub-tasks.
It appears on your roadmap as a colored bar.
Here’s how you can create an epic in Jira Roadmaps.
Step 1: Sign in to your Jira account.
Step 2: Choose the relevant project.
Step 3: Click on Roadmaps from the left menu of your screen.
Step 4: To create a new epic, click on + Create Epic.
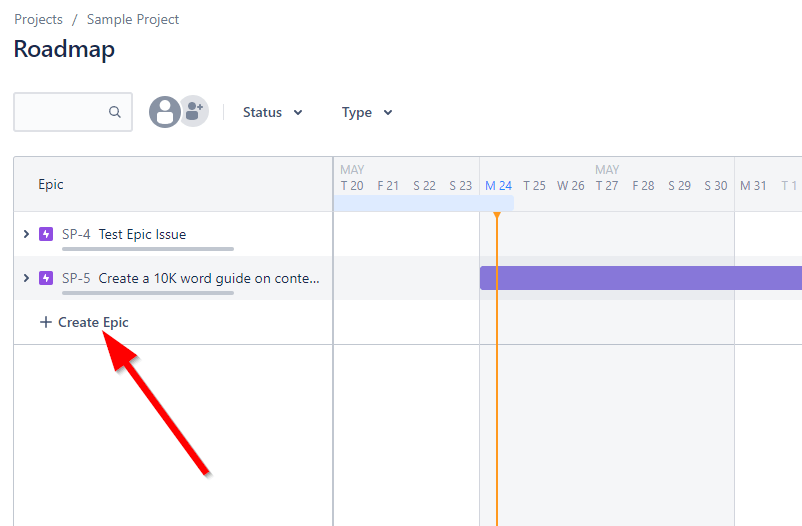
Step 5: Enter a descriptive name of your epic in the text box so everyone can immediately recognize the project.
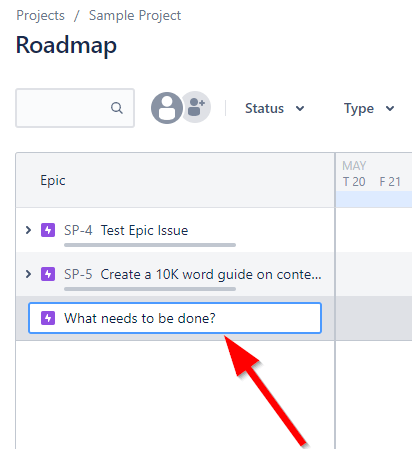
Step 6: Once you enter the epic name, press the Enter key to create the epic.
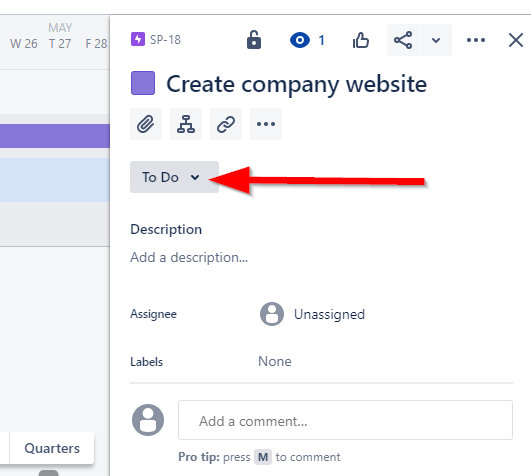
Step 7: Now click on the epic to open its settings panel on the right of your screen.
The settings panel provides you with various options related to your epic that we’ll use in the following steps.
Step 8: First, choose the workflow stage (To-Do, In-Progress, Done) of your epic from the dropdown menu in the settings panel.
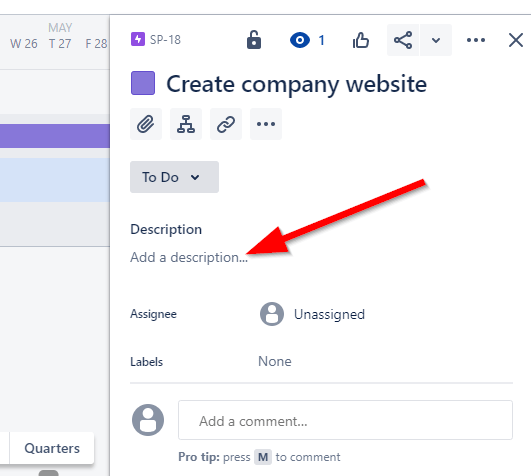
Step 9: Click on the text box below Description and add a description that introduces the viewer to the long-term objective of the epic. Press Enter to save the description.
Step 10: To assign the epic to a team member, click on the icon next to Assignee. Then, click on the team member you want to make responsible for the epic.
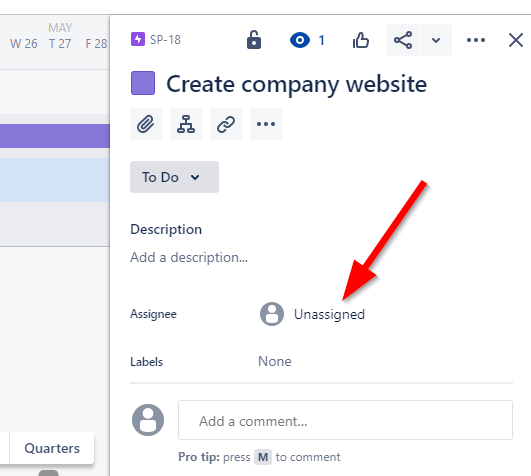
Step 11: If you want to add any labels to your epic, click on the field next to Label. Enter the desired label and press Enter to continue.
Until now, your epic has not been visible on the roadmap because you haven’t assigned any start or due dates.
Step 12: To assign a start date, click on None next to Start Date and choose a start date from the calendar. Press Enter or click anywhere outside the date field to continue.
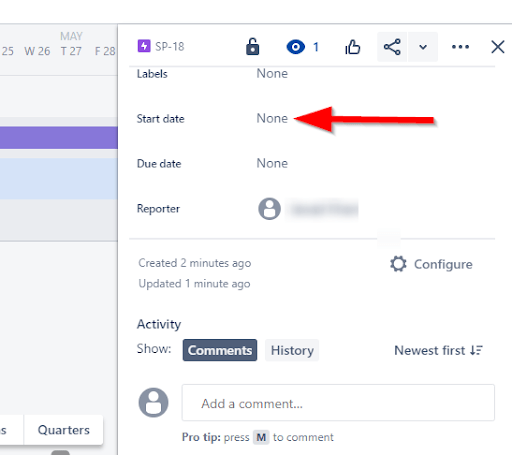
Step 13: To add a due date, click on None next to Due Date. Select a date from the calendar. Press enter or click anywhere outside the date field to continue.
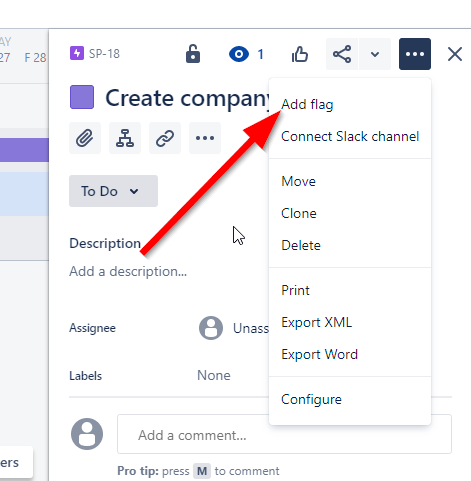
You can also flag an epic to highlight an urgent issue.
Step 14: To add a flag, click on the actions icon in the settings panel of your epic.
![]()
Step 15: Click Add flag.
Step 16: If you want to delete an epic, open the options menu of your epic and click Delete.

Step 17: To explore additional configuration options for an epic, click on the actions icon in the settings panel. Now click Configure to open the configuration page. On the configuration page, you can add or remove fields to your epic settings panel.
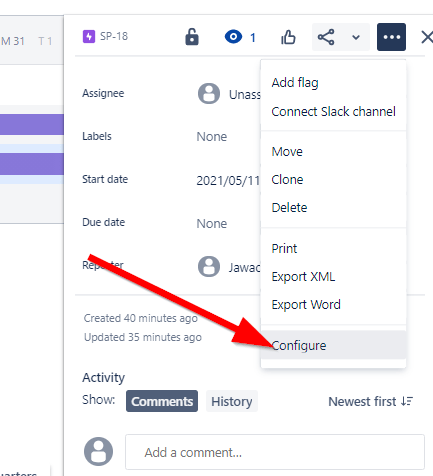
Step 18: To add a new field, drag it from the fields panel on the right to the context field of your epic.
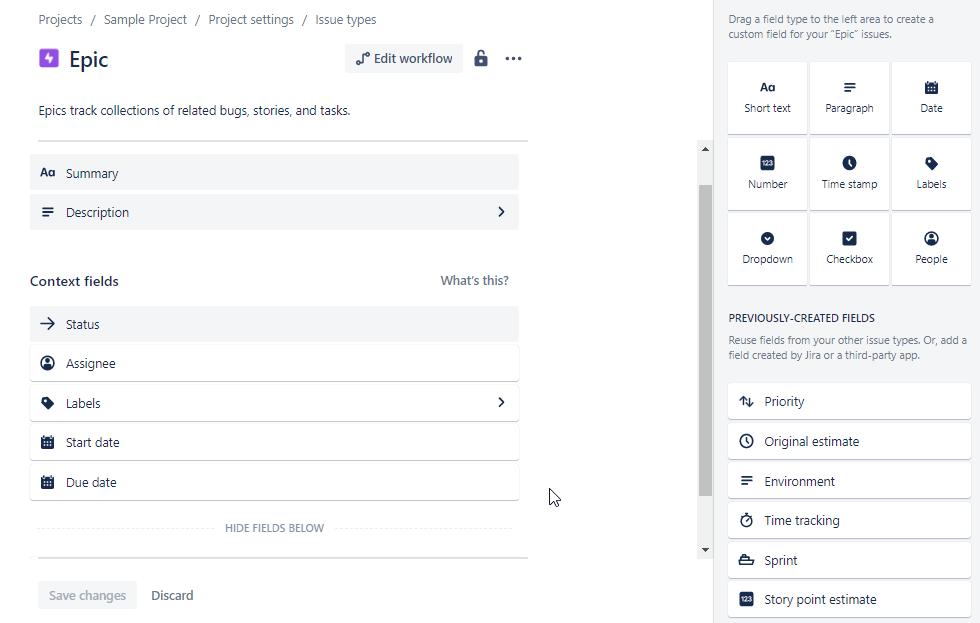
Step 19: Click Save Changes to make the new fields a part of your epic’s settings panel.
You’ve successfully created and configured an epic in Jira Roadmap. You can make more epics using the same process.
Create A Child Issue
An epic represents a long-term project goal. To achieve that goal, you need to perform several tasks and subtasks within each epic. These tasks are called child issues in Jira Roadmaps.
Here’s how you can create a child issue.
Step 1: Open the roadmap of the relevant project in Jira
Step 2: Click on the epic under which you want to create a child issue.
Step 3: Hover your mouse pointer over the relevant epic.
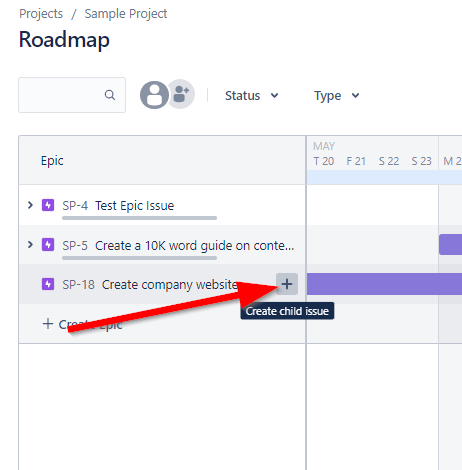
Step 4: Click on the + icon to open a child issue field. To choose the type of child issue, click on the type icon.
![]()
Step 5: Choose the relevant issue type (Task, Bug, Story).
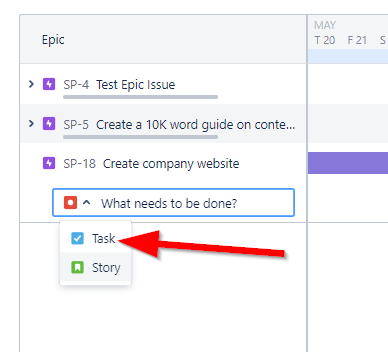
Step 6: Add a descriptive title to your child issue. Press the Enter key or click outside the text field to create the child issue.
Step 7: Click on the child issue under the relevant epic to open its settings panel.
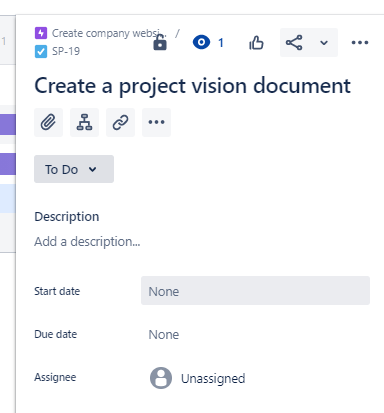
Step 8: The settings panel of a child issue is very similar to an epic. To add start and due dates, click on the relevant fields next to them and choose a date.
Step 9: Configure the rest of the fields the same way as described in the epic settings.
Your child issue is now visible under its relevant epic. You can create more child issues using the same process.
You can also drag and drop child issues from one epic to another in the roadmaps interface.
Common Problems When Creating Jira Roadmaps
Here are some of the most common problems users face while creating and using Jira Roadmaps.
Problem 1: Can’t Find Jira Roadmaps
If you can’t find the roadmaps feature in your Jira Software account, you’re not alone. It’s one of the most commonly reported issues on the Atlassian help forum.
Here’s how to resolve it:
Step 1: Sign in to your Jira account.
Step 2: Click on the project for which you want to enable roadmaps.
Step 3: In your project screen, go to Project Settings → Features.
Step 4: Click on the toggle switch next to Roadmaps to enable the feature in your Jira account.
Problem 2: Can’t Edit Roadmaps
Another common problem reported on Jira help forums is that users are unable to edit their roadmaps.
This happens when you don’t have the necessary usage rights.
Only Administrators have the right to change roadmaps. If you can’t edit your roadmaps, check your role with the relevant Jira administrators in your company and have it adjusted if necessary.
Problem 3: Must Use A Custom Issue Type For Child Issues
The default issue types for child issues are Task, Bug, and Story.
However, if you want to use custom issue types for your child issues, follow these steps.
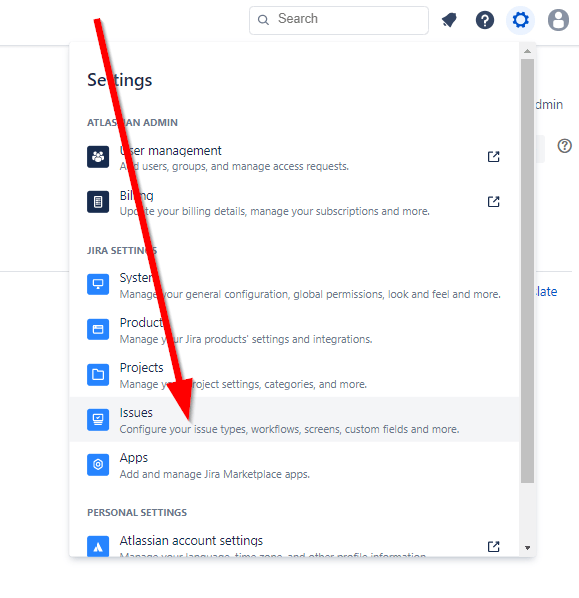
Step 1: Click on the settings icon in your Jira Account.
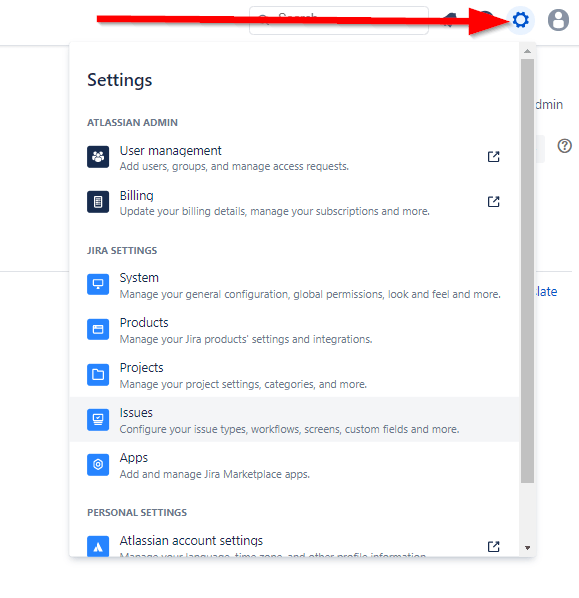
Step 2: Click on Issues.
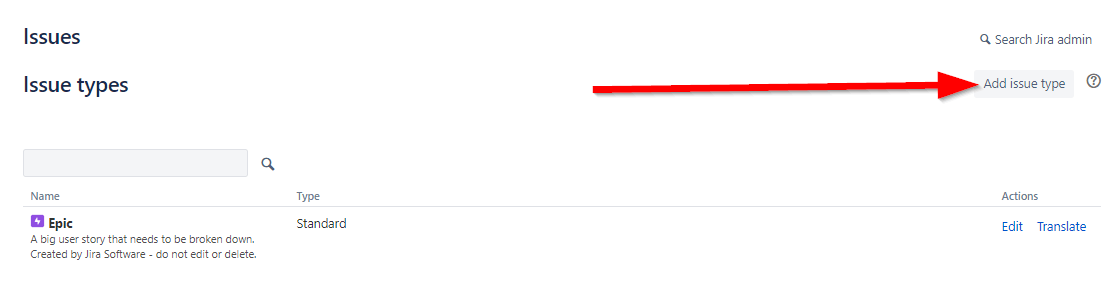
Step 3: Click on Add issue type.
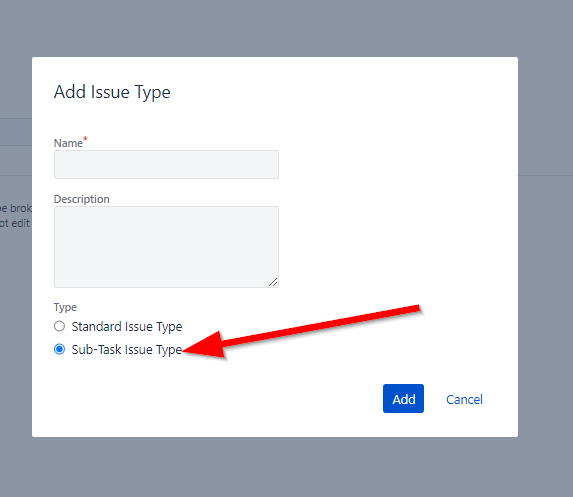
Step 4: Add your issue name and description.
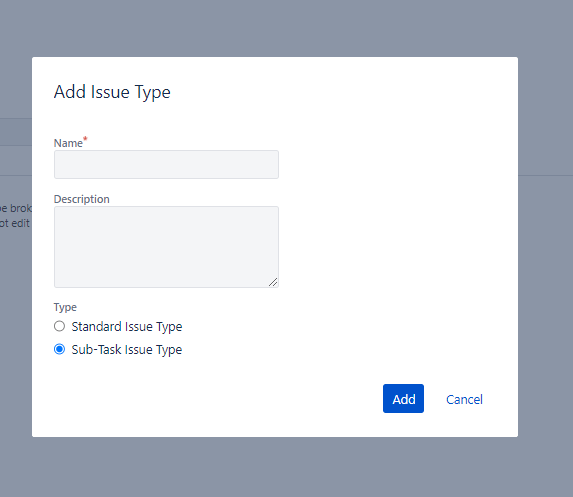
Step 5: Under the type heading, select Sub-Task Issue Type.
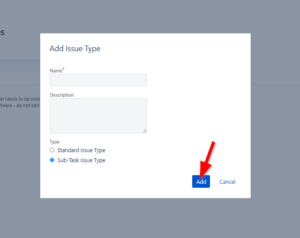
Step 6: Click Add to create the new issue type.
Now, when you create a child issue in Jira roadmaps, your new issue type will be visible in the dropdown menu.

