How to Use GitLab
Git is a free and open-source distributed version control system that allows developers to handle everything from small to very large projects with top speed and efficiency. Its goals include data integrity, speed, and support for distributed, non-linear workflows, which essentially means multiple people can work together on the same code without hindering the other’s progress.
GitLab is an online platform where you can carry out all Git-related actions in your browser.
On its website, GitLab describes itself as “an open-source software to collaborate on code“. What’s more, the platform allows non-developers—or at least people who’ve never professionally learned how to use a version control system—to add modifications in the code without needing extensive computer science training.
In this guide, we’ll give you a step-by-step tutorial on how to get started with GitLab, as well as tackle common problems during the process.
Let’s dig right in.
1. Sign Into Your Account
Open the official GitLab website and log in to your account.
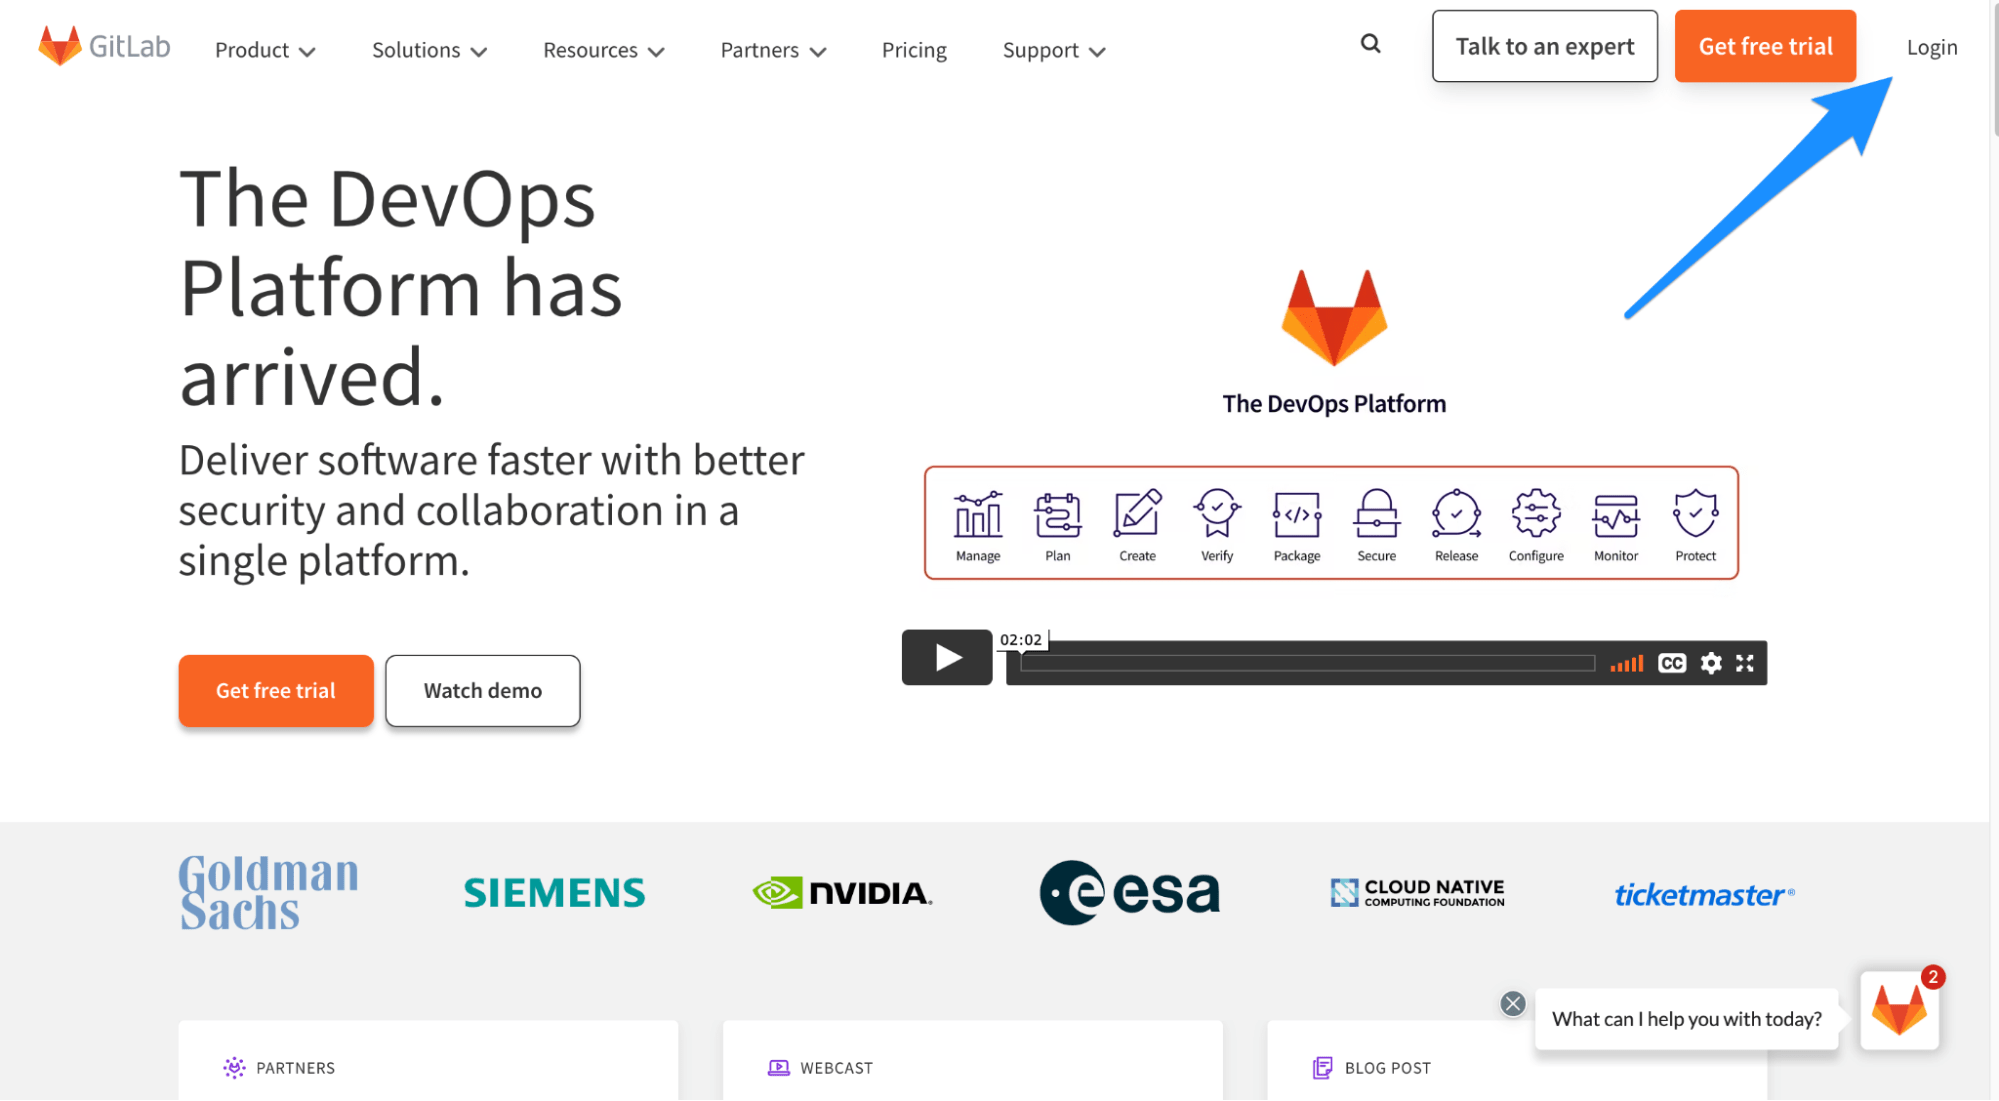
If you don’t already have an account, sign up for a new account with your credentials. Alternatively, you can sign in with Google and other third-party sites like LinkedIn.
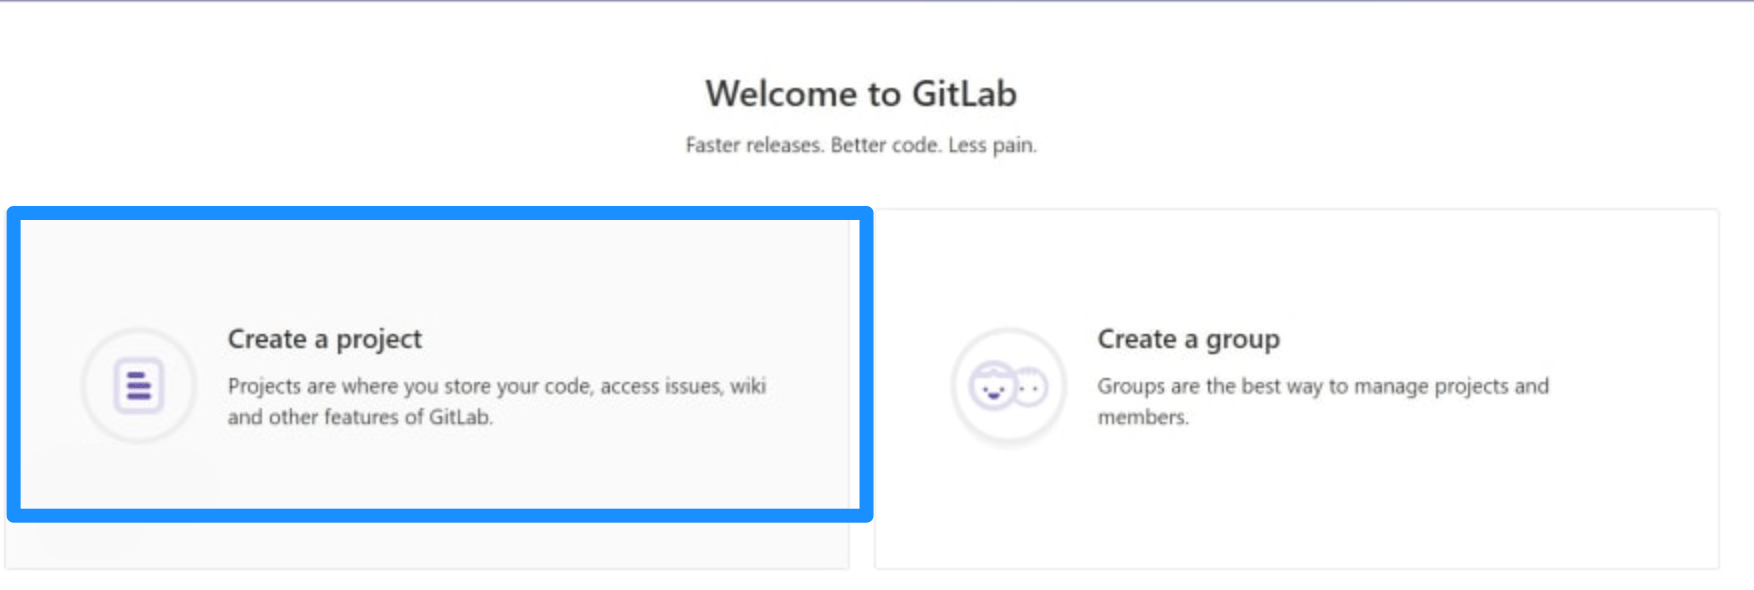
2. Create Your First GitLab Project
On your screen, click on Create a project followed by Create blank project.
Enter a suitable name for your project and a slug. The slug will show up in the URL of your project on GitLab, so make sure it’s written properly. You can also write a project description. While this is optional, we highly recommend it for clarity.
Please note the visibility of your project is ‘Private‘ by default. You can change it to ‘Public‘ if your project is public-facing and doesn’t have any sensitive or confidential information.
For the purpose of this article, we’ve changed the visibility from ‘Private‘ to ‘Public‘.

Your GitLab repository should open after you complete all the steps described above. It will have the same name you chose for the project, plus a couple of default lines, namely, a README with basic user documentation and a GitLab yml file for continuous integration.
3. Open a Git Bash and Configure a Git
You can enter the following commands either in Git Bash or configure the Git directly in your terminal:
git config –global user. name
git config –global user.email
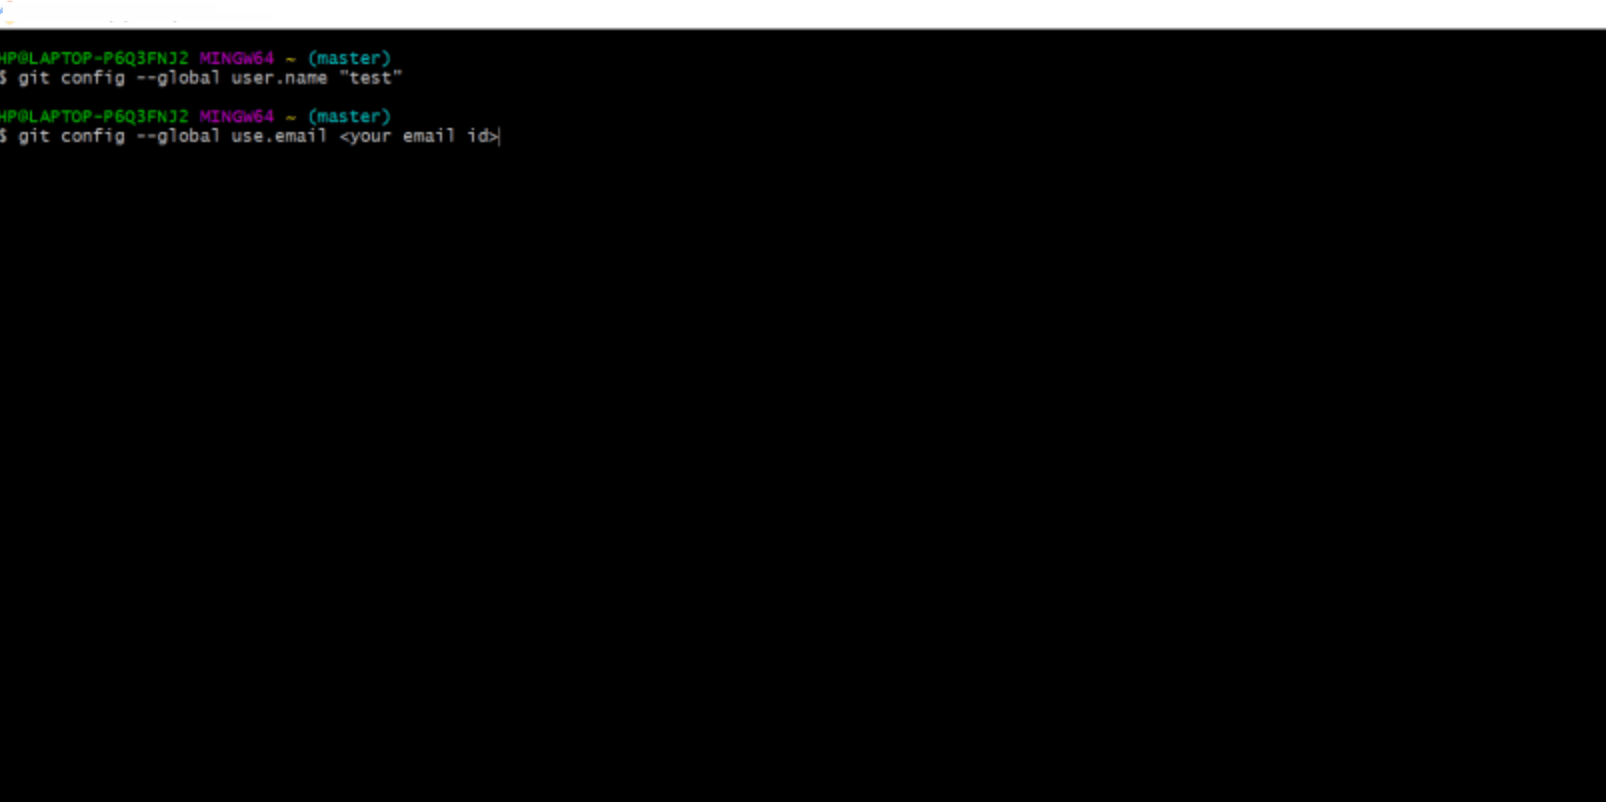
Note: If you are a new user and have already configured Git, you can skip this step.
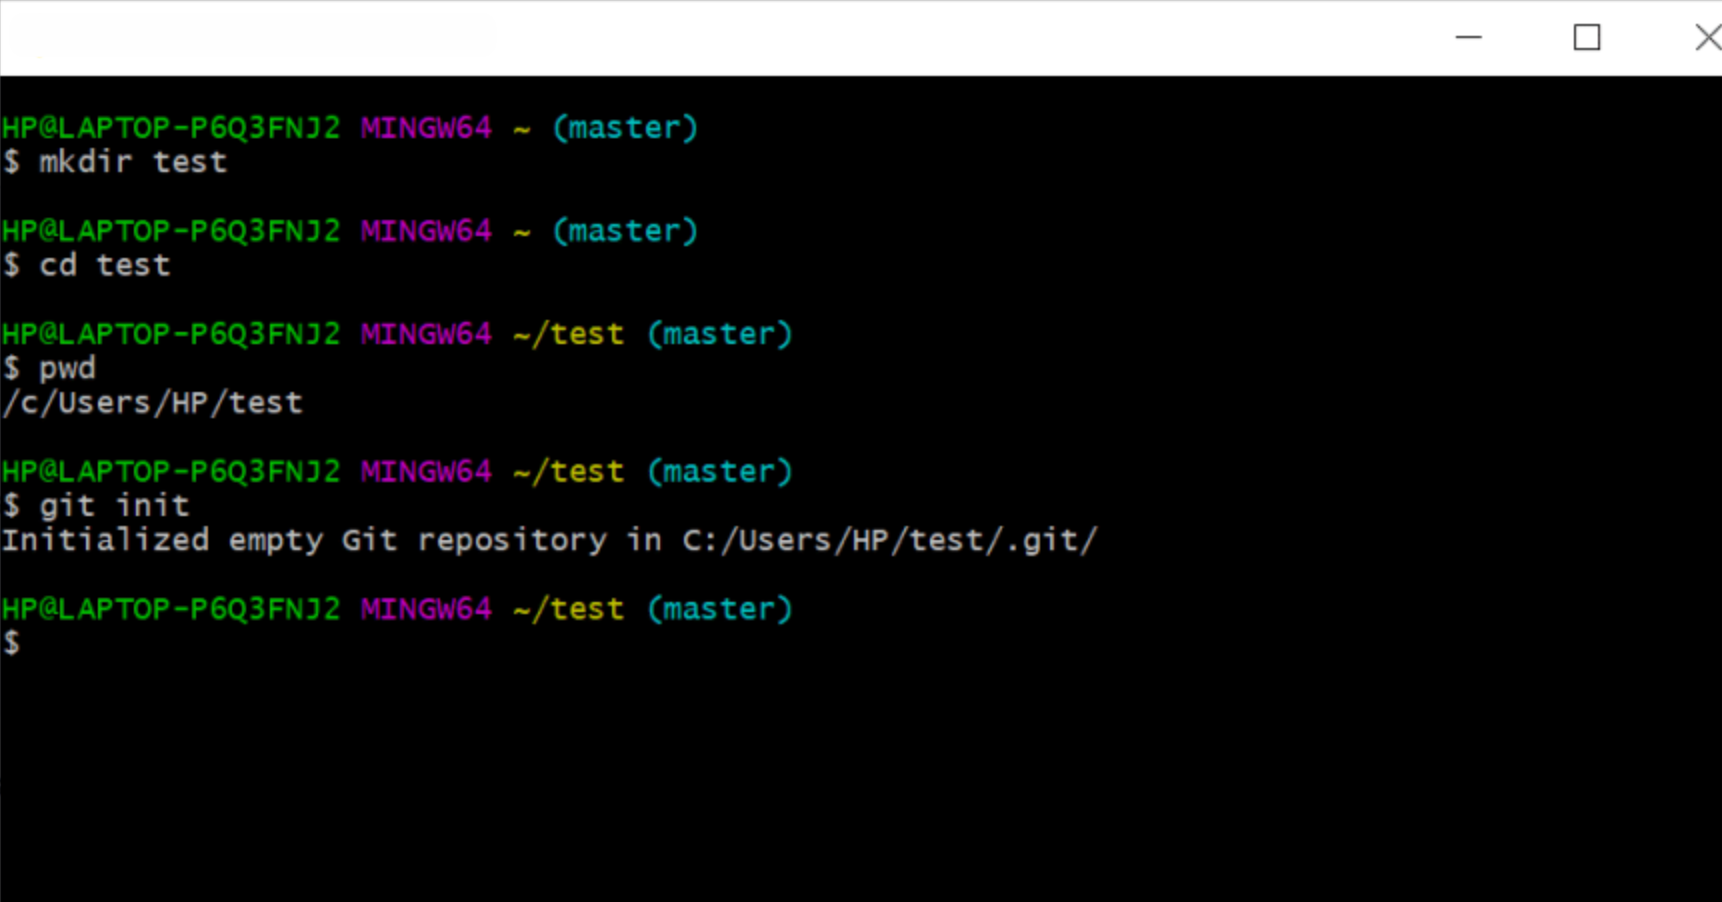
4. Create a Project Folder or Directory to Initialize Git
To make a directory or folder in GitLab, enter the following command: mkdir
Next, open your newly created directory or folder with cd , and then confirm the directory location with pwd or ls.
Finally, initialize your Git repository using git init.
5. Create an Example Text File
In this step, you can make changes to your file based on your requirements.
To do this, open your file or notepad using the following command: notepad
As you type the above command, the notepad app will open towards the lower side of your screen. It should look something like this:
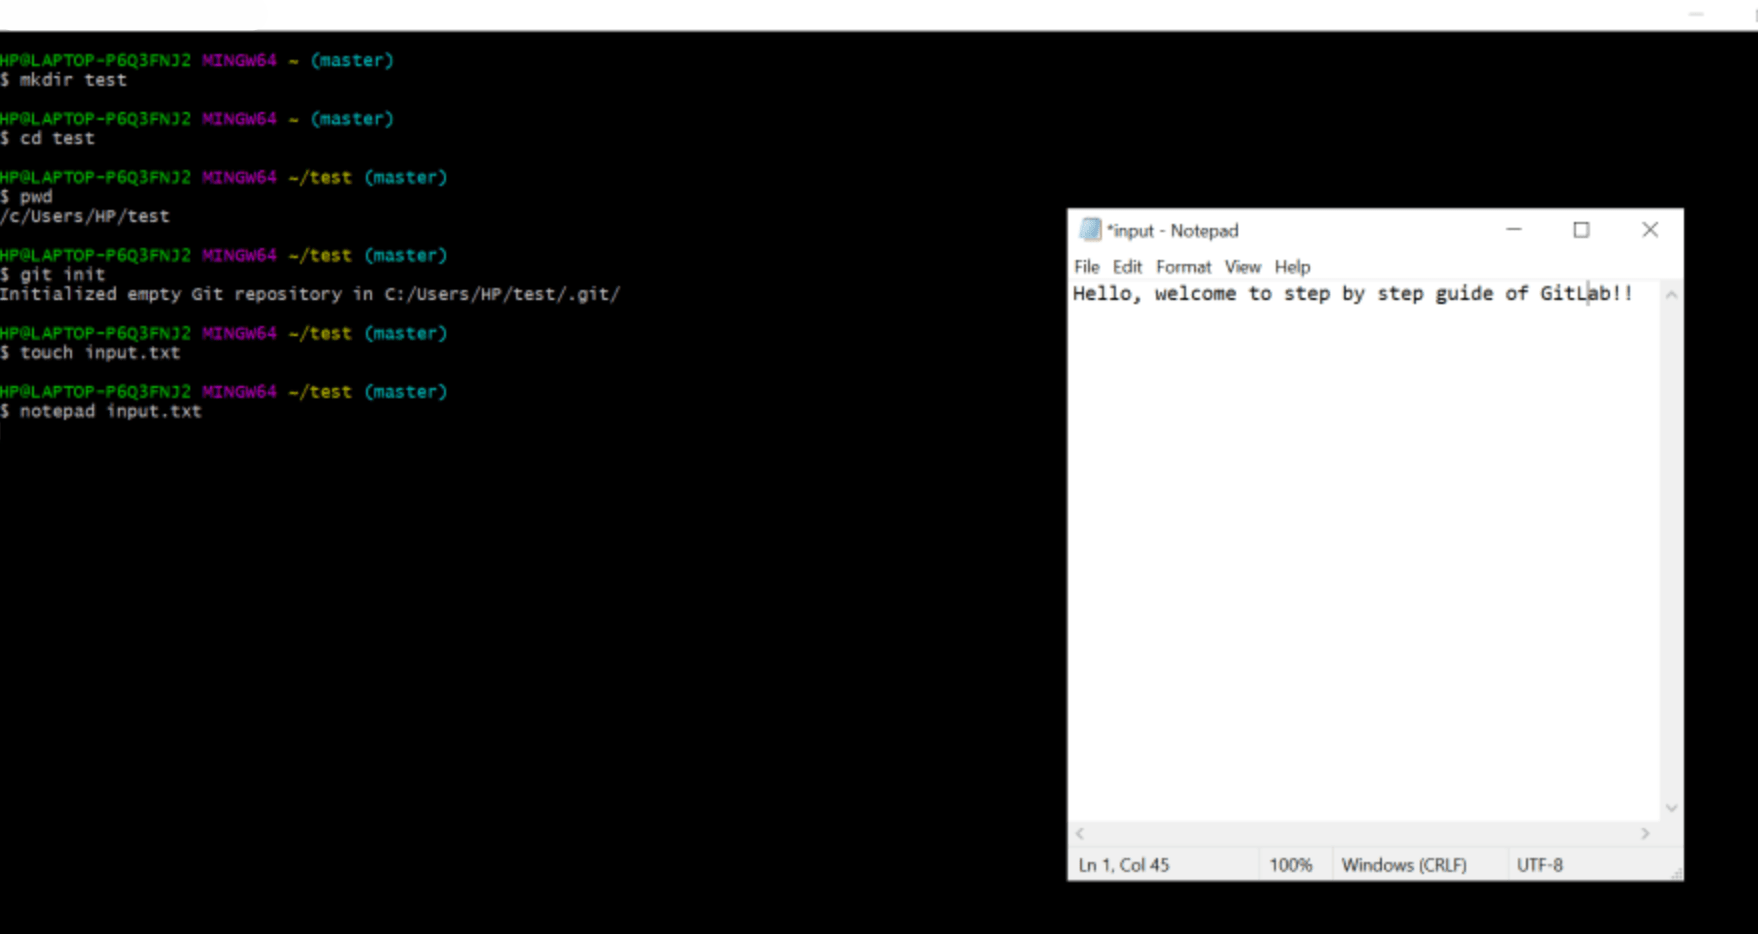
At this stage, you can make any changes to the notepad text file depending on your requirements.
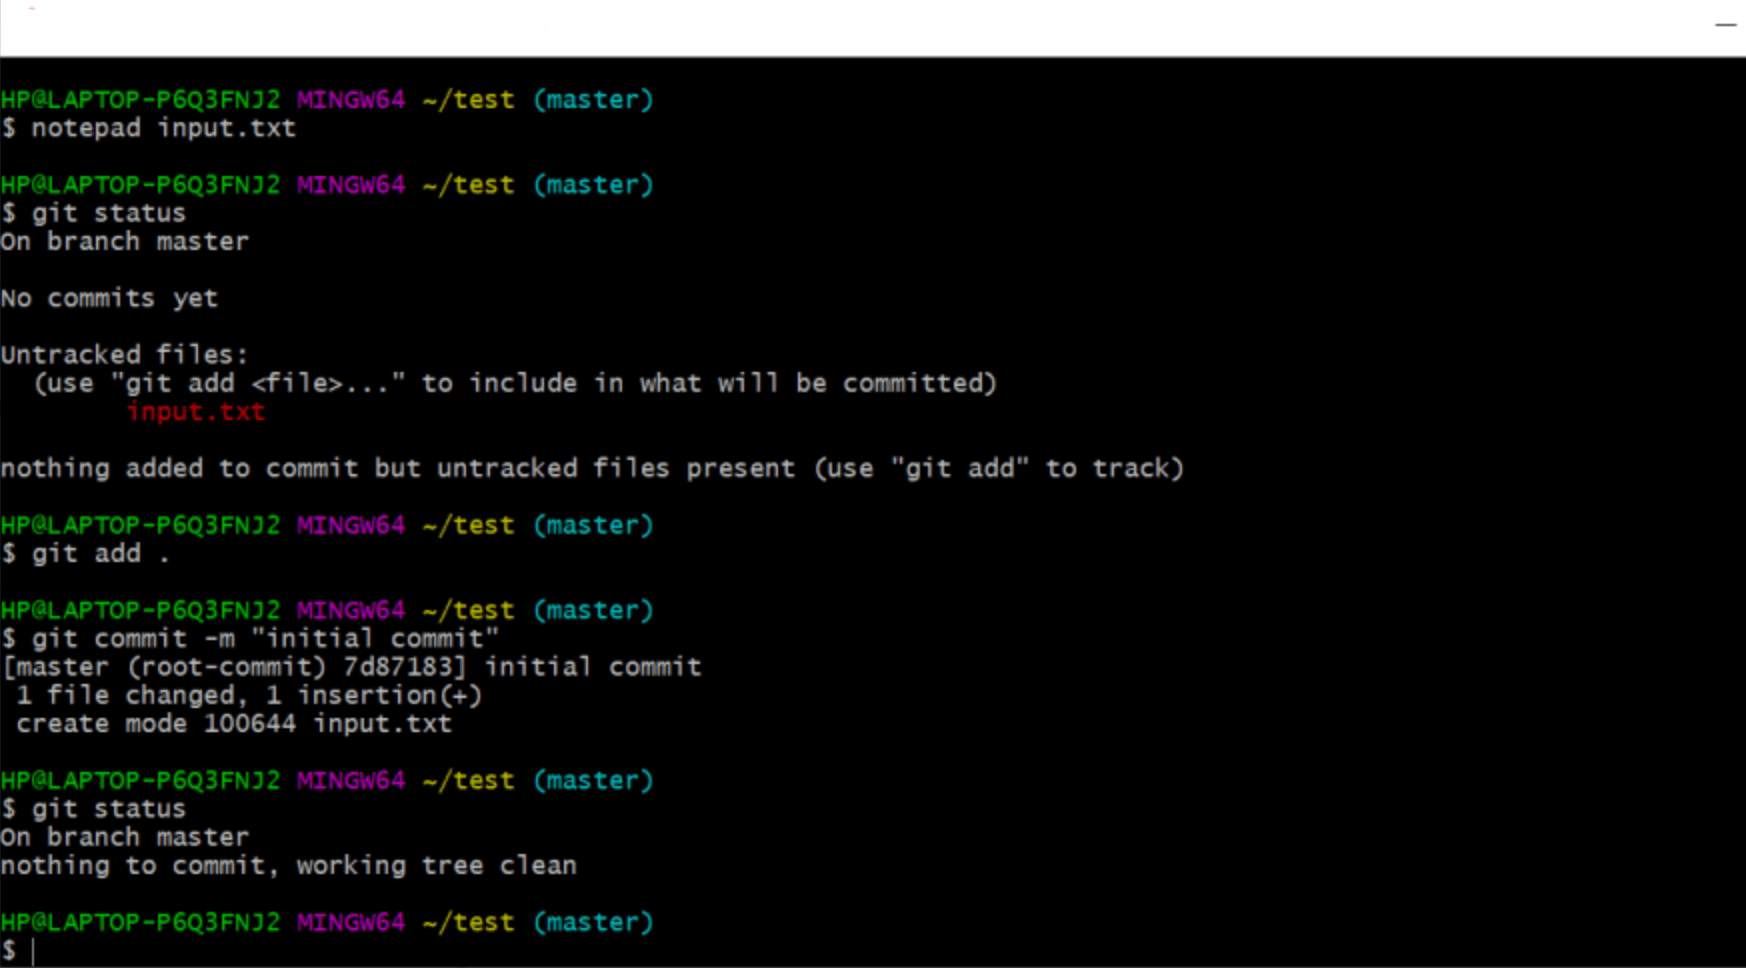
6. Add the File to Staging and Commit the Changes
Before you add the file to staging and commit the changes, you’ll have to check the current status of your Git repository. To do this, enter the following command: git status
Follow this up by adding all changes in the current directory to the staging area: git add
Next, commit the change by entering the following command: git commit -m
The whole thing should look something like this:
7. Push Local Changes to the Remote Repository
At this stage, you will use the remote command and the push command (in that order) to push the file to the remote repository.
Enter and run the following subsequent commands in your terminal:
git remote add origin
git remote -v
Follow the above by pushing the local repository to the remote GitLab server by using the git push -u origin master/main command.
As you write the push command, you will see this window appear on your screen for authentication:
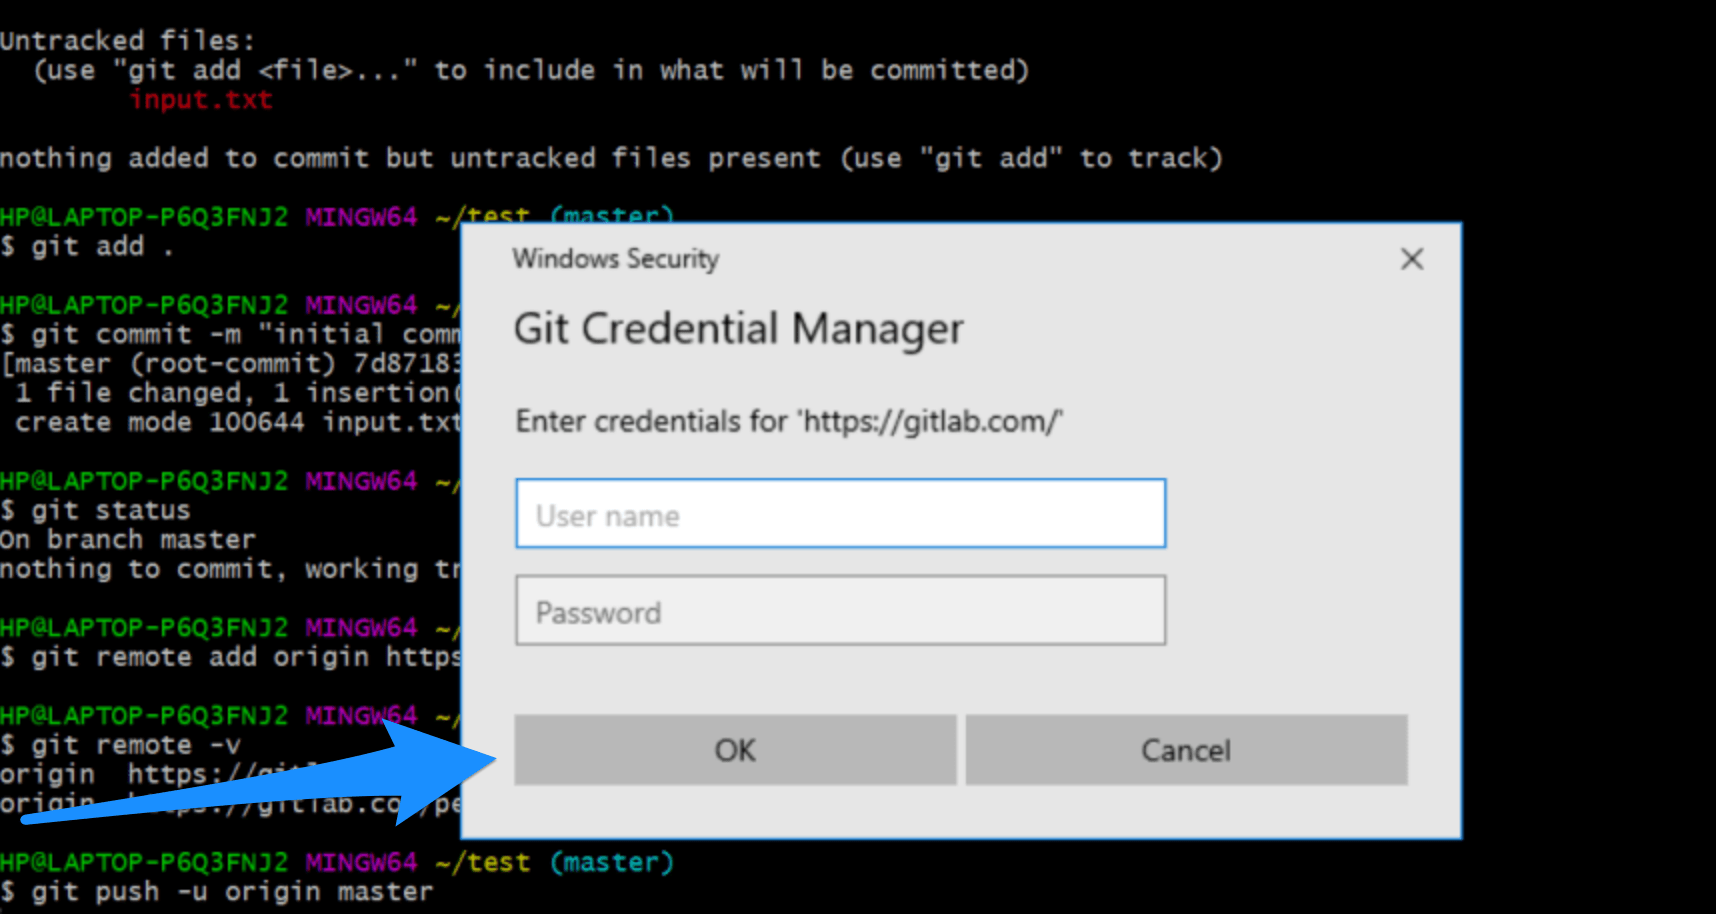
Enter your GitLab credentials and click on OK to continue.
And that’s it! All of your local changes will be automatically checked into version control and reflected on your remote GitLab repository.
This is how you upload your first project on GitLab using version control. While all these steps aren’t necessarily the easiest to follow, things will become a lot less complicated once you get a better hang of things.
A Handy List of Git Commands
Here’s a comprehensive list of essential Git commands that you can use to work on GitLab. Let’s take a quick look.
- To check the version of Git
-
- $ git –version
- To add a Git username to help identify the author
$ git config –global user.name “USERNAME”
-
- To verify Git username
$ git config –global user.name
-
- To set the email address
$ git config –global user.email “email_address@example.com”
-
- To verify the email address
$ git config –global user.email
-
- To add all files to the platform
$ git add .
-
- To view all changes made to code in red color, and then add the file
$ git add file-name
-
- To check all changes made in the file
$ git status
-
- To verify and check the complete information list
$ git config –global –list
-
- To create a new branch
$ git checkout -b branch-name
-
- To switch from one branch to another
$ git checkout branch-name
-
- To pull all the latest changes to the master branch
$ git checkout master
-
- To send changes to the master branch
$ git push origin branch-name
-
- To delete all changes, including all untracked files
$ git clean -f
-
- To merge a different branch with the master branch
$ git checkout branch-name
$ git merge master
Common Problems When Using GitLab
Saying Git is complex is an understatement. So when you’re brand-new to the world of Git, you are bound to make mistakes. In this section, we’ll cover the six common Git mistakes, as well as solutions to help you fix them.
Problem #1: Spelled that Last Commit Message Wrong
When working on a code for a considerable amount of time, you start making spelling mistakes. If you spell your last comment message wrong, all you need to do is enter the following command:
git commit –amend
This will open up the editor, allowing you to make the required changes to your last commit message.
Problem #2: Add a File to Your Last Commit
Committing too early is another common Git issue. Does this sound familiar: you missed a file, forgot to save it, or perhaps have to make a minor change to the last commit?
This is another issue where you’ll be using —amend.
After adding that missed file, run the command. It should look something like this:
git add missed-file.txt
git commit –amend
At this stage, you can either amend the commit message or save it to retain the message.
Problem #3: Committing the Changes to the Master Branch
Imagine you’re working on a new feature, but you forget to open a new branch for it. In your haste, you ended up already committing a lot of files that are now sitting on the master branch.
The good news is GitLab can stop you from pushing directly to the master branch. In this case, however, you can roll back all the changes to a new branch by entering the following three commands:
git branch future-brunch
git reset HEAD~ –hard
git checkout future-brunch
Applying the above command will create a new branch, roll back the master branch to where it was before you committed the changes, and then provide you a new branch with all your previous changes.
Note: Be sure to commit or stash all your changes first. Otherwise, you will lose all your progress.
Problem #4: Misspelling Your Branch Name
You can rename your branch in the same way you rename a file with the mv command, which involves moving the branch to a new location with the correct name. Like this:
git branch -m future-brunch feature-branch
If you already pushed the branch, you’ll have to carry out a few extra steps. First, you will have to delete the old branch from the remote and then push up a new one.
git push origin –delete future-brunch
git push origin feature-branch
Problem #5: Removing the File You Mistakenly Added to Your Repository
Regardless of whether you add a rogue ENV file, a personal picture, or a build directory, it’s all fixable.
If you simply staged the file and didn’t commit yet, you can reset that staged file by using the following command:
git reset /assets/img/misty-and-pepper.jpg
On the other hand, if you have already committed that change, you’ll have to run an extra step before. It’ll go like this:
git reset –soft HEAD~1
git reset /assets/img/misty-and-pepper.jpg
rm /assets/img/misty-and-pepper.jpg
git commit
Applying the above command will undo the commit, remove the image, and then add a new commit in its place.

