How to Stop Email Spoofing
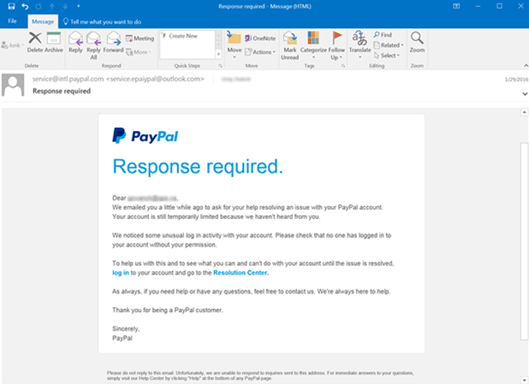
Email spoofing relies on fabricating a sender’s address in the hope of duping the recipient. The motivation is typically sinister and most likely an attempt to steal funds, send malware, take over an account, or collect the recipient’s personal information.
Here’s a step-by-step guide to help you stop email spoofing.
Step 1 – Register a Sender Policy Framework (SPF) Record
A Sender Policy Framework (SPF) prevents scammers from hijacking your domain to send emails purporting to be from your organization. For example, a cybercriminal may use your domain to send emails to your client list asking them to take specific actions, such as providing sensitive information, sending payment to an alternate bank account, or downloading malware-infected files.
You’ll need to publish an SPF record for your domain to prevent this scenario. An SPF record is simply a list of all the IP addresses authorized to send emails on your behalf. Therefore, this record lets receiving servers know whether the sender can send an email on your behalf. If not, the email might be quarantined or rejected. At the very least, the email may be flagged as suspicious.
Start by creating a list of all your domains, including inactive domains or domains that you don’t use to send emails. You’ll need to create a separate record for each domain, so this step is essential. Also don’t forget to include email service providers (ESP), mail servers, and other miscellaneous services such as payment providers.
You register your SPF record in your overall Domain Name System (DNS) records. So you’ll need access to your domain’s DNS control panel to create your SPF record. You can typically find information on accessing the DNS control panel from your hosting provider’s supporting documentation. Alternatively, you can contact your IT provider for support.
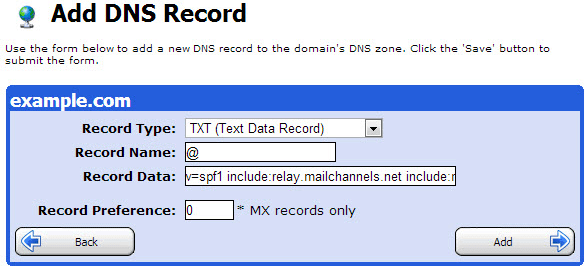
To create your SPF TXT record:
- Start with a version tag to indicate that you’re creating an SPF record. Currently, there’s only one SPF version which is v=spf1.
- Next, specify all the IP addresses allowed to send emails on behalf of your domain. The IP address comes after the SPF version tag. So, your record might look something like this: v=spf1 ip2:59.28.181 ip194:72.0.102
- Now you’ll need to include the third-party services that email on your behalf. But be sure to ask them for the proper domain to use. Simply enter the include statement before the third-party domain. Your record at this point might look something like v=spf1 ip2:59.28.181 ip194:72.0.102 include:ticketingsystem.com.
- Finish the record with instructions on what to do when a receiving server detects a sender not listed in your SPF record. You do this using the all-tag. For example, -all means a failure and unauthorized emails are rejected. ~all means soft fail where unauthorized emails are accepted but marked.
- Finally, your SPF record will look something like v=spf1 ip2:59.28.181 ip194:72.0.102 include:ticketingsystem.com ~all.
You’re now ready to publish your SPF record in your DNS zone file. Again, you can do this via the DSN dashboard. Again, refer to your documentation to get the specific publishing steps depending on your DSN provider. Or ask your DNS manager to publish it. Alternatively, you can talk to your DSN provider directly to post the record on your behalf.
There are a few points worth mentioning before moving on to the next step. First, you can only include up to ten tags, also known as lookups, in your SPF record. Secondly, your SPF record cannot exceed 225 characters.
Finally, make sure that your mail server uses SPF filtering to enjoy the same advantages that you are extending to your recipients.
Step 2 – Set Up Domain Keys Identified Mail (DKIM)
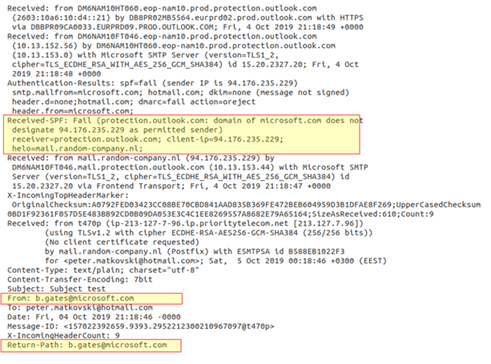
Setting up SPF records is a good start. It stops scammers from hijacking your domain. However, SPF doesn’t prevent cybercriminals from intercepting and changing your emails once you send them. This is where Domain Keys Identified Mail (DKIM) steps in.
DKIM is a type of email authentication that uses a digital signature and encryption keys to verify that the email message was sent by an authorized mail server and hasn’t been tampered with. Just like with SPF, you’ll need to publish a DKIM TXT record in your Domain Name System (DNS).
This TXT record contains a public key that the recipient server can use to confirm the authenticity of an email. Additionally, DKIM automatically attaches an encrypted digital signature to each outbound email. The recipient’s server detects the signature and looks up the DKIM key in your DNS records. Next, the authenticator uses your key to decrypt the email header’s hash value.
It then compares that value to the value from the received email. A match means that the email is from the actual sender and hasn’t been tampered with. All this happens virtually, and you won’t be able to see the process.
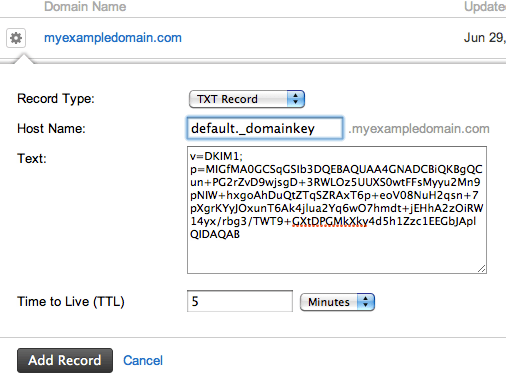
To create and publish your DKIM record:
- Create a list of all the domains and email service providers. Hopefully, you did this in step 1 when registering your SPF.
- Next, contact your domain and ESP providers and ask them to configure DKIM on your behalf. Also, ask for a copy of the public key.
- Generate two key pairs. You can ask your IT department to do this if you have your own email server. Alternatively, you can use tools like OpenSSL or third-party tools to generate the key.
- Publish the public key as a TXT record in your DNS, just like we did with the SPF record. Again, you can refer to your DNS provider’s documentation for the exact steps to create and publish your record.
- Finally, save the private key to your Mail Transfer Agent (MTA) or Simple Mail Transfer Protocol (SMTP) server. Again, refer to your documentation for the exact steps or ask your server administrator or network provider to do it on your behalf.
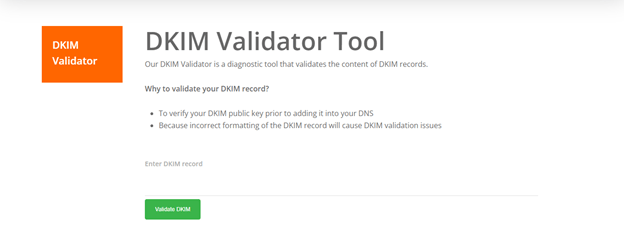
You can use a tool like Dmarcian DKIM Inspector to check that you’ve configured DKIM correctly. Dmarcian also offers a handy DKIM Validator to check that your TXT record is appropriately formatted.
Step 3 – Configure Your Domain-based Message Authentication, Reporting, and Conformance (DMARC) Settings
Again, SPF and DKIM are great for preventing email spoofing. But the work isn’t done. SPF and DKIM still don’t specify a course of action in case of suspected spoofing. For this, you’ll need to enable Domain-based Message Authentication, Reporting, and Conformance (DMARC).
You can think of DMARC as your policy for defining email authentication practices. DMARC also instructs receiving servers on how to enforce your policy. You’ll need to have completed the previous two steps to enable DMARC.
Here’s how DMARC works in a nutshell:
First, you’ll need to publish your email authentication policy in your overall DSN records. This policy defines how receiving mail servers should handle emails that violate your policy. Secondly, the inbound mail server will look up your policy every time it receives an email from your authorized domains.
Next, the receiving server looks up your SPF records to validate that the email originates from an approved IP address. Similarly, the server validates the DKIM signature as discussed in the previous step. Finally, the server carries out the instructions in your DMARC policy if there’s a violation. These instructions may include accepting, rejecting, or flagging the email.
The receiving server also sends a report to the registered sending domain with details of the violation.
Once again, you’ll need to publish a DMARC TXT record in your DNS database. A DMARC record contains the following values:
Hostname – Which should begin with an underscore. For example, _dmarc
Value information – There are two mandatory tag-value pairs. These are v and p. The v tag-value pair can only be v=DMARK1. First, it specifies that you’re creating a DMARC record. Next, the p tag pair determines what happens if there’s a valuation. For example, p=none means do nothing, p=quarantine means the email is quarantined, while p=reject means the email is rejected. We highly recommend starting with p=none until you’re able to track potential email delivery problems.
Address – This is where you’d like to receive reports. DMARC RUA refers to aggregate reports, and RUF refers to forensic reports.
So, your record will look something like v=DMARC1; p=none;rua=mailto:mail@example.com.
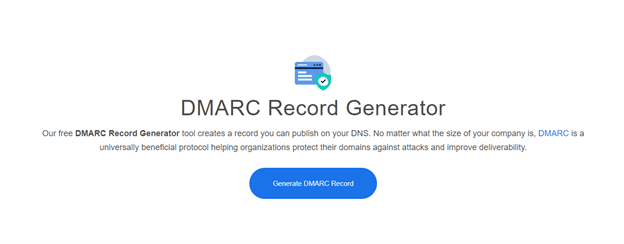
Fortunately, you can use a tool like this free DMARC record generator to make the process easier. You’ll only need to copy and paste the record to your DNS.
Lastly, log into your DNS dashboard to create and publish your record. Again, you can refer to your hosting provider’s documentation or admin for details on how to go about this process.

Step 4 – Address Inbound Email Spoofing
So far, you’ve made it more difficult, if not impossible, for scammers to spoof your outgoing emails. These measures also protect you from inbound spoofing attempts. However, this only works if the senders have put in place the same security measures we’ve outlined here.
Proper employee training and awareness are the best defense against inbound spoofing attempts. We have a comprehensive resource for the 5 Best Programs for Cloud Security Training to help you get started. Nevertheless, phishing awareness training empowers employees to identify and report phishing attempts, including spoofing.
It’s also worth incorporating simulated spoofing campaigns to help reinforce the training. You’ll also get reliable feedback on how well your employees can protect your organization against inbound spoofing attempts.
Common Problems When Attempting to Prevent Email Spoofing
The good news is that it is possible to prevent or at least minimize email spoofing incidents. Still, there are a few problems that are bound to come up. Below are the most common issues when attempting to prevent email spoofing and how to solve them.
Please note that for the sake of conciseness in this section, we may use DMARC as an umbrella term that also includes SPF and DKIM.
Ongoing Domain Spoofing despite Setting up DMARC
You may notice that spoofing attempts continue despite taking your time to implement the measures that we’ve covered here. This doesn’t necessarily mean that DMARC doesn’t work. Instead, it might be the case that you forgot a few crucial details.
For example, neglecting your inactive or parked domains may leave you vulnerable to outbound spoofing. Hackers can still use your dormant domains to send fraudulent emails to your clients and vendors. So don’t forget to configure DMARC for your parked domains, including ones you don’t use to send emails.
Similarly, it is easy to forget your subdomains. Again, hackers can misuse these for their own ends. Be sure to enforce DMARC for your subdomains as well, including those not used for sending emails. Again, don’t forget contracted third-party senders such as Bamboo HR, Zendesk, or Marketo.
Finally, keep an updated list of all your allowed domains, including subdomains and third-party senders. It may also be necessary to retire some senders since there’s a limit to the number of records, also known as lookups, which you can create.
SPF and DKIM Aren’t Properly Aligned
SPF and DKIM are interdependent. DMARC relies on DKIM and SPF identifiers to verify the sender. It also checks the “From” header relative to the authorized sender domains in your SPF record. So you’ll need to make sure that there is as close to 100% identifier alignment as possible. You do this by ensuring that the domains in your SPF and DKIM records match.
Otherwise, you may continue to suffer from email spoofing and a low delivery rate if these two aren’t aligned. You can use this free DMARC Record Checker to see if your SPF and DKIM records align.
Starting With a Full Reject Policy
Logically, you may want to apply the highest tier of security that DMARC has to offer right off the bat. However, using a full reject policy from the beginning is almost always a bad idea. This is because you’re likely to experience a lot of false positives in the beginning, leading to losing legitimate emails.
Instead, keep an eye on your reports to see what’s happening. You’ll be able to identify patterns such as spoofed emails, sources, and unsigned messages. Then, you can gradually enforce a quarantine policy before going with the full reject option once you are sure that only spoofed emails are flagged.
Starting with a full-reject policy may also result in a hit on your delivery rates.
Incomprehensible or Missing DMARC Data
If you aren’t receiving DMARC data at all, it’s probably because you omitted a reporting email address that we covered in step 3. These reports are admittedly hard to read. You may need dedicated staff to analyze and condense the reports into an actionable format. Alternatively, you can use a tool to help you simplify the reports.
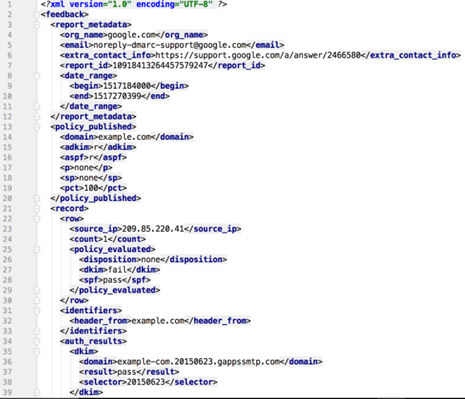
These reports offer a wealth of information about your outbound email channels. These details include pass and failure rates and authentication status and are invaluable for streamlining your DMARC policies to improve your email security further.

