How To Share Files On Microsoft OneDrive
Whether you are using OneDrive for work, school, or personal uses, one of the things you can expect to do most frequently is share files. Especially if you have never used Microsoft OneDrive before, the process of sharing files can be a challenge. However, there are a few simple ways to do it. In this blog post, we’ll show you how to share files on Microsoft OneDrive in just a few easy steps.
How to Share Files with Specific People
All of your files on OneDrive are private until you choose to share them. When you share a file or folder with specific people, they will be the only ones who can access it. To share a file or folder with specific people, follow the below steps.
1. Open OneDrive and sign in
To share a file or folder, open OneDrive and sign in. Your login credentials are those for your work, school, or personal account.
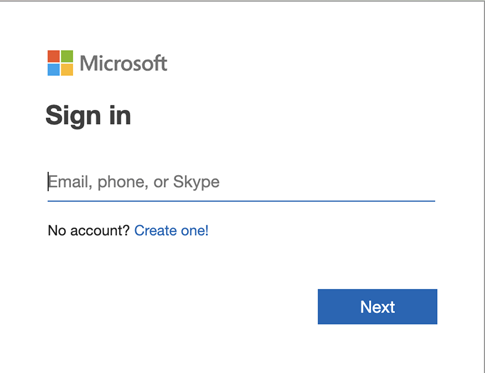
If you are not automatically signed in, click the blue “Sign In” button in the top-right corner of the page and enter your login credentials.
2. Select the file or folder you want to share.
Once you are signed in, you will see all of your files and folders listed on the OneDrive main page. Locate the file or folder you want to share and click on it to select it.
You can also select multiple files or folders by holding down the Ctrl button (Windows) or the Command button (Mac) while clicking on each item.
Select the circle on the left side of the item if you’re using List view. You may also select multiple items to share them together.
Select the circle in the top right corner of the item if you’re using Tiles view. You may select multiple things to share and combine them into a single list.
Note: Sharing multiple files and folders at once is not currently available with OneDrive school and work accounts.
3. Click the Share button at the top of the page.
Once you have selected the file or folder (or multiple items) you want to share, click the blue Share button in the top-right corner of the page.
A pop-up window will appear with a few different options for sharing your file or folder.

If the file you want to share is already shared with others, you will see a list of people under “Shared with.” In this list, you will find the email addresses and profile pictures (if they have one) of each person you have already included in this file.
If you want to configure these settings, select the photo of the person you wish to change permissions or restrict to open their access settings.
If the desired file is not shared with anyone yet, there will be no list.
4. Enter the email addresses of the people you want to share with.
In the “To” field, type in the email addresses of the people you want to share your file or folder with. If you are sharing with someone who already uses OneDrive, their name may appear as you type. You can click on their name to add them without having to type in their email address.
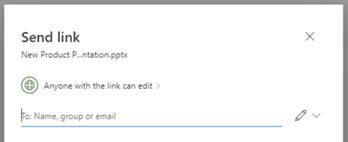
You can also share with people who do not have a OneDrive account by entering their email addresses in the same box. They will be sent an invitation to view the file or folder you are sharing with them.
Next, click the pencil on the right of the box and indicate whether you want to allow editing permissions or not.
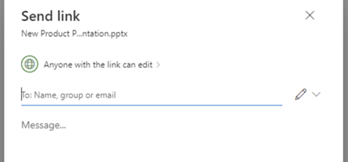
If you want to add a message to go along with your shared item, enter it in the “Message…” box. However, this is optional.
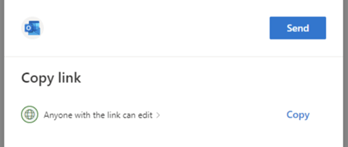
If you are sharing with a large number of people, you may want to click the Copy link option instead and manually share it via email.
Note: You can share with up to 20 people at a time. If you need to share with more than 20 people, we recommend using the Copy link option or creating a group.
5. Configure your link sharing settings.
Under the Send button, click Anyone with the link can edit to open the link settings.
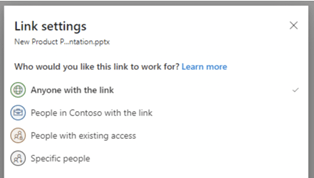
Right away, you will notice a few different link sharing options:
- Anyone with the link: This option gives anyone who clicks on the link access to view or edit your file, even if you did not directly send it to them or they are outside of your organization.
- People in <your organization> with the link: If you are signed in with a work or school account, this option will restrict access to only people within your organization (or those who have been given permission by someone within the organization).
- People with existing access: This option will only share the file or folder with people who already have access.
- Specific people: This option allows you to share with specific people by email address. You can also add a message to go along with your shared item.
Keep in mind that if your OneDrive account is through a school or work organization, the account admin may restrict your ability to choose who can access your shared items and for how long.
6. Choose your other settings.
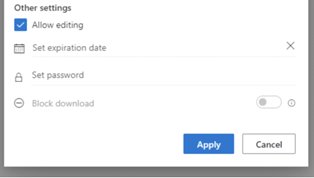
Below this menu, you will see the “Other settings” menu. Here’s what they mean:
- Allow editing: This clickable blue checkmark allows people you share with to edit your file. If it is unchecked, they will only be able to view the file (it is checked by default). Unchecking the box means that people will not be able to make changes to the document, but they can still copy, download, and redistribute it.
- Set expiration date: This setting allows you to set an expiration date for the link. After the specified date, people will no longer be able to access your file. Expiration dates are recommended if you are sharing highly sensitive information with an organization or a family member.
- Set password: This setting allows you to set a password for the link. This is an additional level of security to make sure that only people with the password can access your file.
- Block download: This setting allows you to block people from downloading your file. They will still be able to view it, but they will not be able to download it to their own computer.
- Open in review mode only: This setting allows you to open your file in “review mode.” This means that people will be able to view and leave comments on the document, but they will not be able to make changes. Only Word documents have this option, so you may not see it.
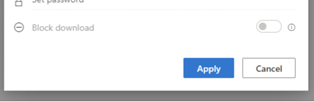
Once you have finished configuring your settings, click Apply.
Click the Share button when you are finished.
The people you shared the file or folder with will now receive an email notification about the share. They can then click on the link in the email to access the item.
Common Problems When Sharing Files With OneDrive
Even though OneDrive makes it easy to share files, there are still a few common problems that users run into. Here are a few of the most common (and how to fix them):
You can’t share a file with someone outside of your organization
If you are using OneDrive for Business (or have an Office 365 account), you will only be able to share files with people within your organization by default. To share with people outside of your organization, you will need to change your sharing settings.
To do this, open the “Shared with” menu and click on the Advanced button. Then, select Change next to the “Who has access” setting.
You will then be able to choose whether you want to share with people within your organization or with specific people by email address.
Keep in mind that your account admin may have restricted your ability to share with people outside of your organization, so you may not be able to change this setting. If this is the case, you will have to contact the admin to change permissions.
You can’t find the “Shared with” menu
The “Shared with” menu is only available for files and folders that have already been shared. If you want to share a file or folder, you will need to open it first. Then, click on the Share button in the top-right corner of the screen.
If you still can’t find the “Shared with” menu, it’s possible that your OneDrive account doesn’t have sharing enabled. To check this, open the OneDrive settings menu and click on the Account tab.
If you see a message that says “Your administrator has turned off file sharing”, then you will not be able to share files from your account. In this case, you will have to contact your administrator and ask them to turn on file sharing for your account.
You accidentally shared a file with the wrong people
If you accidentally share a file with the wrong people, you can fix it by opening the “Shared with” menu and clicking on the Advanced button. Then, click on the X next to the name of the person (or group) that you want to remove.
You can also prevent this problem by setting an expiration date for the share. That way, even if you accidentally share a file with someone, they will only have access to it for a limited amount of time.
Keep in mind that you can usually only remove people from the “Shared with” list if you are the owner of the file (or if you have been given permission to do so by the owner).
If you are not the owner of the file, you will need to ask the owner to remove the person (or group) for you.
You cannot access OneDrive
If the device you are currently using does not have OneDrive installed, you can go to the OneDrive website and log in with your Microsoft account.
Once you are logged in, you will be able to access your files from any device with an internet connection.
If you are having trouble logging in, make sure that you are using the correct email address and password for your Microsoft account.
If you still can’t log in, you can reset your password by clicking on the “Forgot your password?” link on the OneDrive login page.
Keep in mind that if you are using an Office 365 account, you will need to use your work or school email address and password to log in, so you will likely need to go through a portal.
There are missing or corrupted files
If you are missing files or folders, it’s possible that they were deleted by accident. To see if this is the case, open the Recycle Bin from the OneDrive menu.
If you see the missing file (or folder) in the Recycle Bin, you can restore it by clicking on the Restore button.
If the file is not in the Recycle Bin, it’s possible that it was permanently deleted. In this case, you will not be able to recover the file.
Another possibility is that the file (or folder) is corrupted. Every now and then, when syncing files, OneDrive may create a corrupted copy of the file. When this happens, you will not be able to open or edit the file.
If you think that this might be the case, try opening the file from a different device (or from the OneDrive website). If you still can’t open it, then it’s likely that the file is corrupted and you will need to delete it.
You are unable to share files
In some cases, you may be unable to share a file altogether. This could be due to a few different factors:
- You have reached your sharing limit: By default, your sharing ability is limited with a basic plan. This limit resets every 24 hours. If you need to share more than your allotted amount, you will need to increase your sharing limit.
- The file type is not supported: there are some types of files that cannot be shared, such as EXE files.
- Your account needs to be validated: In some cases, sharing may be disabled for your account until you validate it. This is usually only the case for new accounts.
- To validate your account, you will need to log in to the OneDrive website and click on the Validate button.
If you are still having trouble sharing files, contact customer support.
Final Thoughts
Sharing files via OneDrive is an excellent way to share documents with co-workers, family, and friends. It’s easy to do and only requires a few steps. However, there are a few things you should keep in mind, such as setting an expiration date for shares and making sure you have the correct permissions before sharing files.

