How to Set Goals in Asana
An organization’s goal-setting framework has strategic implications. This is why it’s crucial to have a transparent goal-setting mechanism that clearly links organizational goals with every team and its members.
This is where Asana Goals come in. With goals in Asana, your team is guided by the shared objectives connected to the work to achieve them.
This article will give you an overview of how to set goals in Asana. We’ll walk through the process of adding your company’s and team’s goals in Asana and show you how Asana Goals fit in with the rest of your team’s work.
Finally, we’ll also look at some common problems users face when working with Asana Goals and how you can resolve them.
Let’s jump in.
How Setting Goals In Asana Works
To create Asana Goals and utilize them efficiently for project management, let’s first understand some of its key terms and methodologies.
What is a Goal in Asana?
Goals in Asana are built around the OKRs or “objectives and key results” methodology. However, it is flexible enough to support any goal-setting approach.
OKRs is a two-part approach to setting and measuring goals composed of objectives and key results.
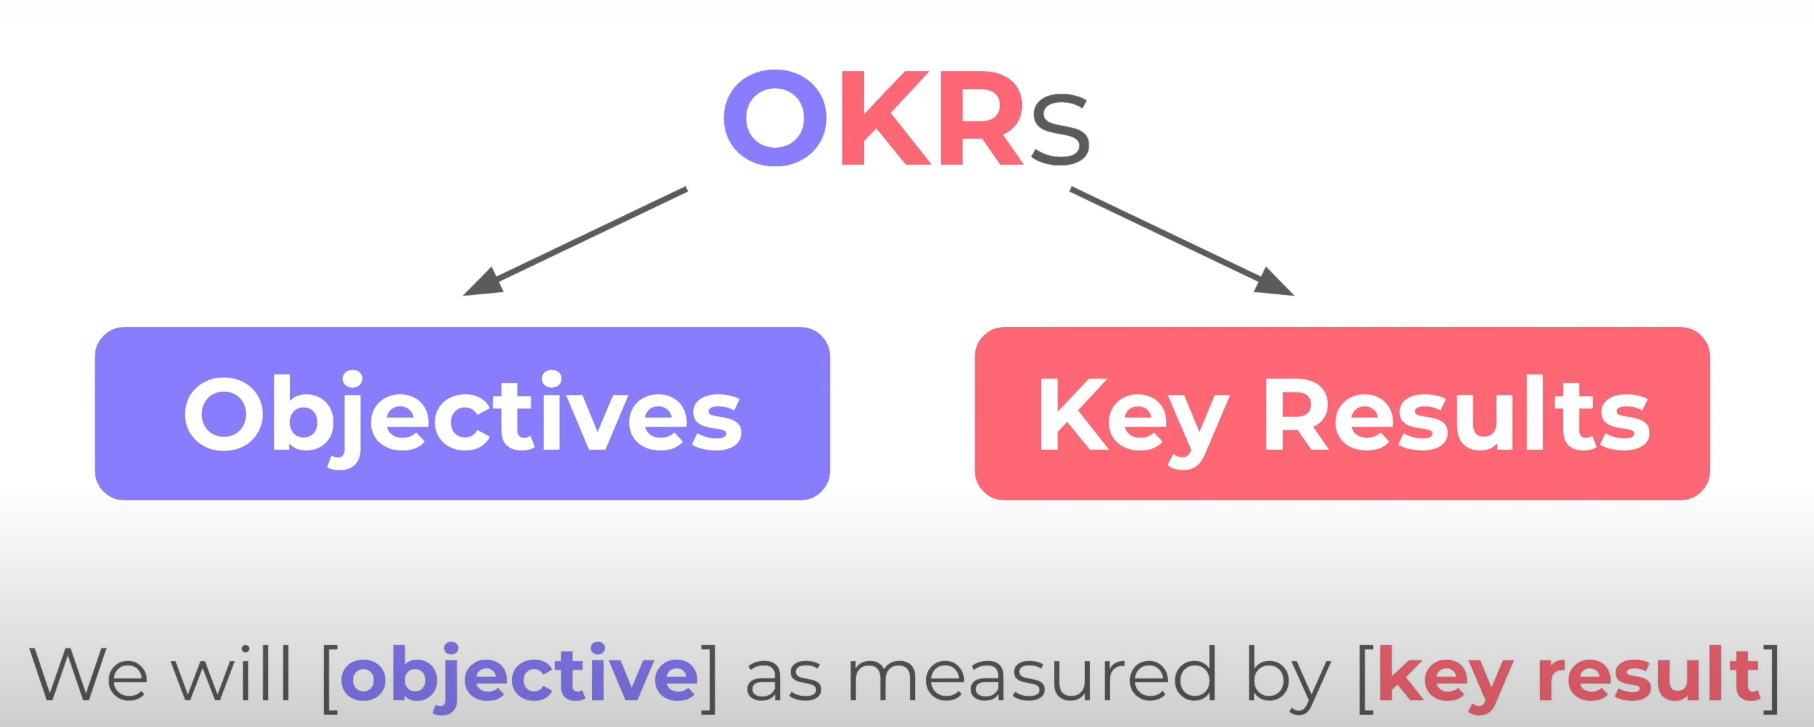
An objective answers the question, “Where are we going?” and KRs make it clear if we
got there or not.
An objective is what you want to achieve. Examples: increase active customers, minimize costs, expand to more countries, etc.
Key Results are the metric values by which you measure the progress toward your objectives. Examples: two million transactions a day, lowering expenses by $100,000 per month, opening four offices in the middle east, etc.
Types of Progress Metrics in Asana
Asana supports three different types of metrics that you can use for tracking your goal’s progress.
Numeric
The numeric metric is ideal for a goal where the result is in a specific number. For example, “get 1,000 new visitors on a website every day” or “make 300 sales in a week.”
The numeric metric can also be used for goals where the expected outcome is either yes or no (binary). For example, “add a new feature.” Or in the case of continuative goals, such as “maintain 99.9% uptime on all systems,” where the goal is evaluated as either achieved or missed.
The initial value for such goals would be set up as “0,” and the target value would be “1.”
Percentage
The percentage metric is best for tracking qualitative goals. Asana allows you to track the progress of such goals by using 0-100% and estimating the amount completed.
Set a percentage metric with “100%” as the target value for goals like “win customer loyalty” or “grow and engage teams.” You can use the description field to add guidelines on how to measure actual progress.
Goals with % as the unit for measurement are ideal for the percentage metric. For example, “increase profit margin by 25%” or “increase customer satisfaction scores from 85% to 90%.”
Currency
The currency metric is best used for goals involving money. For example, “increase annual revenue to $200,000” or “generate $70,000 worth of sales in Q1.”
Types of Goals in Asana
Asana lets you set, track, and manage both company-wide and team goals. The company-wide goals are long-term goals that set the direction of the organization.
Team Goals are short-term goals that ladder up to your company’s mission-oriented objectives.
Setting Company Goals in Asana
Company-wide goals and objectives play a crucial role in determining the direction of your company and making informed business decisions. In addition, they increase employee engagement and allow your teams to approach their daily work with a clear understanding of the desired outcome.
When your teams know how their work aligns with company goals, it reduces conflict within the organization. This allows everyone to move in one direction rather than being at cross-purposes.
But how will your teams know if they’ve accomplished their objectives?
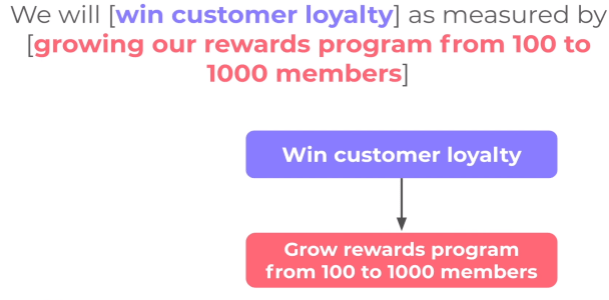
Start by setting a KR (key result) for each team. For example, the marketing team can be given a KR for growing the rewards program from 100 to 1,000 members. The marketing team is responsible for owning and hitting this KR, so you assign it to the marketing lead.
The marketing team manager will put together a plan for how the team will achieve this goal and set a deadline.
Now that the team knows what it is trying to achieve and how it’ll get there, it’s time to add goals to Asana.
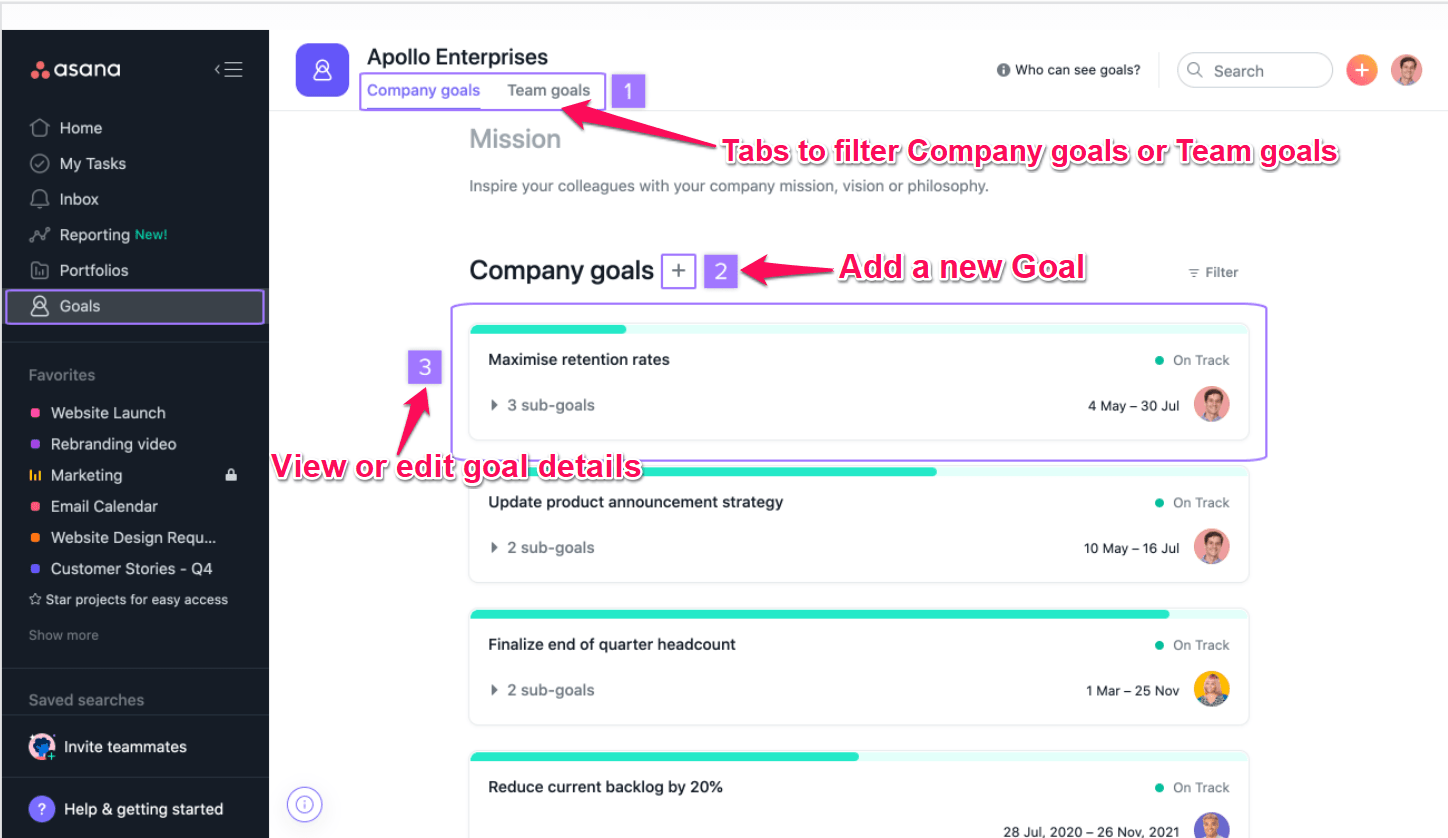
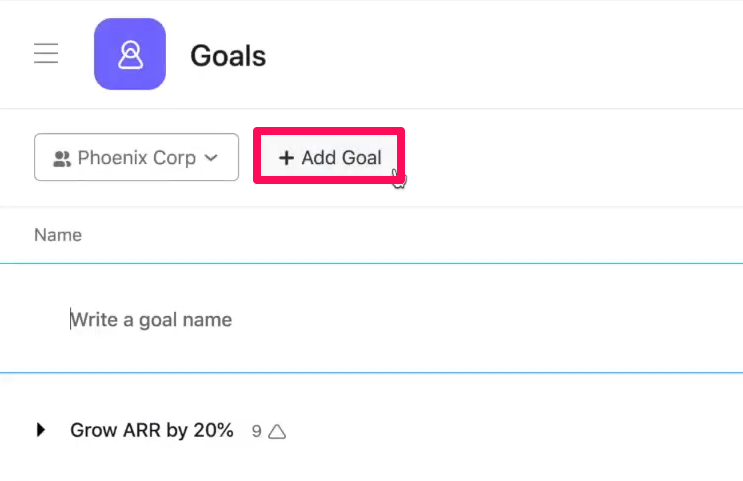
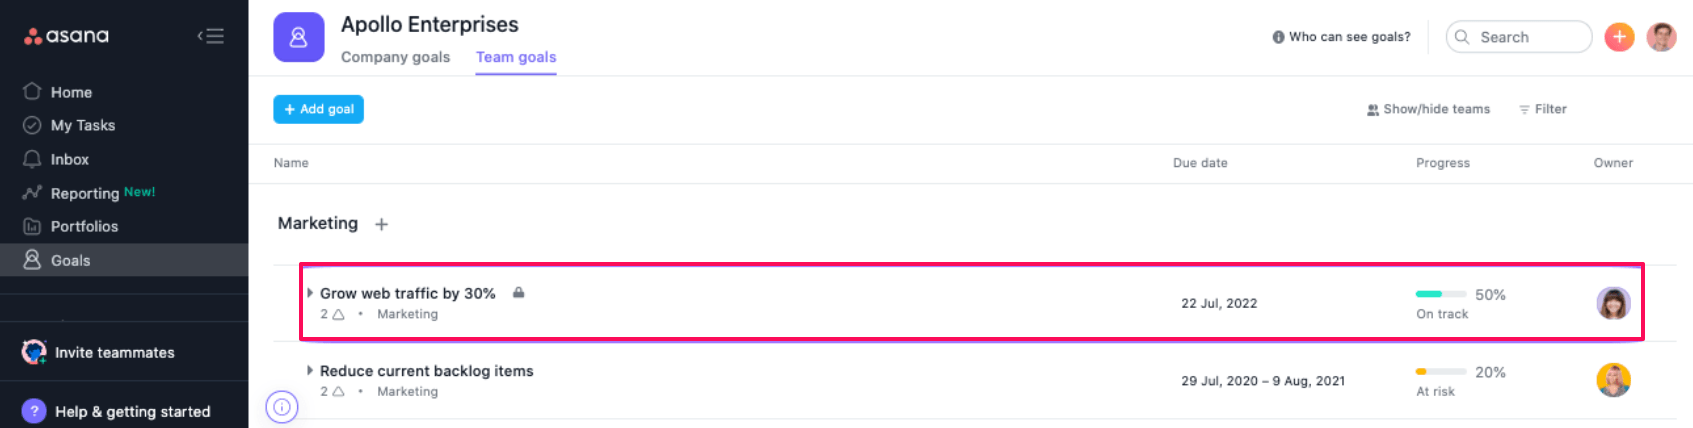
First, you’ll access your organization’s goals from the upper left-hand corner of the sidebar below the portfolios button.
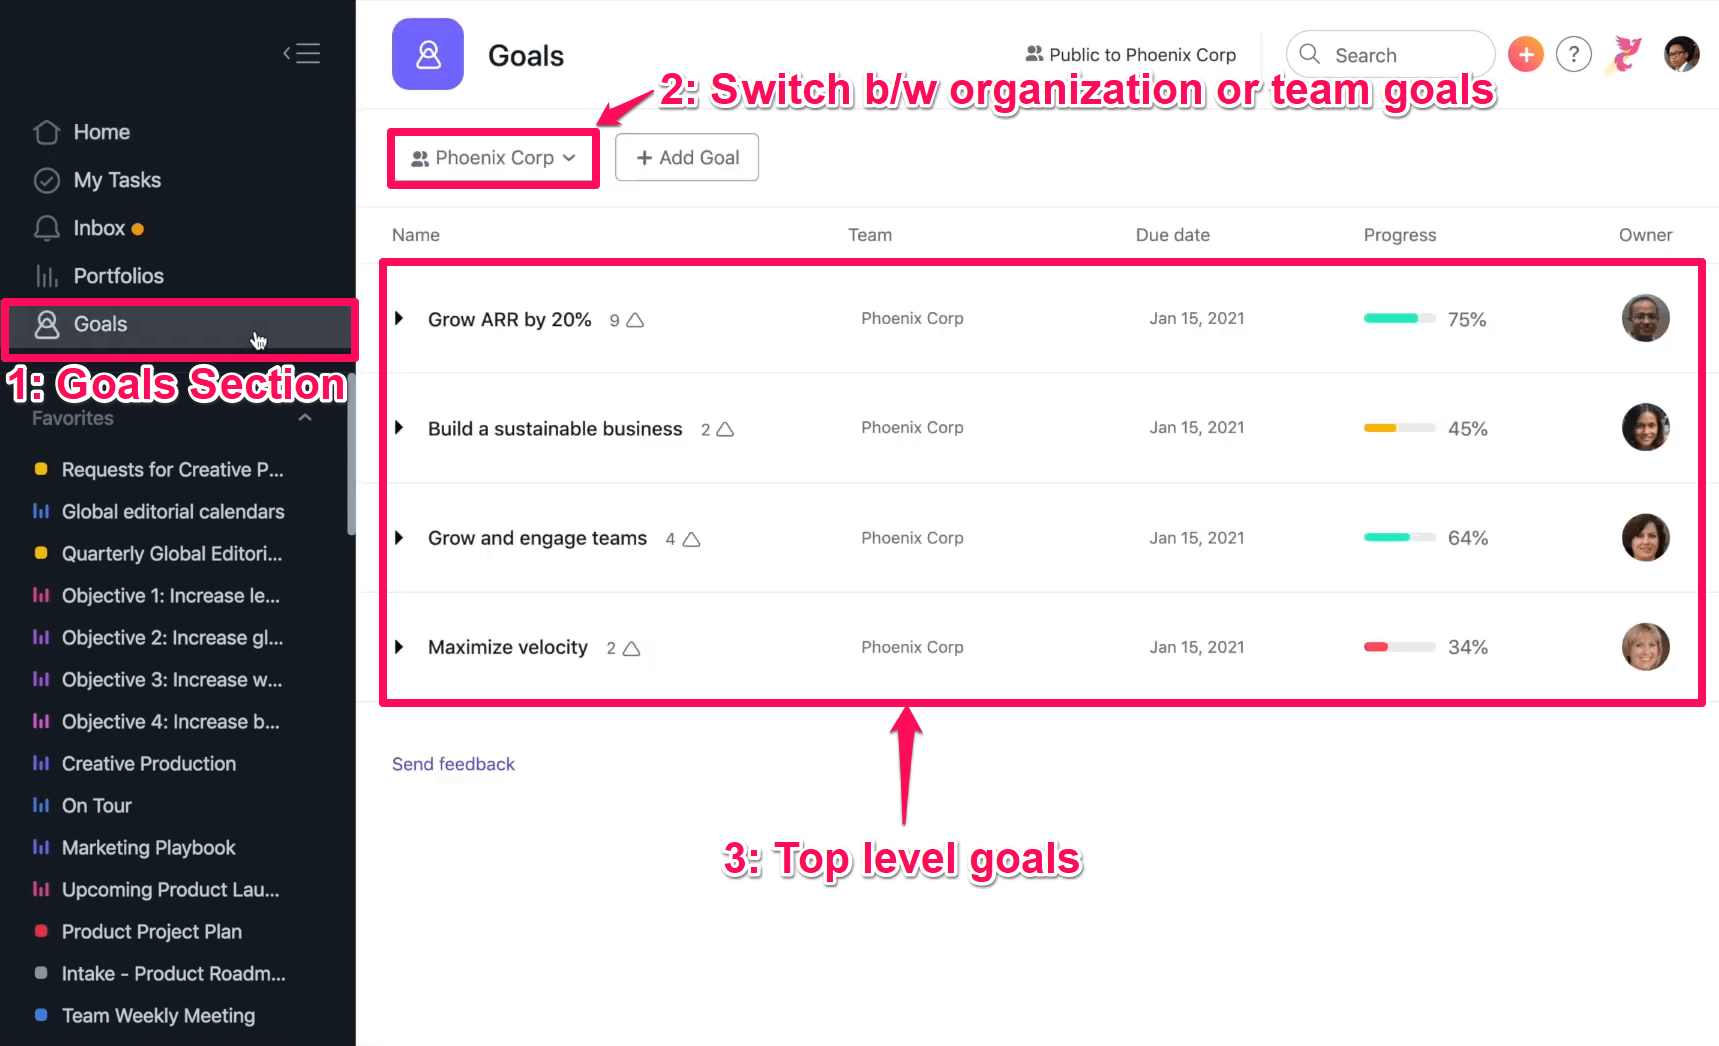
From there, you can view the goals for your organization or a single team.
Top-level goals represent company objectives, while sub-goals represent the measurable key results needed to achieve them.
If your entire company is using the Goals feature, it’s recommended that you start by creating your goals from the top down by adding your company-wide goals first, then building your team goals and sub-goals.
Let’s add a goal of winning customer loyalty.
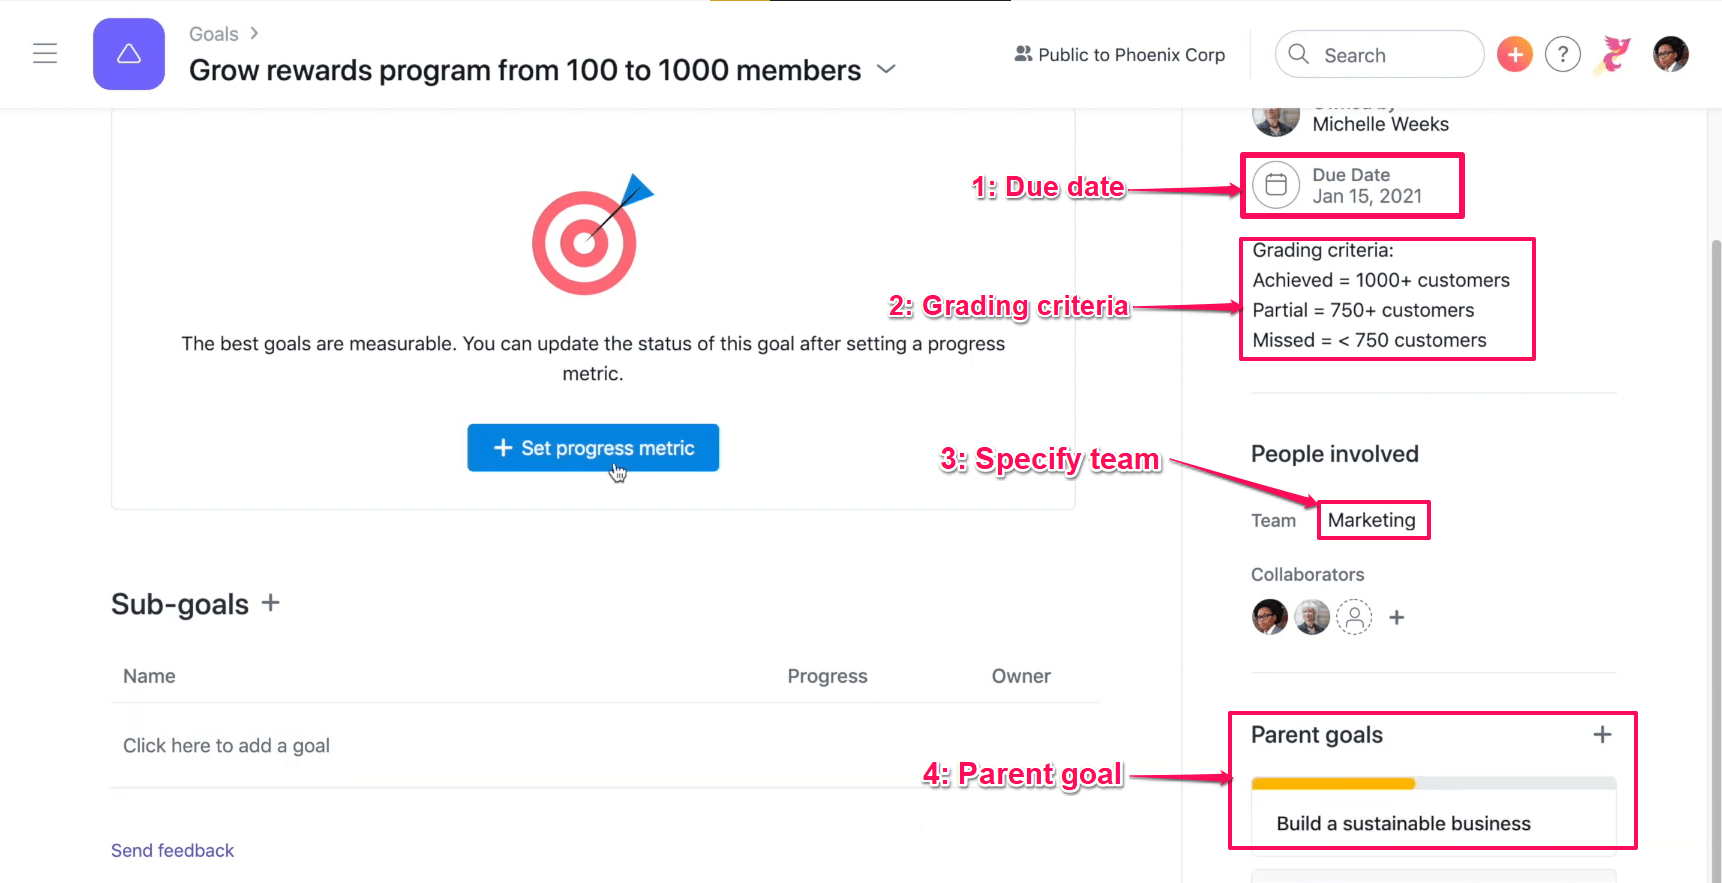
Step 1: On the goals page, click on the Add goal button to write down the goal, add a due date, and assign an owner. The assignee will also get an inbox notification letting them know when a goal is assigned to them.
Step 2: Add further details. Click on the specific goal to see the goal details page.
Once on the details page, you can do several things.
Step 3: Add a description to give more context and background about the goal, including grading criteria, so you know how to evaluate it at the end of the quarter, year, or deadline you choose.
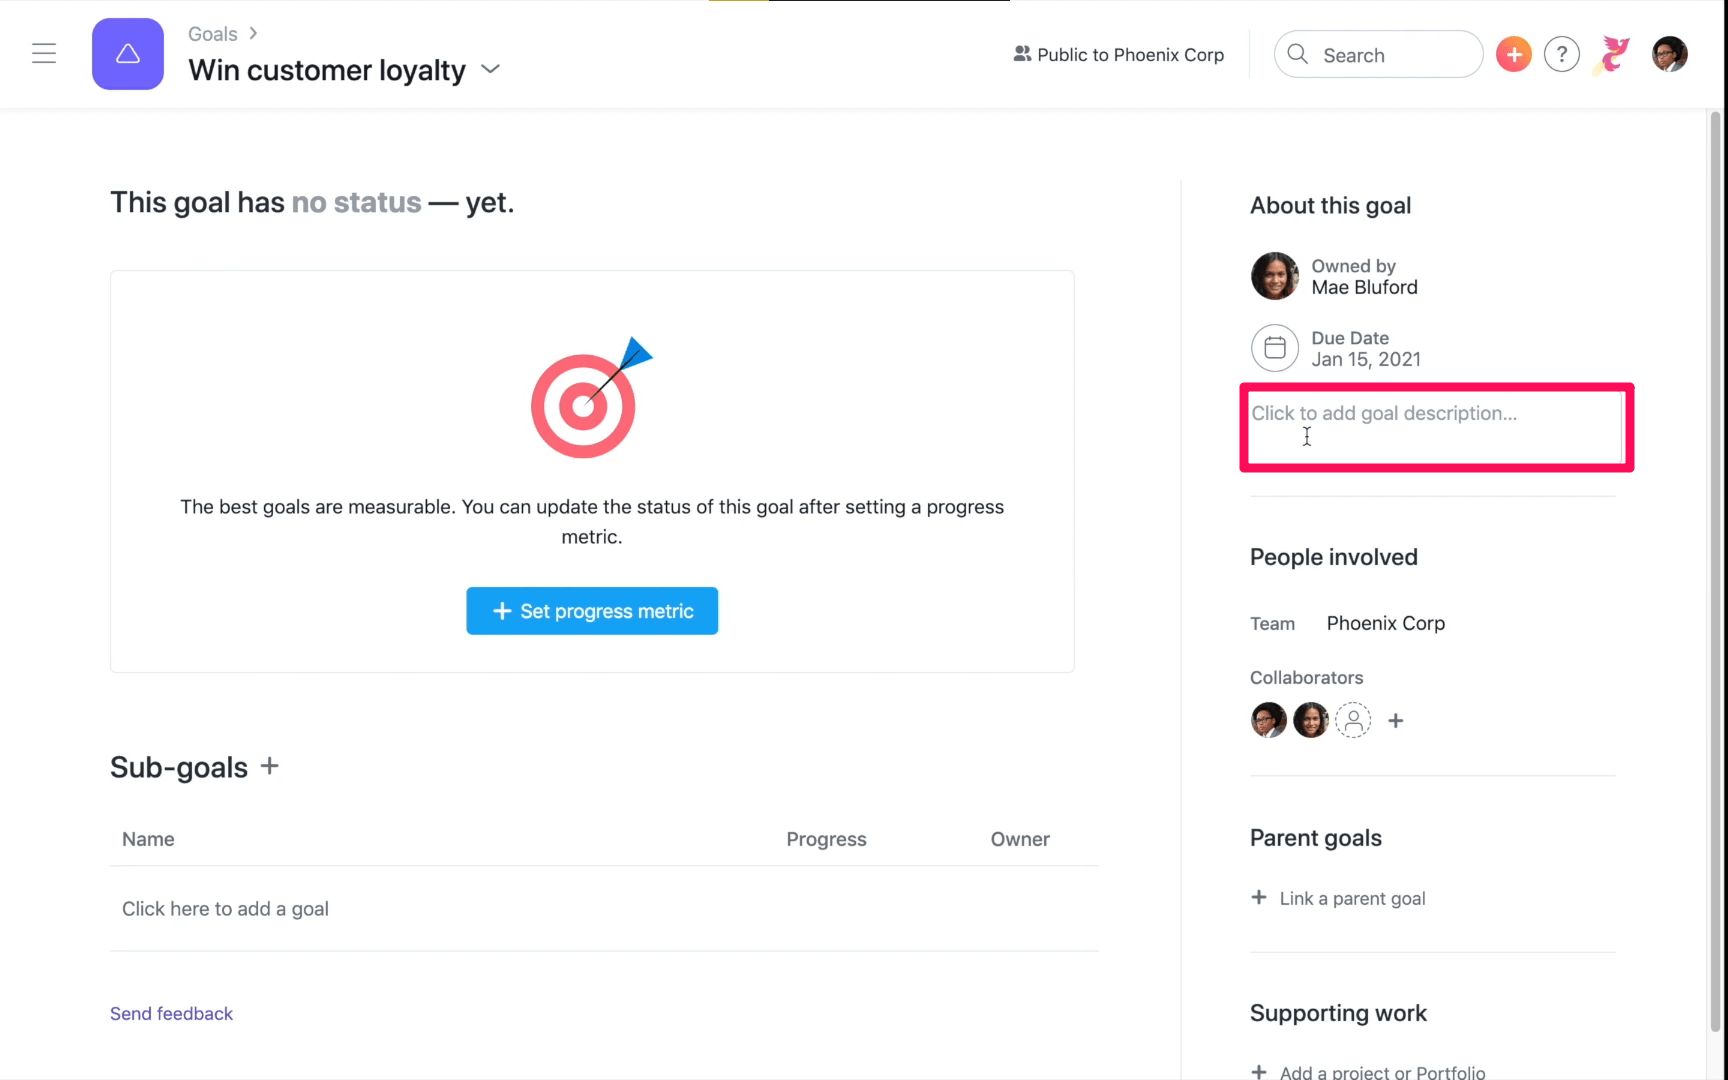
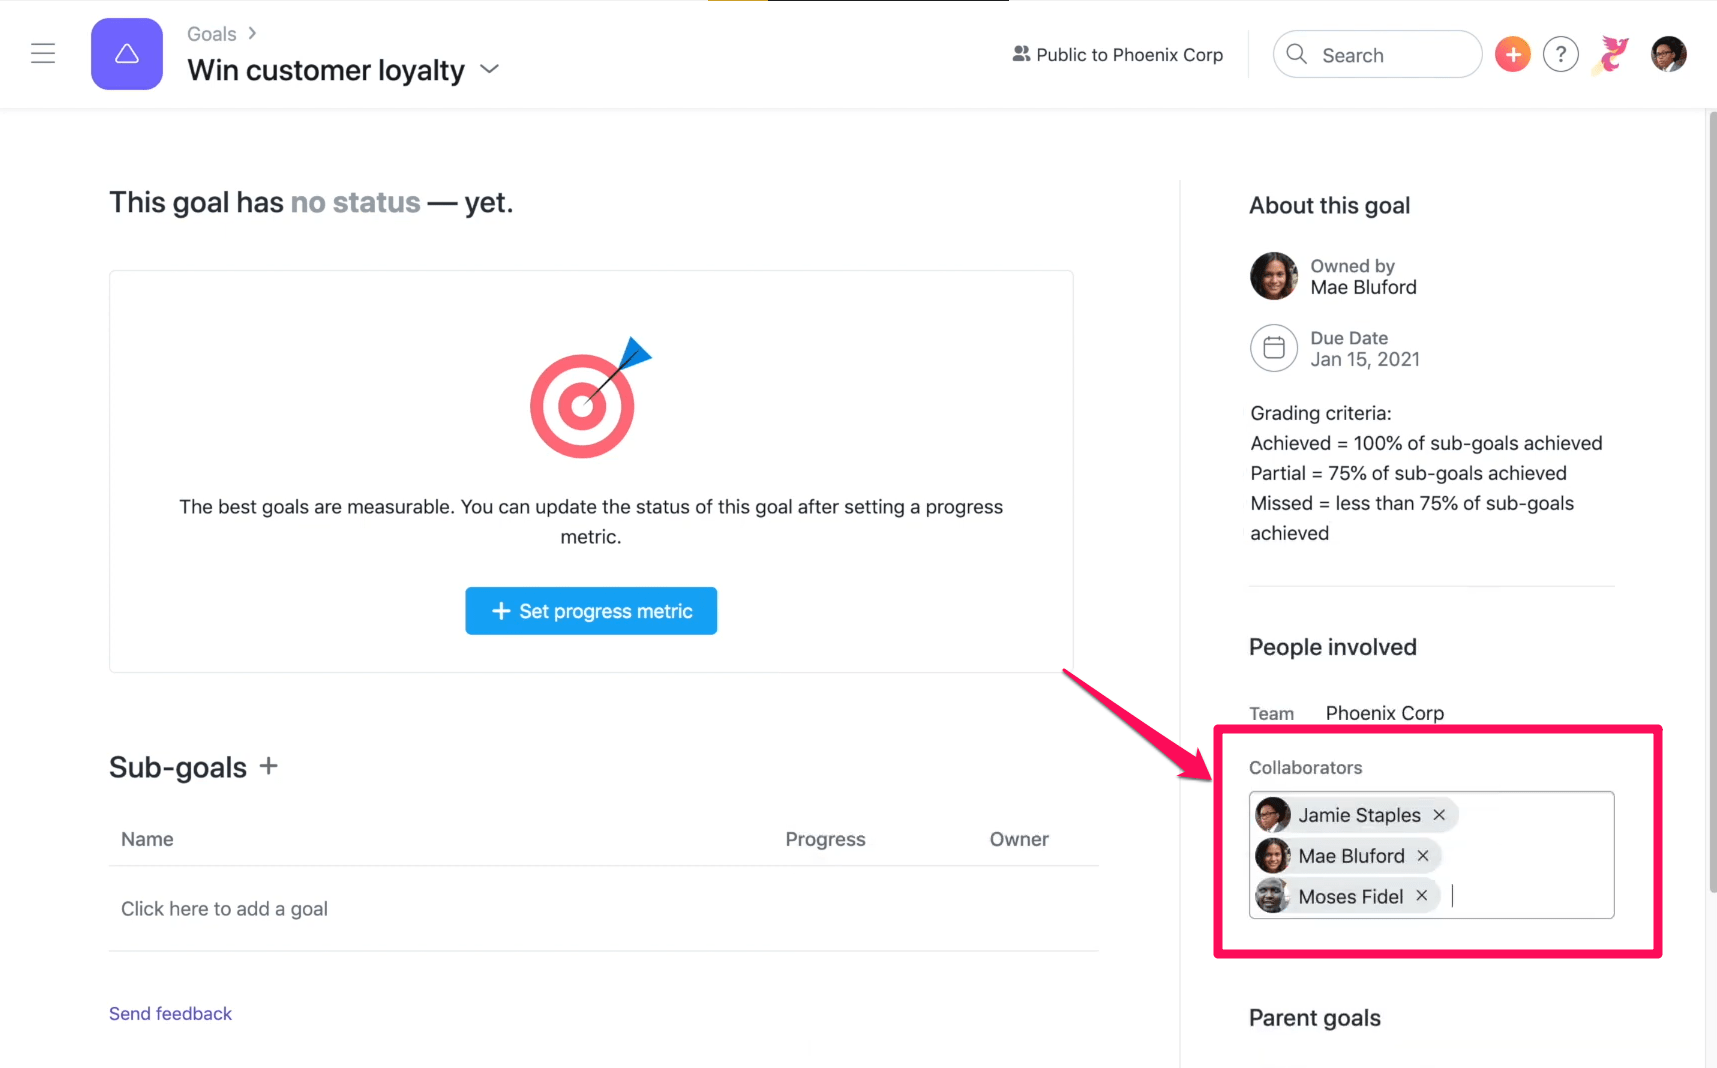
Because we created this goal from the organization-wide goals view, the team has already been updated. Collaborators will get an inbox notification when the goal status changes since we’re setting a company-wide goal.
Step 4: Add relevant projects or portfolios, creating a clear line of sight between the goal and the actionable work that ladders up to it.
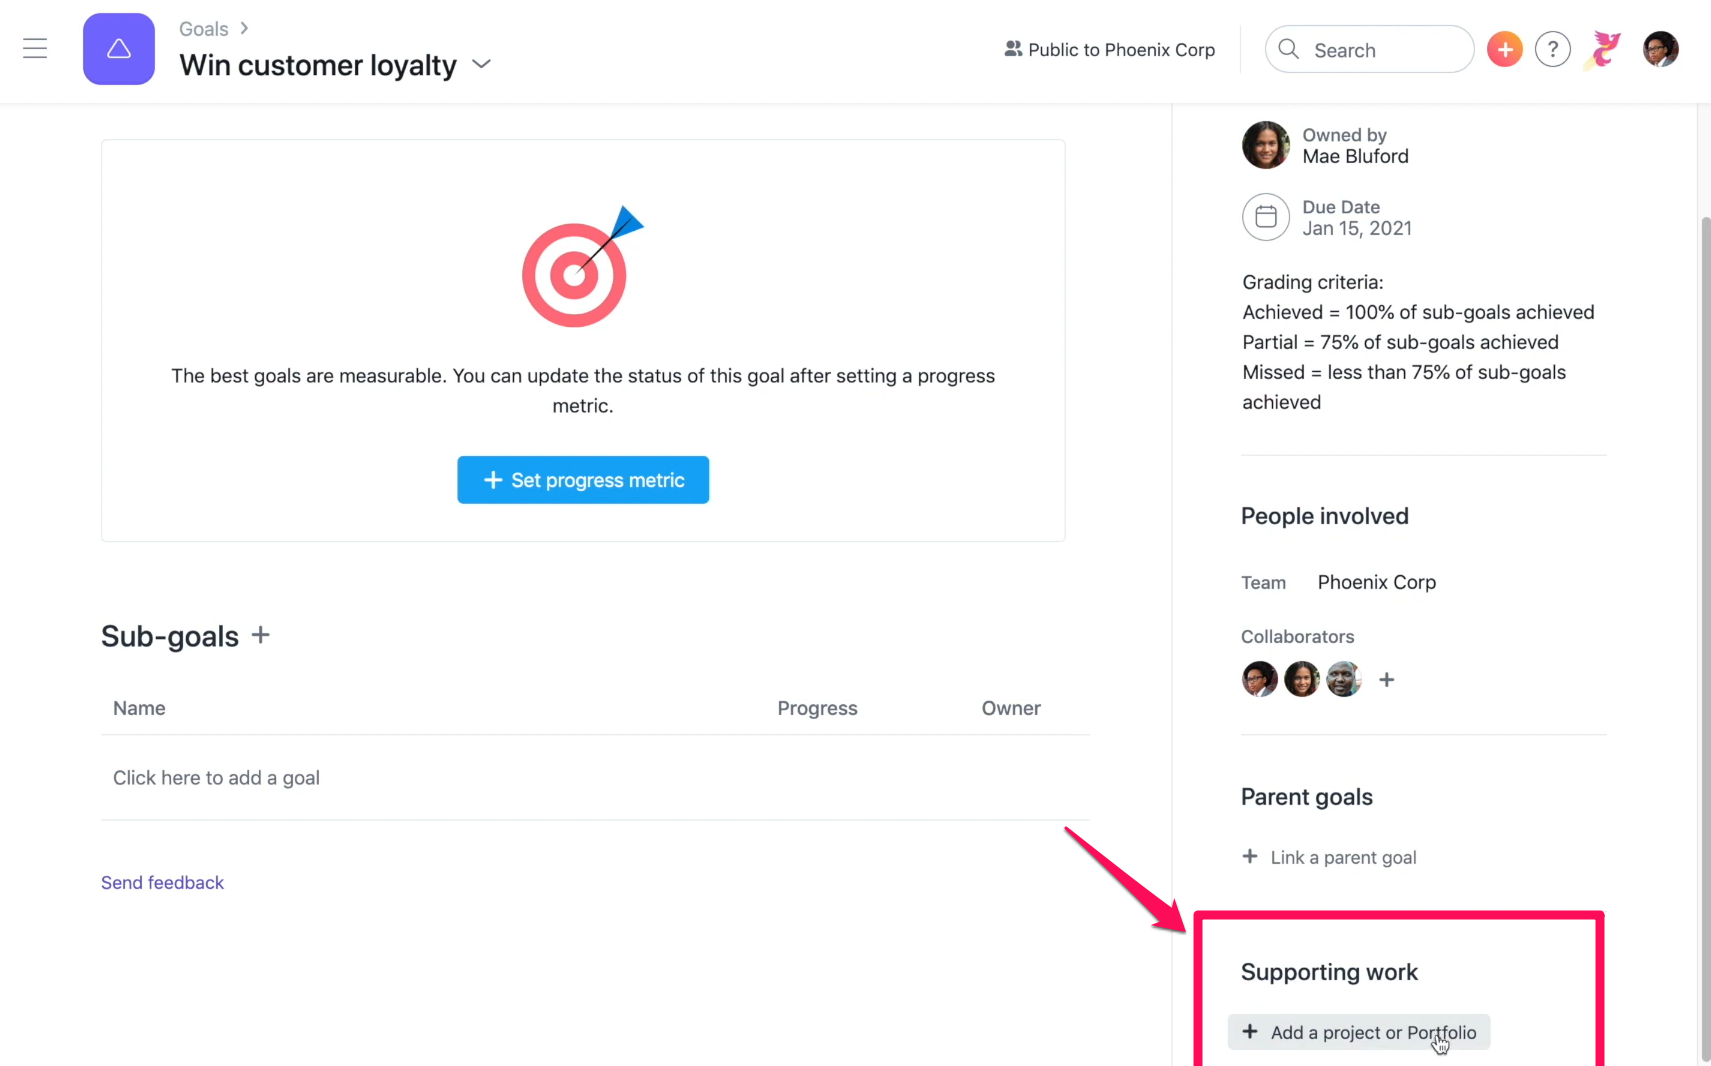
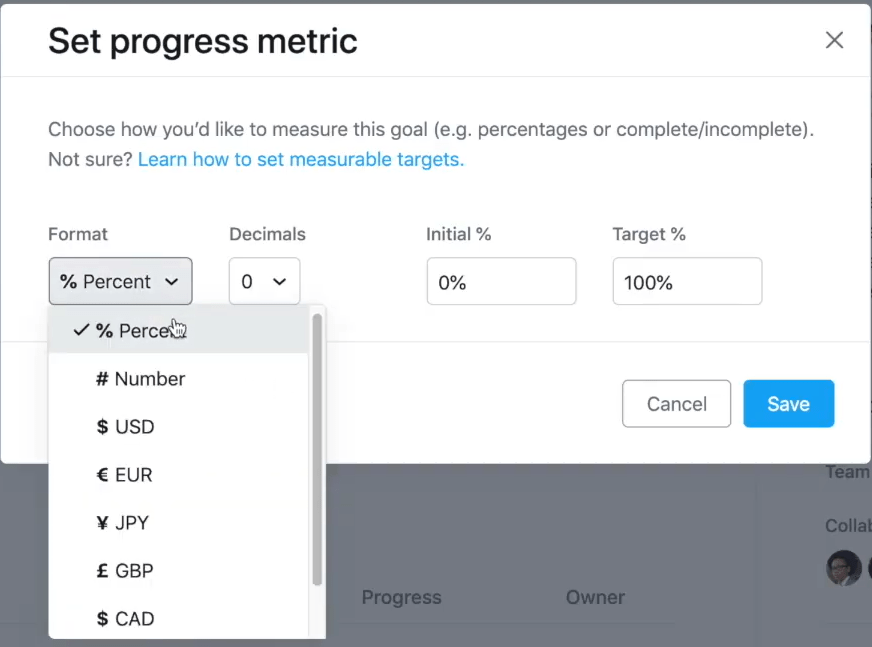
Step 5: Always remember to set a progress metric for each goal. Do so by clicking + Set progress metric.
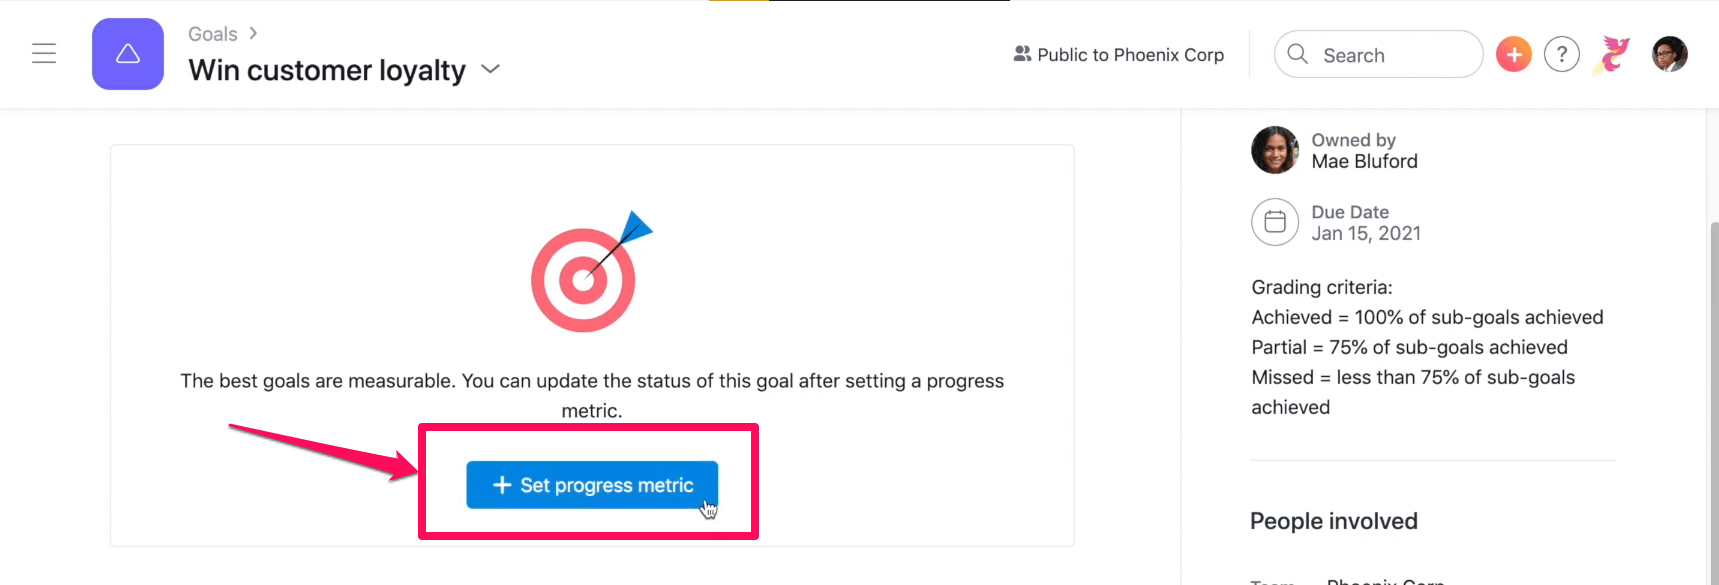
Choose a numerical option, such as percent, number, or currency.
Sub-Goals in Asana
Once the company-wide objective has been created, adding sub-goals to that objective will break it down for your teams.
Adding sub-goals provides more clarity to each team member on how they will contribute to the company’s success.
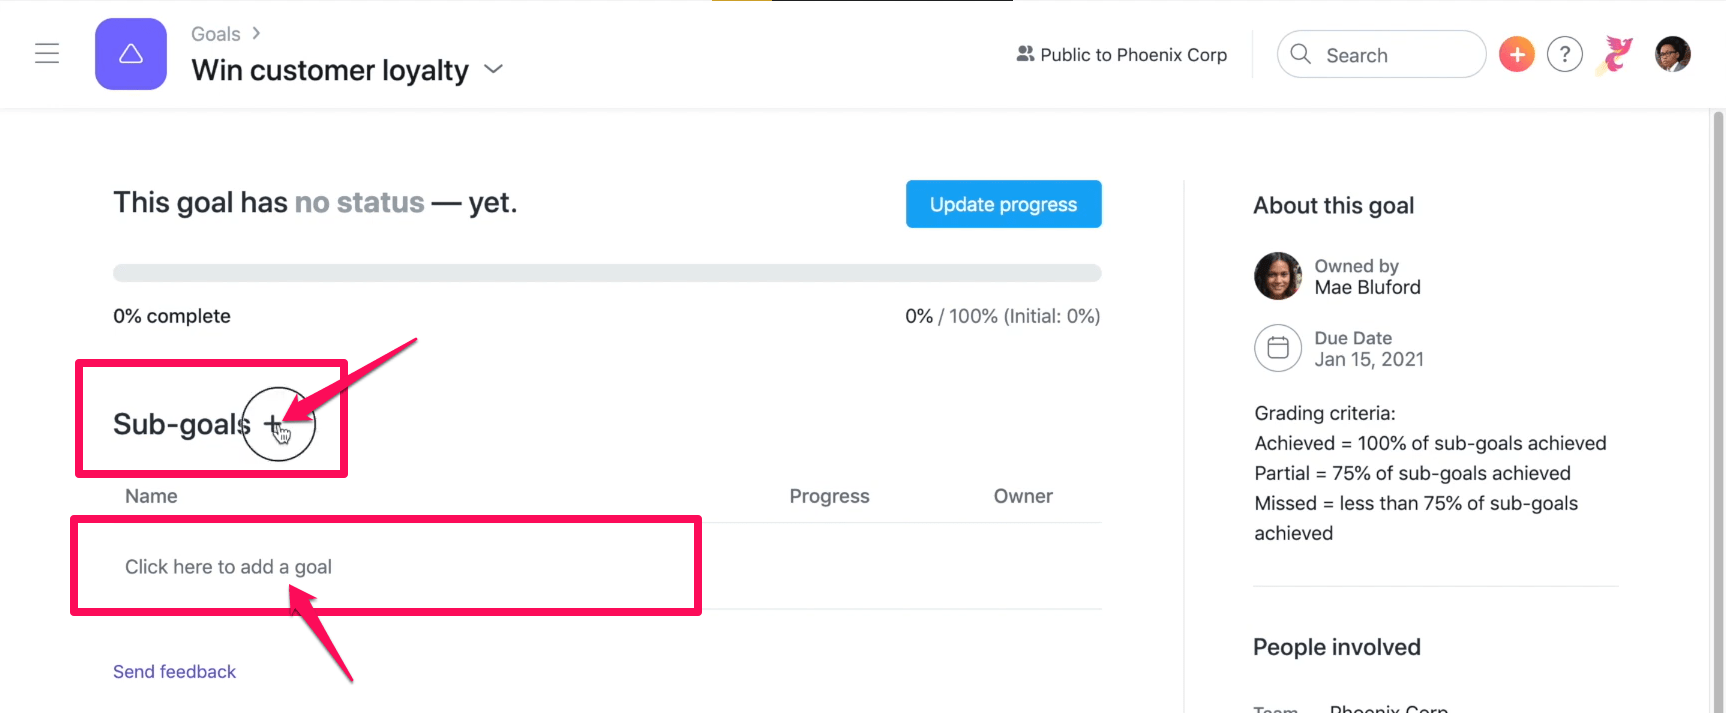
With an existing company-wide goal of growing the rewards program, let’s break it down into sub-goals.
Step 1: Click on the plus sign to add a sub-goal to a parent goal.
Step 2: Click on the owner icon and assign an owner by typing the employee’s name in the search box.
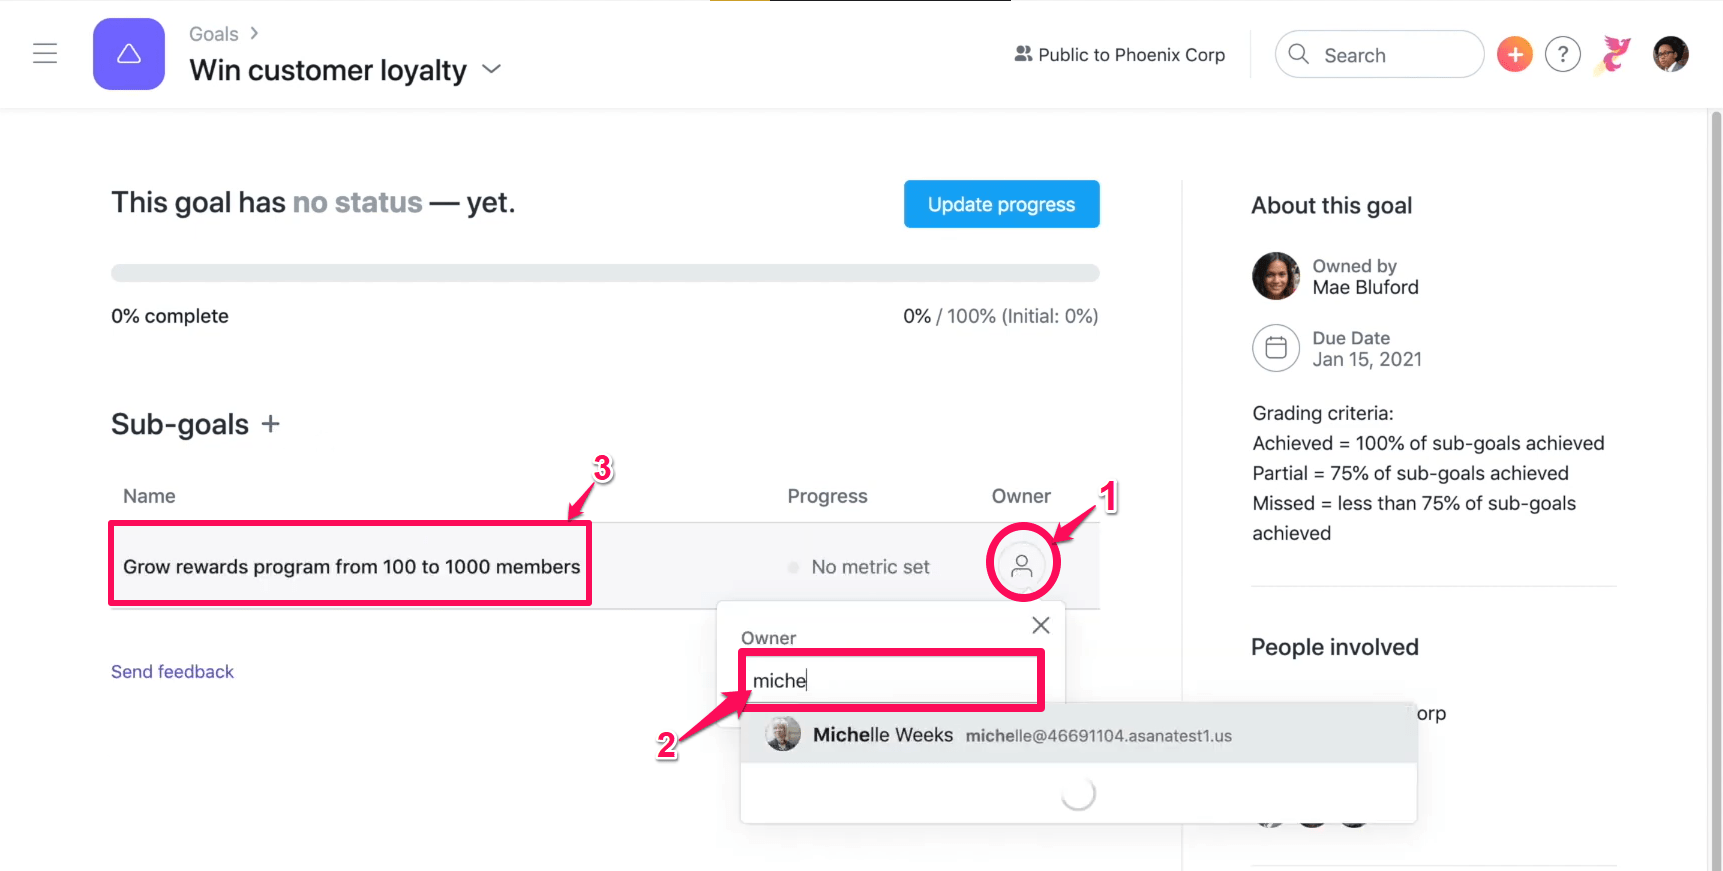
Step 3: Once an owner is assigned, click on the subgoal to view the detail page.
Step 4: Add a due date for your subgoal.
Step 5: Include clear grading criteria to know what success looks like at the end of the quarter, year, or specified deadline.
Step 6: Specify the team of the new subgoal to display it the relevant goals view. Since this is a sub-goal, the parent goal has already been added. If this KR aligns with more than one goal, you can add another.
Step 7: Finally, let’s set a progress metric for our sub-goal. Click on the + Set progress metric button to configure progress metrics.
In this case, we’ll use the number option to track our progress from 100 to 1000.
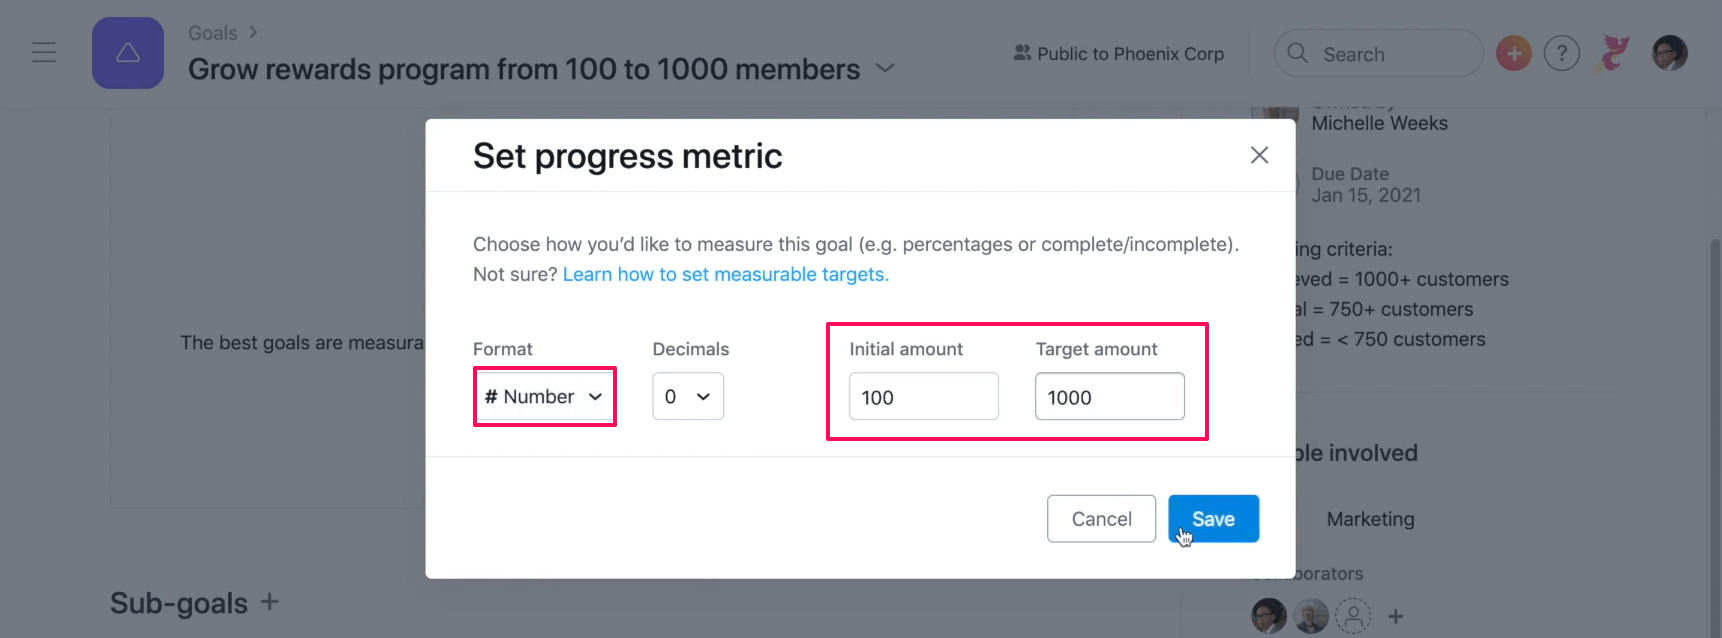
Click Save to continue.
Updating & Closing Goals in Asana
Whoever owns a goal should update its progress regularly. You can also set up a recurring task for this so that you never forget it.
Here’s how:
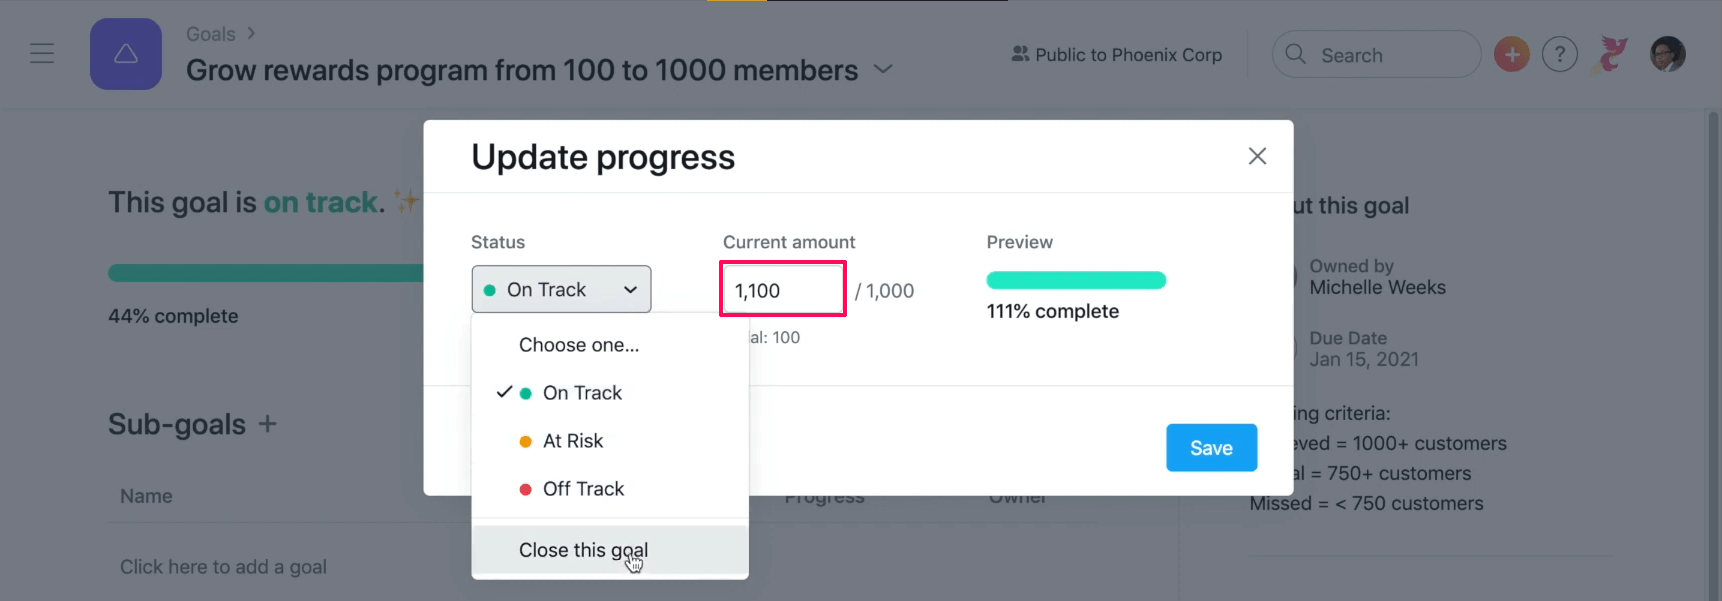
Step 1: Click on the Update progress button.
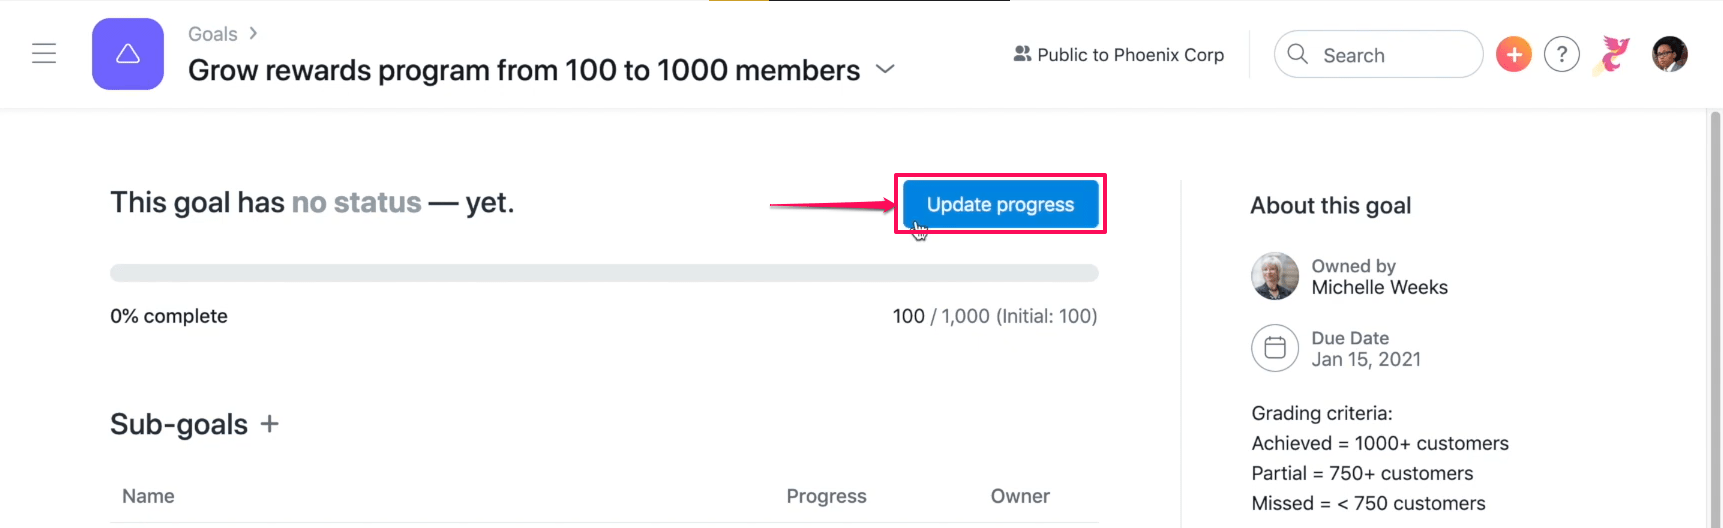
Step 2: Update the status and metric number.
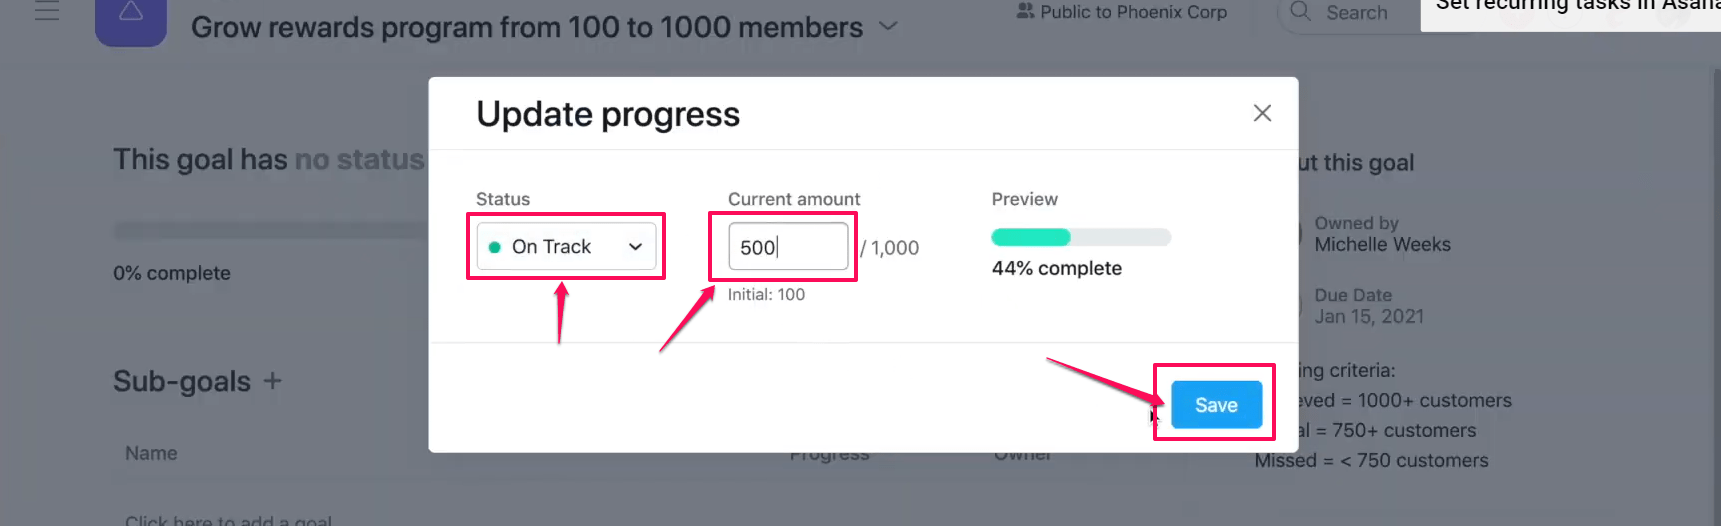
Click Save to continue.
When you update your progress, your team and manager know precisely how much work has been completed. These steps increase transparency and give your team the best possible chance to achieve the targets before the deadline.
When you come to the end of the quarter or year, communicate the outcome using the grading criteria you established to close out your goals with one last progress update.
Deleting Goals in Asana
You can change the status of Goals in Asana to “Closed” after they have served their purpose. But in cases where a specific goal is no longer needed, Asana gives you the option to delete such goals.
Here’s how to do it.
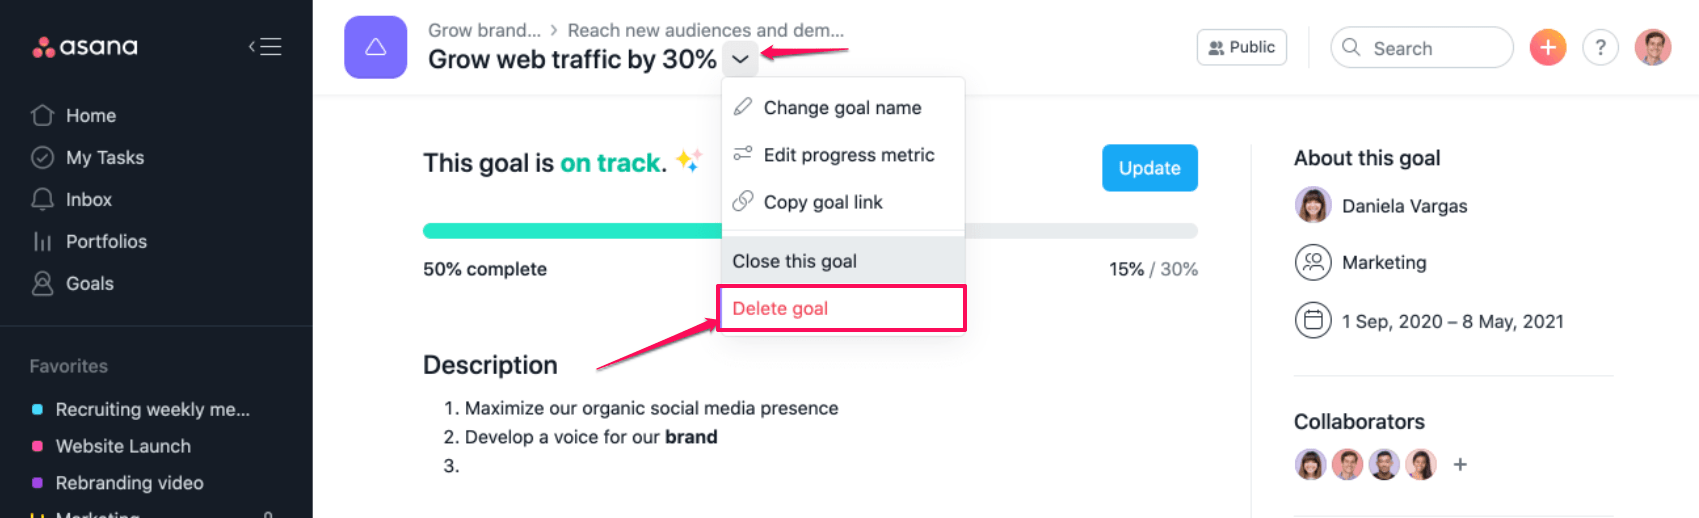
Step 1: Click on the goal you need to delete from the goals list page.
Step 2: Click on the drop-down arrow next to the goal name and click on Delete goal.
In cases where you end up deleting a team, all of the goals assigned to that specific team are not automatically deleted.
Ideally, you should assign such goals to a new team before deletion. But in cases where you no longer require them, deleting them may be your only option.
Common Problems With Asana Goals
There’s a lot to like about Asana’s goal-setting features. However, like every product, it has some flaws. Here are some of the most common problems users face when working with Asana Goals.
Problem 1: You Can’t Find Your Goals
Asana allows you to create up to 10 goals per portfolio. So naturally, as the number of projects and goals increases, finding specific goals becomes a common issue.
Here’s an easy solution:
Step 1: Sign in to your Asana Business account. You must have a Business account to search for Goals in Asana.
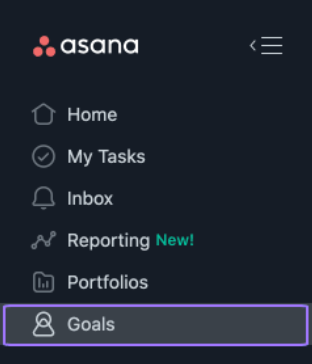
Step 2: Click on Goals from the side menu.
Step 3: Click on the search bar and enter the goal that you’re searching for.
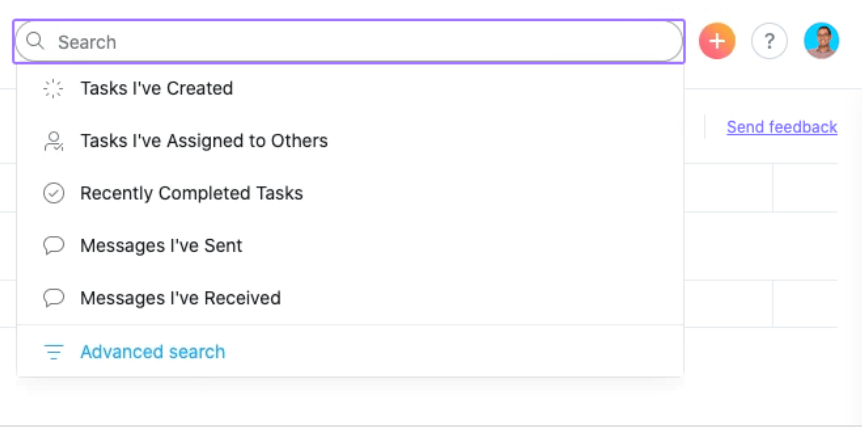
Step 4: Click on the goal to access it.
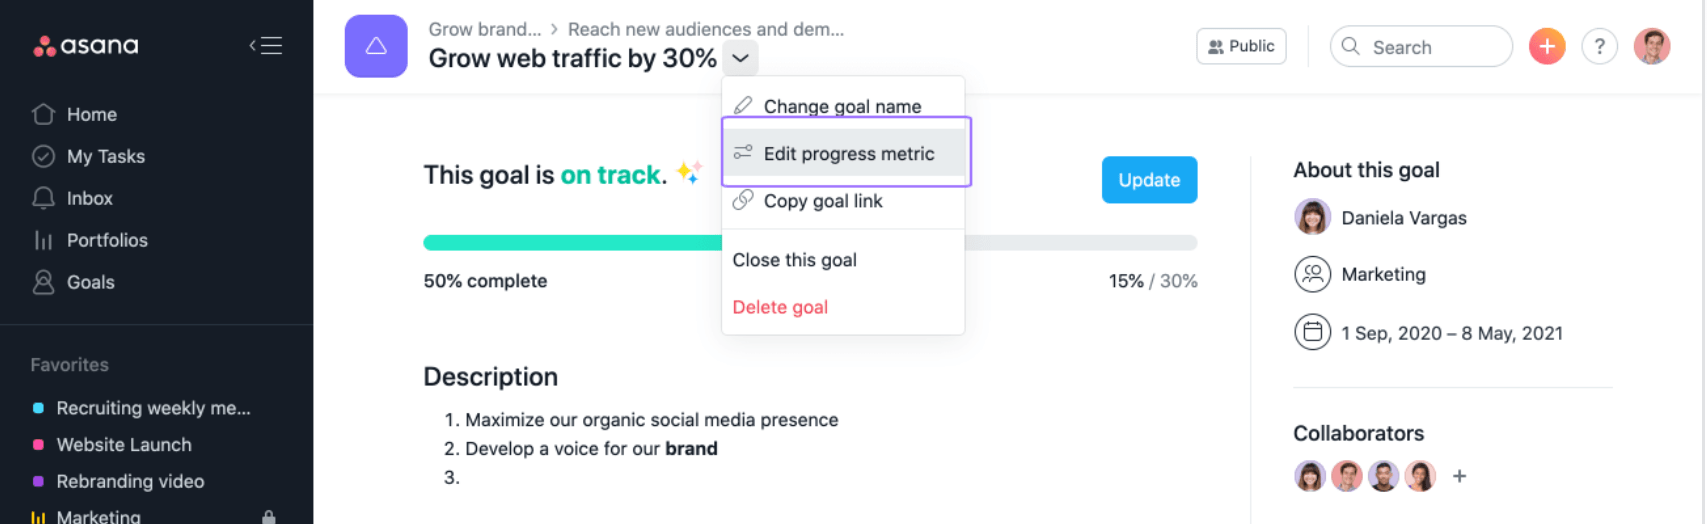
Problem 2: You Selected the Wrong Progress Metric
Creating a goal and selecting the wrong progress metric type is a common occurrence among Asana users. For example, you can end up picking “number” as the metric type instead of “percentage.”
Here’s how to fix it:
Step 1: Click on the goal in which you need to make the change.
Step 2: On the goal’s page, click on the drop-down arrow next to your goal header and select Edit progress metric.
Step 3: In the Edit window, you can change all of the settings related to goal measurements like metric type, decimals, goal target number, etc.
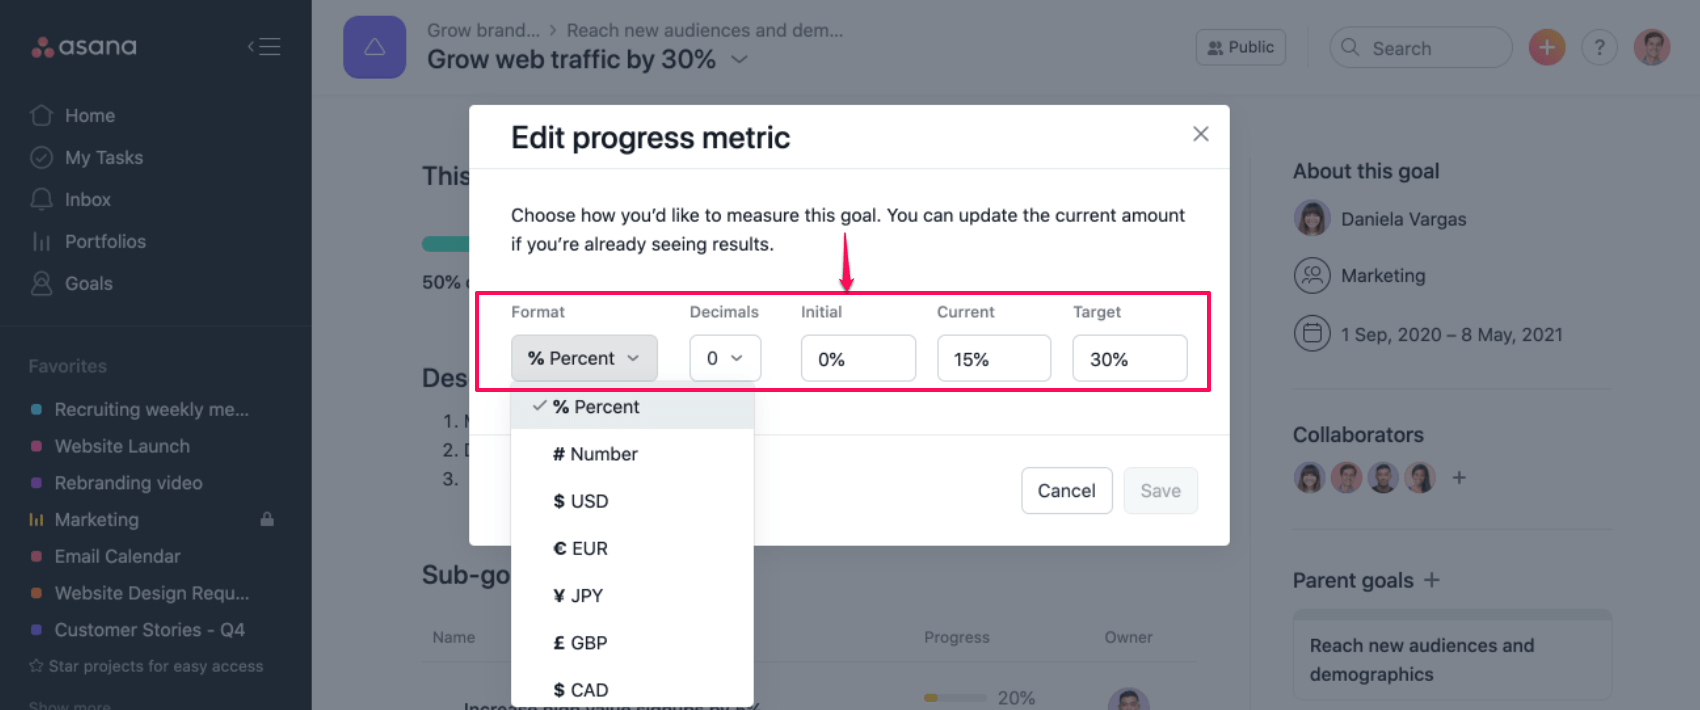
Step 4: Once you complete the changes, click Save.
Problem 3: You Want to Change Goal Privacy
By default, the goals created in Asana are visible to the entire company.
But you can choose to hide a goal from irrelevant users by changing the privacy settings. You can change the privacy settings for both new and existing goals.
When creating a new goal, select the privacy option at the bottom of the window to change goal visibility.
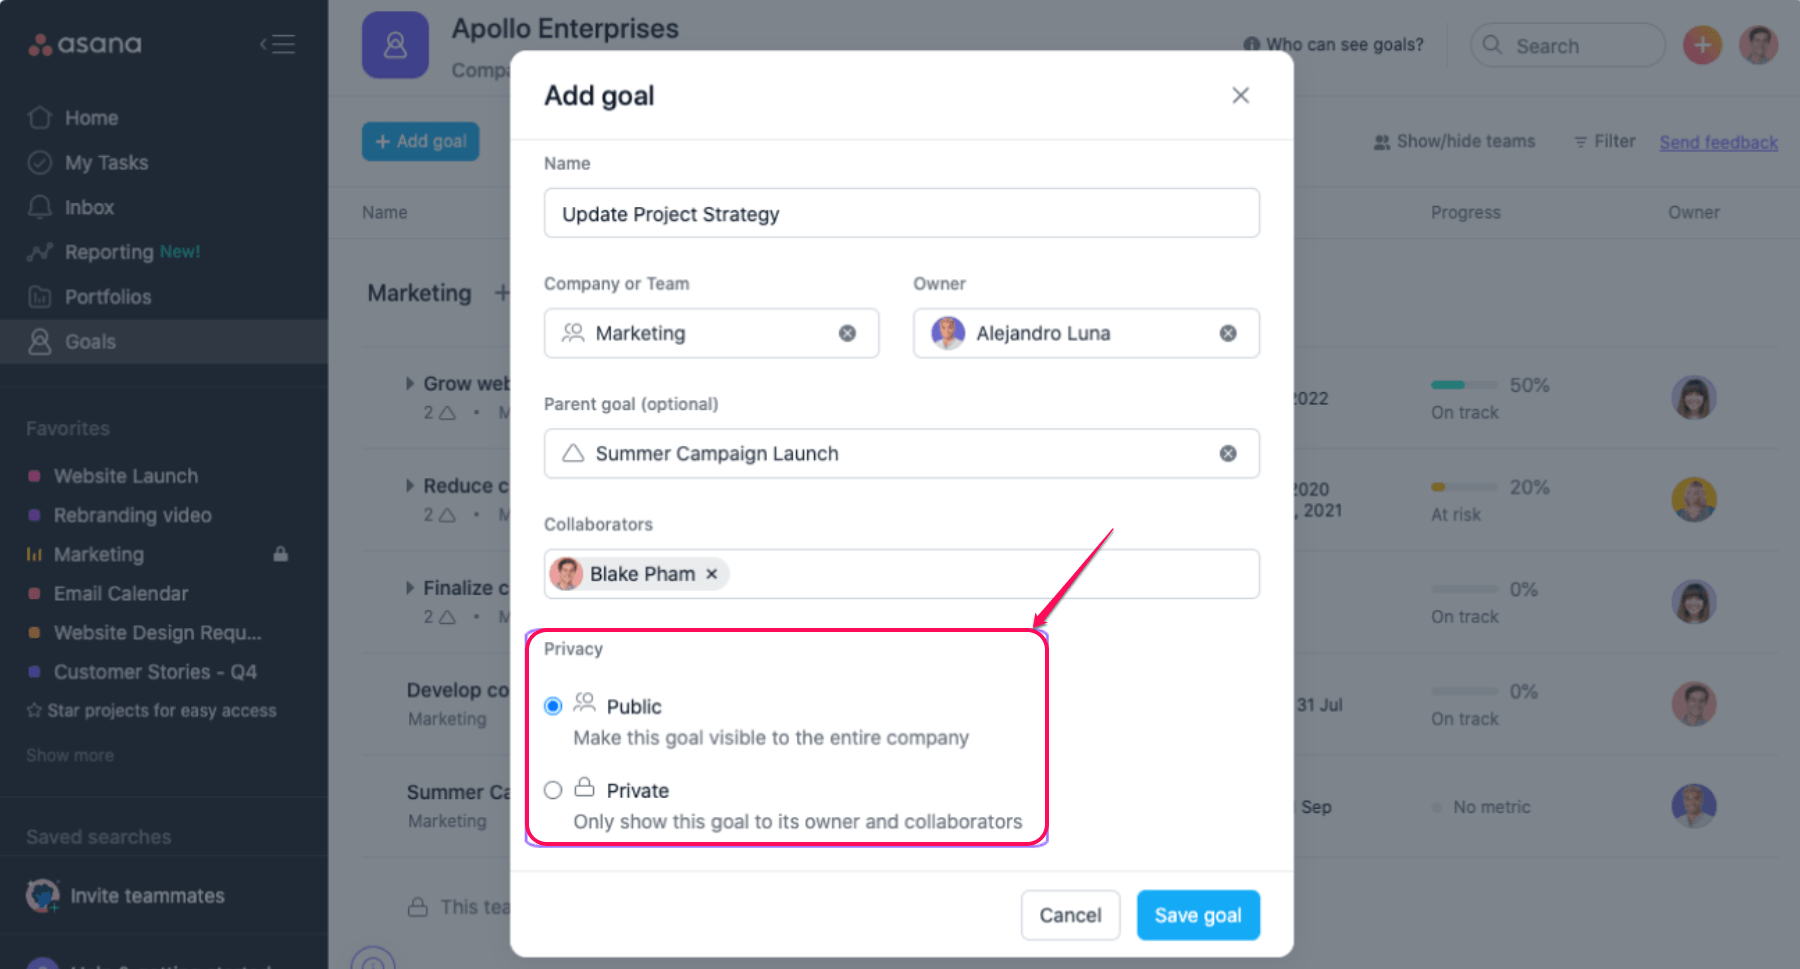
To limit the goal’s visibility to selected users, choose Private.
For an existing goal, simply click on the desired goal from the goal list view.
From the goal page, click on the privacy icon on the top right corner of the page to change the privacy settings.
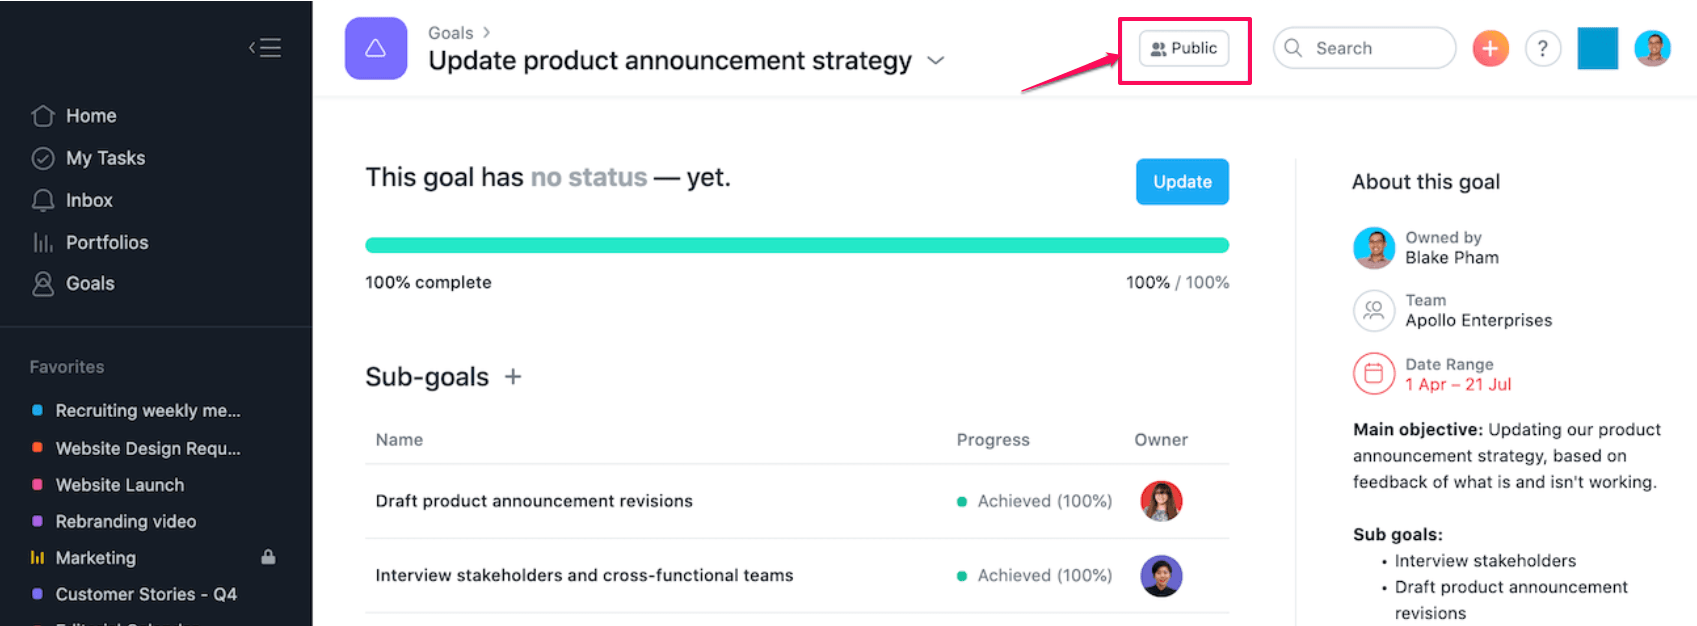
In the window, select Public or Private to change the privacy setting.
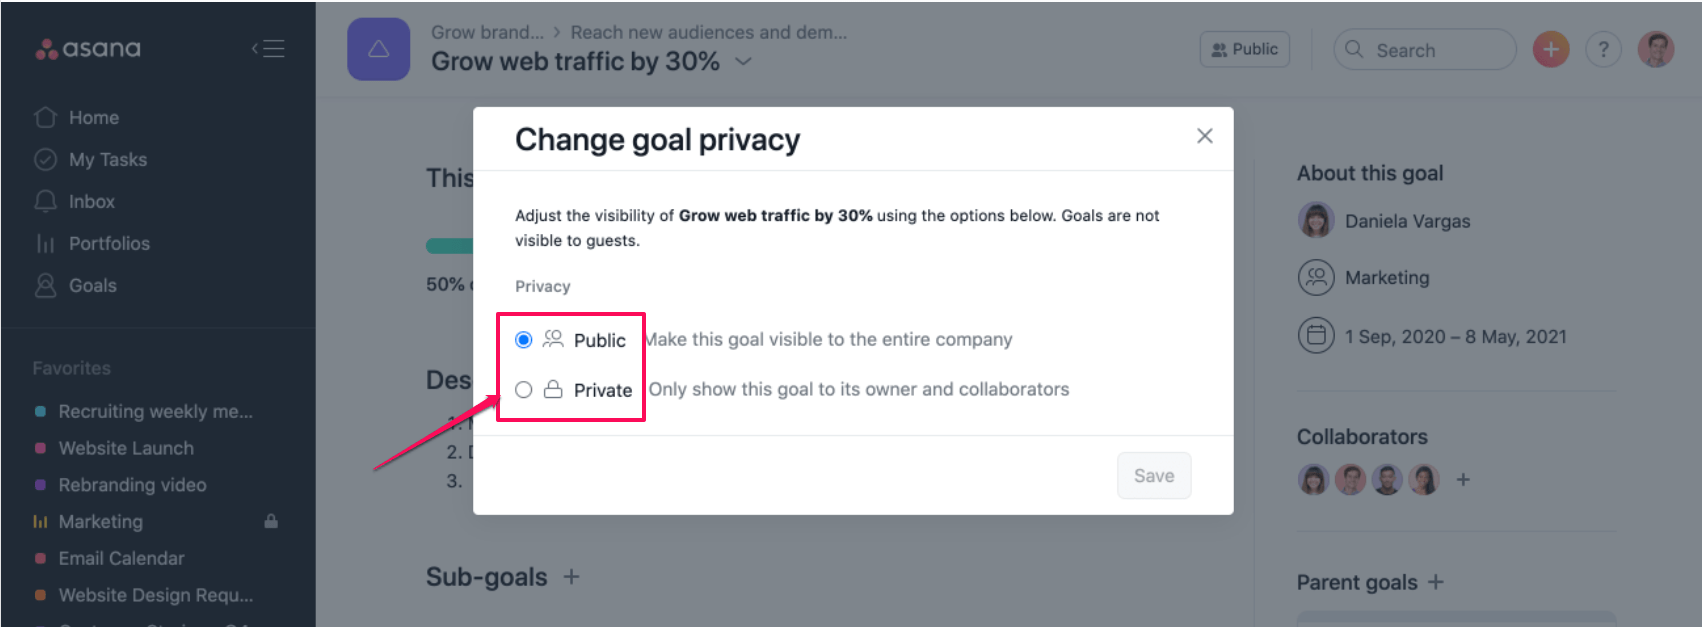
When changed to Private, the specific goal is only visible to the owner and the added collaborators of the goal.

