How to Recover Deleted Files in GitHub
Accidentally deleting the wrong file in a GitHub project happens to every developer. Regardless of the reason for this error, deleting important files can be concerning if they’re not restored promptly—especially if you’re working with a team that pulls frequent changes in the project.
This guide will show you multiple ways to recover deleted files in GitHub, so you can get back to work quickly without causing other issues for your team.
Step #1: Use the Git Command Line
Each time you modify a file, create a new file, edit a file, or delete an existing file in GitHub, your changes are unstaged. Then you’ll use a Git add command to stage those changes and commit those changes using a Git commit command.
If you haven’t staged the deleted files yet, you can quickly use the command line to restore the files from the index. Just enter Git restore <filename> to recover it instantly.
Unfortunately, running this command after the changes have been staged will display an error code. That’s because the file no longer exists in that index.
In this scenario, you’ll have to use the command line to run something else. Try entering Git restore –staged –worktree <filename>. This sequence tells Git to restore the file from the HEAD and working tree.
If the files have been deleted, staged, and committed, then you’ll need to use a Git checkout command to restore the deletion using the command line.
This could take a bit longer, as you’ll need to locate the checksum of the commit that ultimately deleted the file. Then you’ll need to check out that file from your previous commit.
You can use the command line to list all commits, which can be found in the head. Then limit those results to only a single commit as a way to show an output of the commit that contains the deleted file. You’ll have to run a Git show command with the checksum here.
This will show you the last commit where the deleted file was still present in the repository. Then you can restore the file from that commit by adding a ^ symbol at the end of that commit hash, which tells GitHub to fetch the prior commit.
Step #2: Use the GitHub Desktop Application
Many developers find the command line to be complicated for deleted file recovery. So if you’re more comfortable using a graphical interface, the GitHub desktop app for Windows and macOS might be easier for you.
Again, you likely find yourself in one of two scenarios here as you’re attempting to recover the deleted file—your changes have been staged, or the changes have been committed.
If you have not committed the changes, you can easily recover the deleted file from the staging area. Just navigate to the left side of your desktop application to locate the deletion.
Then right-click on the file you’ve deleted in the staging area, and select discard changes.
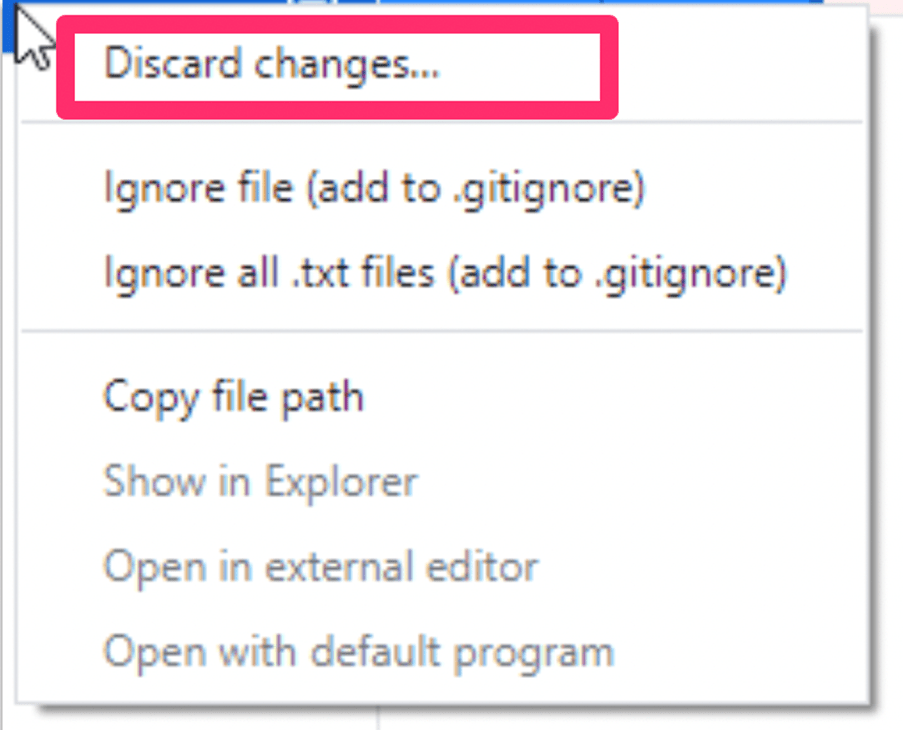
GitHub will ask you to confirm this request. Once you confirm the changes in the pop-up window, the file will be recovered and sent back to its original location.
If the file was deleted and you committed the changes, you need to find the commit hash. This can’t be done from the desktop application alone. Instead, you’ll need to run Git rev-list from the command line.
You should see all of the listed commits along with their names. But the hashes won’t be displayed until you run a Git show command with the hash.
Once located, go to your History tab in the desktop application. Right-click on the commit that contains the file you want to recover and choose revert changes in commit from the menu.
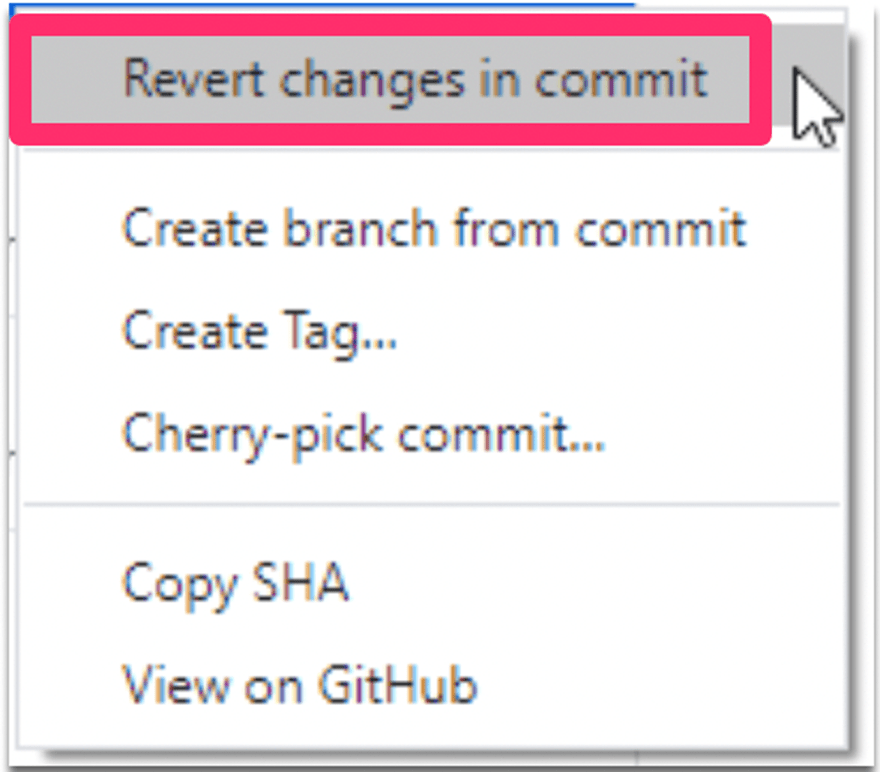
A new commit will be created, and the previous one will be restored—along with the deleted file.
Step #3: Using the GitHub Web UI
If you’ve committed your changes after deleting a file and pushed the changes to GitHub, you can attempt a recovery using the web UI.
Simply look through your commit history by date, and then download any files from your project at any point in time.
You just need to know which commit contains the deleted file. Run a Git rev-list and find the commit hash.
Open a web browser and enter the following URL:
http://github.com/<username>/<reponame>/commits/hash^
Adding your username and repository name will point the URL to your repo. Then enter the full hash followed by a ^ symbol. This prompts GitHub to open the commit prior to the offending commit.
Once that commit containing the file you want to recover has been opened, select browse files from the top right side of your screen.

Locate the file you want to recover and click on it.
To see a raw text version of the deleted file, click the Raw button on the screen. Then right-click and choose Save As from the menu to download the file. This will save it to your project.
From here, you can add the recovered file back to your local repository and then commit the changes.
Step #4: Install a Full Backup
Once you’ve recovered your file using one of the three methods mentioned in the previous steps, you should install a full backup to make this process easier in the future.
Depending on the situation, restoring deleted files in GitHub can be complicated. This is especially true if you need to use the command line and locate commit hashes.
Restoring old commits can introduce inconsistency into your repositories, which is why installing a full backup can make your life a bit easier. BackHub is one of just many options to consider.
I like it because the installation process is relatively straightforward. You just need to sync up the permissions with your GitHub account, and then you can quickly select which repositories you want to be backed up with BackHub.
There’s even an option to backup all repositories. If you select this method, all new repositories created on GitHub will be backed up automatically on BackHub.
Moving forward, you’ll have nightly backups of your repositories with snapshots saved for 30 days. So if you delete a file and want to recover it, you just need to find a day from the snapshot that contains the desired file.
You can download all files in the snapshot from BackHub in a single zip file. Then you just need to locate the deleted file and copy it to your local repository for recovery.
Common Problems When Recovering Deleted Files in GitHub
There are several common hurdles that developers come across when they’ve deleted files in GitHub. Some of these problems can make the recovery process a bit more challenging.
We’ve identified the most common pain points with this process, along with solutions for troubleshooting them.
Problem #1: Pushing Changes to Shared Repository After Deleting Files
If you’re a solo developer working alone, this problem won’t really apply to you. But for developers using GitHub to work on team projects in a remote repository, this happens often.
Here’s the scenario—you delete files in GitHub, then use a push command to upload your local repository to the shared repository. If your team is using pull requests, then the changes you’ve applied will merge with their local repositories as well.
Depending on the importance of the files you deleted, this can lead to critical errors with the project and can be a hassle for your team members.
To fix this, you should create a new repository in GitHub. Give it a title that shows its sole purpose—to recover a forced push. Then create a new file in GitHub’s web interface and commit the new repository as your initial commit.
First, try to find a reference branch for the commit using a new branch that points to the hash. If there’s an error, it either means you made a mistake with your commands, or maybe the branch was permanently deleted after the force push.
You can also use Git reflog and Git checkout as alternative methods to get the commit back. From here, you can attempt to recover files from a local repository that was force pushed.
But you need to make sure you’re running it on the local repository that initially pushed the changes—not from a cloned repository. Create a branch, and rebase the history of your commits.
Problem #2: Detached HEAD State
In an attempt to recover deleted files, some developers come across a Git message that says, “You are in ‘detached HEAD’ state.”
This can seem a bit puzzling or potentially concerning, especially if you’ve never seen this error before.
Let’s start with the good news—everything is ok. The repository isn’t broken, and you didn’t do anything wrong. In fact, some experienced developers even enter this detached HEAD state intentionally. A detached HEAD simply means that you’re not in a normal state, which would be an attached HEAD.
Git repositories are collections of references and objects. References point to other objects and references, and objects have relationships with other objects. Commits are the primary objects in Git repositories, but other important objects include trees and blobs.
In addition to branches, the HEAD is another crucial type of Git reference. The HEAD is designed to keep the current Git repository on track. For example, when you use the log command, git shows you the results by looking to the HEAD for an answer.
Each time you create a new commit, the parent of that commit is located where the HEAD is currently pointing.
There are actually some benefits to a detached HEAD, which is why some developers come to this state intentionally. Here’s how the detached head message begins:
You are in ‘detached HEAD’ state. You can look around, make experimental changes and commit them, and you can discard any commits you make in this state without impacting any branches by switching back to a branch.
In simple terms, the detached HEAD gives you the ability to make experimental changes—thus creating an alternative history. You’ll have the option to either keep or delete your experimental changes as well.
You can also use this state to back and look at previous points in the history of the project, like a bug that occurred last week. You can access this using the log command, filter the log by date, and use a commit hash.
If you’re not planning to use the detached HEAD state as a way to recover your deleted files and you just want to get back to normal, run this command:
git config advice.detached head false
Using the -global modifier will apply these changes to all repositories, in addition to your current repo.
Problem #3: Troubleshooting the GitHub Desktop Application
Using the GitHub desktop application is a popular way to recover deleted files in GitHub, especially for developers who would rather use graphical interfaces instead of experimenting with the command line.
But not everyone will have this option.
GitHub desktop is only available on macOS and Windows. So if you’re using a Linux machine for your project, this method won’t be at your disposal.
Using GitHub desktop to recover deleted files is much easier if you haven’t committed the changes. Once you’ve committed the deletion, things become a bit more complicated—as you’ll need to search through the project history to locate your commit with the command line.
It’s also worth noting that you can’t just change the deleted file from your commit. The entire commit must be reverted. So if you made other changes during the same commit where the files were deleted, those would also be reverted.
Depending on how big the changes were during that commit, you may end up having to re-do quite a bit of work once you’ve recovered the deleted files.
Problem #4: Downloading Files From the GitHub Web UI
Lots of developers like to use the GitHub web UI instead of the desktop application to recover deleted files. That’s because the web UI has a graphical interface, and you won’t have to go through trial and error.
The web UI also allows you to browse through your repository and commit history without the need to clone the commit or checkout the commit. All of this can be accomplished visually.
However, you can’t select and download more than one file at a time from the web interface. This can be cumbersome if you’ve accidentally deleted multiple files.
You’d have to find each file and download them one by one, which is typically time-consuming. You’ll still have to rely on the command line a bit using this method, as you’d need to find the appropriate commit hash.
But if you just deleted a single file and you’re easily able to locate it and download it from your commit history, the web UI is a simple approach.

