How to Merge Branches in GitHub
When you are ready to submit your coding changes to the main branch in GitHub, you will merge your develop branch with the main branch. The develop branch allows you to work on your new coding changes separately from the main code. You then can be certain the new code is perfect before submitting it. Below, we’ll discuss how to merge branches in GitHub.
1. Create a Branch
Before you can merge branches, you will need to create a develop branch in which to add your proposed coding changes. You will want to create this branch as a subsidiary of the main branch, so you can merge the branches later.
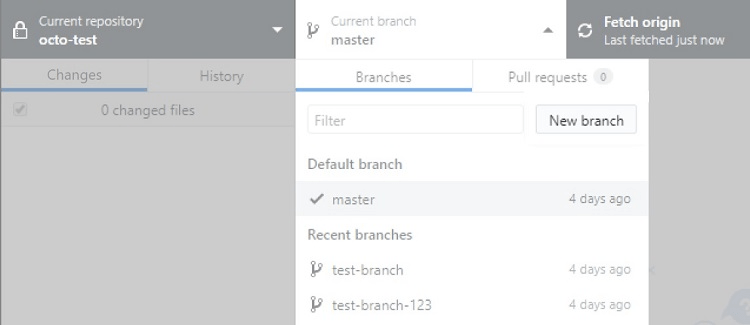
In your GitHub interface, the Current Branch button should list the branch in which you are currently working. If you need to change this current branch, click Current Branch and select the branch you want to use from the list.
Once you have the correct current branch selected, click Current Branch again. Then click the New Branch button.
In the Name text box, type the name you want to use for your new branch (that will become the develop branch). If you need to change the branch into which this branch would merge, click on the branch name in the middle of the screen. Finally, click the Create Branch button to make your new branch.
2. Create a Pull Request
After adding your code to the develop branch, you’ll be ready to create a pull request to merge the develop branch and the main branch.
On the GitHub page for your repository, click on the Branches menu. You should see a list of all available branches. Select the develop branch that has the changes you’d like to merge to the main branch.
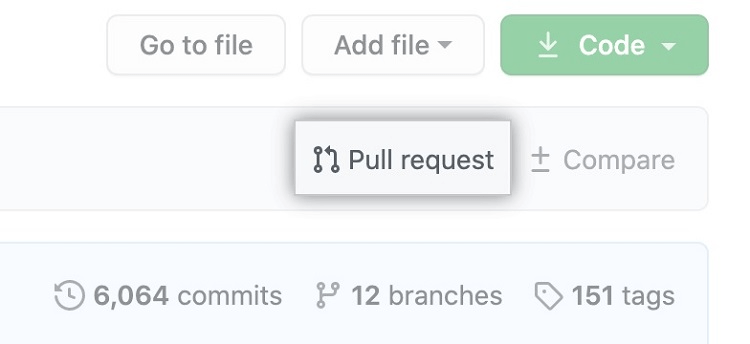
You should see a list of the files contained in the branch. Click on the Pull Request button. You now can make a request to merge your new code with the main code.
In the Pull Request window, click the Base button. From the drop-down menu, select the main branch into which you want to merge your coding changes. Then click the Compare button and select the develop branch that contains your coding changes.
In the test boxes underneath, add a title for the pull request that briefly describes what you are requesting. In the larger text box lower on the page, type a message for those who will be reviewing the pull request. You can be as descriptive as you would like in this text box.
Finally, click the Create Pull Request button to have others review your proposed changes and to determine whether a branch merger should occur.
If you aren’t quite ready to commit the pull request, click the drop-down menu arrow to the right of the Create Pull Request button and click on Create Draft Pull Request. GitHub will save the details of your pull request, but it will not alert others that the pull request exists. You then can make any edits to the pull request. When you want to submit the pull request later, just select the Create Pull Request button.
3. Find Your Pull Request for the Branch Merger

After creating the pull request, the branch merger may occur automatically, depending on the configuration of your repository. If you don’t have permission to merge branches, though, you will need to use the pull request to propose the changes for merging from the develop branch to the main branch.
On your main GitHub screen, click the Pull Requests menu at the top of the page. (It should exist between the Issues and Actions menus.)
If you see a number in a gray circle to the right of Pull Requests, this means you have some pull requests pending. If so, you will see a list of your pending pull requests when you click on this menu. (If you do not see your pull request in this list, you will need to return to the previous step and create the pull request.)
4. Select the Type of Pull Request for the Branch Merger
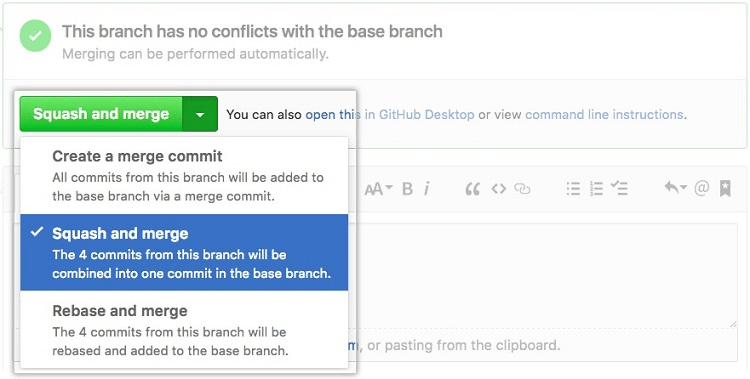
You now can select which of the three merge pull request options you would like to use with this branch merger. You may not see all three of these options, depending on the settings enabled in your repository.
Merge Pull Request and Create a Merge Commit
When you want to merge all commits in the develop branch to the main branch with your branch merger action, you will want to use this command. You will need to have write permissions for the repository for this merger to take place immediately. If not, others will need to review your pull request before the changes you are proposing will become part of the main branch.
You can click on the Merge Pull Request button to merge all commits into the main branch.
If this button is dim and not available, you will need to click on the drop-down arrow to the right of the Merge Pull Request button and click on Create a Merge Commit. Click on the green button after it changes to a Create a Merge Commit button. This will accomplish the same task as selecting Merge Pull Request.
If you cannot select Create a Merge Commit from the drop-down menu, you may need to make some changes to the merge option settings in your repository.
Squash and Merge
The Squash and Merge option for your pull request focuses on making multiple commits simultaneously. If you have multiple commits that will be part of the pull request, this option will combine all the commits into one commit as part of the pull request.
This gives you a more streamlined process for making changes to the main branch in your repository. If you want a less complex and cleaner history for your repository, the Squash and Merge option will be a good choice for you. However, if you need to be able to see a specific list of all changes in the repository’s history, you will not want to combine multiple commits into one commit.
The settings for some repositories do not allow the Squash and Merge option. You also will need write permissions in the repository to use this option, or you will need others to review the pull request.
To see the Squash and Merge button, you will need to click the drop-down arrow to the right of the Merge Pull Request button. Click on Squash and Merge in the drop-down menu. This changes the green button to a Squash and Merge button. Now you can click on the green button to select this option for the pull request.
Rebase and Merge
With the Rebase and Merge option for a GitHub pull request, all commits from the develop branch will attach to the main branch without a merge request. This is the best way to track the project history for the repository in a linear manner.
Your repository’s settings must allow for the Rebase and Merge option before you can use it. You must have write permissions in the repository for it to take effect immediately, or others will need to review the request.
To see the Rebase and Merge button, click on the drop-down arrow and then click on Rebase and Merge in the menu. You then can click on the green button, as it now is a Rebase and Merge button.
5. Submit the Pull Request Merge
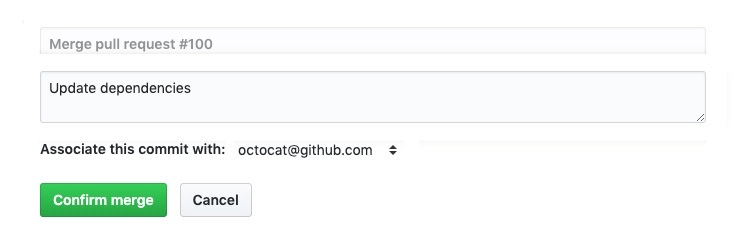
After you select the type of merge pull request that you want to use, you can enter a message in the text box underneath the name of the merge pull request. GitHub will create a default message for you in this text box that you can send as is. Alternatively, you can choose to edit it or to start from scratch, if desired.
Underneath the text box, you should see your email address. If you have more than one email address associated with your GitHub account, you can click on the box to see a drop-down menu and select the email address you want to use. This email address simply identifies you to the other GitHub users who may be reviewing the branch merge request.
If you have email address privacy activated with your GitHub configuration, you will see a stand-in, generic email address, rather than your email address.
Depending on the type of pull request you selected in the previous step, the green button underneath your email address will list Confirm Merge, Confirm Squash and Merge, or Confirm Rebase and Merge. Click on the green button to submit the merge pull request.
Common Problems With How To Merge Branches In GitHub
When you merge branches that have incompatible coding that would cause conflicts if the changes go through, GitHub will return an error message when you try to merge branches. This is a merge conflict.
You cannot complete a pull request in GitHub without resolving the merge conflicts. Git can resolve some conflicts with minimal intervention on your part. However, if the conflicts are significant enough, you will need to resolve them yourself. The tips here will focus on helping you resolve merge conflicts.
Problem 1: Merge Conflict Resolution Using the Conflict Editor
Merge conflicts are common when attempting to merge code from a develop branch into the main branch, especially when you are part of a large team.
A merge conflict may occur when multiple coders try to push different changes to the same line of code in the main branch. This is a frequent problem when multiple people on the team are pushing changes and merging branches at the same time. By the time you are ready to merge your changes, a recent change to the main branch could leave you with an unexpected conflict.
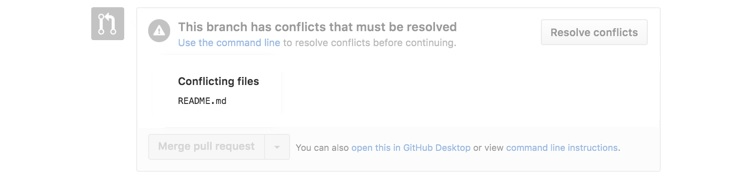
If you see an error message about conflicts that require resolving, click on the Resolve Conflicts button to start using the conflict editor.
Within the conflict editor screen, you have three potential options:
- Use only the code changes in your develop branch and discard the coding in the competing develop branch.
- Use only the code changes in the completing develop branch and discard the coding in your develop branch.
- Make new editing changes to the segments of the branch merge that are in conflict.
After making the desired changes, click the Mark As Resolved button to save your choices.
Understand that when you use the conflict editor, the entire develop branch merges into the main branch. You cannot only merge the line of code that’s in conflict. Any other coding changes that are part of the branch that you select will also become part of the merge. This is an all-or-nothing proposition.
As an additional troubleshooting option, if you see the Resolve Conflicts button, but it’s dim, meaning you cannot click on it, you have a problem that is too complex for the conflict editor. GitHub then requires that you resolve the merge conflict using the command line.
Problem 2: Merge Conflict Resolution Using the Command Line and a Text Editor
You sometimes may find it easier to resolve the merge conflict using the command line. If you cannot use the conflict editor, you will have no choice but to use the command line.
After moving to the repository where the merge conflict exists, type git status at the command line to see all the merge conflicts. Then use a text editor and open the file that has the merge conflict.
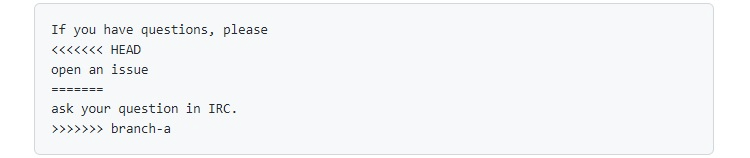
Any areas of the file that have merge conflicts will have a marker consisting of <<<<<< HEAD ahead of the conflict and a marker of >>>>>> after the conflict in the text file. You’ll see a marker of =======, which separates the two items that are in conflict.
Make the changes you want in the text editor and then remove all the marker characters. After saving the file, you then can push the changes again to attempt to merge the branches.
Problem 3: Merge Conflict Resolution Involving Deleted Files
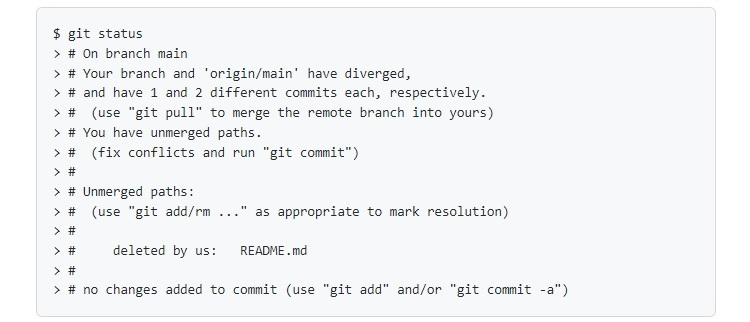
You may find yourself experiencing a merge conflict that relates to someone deleting a file that you need to push your code changes.
You will have to create a new commit that deals with the deleted file before you can attempt to merge the two branches. The new commit will determine whether you restore the deleted file and continue with merging the branches as you planned or whether you rework the coding in your develop branch by leaving the file deleted.
You will need to make use of the command line to see all the files deleted previously, including those involved in the merge conflict.
Problem 4: Disable Branch Merging Without Proper Review

If you would like to require extra collaboration on potential coding changes before allowing the merging of branches, you can require multiple approvals of the new code to occur.
The administrator for the main branch has the option of requiring a certain number of approvals from coders with the proper permissions level before allowing the merger of the develop and main branches. Think of this like a certain number of coders having to give a positive review or vote on the changes before they can go into the main branch.
Additionally, you can set up the branch merging process to require a final review from an administrator after the develop branch receives enough approvals.
Along the same lines, if someone reviewing the develop branch makes a request for changes, this can block the merging of the develop branch into the main branch without further review and a resolution of the changes.
If you are receiving an error message related to a branch merger failure, check to see whether a certain number of approvals must occur before the merge can occur or whether any change requests remain unresolved.

