How to Install GitLab
GitLab is a version control system (VCS) used in software development. Installing the application will enable cross-team, agile software development with the added benefit of continuous logging so changes to your code don’t get lost. Below you’ll find the main steps to install GitLab.
1. Download the Official GitLab Omnibus Package
It’s better to install GitLab in a Linux environment as the software was custom-made for it. These instructions will show you how to do just that.
We need to start by downloading the GitLab omnibus package from the official GitLab site. Load up the site, and scroll down to where it says Official Linux package, like so:
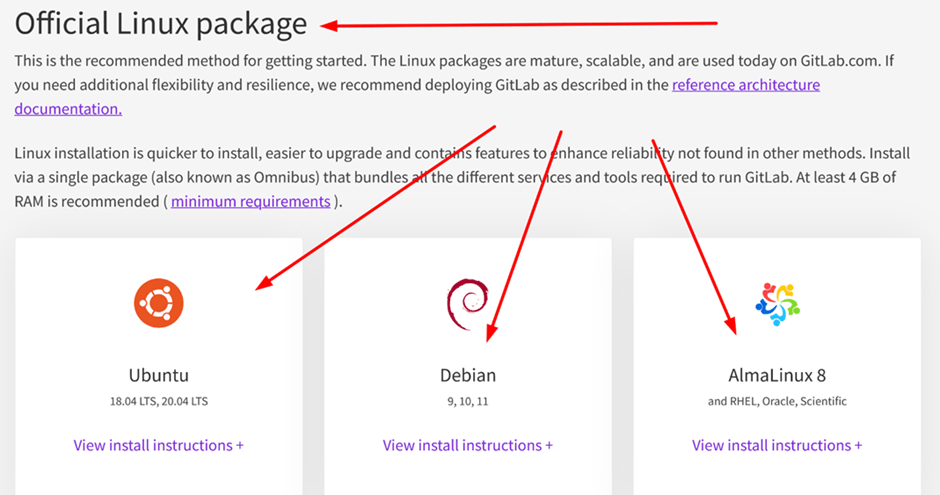
Underneath, you’ll see package options for Ubuntu, Debian, AlmaLinux 8, and more. Download it on your preferred Linux distribution. Ubuntu is ideal for those just starting, while Debian can be a bit more complex—they all ultimately get the job done.
2. Update the Repository
Now we need to log in to the server and update the repository. Doing so will allow us to receive all the necessary packages for GitLab.
So log into the server on your distribution—we’re using Ubuntu in this case—and use the following commands, as shown here:

From there, install the packages with this quick command:

If everything has worked correctly, a configuration screen will appear: click Internet site and enter the server domain name for sending and receiving emails.
3. Installing GitLab
With that done, we can now install the GitLab Omnibus package itself. Start by adding the GitLab package repository using this command:
curl https://packages.GitLab.com/install/repositories/GitLab/GitLab-ee/script.deb.sh | sudo bash
Now we need to install GitLab using the “apt” command, like so:

That’s the critical part done. The server will now automatically download and install the GitLab package. The installation will confirm it’s been successful.
We just need to configure the primary URL that you’ll employ to access GitLab’s server. We need to change the URL https://GitLab.example.com to the URL you want to use.
Navigate to the /etc/GitLab directory where the configuration is and edit the specific configuration file GitLab.rb using the default (and provided) text editor.
The commands should look like this:

In the GitLab.rb file, look for line 9 and enter your URL. GitLab will now start and configure the installation at this chosen URL.
4. Set the Password for the Administrator
We’re close to the finish and just need to set the password for the administrator.
Open up GitLab—which you installed and now have ready to go—and you’ll notice you’re directed to a password reset screen before you can do anything else. Here we need to set the password in the boxes shown and change it:
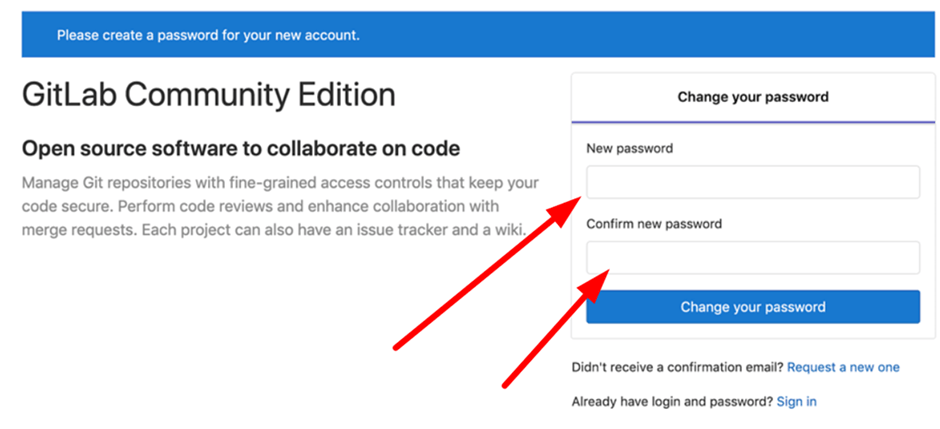
Once that’s done, you’ll get redirected to the login screen. The default user “root” will allow you to log in, so use that—you can change the login settings later.
That’s it; you have GitLab fully installed on Linux and ready to go.
Common Problems When Installing GitLab
While installing GitLab may be a relatively easy task compared to pure coding, it’s not always a smooth process for everyone. In fact, some well-known GitLab installation issues often get in the way and sometimes even put people off from using the platform altogether.
Worry not; we’ve listed some of the most common installation issues below and what to do should you encounter them.
False Warnings From Installation on openSUSE and SLES Platforms
This problem occurs when the package manager used in the openSUSE and SLES platforms starts to raise false warnings. It does this because the Omnibus GitLab packages get signed with what’s known as “GPG” (GNU Privacy Guard) keys—this is as well as the package repositories themselves that provide the signed metadata.
The warnings will look something like this:
File “repomd.xml” from repository “gitlab_gitlab-ce” is signed with an unknown key “14219A96E15E78F4.” Continue? [yes/no] (no):
The good news is that this is a well-known bug and can be attributed to Zypper—the package manager—ignoring the GPG keyword in the repository configuration file.
To get around this problem while using GitLab, users will have to agree to the package installation manually and confirm that it’s safe to continue with installation—that’s all there is to it. You can expect updates down the line that prevent these warnings from appearing.
GitLab Is Unreachable in Your Browser
Another common problem is where GitLab is unreachable while viewing it in your browser. There are a few reasons why this might happen, and it’s worth trying to fix this with some quick solutions.
The first action we can take is to attempt to specify an external_url in the line /etc/gitlab/gitlab.rb. Check your firewall settings if that doesn’t work, as this can interfere with proper functioning, too—ensure that port 80 or 443 isn’t closed on your GitLab server, and then try reloading the application.
Remember that specifying the external_url doesn’t follow the “key=value” format that other parts of gitlab.rb follow—to prevent that, ensure that you have them set in the following format:
- Set the external_url as: https://gitlab.example.com
- Set the registry_external_url as: https://registry.example.com
- Set the mattermost_external_url as: https://mattermost.example.com
The vast majority of the time, simply taking these actions will allow you to reach GitLab once more, usually in the browser of your choice.
You Can’t Install Omnibus GitLab Without Root Access
This problem emerges from a misconception more than anything.
GitLab users often want to know whether they can install it without root access, but there is no proper way to install Debian or the RPM (Red-Hat Package Manager) as a “non-privileged” user. You can’t install Omnibus GitLab RPMs because the Omnibus build process doesn’t construct source RPMs in the first place.
A suitable method is to deploy a web server and have it running on the same server as GitLab—this only functions when the server is listening on a “privileged” port. Admins installing GitLab can disable the bundled NGINX (Engine-Ex) service if this doesn’t work. However, they have to keep the configuration in sync with GitLab during all application updates if they do that. For some, this will be more hassle than it’s worth.
You can also tweak the OS for better performance, but note that this can only get completed with—as before—that all-important root access.
The Extension is Missing “Pg_trgm”
This event transpires when the extension isn’t enabled manually. Version 8.6 of GitLab (and onwards) requires the PostgreSQL extension known as “pg_trgm.” The extension should be automatically enabled if you’re using the Omnibus GitLab package with the included database.
That said, if you’re using an external database, you’ll need to enable the extension manually—this is because the Omnibus GitLab package with the external database doesn’t know if the extension exists or not. It also doesn’t have a way of enabling the extension itself, hence the error.
You’ll need to install the pg_trgm extension to fix this. You can find the extension in the postgresql-contrib package, although it’s different for Debian, and you need to write it as follows:
sudo apt-get install postgresql-contrib
Once the extension gets installed, just access it and enable the extension with:
CREATE EXTENSION pg_trgm; \q
You can now rerun migrations, and that should fix the problem.
GitLab-Rake Assets: Precompile Fails With “Permission Denied”
Another problem is where users state that running the code “gitlab-rake assets:precompile” doesn’t work with the Omnibus packages. The answer here is not to run the command anyway—it’s only for GitLab installations from source.
The GitLab web interface uses CSS and JavaScript files—these files get stored in a developer-friendly way, meaning they are easy to read and edit when required. When you’re a regular user of GitLab, you don’t want these files to be in that format because it makes GitLab run slower overall.
When you install GitLab from source, you need to convert the assets on your GitLab server each time you update it. Users often overlook this step, but the converted assets are already there when installing GitLab with an Omnibus package.
In other words, you do not need to run rake assets:precompile when you install GitLab from a package.
When you get this permission error, it fails for a reason. From a security perspective, the assets can’t readily get rewritten, making it harder for an attacker to use your GitLab server to serve malicious code to visitors. If you want to run GitLab with custom code, you are likely better off running GitLab from source or creating your own packages.
Other Problems When Installing GitLab
As you can imagine, quite a few problems surface during the installation of GitLab, even if most users don’t tend to have issues and can start reaping the platform’s benefits immediately.
We’ve rounded up some of the other most common problems for you below, along with their solutions.
- Encrypt SSL certificate failure: This is where the container itself fails to start. You need to check the domain has relevant DNS records pointing to the server.
- Limited resources: GitLab has comparatively demanding hardware requirements. If you encounter poor performance or unexpected HTTP 500 errors, you might need to increase your server specifications before doing anything else.
- GitLab “runsvdir” isn’t starting: For GitLab 11.2 and higher versions, the “gitlab-runsvdir” begins during the multi-user.target instead of basic.target. For those having trouble starting the service after upgrading GitLab, you need to check the system has adequately booted all the required services via this command: systemctl -t target.
- You have trouble installing GitLab on Windows: You can’t install GitLab on a Windows server, but you can use a GitLab “Runner” to access an existing installation on a Linux server from Windows. The software gets installed in Windows and is compatible with the functionality of GitLab.
- Team collaboration features aren’t working: The easiest way to work with other users on a GitLab project is to grant users direct push access to the repository. To do this, add the users to a project and provide them with the proper access rights. Users with “developer” authorization or higher can move their commits and branches to the repository without any restrictions.
- You can’t create a new project: Select the New project button—this takes you to the page for creating a new project. Enter the name of the project in the Project name field. This field can’t contain any special characters or spaces. Under the Visibility level, you define which users have access to the project. After selecting the settings, create the project by clicking Create project.
- GitLab can’t allocate memory during backup or upgrade: GitLab requires around 2 GB of available memory to run without errors. Having 2 GB of memory installed may not be enough depending on the resource usage of other processes on the server. Adding more “swaps” can solve the problem if GitLab runs sufficiently when not running a backup. If you see the server swap during normal usage, you can quickly add more RAM to improve performance.
- You keep seeing the “err_name_not_resolved” error: This error is almost invariably a DNS error. GitLab works on the base domain, and this issue typically occurs when the user hasn’t set up the DNS record for the subdomain. You may have set up a DNS record for your domain name, but you also need to set up one for every other subdomain you intend to use, so be sure to try that before anything else, as it usually solves the problem.
- You don’t know how to run GitLab in docker: This is only possible using what’s known as the “Docker executor.” When used with GitLab, the Docker executor connects to the “Docker Engine” and runs each build in an isolated container using the predefined image setup. It’s an uncomplicated build environment with the advantage that you can test out all the commands from the shell—although it’s worth getting to grip with the idea before diving in as this can create more problems.

