How To Import A Private Git Repo From GitHub
When you have a project hosted in a private repository on another Git system, you can import it when you are working from inside GitHub. We’ll break down some of the techniques you can use for importing this private Git repository while working from GitHub.
1. Importing Using the GitHub Importer Tool
The GitHub Importer tool is the easiest means of importing your Git project in a private repository when you are working from inside GitHub.
Step 1: Start the Import Process

You do not need to change your account settings or make any changes to GitHub before beginning the import process.
From any page within your GitHub account, you should be able to access the Importer tool. Click on the plus sign in the upper right corner of the window. In the drop-down menu, click on Import Repository.
You should see a message that explains how the importing process will work, including the type of information that the tool will import for you. The standard information the Importer tool will access includes all the files in the private repository, as well as any revision history in the private repo.
Step 2: Save the Repository in GitHub
In the text box, type the name of the clone URL for the repository from which you want to import the Git project.
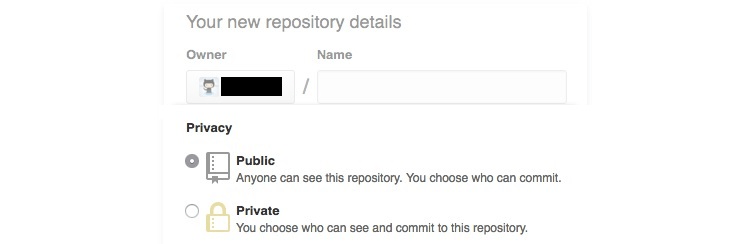
Scroll down the page, and you can choose the account in which you want to save the imported private repository. This can be your personal account, or it can be the organizational account.
In the Name text box, give the repository the name you want to use in GitHub. Scroll down the page and select whether the new repository will be set to private or public in GitHub.
Finally, at the bottom of the page, click the Begin Import button.
Step 3: Select the Repository to Import

If the clone URL you entered has multiple Git projects stored or requires a password, you may have to perform a few extra steps before you can actually begin the importing process using GitHub Importer.
- Password required: When your project is in a private repository that has password protection at the other version control hosting site, GitHub Importer will ask you to enter your login credentials on the next screen. The Importer tool then can make use of those credentials automatically to gain access to your project and begin the importing process. Click the Submit button to give the Importer tool access to your login credentials.
- Multiple projects: If you have multiple projects stored at the clone URL, you will need to tell GitHub Importer exactly which project you want to import. Click on the radio button to the left of the project that you want to import and click the Submit button.
- Large files: If your project contains any files that are 100 MB in size or larger, GitHub Importer will ask whether you want to use Git Large File Storage (LFS) to import these files. It can be faster to use Git LFS to import large files when you are working from inside GitHub. (You may end up with extra costs on your GitHub subscription if you choose to use Git LFS, however.) Select whether to use Git LFS by clicking on the appropriate radio button and then clicking the Continue button.
Remember, you will only see these windows if you need them. If your project in the private repo does not use a password, or if you only have one project stored at the clone URL, you will not see these additional windows.
The process through GitHub Importer can take a couple of minutes or longer, depending on the complexity of the project and the number of files involved. GitHub will send you an email when the importing process finishes.
2. Importing Using the Command Line
Although the GitHub Importer is the easiest way to import your project from a private repo when you are working from inside GitHub, you may have times where using the command line is the better option, such as if you are importing from a private network.
Before you can import the repository using the command line, you will need to have your GitHub username available, as well as the clone URL for the Git repository that contains your private repository project.
Step 1: Create a New Repository

You will first need to create a new repository in your GitHub account. This repository will hold the project after the importing process.
From any window in your GitHub account, click on the plus sign icon in the upper right corner. In the drop-down menu, click on New Repository.
For the new repository, select the owner from the drop-down menu. Then give the repository a new name. You have the option of adding a description in the text box, so you can easily distinguish this repository from others.
Scroll down the window to select the visibility for the new repository. You can select among Private, Public, or Internal.
As you scroll further down the window, you will see a number of other options, such as pre-populating the repository. However, in this case, because you are importing an existing private repository into this new repository, you should not select any of these extra options. Activating any of these options likely will cause a merge conflict.
Instead, skip these options and scroll all the way to the bottom of the window. Then click the Create Repository button. In the next window, you will have the option of importing code from an older repository into this new repository. Again, you do not want to do this because you are not importing code from an old repository inside GitHub. You are importing code from a private repository elsewhere.
Step 2: Create a Clone of the Repository to Import

From the command line, you then will need to create a clone of the new repository, using the URL of the private repo that you want to import. Using the bare command ensures that GitHub will copy the data, but it will not create a working directory and other items in the new repository that could cause problems with the import.
To create the bare clone, type $ git clone –bare followed by the URL of the private repository that you want to import into GitHub. Press the Enter key.
Then you will need to push this cloned repository to GitHub, placing it in the new directory you created in the previous step. On the command line, type $ cd followed by the name of the repository directory you just cloned. (The cd command is the change directory command.) Then press Enter.
Next, you will use the mirror option in Git to make the imported items become part of the new repository. Type $ git push –mirror followed by the URL address of the new repository you created.
All the files and other aspects of the private repository should now be part of GitHub in the new repository you created in the first step through this importing process.
3. Importing Using an External Source Code Migration Tool
If you are importing a private repository stored on a specific Git repository listed here, you have the option of making use of a source code migration tool that is shown as fully compatible with that Git repository. You may need to make use of these external tools to first convert the project in the private repository to Git before importing it when you are working from within GitHub.
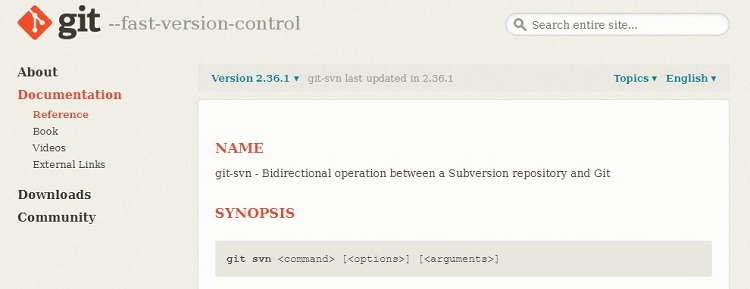
git svn
When importing a private repo from Subversion, GitHub recommends using git svn to convert your Subversion repository into Git before importing it when you are working from within GitHub.
It can be tricky to import repositories from Subversion, because it stores several projects within one root repository. Using git svn simplifies the process of importing each repository you have in Subversion into a separate GitHub repository.
git-tfs
If you make use of Team Foundation Version Control (TFVC), GitHub recommends git-tfs for migrating your repositories to Git before importing them into GitHub. The git-tfs tool serves as a two-way tool between GitHub and the Team Foundation server that is hosting your private repository.
hg-fast-export
When you have Git repositories stored with Mercurial, GitHub recommends using hg-fast-export to convert the repositories to Git, which is one of the simplest means of converting Mercurial repositories to Git. You then can import from Git into GitHub. The hg-fast-export tool supports multiple branches.
Mercurial is a free distributed version control system that primarily serves businesses, rather than individuals. But individuals can use it if desired.
svn2git
Another option for importing a private repository from Subversion is to use svn2git. With svn2git, you also will be able to easily sort and import the repositories from the single root in Subversion into separate repositories in GitHub.
Push the Project to GitHub
Once you convert the project to Git, you then can push it to GitHub. You can do this from the command prompt. Type git push followed by the remote name and the branch name, which will push the changes to your GitHub repository.
Common Problems When Importing a Private Git Repo From GitHub
Although importing the private Git repository is an easy process in many cases, you may run into a few potential problems. We can help you break down some of the issues you may experience, so you can make the process go smoother.
Connecting a GitHub Commit to Its Author
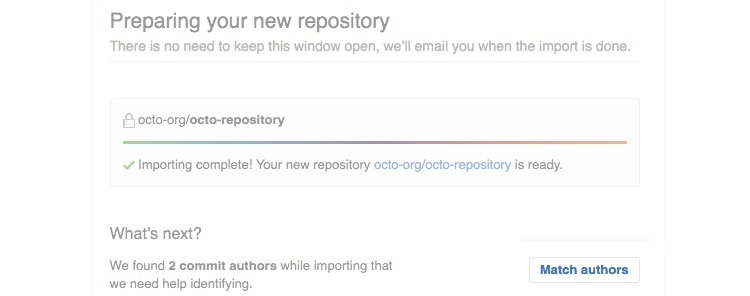
When using GitHub Importer, it can be difficult to match the author to the commits in the Git private repository, as this information sometimes doesn’t import properly.
After importing the private repository, GitHub Importer should give you a message, asking if you want to match the authors. To be able to match the author to his or her commits, though, those authors must have public email addresses registered with GitHub.
One way to troubleshoot this matching process before starting the import is by making sure that every author has a GitHub account and an email address associated with it. Once you are certain every contributor has taken this step, you then can begin the import process.
If the author of the commit does not have a public email address registered with GitHub before you start the import, this complicates the process a little bit. The author of the commit can add an email address after the import occurs, and GitHub Importer can attribute that email address to that author’s commits.
If the commit’s author does not want to use a public email address on GitHub, set the author’s email address to private. GitHub will display a stand-in no-reply email address in place of the author’s actual email address.
Inability to Use GitHub Importer With a Private Network
When working inside GitHub and trying to import a repository, your first instinct may be to make use of GitHub Importer. The Importer tool greatly simplifies the process of moving repositories from another version control hosting system to inside GitHub.
However, if you are hosting your private Git repository from a private network, GitHub Importer will not work. The Importer tool cannot access the private network. In a case like this, you will need to import the code using the command line.
Importing Large Projects
The GitHub Importer may experience some problems with importing extremely large projects. For example, it may not be able to pull in all notes and diff notes because of limitations with the GitHub API attempting to maintain the desired level of network speed for all users.
You can work around this issue by importing the notes and diff notes through a feature flag and by pulling notes from only one object at a time. However, this increases the amount of time required for the execution of all the tasks.
Importing Large Files
When your private repo contains files of a certain size, importing them into GitHub can involve significant problems. As a general rule, GitHub limits files stored in its repositories to 50 MB. When you try to place a larger file in your repository, you will receive a warning message that a file of this size likely will cause performance issues with your repository.
If you are trying to make use of a file that exceeds 100 MB, GitHub will block the use of the file. If you cannot do anything to reduce the size of this file, you have the option of using Git LFS to aid in the importing process. With Git LFS in use, you can increase your maximum file size quite a bit, depending on the pricing tier you are using with GitHub.
- Free tier: 2 GB maximum file size
- Pro tier: 2 GB maximum file size
- Team tier: 4 GB maximum file size
- Enterprise Cloud tier: 5 GB maximum file size
The downside to using Git LFS is that it could cause you to exceed your allotted bandwidth, meaning you may need to purchase extra bandwidth for the month.

