How to Disable the Administrator Account in Windows 10
When working with Windows 10, you may need to make use of the built-in administrator-level account to enable certain changes to the system. However, keeping this administrative account active could end up representing a security weakness for the system.
We will walk you through the steps required to disable the administrator account in Windows 10.
1. Determine What Type of Account You Are Using
When you are using Windows 10, you will have access to either an Administrator account or a Standard account.
The Standard account is what most people need to do their daily tasks inside Windows 10. When making changes to files or when using a web browser, users can run the Standard account with no issues.
The Administrator account allows you to make more extensive changes to the computer, like adding and removing user accounts or making changes to installed software settings. For those changes, an Administrator account is usually necessary.
When running Windows 10 on a company network, nearly all users will be running the Standard account. If using Windows 10 on a personal computer at home, you may be more likely to be using your own Administrator account.
Understanding the Built-in Administrator Account
However, with Windows 10, your computer has a built-in Administrator account. This is separate from your personal Standard or Administrator account. This is a default account that hackers may try to exploit because they know it exists on every Windows 10 computer.
Microsoft includes this built-in Administrator account primarily for the OEM (original equipment manufacturer) team that is completing the build of the computer. It allows that team to make changes to the computer or to the operating system without having to set up a separate account. Once the OEM team members complete these changes and adjustments, they can ship the computer to you as the end-user.
Because Microsoft disables this account by default in Windows 10, it does not have a password associated with it. This means a hacker who can gain access to the built-in Administrator account will not need to enter a password. The hacker could boot Win10 from an installation disc or a rescue disc and gain access to the built-in Administrator account. Once the hacker completes this process, the hacker may gain full access to the computer.
Although it is possible that you may need to use this built-in Administrator account because of a catastrophic error with your personal Administrator account, such problems would be rare. Very few end users actually need to use this account, so the better option is to disable or delete it to prevent hackers from gaining access to it.
View Your Account Type
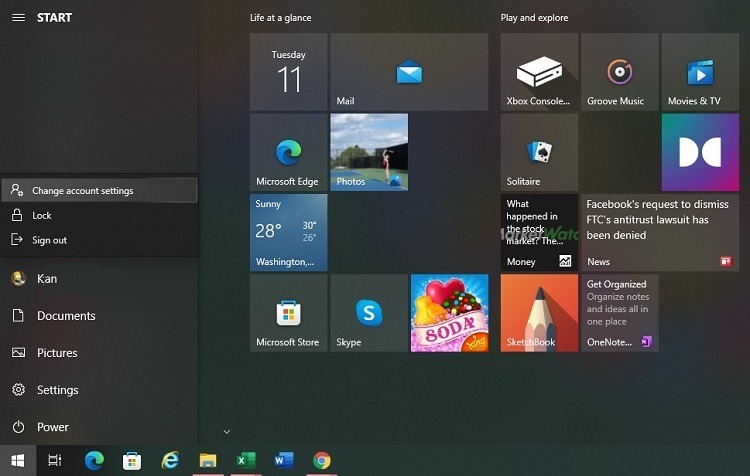
To see the type of account you are using, click on the Start button in the lower-left corner of the Windows screen. The Windows logo marks the Start menu.
In the popup menu, click your account name. This should be at the top of the popup menu. Most of the time, this will be your name.
Then click Change Account Settings. In the Your Info window, you should see your name along the top. Underneath your name, you should see whether it is an Administrator or Standard account.
2. Make Sure You Disable the Correct Administrator Account
If you choose to disable the built-in administrator account, you will want to be certain you are disabling the built-in Administrator account and not the personal Administrator account you set up. Disabling your personal Administrator account could leave you unable to use the computer.
Look closely at the list of accounts you have on this computer to make sure you know which one is the built-in Administrator account. It’s usually called Administrator. Your personal Administrator account should contain your name.
As an added security measure, you may want to change any idle Administrator accounts you find on the computer to Standard accounts. You cannot change the built-in Administrator account to a Standard account.
How to Change an Administrator Account to Standard Using the Settings Command
To change an idle Windows 10 account from Administrator to Standard, start by clicking on the Start button. Then click on Settings in the popup menu. A gear icon marks the Settings entry.
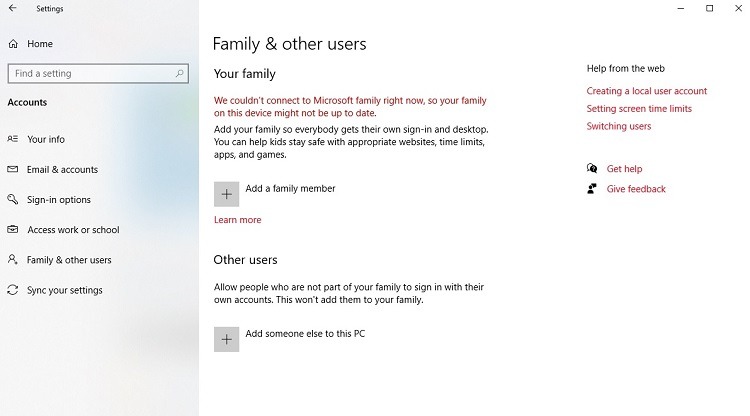
In the Settings window, click on the Accounts link. Then click Family & Other Users on the left side of the Accounts window.
If you have other user accounts that are part of your Windows 10 installation, Windows will list them here.
Click on the name of the user account that you want to change from Administrator to Standard. Then click Change Account Type. In the Account Type section of the popup window, you should see Administrator listed. Click on the downward arrowhead and select Standard User from the drop-down menu.
Then click the OK button to save the changes.
How to Change an Administrator Account to Standard Using the Control Panel
You also can make use of the Control Panel in Windows 10 to change the status of an account.
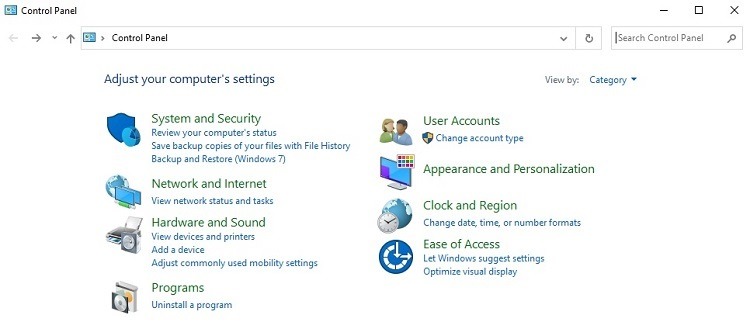
To open the Control Panel in Win10, click on the Start button, followed by clicking on Settings in the popup menu. In the search bar at the top of the page, type Control Panel and hit the Enter key.
In the Control Panel window, click on the Change Account Type link.
In the next window, double-click on the user name for which you want to change the account. In the area along the left side of the screen, click Change the Account Type.
You then can select either Standard or Administrator by clicking the radio button. Click the Change Account Type button to save the change.
3. Disable the Built-in Administrator Account
You have a couple of different options for disabling the Administrator account built into Windows 10.
How to Disable the Administrator Account Using the Command Prompt
For those who are comfortable typing commands at the command prompt, this is one of the easiest ways to disable the Administrator account.
Start by logging into Windows 10 using your account name and password. Then open the command prompt window using one of the following methods.
- Press and hold the Windows key on the keyboard, followed by pressing the R key. Then type cmd in the run box and click OK.
- Click the Start button in the lower left corner. Scroll down the menu of apps before clicking on Windows System. In the popup menu, click Command Prompt.
- Open the Task Manager by right-clicking on the taskbar along the lower edge of Windows 10 and left-click on Task Manager in the popup menu. Click File and Run New Task. (You may have to click More Details to see the File menu.) Type cmd in the Open text box and click OK.
In the command prompt window, type net user administrator at the prompt and hit the Enter key. Within the command prompt window, you should see data about the built-in Administrator account. If the account is active, the Account Active value will be Yes.
After confirmation, type net user administrator /active: no at the command prompt to disable the account. Then hit Enter. To determine whether you entered the command correctly, type net user administrator again at the prompt and hit Enter. In the information that Windows 10 displays in the command prompt window, the Account Active value now should display No.
How to Disable the Administrator Account Using Administrative Tools
You also can disable the built-in Administrator account through the Settings menu if you are running Windows 10 Server.
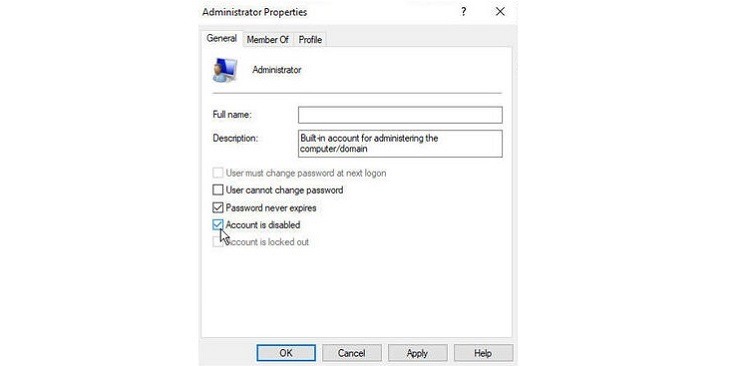
Open the Control Panel and click on Administrative Tools. Look for the Computer Management link and click on it. Then click on the Local Users and Groups folder, followed by the Users folder. Finally, double-click on the Administrator account link.
In the Administrator Properties window, click on the General tab. Then add a checkmark to the box for Account Is Disabled and click OK.
4. Enable the Built-in Administrator Account Again
If you used Administrative Tools to disable the Administrator account in Win10 Server, as discussed in step 3, you can follow the same steps to enable the account again. However, in the final step in the Administrator window, remove the checkmark from the Account Is Disabled box and click OK.
Another option is to re-enable the built-in Administrator account through the command prompt.
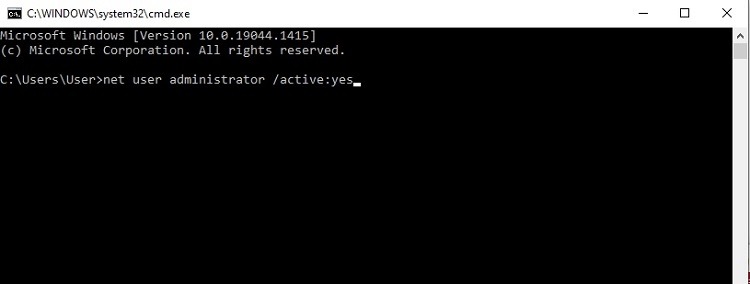
Use your preferred method of opening the command prompt, as we discussed in step 3. At the prompt, type net user administrator /active: yes and hit the Enter key. You should see a response after a couple of seconds that tells you the account is active again.
If you want to double-check the status of the built-in Administrator account, type net user administrator at the command prompt and hit Enter. You should see data that shows the status of the account. Pay particular attention to the Account Active value, which should now have a Yes setting.
How to Add a Password to the Built-in Administrator Account
If you are going to enable the built-in Administrator account, it is important to create a password for it. As we mentioned earlier, it does not have a password by default. (It is possible that the previous user of the Win10 computer set up a password, however.)
To create and set the password, follow the instructions for the Windows 10 Server we listed in step 3 until you reach the Users folder. Then right-click on the Administrator account link. Left-click on Set Password in the popup menu.
In the warning window, you will need to click Proceed to continue the process. Then enter a new, secure password in the following window and click OK.
If the entity who set up or used this Win10 computer in the past set a password for the built-in Administrator account, you may need access to a password reset tool to be able to change this password. If you cannot reset the password, you may simply want to disable the account.
5. Delete the Built-in Administrator Account in Windows 10
You may prefer to delete this built-in Administrator account, rather than simply disabling it.
You will need to use the Windows Registry to delete the built-in Administrator account. Press and hold the Windows key on the keyboard and type the R key to open the run window. Type regedit in the Open text box and click OK. You may have to click Yes to verify your command.
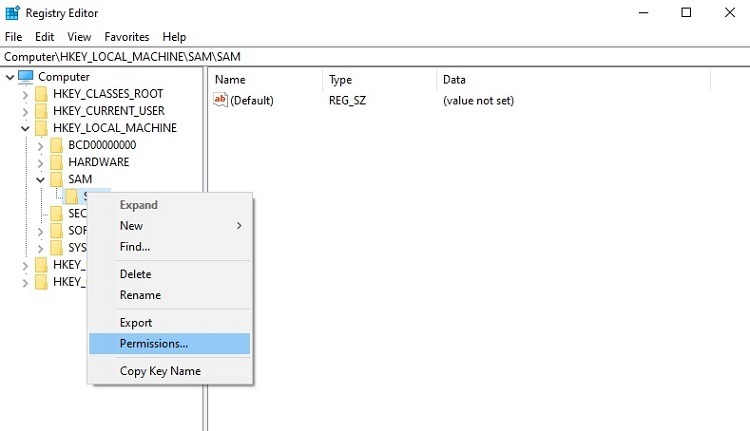
On the left side of the window, click HKEY_LOCAL_MACHINE, followed by clicking SAM. This opens a subfolder also called SAM. Right-click on SAM (the subfolder) and left-click on Permissions.
In the Permissions window, click on Administrators in the top section of the window. In the lower section of the window, click on the Allow column checkbox in the Full Control row. Then click OK.
When you return to the Registry Editor window, press the F5 key on the keyboard to refresh the screen. Then click on the following folders in the Registry Editor window in order: HKEY_LOCAL_MACHINE, SAM, SAM, Domains, Account, Users, and Names.
Right-click on Administrator and left-click on Delete to delete this built-in Administrator account. After restarting the computer, Windows 10 will show the Administrator account deletion.
Common Problems When Disabling an Administrator Account in Windows 10
You Lost Your Password to Your Administrator Account
In addition to use by the OEM team, Windows 10 includes the built-in Administrator account as a possible means of recovering control of the computer. Should you lose your password or accidentally delete your account, logging into the built-in Administrator account gives you a chance to salvage the installation.
However, you will need to have this built-in Administrator account enabled before the error occurs to be able to use this function.
The chances of either one of these types of failures occurring is extremely small. For the vast majority of Win10 users, having the built-in Administrator account enabled in case of a failure is not worth the risk of a security breach.
If you have concerns about working around a lost password, the better solution is to create a secondary Administrator account with a different, complex password. You then could access that secondary account if you ever need it to deal with a lost password. The strong password on the second Administrator account should keep it secure. You then can disable or delete the built-in Administrator account without concern.
The Built-in Administrator Account is Disabled By Default
In older versions of Windows, such as Windows XP, Microsoft left the built-in Administrator account enabled by default. Beginning with Windows Vista and continuing through Windows 10 and Windows 11, however, Microsoft now disables the account by default.
This makes it easier to ignore the built-in Administrator account. You may not feel the need to double-check that it remains disabled because, the vast majority of the time, it will be disabled. For security purposes, however, users should always check the status of the built-in Administrator account as soon as possible after they begin using the computer.
You Cannot Change an Administrator Account to Standard
We listed the steps for changing an Administrator account to a Standard account in step 2.
When you are the only user with an account on Windows 10, it automatically becomes an Administrator account. Win10 requires you to have at least one Administrator account on the computer or on the network.
If you want to be able to change a current Administrator account to a Standard account, you will first have to create a new Administrator account or make another account into an Administrator account.

