How to Deploy a React App to GitHub Pages
Building projects and applications take time and effort. When we’re done, we want to showcase our hard work online.
Rather than purchasing a domain and configuring everything on your own, you can just deploy it to GitHub Pages and host it there.
Step 1: Prerequisites
Before you get started, you need to make sure that you have everything set up properly from a technical standpoint.
First and foremost, you must have Git installed on your local machine. If you haven’t done so already, use this link to download Git and follow the default installation process. The link supports macOS, Windows, and Linux/Unix machines.
Git is an open-source version control system that’s used to create projects, collaborate with developers, and track changes in the source code for different software development initiatives.
You’ll also need to have an updated version of NodeJS and npm installed.
NodeJS is a server runtime environment that’s used to run Javascript on the server. Npm is a package manager that supports the downloading and installation of various packages for JavaScript projects.
By installing NodeJS and npm, you’ll have two new commands added to your system—npm and npx. Both of these will be used to create and deploy a react app to GitHub Pages.
An updated version of create-react-app must also be installed locally.
This installation makes it easier to focus on development, as all of your bundles get automatically optimized when they’re ready for deployment. You only need to build one dependency for your app without having to manage a bunch of mismatched versions.
React is a free and open-source front-end library for JavaScript. It’s used to build user interfaces with UI components. It was initially released in 2013, and it’s marinated by Meta (previously Facebook).
To verify the installation and versions of these tools, run these commands on your terminal:
$ git –version
$ npm –version
$ node –version
$ create-react-app –version
You’ll also need to create a GitHub account if you haven’t done so already.
An active and verified GitHub account is required for you to deploy and maintain apps in GitHub Pages. GitHub Pages is a static site hosting service that uses HTML files, CSS files, and JavaScript files from GitHub repositories before running them through a build process and publishing them on the web. It’s the easiest way to edit, push, and host projects directly from a GitHub repository.

Step 2: Create a New Repository on GitHub
Once you have the technical requirements in place, you can officially start the process.
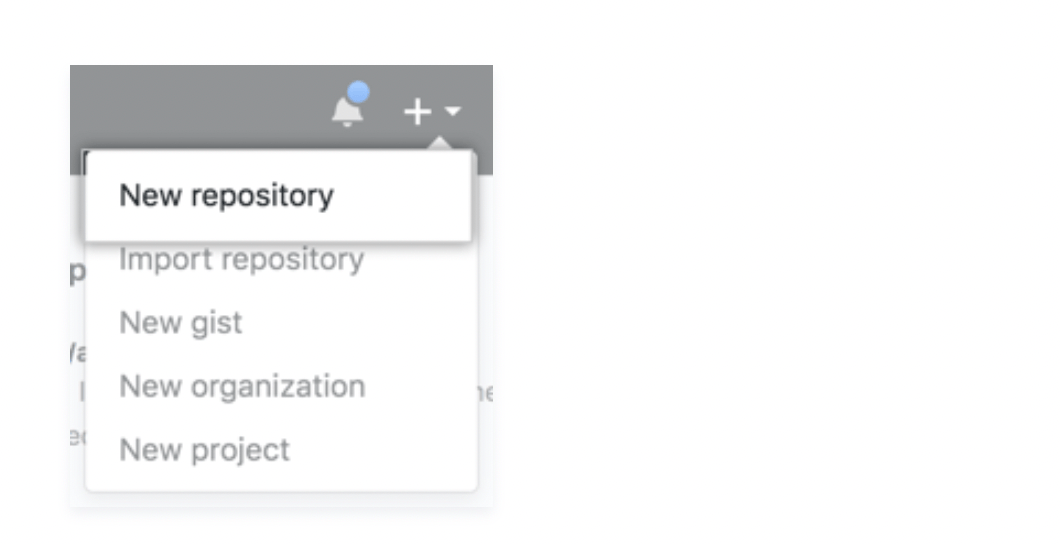
Log into your GitHub account and create a new repository. You can do this by clicking the + drop-down menu in the top right corner of any page in your GitHub dashboard. Then select New repository from the menu.
Next, you’ll be asked to complete the new repository form. I’ll quickly walk you through that process right now.
Give your repository a name. It should be short and memorable.
You’ll have the opinion to give your repository a description. While this is not a requirement, it’s definitely helpful to add a sentence or quick phrase. This will make things easier to manage when you have multiple projects in here.
Configure the visibility options for your new repository. You have three options:
- Public — Anyone can see the repository on GitHub, and you can manage the commit permissions.
- Internal — Only members of your enterprise organization can view the repository, but you still manage commit permissions.
- Private — You have full control over who has access to view and commit.
If your project is still a work in progress right now, just set it to private. You can always change these permissions later on.
Just know that you can’t push a private repository to GitHub Pages. So if you mark it private now, you’ll definitely need to go back and change this after.
Make sure you select the option to initialize this repository with a README:

Now you can create the new repository.
Step 3: Create a React App and Start the Application
If you haven’t done so already, you need to create a react app. This is a single-page web application with a modern build and no configurations required.
You don’t need to install any other tools, like Babel or webpack. The beauty of using create-react-app is that everything is already pre-configured—so you’re ready to start coding immediately.
To get started, open your terminal and run the following command:
npx create-react-app my-app
cd my-app
npm start
I’m not going to spend a ton of time walking you through the creating process, as this guide is primarily focused on the deployment to GitHub Pages.
But you’ll need to have a working version of your react app to continue before you can push and deploy it to GitHub Pages.
Next, enter the application in the command line to start it. You need to verify that it’s running on the local deployment server http://localhost:3000.
If the app runs smoothly without any problems on your local server, you can give it a name and get it ready for GitHub. While it’s not required, it’s typically easier to name your app the same as the repository you created in the previous step—but that’s completely up to you.
Now you need to install a dev-dependency of the app using the gh-pages packages. Here’s what the command looks like:
#install gh-pages package
$ npm install –save gh-pages
Step #4: Push the App to Your GitHub Repository
Next, you need to take the project on your local machine and push it to your GitHub repository.
Start by adding some new properties to the package.json file of the application. Add a homepage property at the top level to define the value string pointing to your GitHub username and repository that you created earlier. The value should look something like this:
http://[your-github-username].github.io/[your-new-repository-name]
There are still two more properties to add—predeploy and deploy. It will look something like this:
“Scrips” : {
//…
“predeploy”: “npm run build”,
“deploy”: “gh-pages -d build”,
//…
“build”: “react-scripts build && cp build/index.html build/404.html”, //
}
This helps prevent page reloads that cause 404 errors.
Now you need to make sure that your GitHub repository has been initialized as a remote project for your local repository. Then push your changes to the repository, so the project appears on GitHub.
The remote origin command essentially tells Git where you want to push things whenever the gh-pages package acts on your behalf. Then you can issue a $ git push command within the local Git repository.
Remember, you need to set the repository as public before you can deploy it to GitHub pages. So if you set it as private back in the second step, you need to go back and make those changes now before you can proceed.

Step 5: Deploy to GitHub Pages
Now you can send your app to GitHub Pages. Start with this command:
$ npm run deploy
This will automatically run the predeploy and deploy scripts in the json package that we defined in the previous step to run.
Behind the scenes, the predeploy script is building a version of your react app for distribution. Then it stores it in a folder titled “build.” The deploy script pushes all the contents within the folder as a new commit to gh-pages, creating a new branch.
By default, new commits to gh-pages will have an “Updates” message. But you can easily add a custom commit message using the -m command, which would look like this:
$ npm run deploy — -m “deploy a new react app in GitHub Pages”
This message is obviously ultra-specific, but it works for the purposes of this tutorial. You can play around with that message as you feel appropriate.
The command will cause GitHub Pages to automatically detect the new commit. Once detected, it automatically starts to serve the files making up the version of your react app to the URL homepage that you defined in the previous step.
Once you’ve completed this command, your React app is live. It’s deployed to GitHub pages and accessible to anyone who visits your previously defined URL.
Common Problems When Deploying a React App to GitHub Pages
Deploying react apps to GitHub Pages is relatively straightforward. But it’s common for beginners to experience some stumbling blocks along the way.
Here are some common problems you might be faced with, and you can learn how to troubleshoot each one below:
Problem 1: 404 Error
Many GitHub users follow these tutorials and get frustrated when they try to use the new react application. They get the dreaded 404 error—saying there is not a GitHub pages site with that URL. What happened?
This typically happens if you’re routing the app using a BrowserRoute from react-router-dom. That’s because the gh-pages do not support routers on the client-side using HTML5 histories.
To solve this problem, you can replace your BrowserRouter with a HashRouter. The command would look something like this:
import {HashRouter as Router} from “react-router-dom”
Alternatively, you can create a 404.html file in your public folder as a workaround.
This requires you to go back to the app.js and change the router to BrowserRouter. This must be done in the same file to update your router components with a basename and dynamic repository name. Here’s what that looks like:
<router basename={process.env.PUBLIC_URL}>
<app />
</router>
You’ve just created your first path.
Next, head to your public folder and create a new file for 404.html. Then add the code in this public repository from math-magicians on GitHub. Make sure the pathSegmentsToKeep is a setting 1 on line 26, and save your file.
Then copy lines 9-21 on this public repository and place them in the public index above the closing tag.
Problem 2: Storing the Source Code
Deploying a react app to GitHub pages doesn’t actually automatically store its source code on GitHub. This is something that many people assume happens, so there’s a surprise when they can’t find it.
Fortunately, this is an easy fix.
After you commit all of the changes to the master branch of your local Git repository, you just need to push that to the corresponding master of your GitHub repo.
You should see two different branches in your GitHub repo at this point—gh-pages and master.
The gh-branch contains the distributable version of the react app you created. The master branch contains the source code.
Problem 3: Using Custom Domains
Not everyone wants to have github.io in the default domain of their react app. Fortunately, you can choose another domain name.
This process isn’t quite as in-depth as buying a domain and hosting an application on your own. You’re still using GitHub Pages to host your project.
With that said, you still need to go and get your domain elsewhere. There are plenty of domain registrars on the web that you can use, including some free options. But you’re better off paying for a domain—as those providers are much more reputable.
Now you need to go back to GitHub Pages and set up your custom domain. This process adds a new CNAME file to the repo.
On the domain side, you need to manage your DNS settings. Just be aware that any changes might take up to 24 hours to go live. But in most cases, it’s usually all set within an hour or two.
Verifying your custom domain ensures that other GitHub users can’t use the URL with their repositories. If the domain is unverified and the GitHub Pages site gets disabled, make sure you update the DNS records with your provider.
If you have a custom domain, your GitHub Pages site might be disabled if you downgrade to a GitHub Free account from a GitHub Pro account. So make sure you don’t accidentally change your subscription.
This can also happen if you transfer the repository from a Pro account to another account using a free plan. The repo change will automatically lose access to GitHub pages, and the application will be unpublished.

