How to Delete a Branch in GitHub
GitHub is a fantastic version control platform for collaborating with others. But, as pull requests get accepted, the now-inactive branches start to create clutter. If you’re looking to clean up your repository by deleting unnecessary branches, this guide covers everything you need to know. We’ve also included solutions to common problems you might encounter along the way.
Step 1 – Navigate to the Repository Main Page
First, you’ll need to head over to your repository’s main page. From this page, you’ll be able to navigate to the branch you’d like to delete.
It’s not always clear which branches you should delete. As a rule of thumb, you’re looking for branches that are no longer useful or relevant. For example, if you’ve merged changes to the master, the branch is no longer helpful.
The main idea is to get rid of anything that’s adding to your branch list unnecessarily. This practice makes working in Git easier on the eyes and less overwhelming. While at it, it’s a good idea to come up with a policy for when to delete old branches so they don’t pile up in the first place.
Step 2 – Find The Branch You’d Like to Delete
You’ll see the NUMBER branches icon above the list of files in your repository. Click on it to get a list of all the branches in your repository. Scroll through the list to find good candidates for deletion.

Alternatively, you can search for the specific branch you want to delete. Simply enter the branch name in the search field on the top right corner of the branches page. You want to use the exact branch name where possible. It will make finding the branch easier. Also, you’ll get a list of suggested matches, not unlike when using Google or other search engines.
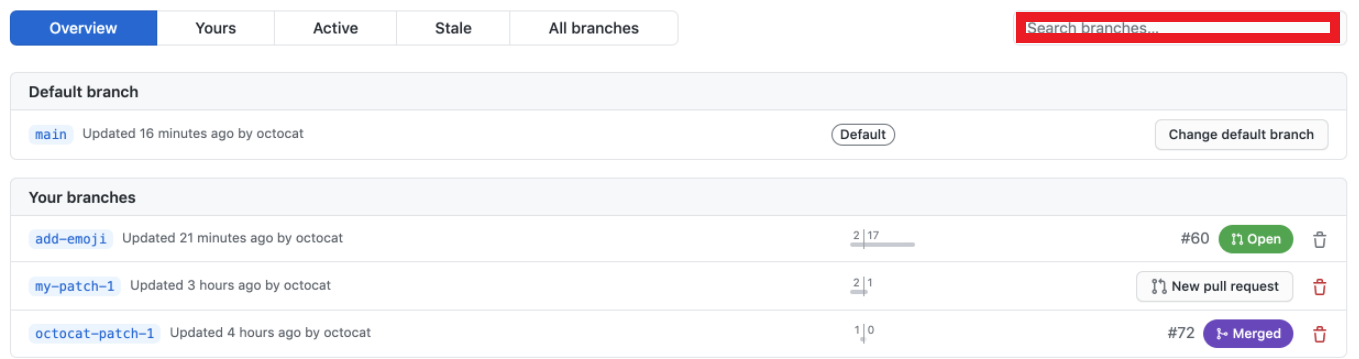
In this case, simply scroll through the list of matches to find the branch you’d like to delete.
Step 3 – Delete the Branch
Scroll down the list of files to find the branch you’d like to delete. You’ll notice a delete icon at the far end of each branch name. Then, simply click the trashcan icon beside the branch to delete it.
Please note that this action only deletes the branch remotely. You’ll need to delete a local branch manually.
Step 4 – Delete the Branch Locally
Deleting your old branches in GitHub is only one part of the cleanup process. You may also notice that the deleted branches still live in your local repository. So, you’ll also need to delete the local branches manually.
As a point of interest, Git doesn’t allow you to delete a branch that you are currently working on. Therefore, you’ll need to switch to a different branch that you do not want to delete. You can also check which branches have been merged with the current branch, such as the master. In this example, you can view your merged branches as follows:
$ git checkout
master
$ git branch
–merged
This way, you have a good view of which branches you can delete quickly.
To delete a local branch that’s already been merged:
- Open the Command Window from the Git repository root.
- Enter the command $ git branch -delete
- Alternatively, you can use a shorter version of the command, which is $ git branch -d . Both commands perform the same function.
- Finally, run the $ git branch -a command to confirm that the branch is deleted.
However, these steps only work if you’ve already pushed and merged the local branch with the remote branch. Otherwise, you won’t be able to delete it. Of course, you can always force-delete if you don’t want to push and merge the branches.
Usually, this happens when you have branches for a feature that you are no longer working on. Fortunately, you don’t have to continue seeing the defunct branches. Instead, you can force the deletion to get rid of these useless branches.
To force-delete a local branch:
- Remember to checkout to a branch that you will NOT be deleting.
- Run the command $ git branch -D
- Run the $ git branch -a command to check that the branch has been deleted.
In the above example, the -D option stands for -delete force. You can use this command any time you want to delete a branch without merging. But be sure to use this feature sparingly. You don’t want to delete a branch you need, even if you can restore it later. Only use this command when you are sure that you want to delete the branch.
Step 5 – Delete the Remote-Tracking Branch
We’ve covered how to delete a remote branch in GitHub. Then, you deleted the local version. But, there is still one more branch to think about when cleaning up your repository. This third branch is the remote-tracking branch.
Remote-tracking branches reference what’s going on with your remote branches. They work just like bookmarks to tell you the status of the remote branch as of the last time you communicated with it. Remote-tracking branch names take the form of / . These branches become obsolete as soon as you delete your remote branch. So, it is good practice to clean these up as well when you delete branches in GitHub.
To delete a remote-tracking branch:
- Run the git branch command $ git branch –delete –remotes /
- Alternatively, you can use the shorter command $ git branch -d -r /
There is also the option to delete more than one outdated tracking branch simultaneously. This option is an excellent idea if you’ve deleted multiple remote branches. You don’t want the remote-tracking branches hanging around since they don’t reference anything. Also, it’s much easier than manually deleting each remote-tracking branch.
To automatically delete all remote-tracking branches associated with deleted remote branches:
$ git remote prune
Alternatively, you can use the Git Fetch and Prune commands together to delete all existing remote-tracking branches associated with remote branches you’ve already deleted. However, the difference is Git also fetches new changes while simultaneously getting rid of remote-tracking branches that no longer track anything.
So, the command will look like this:
$ git fetch –prune
Alternatively, you can use the shorter version: $ git fetch -p
Step 6 – Configure GitHub to Delete Branches Automatically (Optional)
You may find that you most often delete head branches after merging pull requests in your repository. GitHub offers the option to automate this process. It will save you time and ensure that your repositories stay clean and tidy.
To configure GitHub to delete your head branches automatically:
-
- First, log into GitHub and navigate to your chosen repository.
- Click Settings under your repository name

- Under Merge Button, check the Automatically delete head branches box
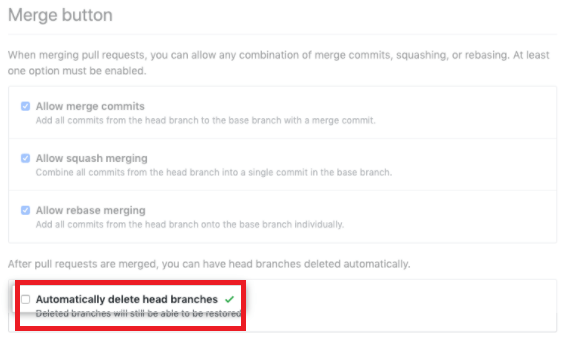
From now on, GitHub will automatically delete your head branches as soon after pull requests are merged in your repository.
Please note that this feature is only enabled in the repository you choose for this step. You’ll need to repeat the process for your other repositories. Also, you can undo the feature by unchecking the Automatically delete head branches box if you decide you’d like to keep your branches until you’re ready to delete them manually.
There might be instances where you accidentally merge something you didn’t mean to. In this case, GitHub will automatically delete the branch. But, you don’t need to worry about losing your progress. You can restore branches at any time if you make a mistake like this one.
You’ll need to find the pull request associated with the delete branch. Then, simply click Restore Branch at the bottom of the pull request. You’ll get your branch back instantly.
Common Problems When Deleting Branches in GitHub
Deleting a branch in GitHub is easy for the most part. But, you might run into problems for several reasons. First, while you’ll still get the trashcan icon, you’ll notice that it is grey, and you can’t click on it. Unfortunately, this means that you can’t delete the branch.
For this section, we will highlight possible reasons why you cannot delete GitHub branches. Fortunately, there are easy fixes for these common problems, and you’ll be able to delete your branches in no time!
1. You Don’t Have The Correct GitHub Permission Level
Right off the bat, you’ll need at least write access to delete branches in GitHub. If you have only read access, then you won’t be able to delete branches. Instead, speak to the administrator to issue you the appropriate permission level or ask them to delete the branch on your behalf.
If you have the proper permission level but still cannot delete the branch, check which branch you are working on. Again, you cannot delete a branch you are working on. To be on the safe side, check out to the master branch and work your way from there. This way, you are sure to get a 360 view of all the branches in your repository.
2. The Branch Is Associated With an Open Pull Request
If you can’t see the option to delete a branch, you may have an open pull request associated with the branch you’re attempting to delete. So, you’ll need to check for open pull requests and merge or close them before you can delete the branch.
As a side note, you’ll need push access before you can complete the merge.
To merge pull requests on GitHub:
-
- Click Pull requests under your repository name.

-
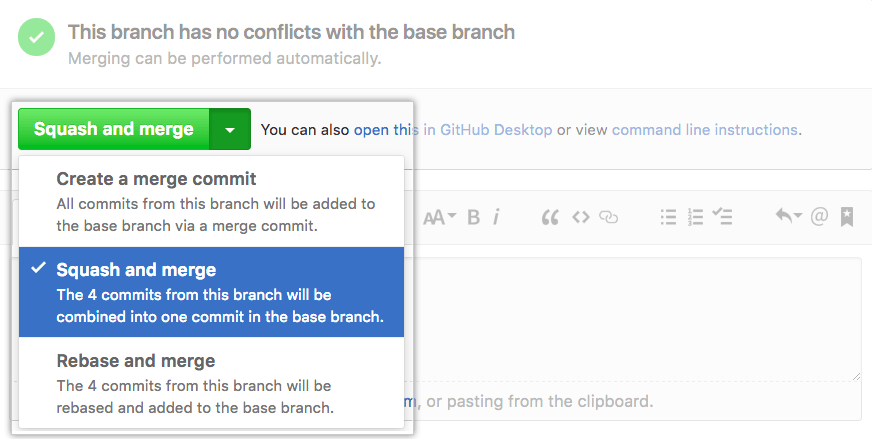
- Click on the pull request you’d like to merge.
- Select the appropriate merge option based on your repository configuration. For example, you may choose to Merge all of the commits into the base branch or Squash the commits into one commit.

-
- Type in your commit message when prompted
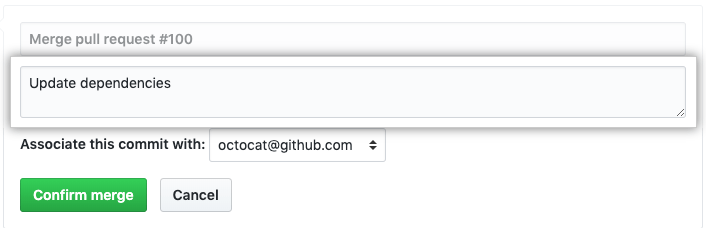
- Finally, confirm the merge
Now, you can go through the steps to delete your branch once more. You should be able to delete the branch, this time with no issues.
Alternatively, you may choose to close the open pull requests before deleting the branch. This option is a great idea when you no longer need the changes or if you’ve found a different solution to your problem.
To close pull requests on GitHub:
-
- Click Pull requests under your repository name

- Select the pull request you’d like to close.
- Scroll to the bottom of the pull request. Click Close pull request just below the comment box.

You can now go ahead and delete the branch.
3. You’re Trying To Delete the Default Branch
Similarly, GitHub won’t let you delete the default branch. Still, there is a simple work-around to this problem. You only need to choose a new default branch before deleting the former default branch.
But first, you’ll need to make sure that you have more than one branch in your repository. Otherwise, you’ll need to create a new branch. Then, you can change your default branch to the new branch.
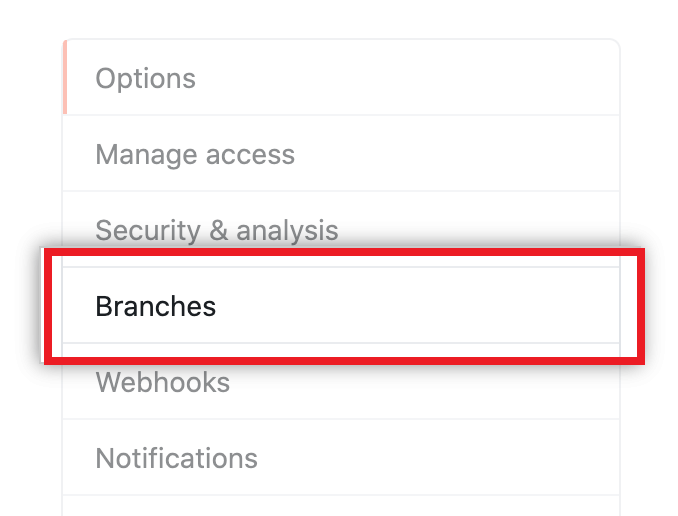
To change the default branch on GitHub:
-
- Go to the main page of your repository.
- Then, click Settings under the repository name.
-
- Click Branches in the left menu.
-
- Navigate to the Default branch and click ⇋.
- From the drop-down menu, find the branch name that you’d like to be the new default branch.
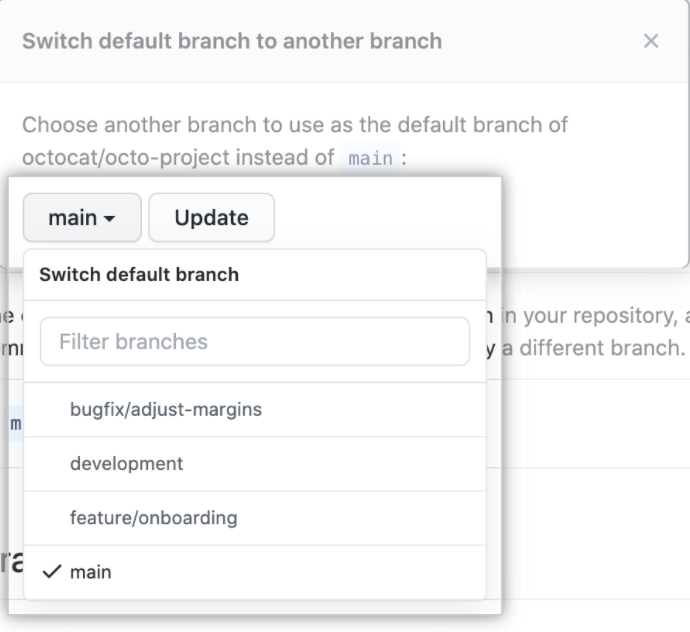
- Finally, click Update. You’ll be presented with a warning. Simply click Update to change the default branch.
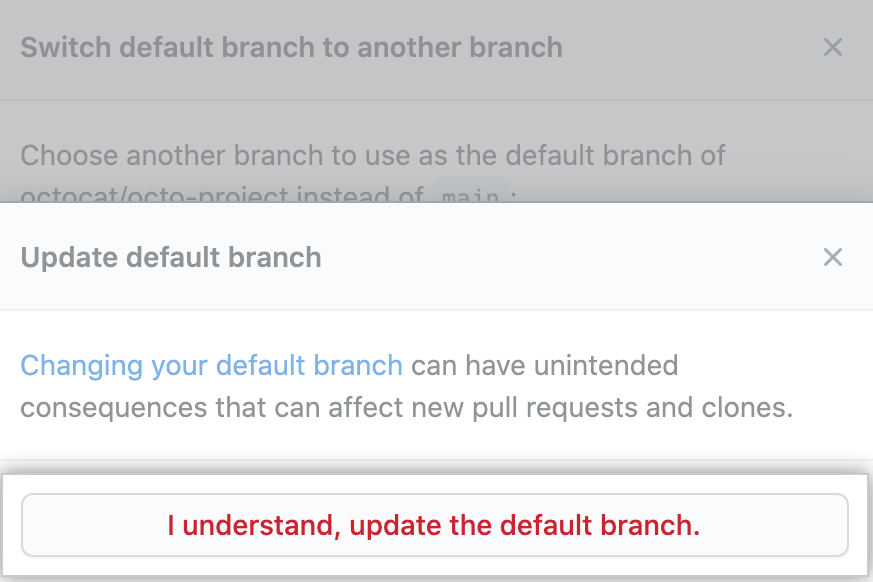
Now, you can follow the deletion process we outlined previously to delete the old default branch.
4. You’re trying To Delete a Protected Branch
GitHub offers the option to impose strict restrictions on branches by protecting them. By default, no one can delete a protected branch. So, you’ll need to enable deleting protected branches. You can do this by editing your branch protection rules.
To enable deleting protected branches:
-
- First, navigate to the main page of your repository.
- Then, click Settings under your repository name.
-
- Then, click Branches in the left-hand menu.
-
- Scroll the Branch protection rules to find Allow deletions
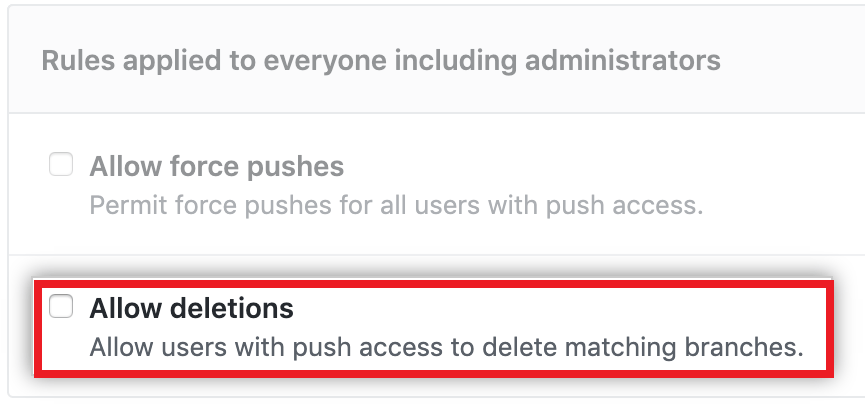
- Finally, click Create to save your changes.
Now, your protected branches will have an active delete icon. Simply click the icon to delete the protected branch.

