How to Create a Ticketing System Using Jira
Jira is a robust solution for project management, bug tracking, and issue tracking.
Implementing a ticketing system using Jira simplifies the customer support workflow for various issues. Internal business users or customers can create a ticket, and your support agents can resolve problems from the issue queue in Jira.
Step 1: Set Up a Jira Service Desk Account
Jira and Jira Service Desk are two different solutions.
If you’re new to Jira Service Desk, the first thing you need to do is create an account. For those of you who have already completed this step, go ahead and skip to step 2.
Here’s a brief overview of the different Jira Service Desk plans that you can choose from:
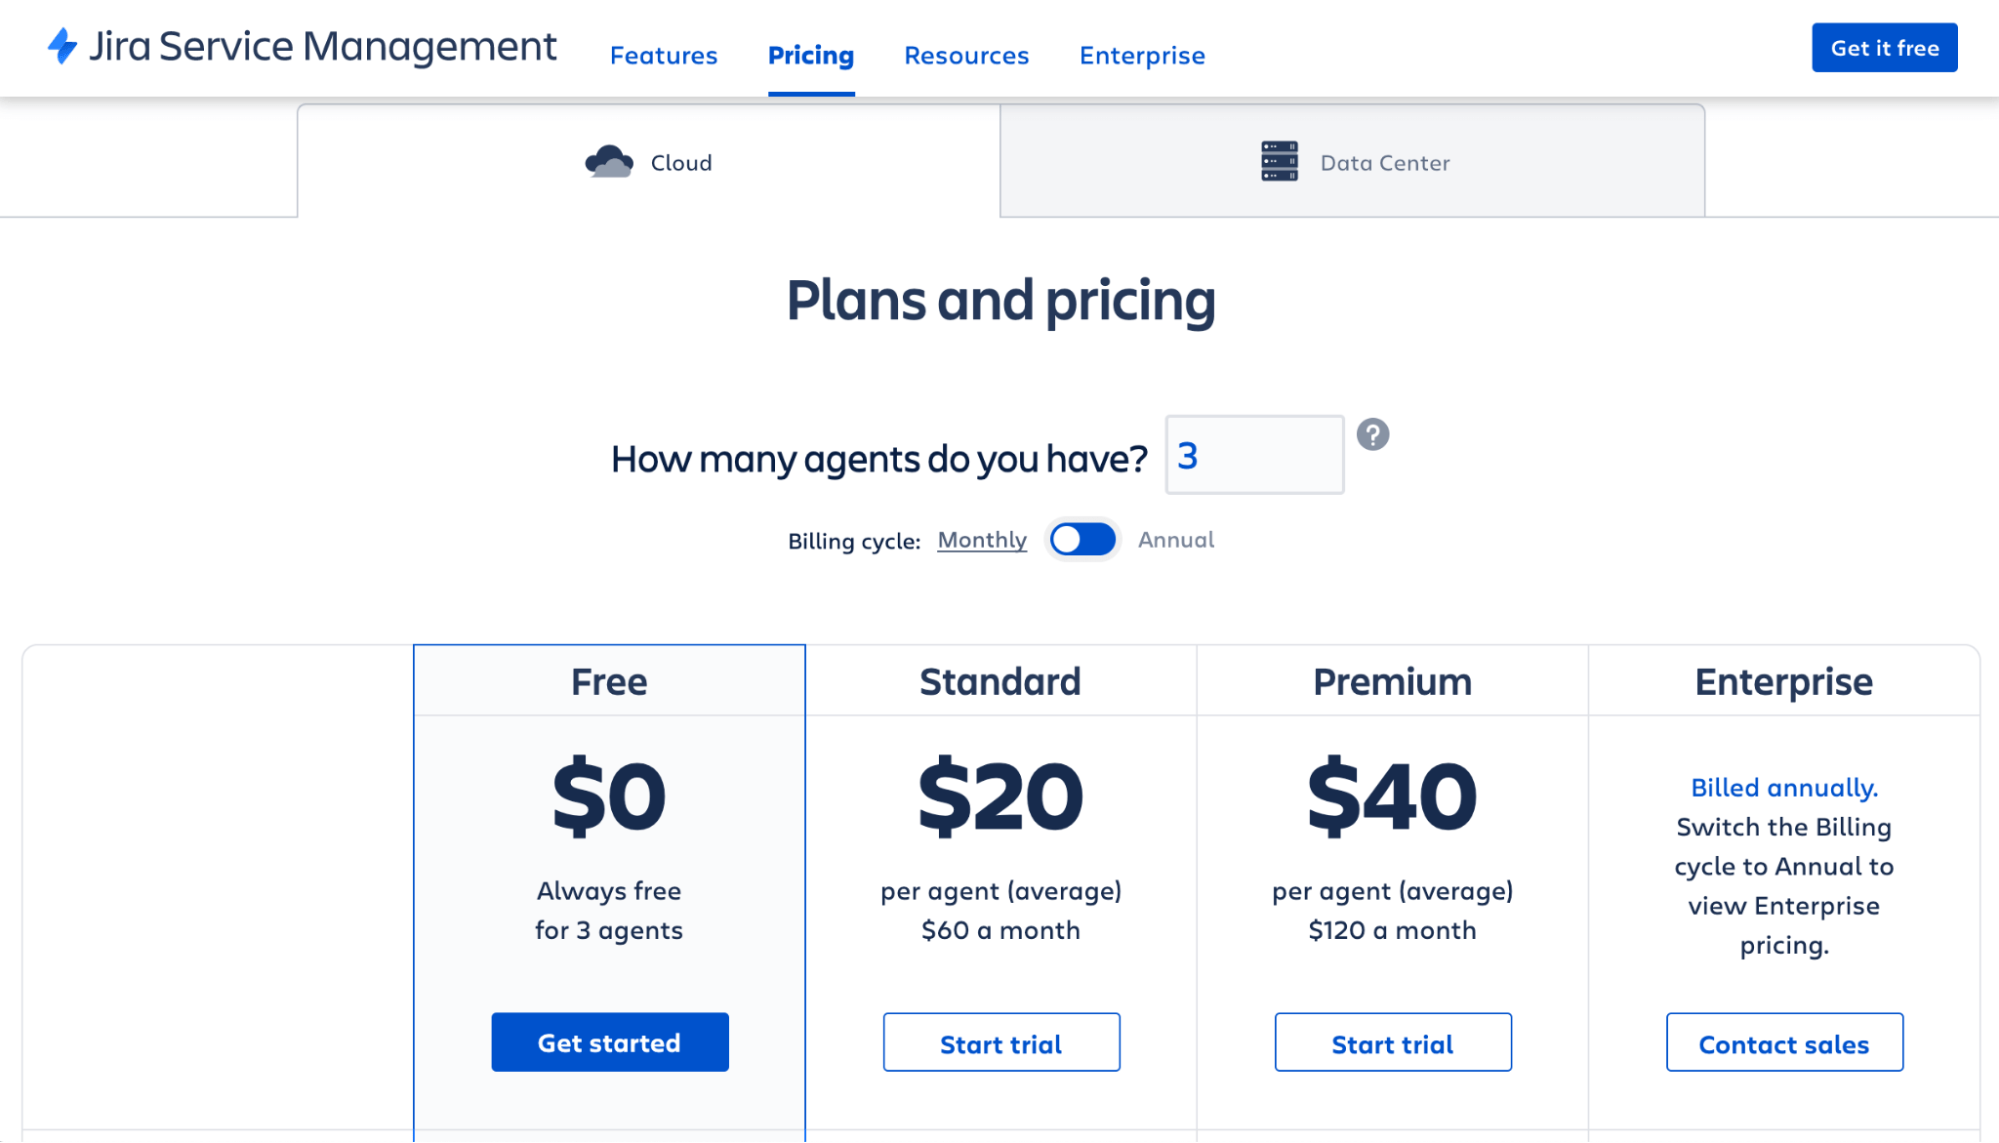
To help you select the right plan, I’ll quickly cover the top feature highlights for each one.
Free
- Up to 3 agents
- Supports a single site
- Unlimited customers
- Service request management
- Incident management
- Change management
- Problem management
- Automation
- Reporting and analytics
- Configurable workflows
- Five major incidents per month
- Manual incident creation
Standard — $20 per agent per month
- Up to 5,000 agents
- Cloud support team during regional business hours
- 100 major incidents per month
- Service status pages
- Service dependency
- Audit logs
- Anonymous access
- 250 GB file storage
Premium — $40 per agent per month
- 24/7 premium support
- Insight asset and configuration management
- Unlimited major incidents per month
- Manual, automatic, API, and template incident creation
- Unlimited post-mortems
- Incident command center
- Incident investigation
- Admin insights
- Unlimited storage
- 99.9% uptime SLA
Enterprise — Custom pricing billed annually
- Unlimited sites
- Dedicated 24/7 enterprise support
- Data residency
- SSO, SCIM, and Active directory sync
- 99.95% uptime SLA
- Org-level billing
The vast majority of project teams go with the Standard or Premium plans. If you’re running a small team of fewer than three agents and just getting started, you can sign up for the Free package.
All of the paid plans come with a seven-day free trial. If you need more time, reach out to the Jira customer service team, and they can extend the trial for up to 30 days.
Signing up takes less than a minute. Just enter some basic account details and follow the prompts on the screen.
Step 2: Create a New Service Desk Project
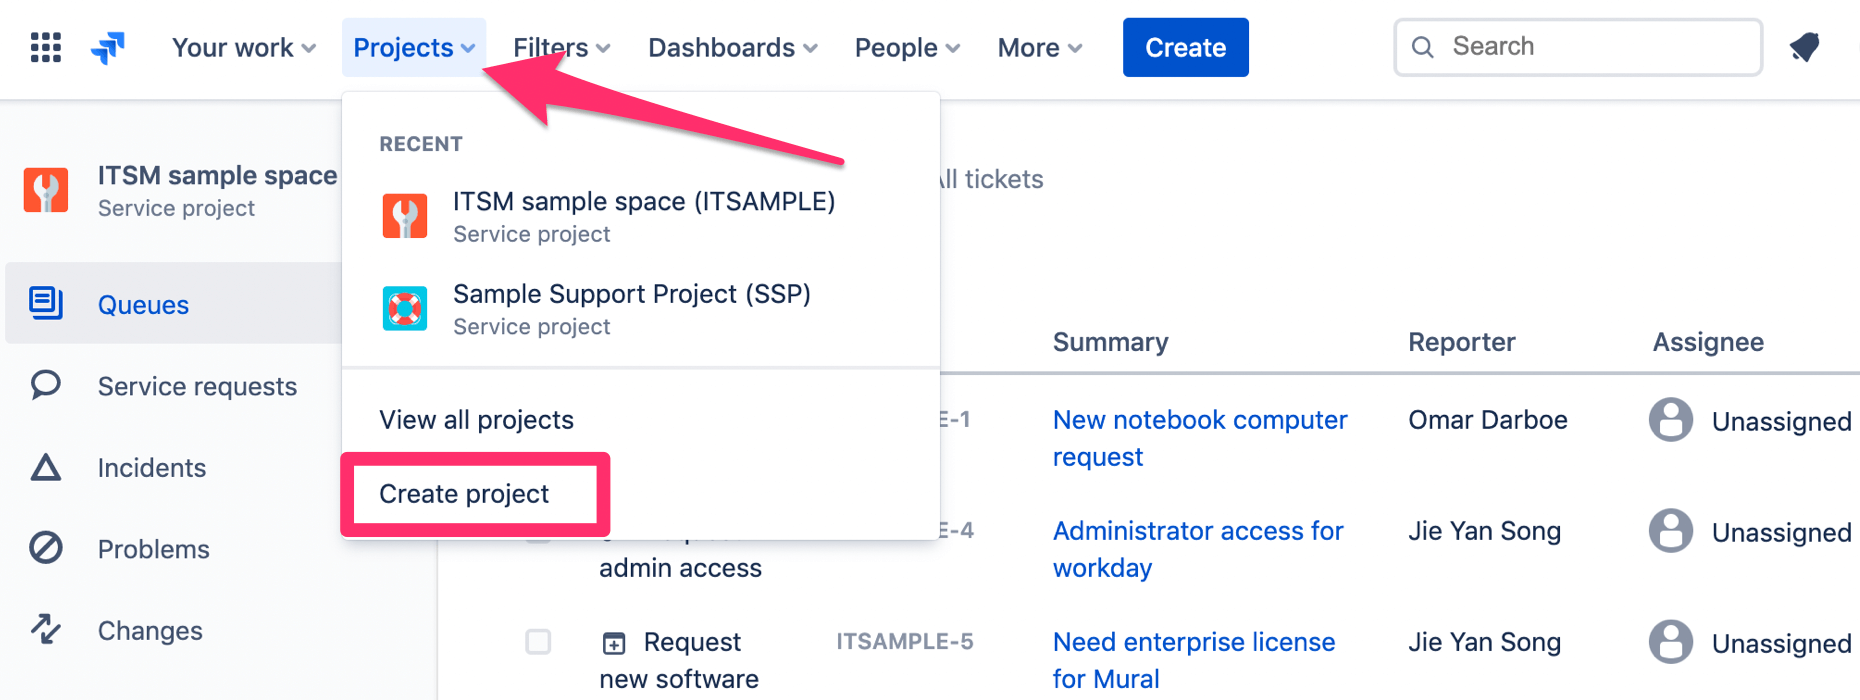
From your Service Desk dashboard, click Projects at the top of the screen. Then select Create project from the dropdown menu.
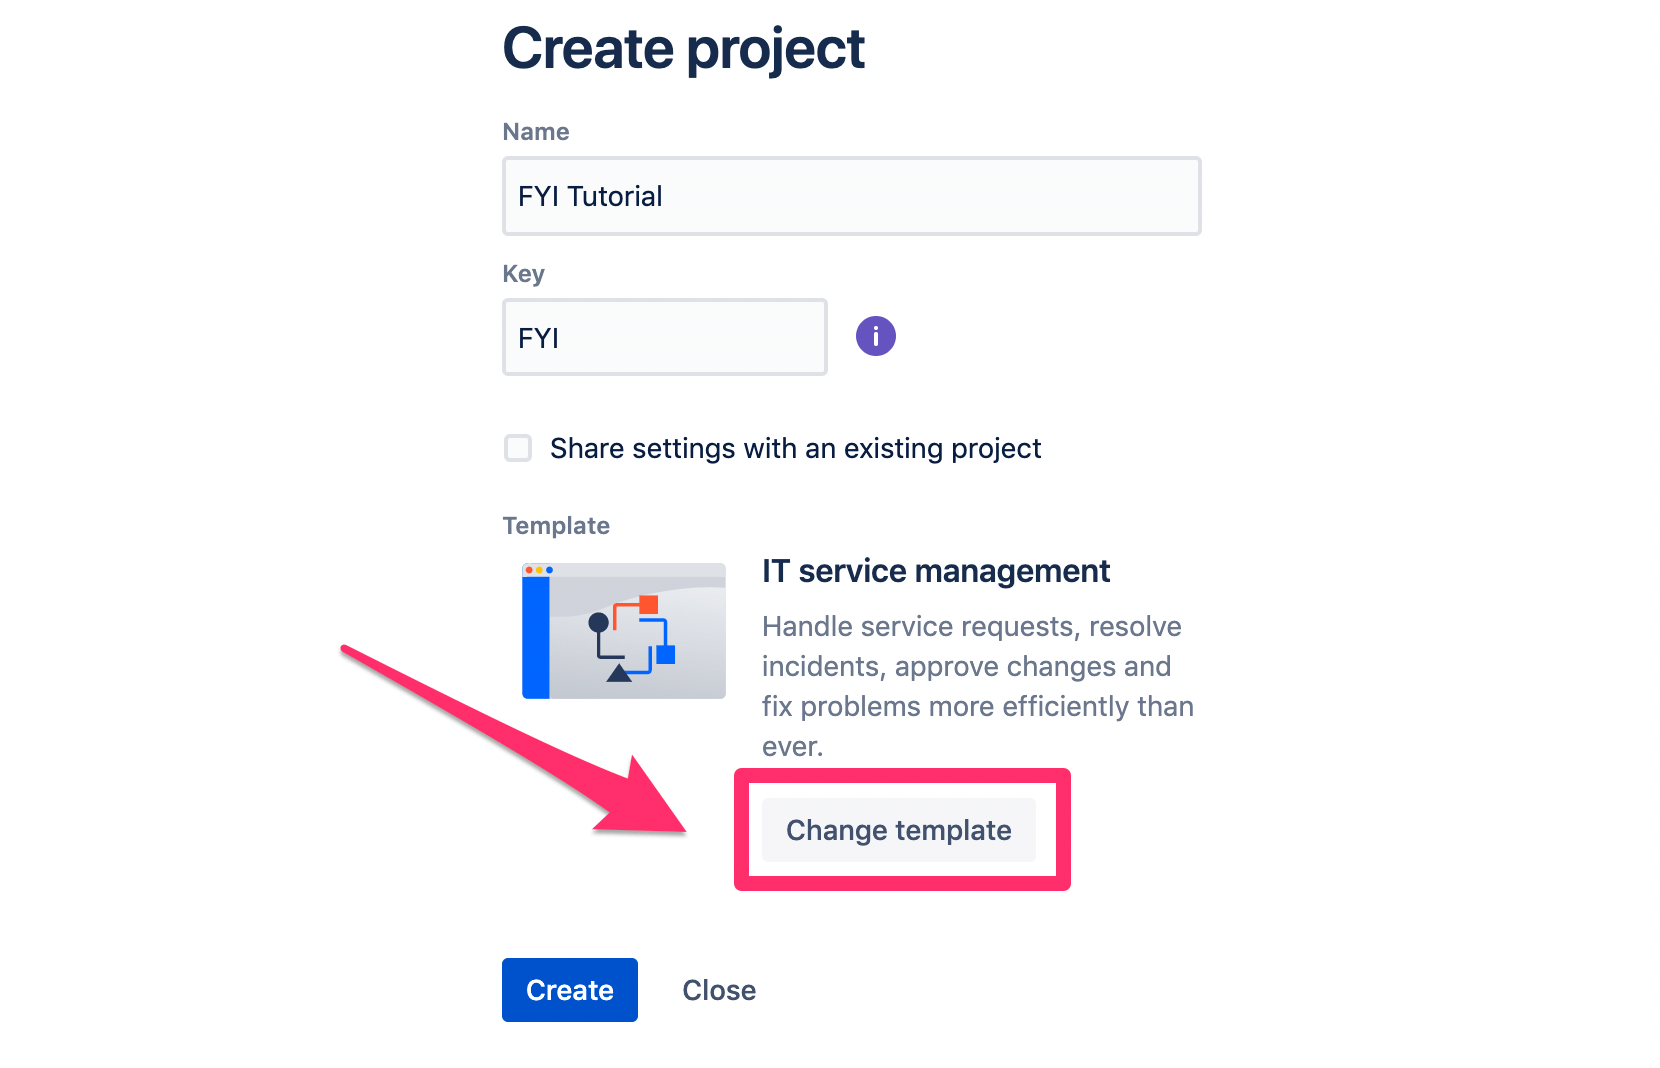
From here, Jira will prompt you to name the project and assign a project key. The key will be used to help your team recognize work from the project when they’re working on issues.
You’ll also have the option to share the settings of your project with another service desk project.
The final step to creating a service project is choosing your template. Just click Change template to see your options.
Here’s a brief overview of the template options and what they’re used for:
- IT Service Management — For service requests, resolving incidents, approving changes, and fixing problems.
- General Service Project — Manage all service requests from one place.
- External Service Project — Answer customer questions and collect bug reports.
- HR Service Project — Manage onboarding, offboarding, and facilitate changes for the staff.
- Facilities Service Project — Manage requests for maintenance, event planning, and moving.
- Legal Service Project — Create, track, and manage contract lifecycles.
Most teams using Jira stick with the templates for ITSM, general service, or external service. But as described above, Jira Service Desk can accommodate a wide range of ticketing needs.
Step 3: Configure Submission Request Settings
Now you need to set up a way for customers or internal users to create a new ticket. You’ll have a few different options to consider here.
Navigate to Channels on the left side of your project dashboard.
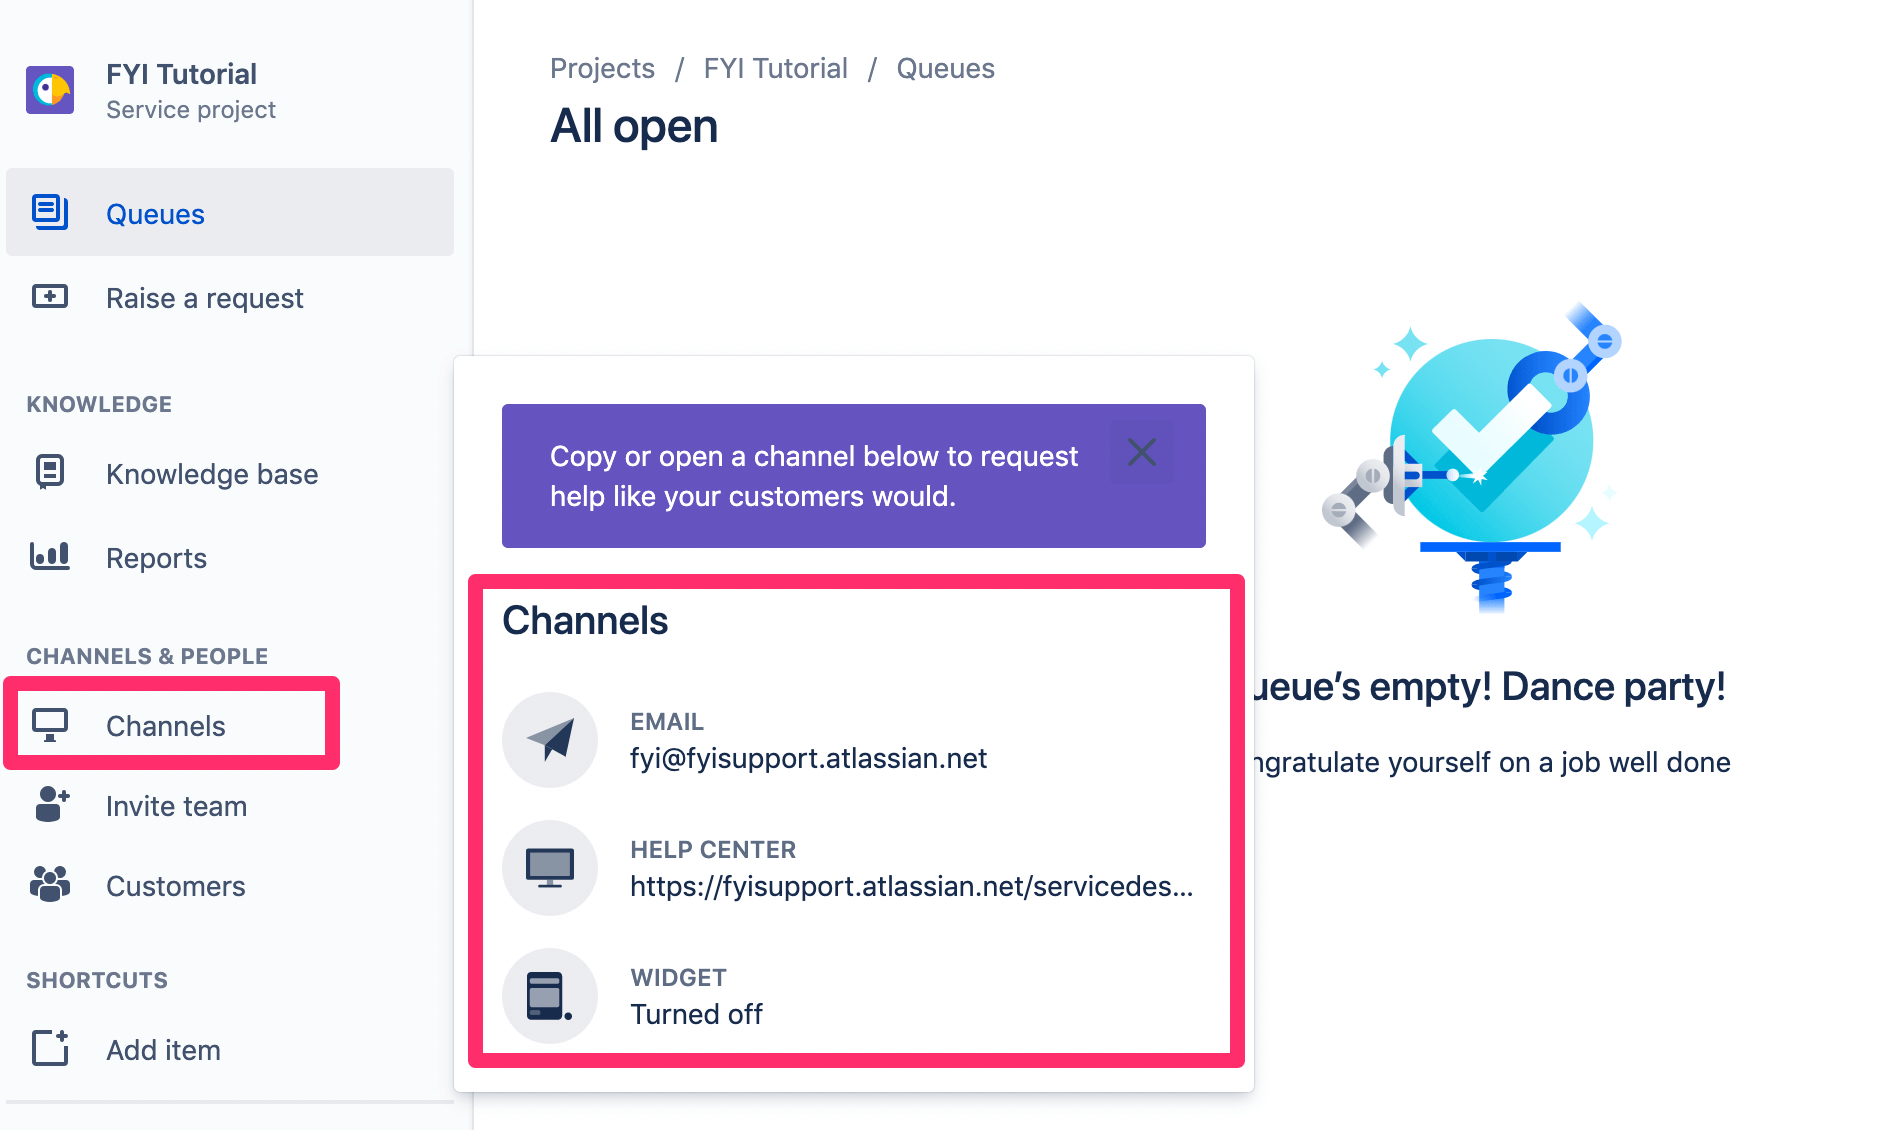
This will open a pop-up menu showing the three ways to submit a request—email, help center, or widget.
In the scenario above, if a customer sends an email to fyi@fyisupport.atlassian.net, then a ticket will be created in this project.
Jira also gives you a dedicated help center page. You can add this to your website and direct people here to submit requests. The default categories on the help center landing page include:
- Technical support
- License and billing questions
- Product trial questions
- Other
- Report a bug
- Suggest a new feature
- Suggest improvement
But all of this is fully customizable based on the product or service you’re offering. The page contents will look different if the project is for external customers or in-house support.
You’ll also have the option to embed a service request widget on your website, which will look something like this:
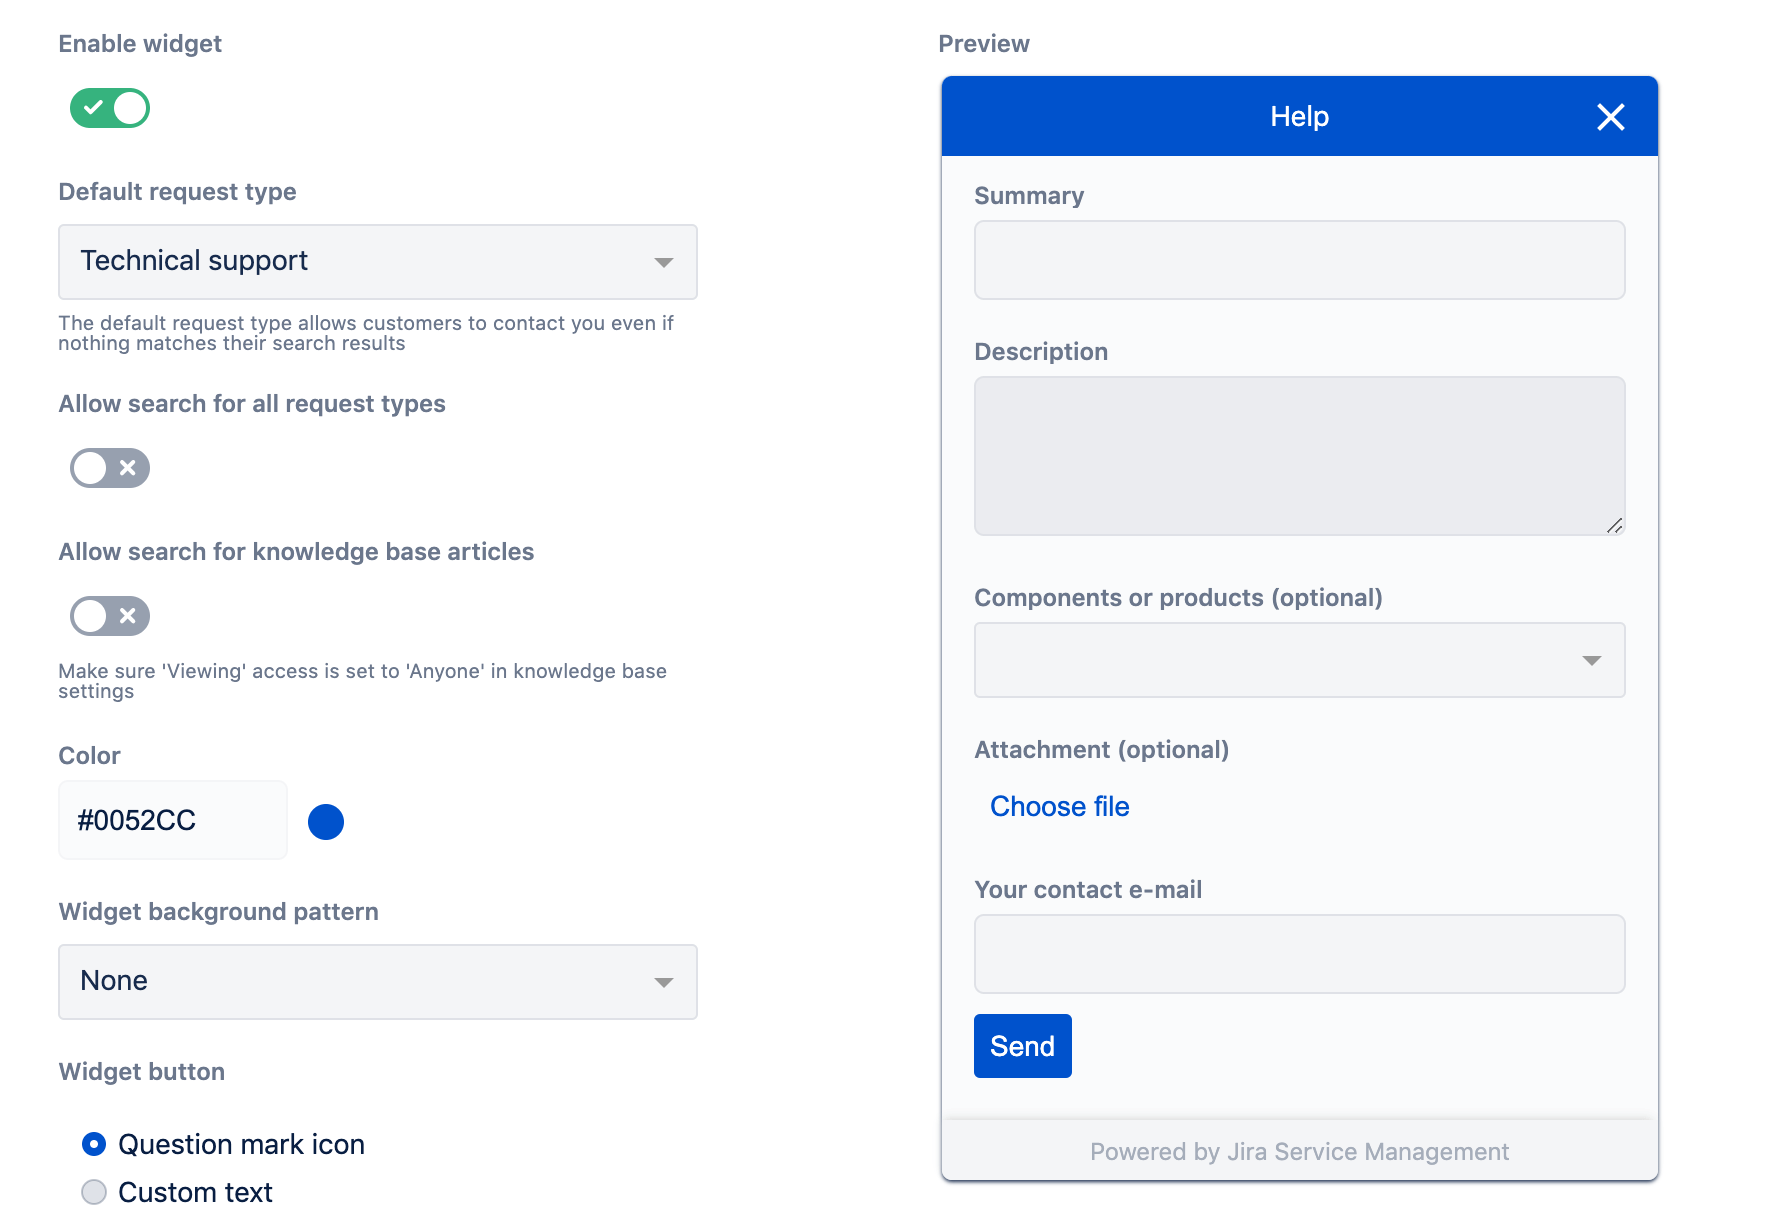
Now it’s just a matter of making this accessible to your customers.
Embed the widget on your site or link out to the help center landing page. You can also include the support email address on your website, social channels, product pages, emails, and more.
Step 4: Manage Request Types
If you’re just getting one or two tickets infrequently, it will be easy to manage everything. But at scale, it’s tough to stay organized if all of your tickets are in the same category.
Jira Service Desk lets you create different request types to expedite the routing process. This ensures that the request is sent to the right department or the most qualified service agent. For example, a ticket with a billing issue shouldn’t be sent to the same agent queue for software bugs.
Start with common categories without getting too specific. “Billing Questions” would be a better category than “Change Credit Card On File” or “Duplicate Charge on Account.”
To configure your settings here, navigate to Request types on the left side of your Jira Service Desk dashboard.
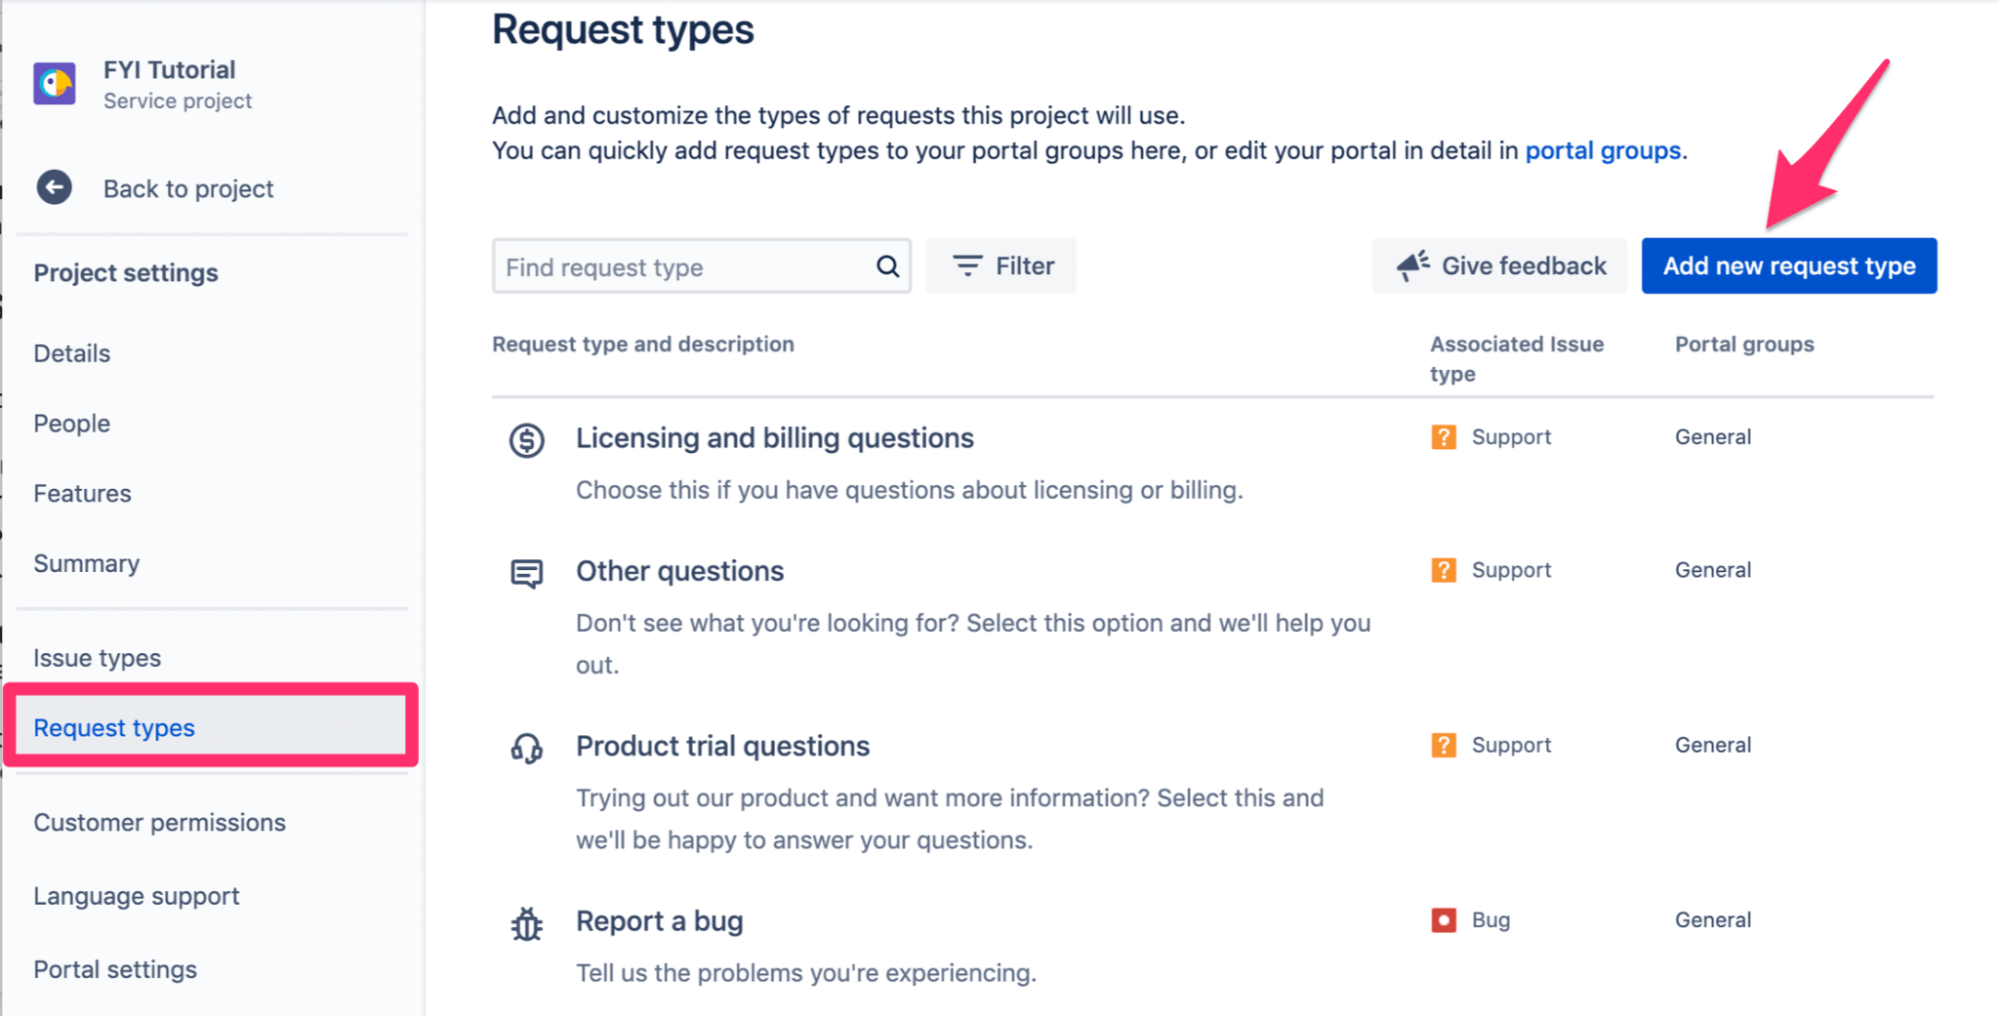
You can edit the existing request types or Add a new request type from this screen as well.
As you’re managing requests, it’s important to look at things from two perspectives—the customer side and the service desk team. For example, your service desk team might use technical jargon to describe a bug or issue. But a customer might not understand what that’s referring to.
So the requests need to start from the perspective of whoever is submitting them. If those people can’t find the right category because the terminology is too confusing, it defeats the purpose of having multiple request types. Then requests could be sent to the wrong agent, and it slows things down even more.
Step 5: Create Queues
Your support agents will work on tickets from different queues. The tickets here can be organized by things like SLA resolution, priority, date, and more.
By default, a queue will automatically sort tickets by priority and category. Admins have a bit more flexibility here, as you’ll be able to manually change priorities and assign tickets to different agents.
Navigate to Queues on the left side navigation of your service desk dashboard. Then click New queue to create a custom option.
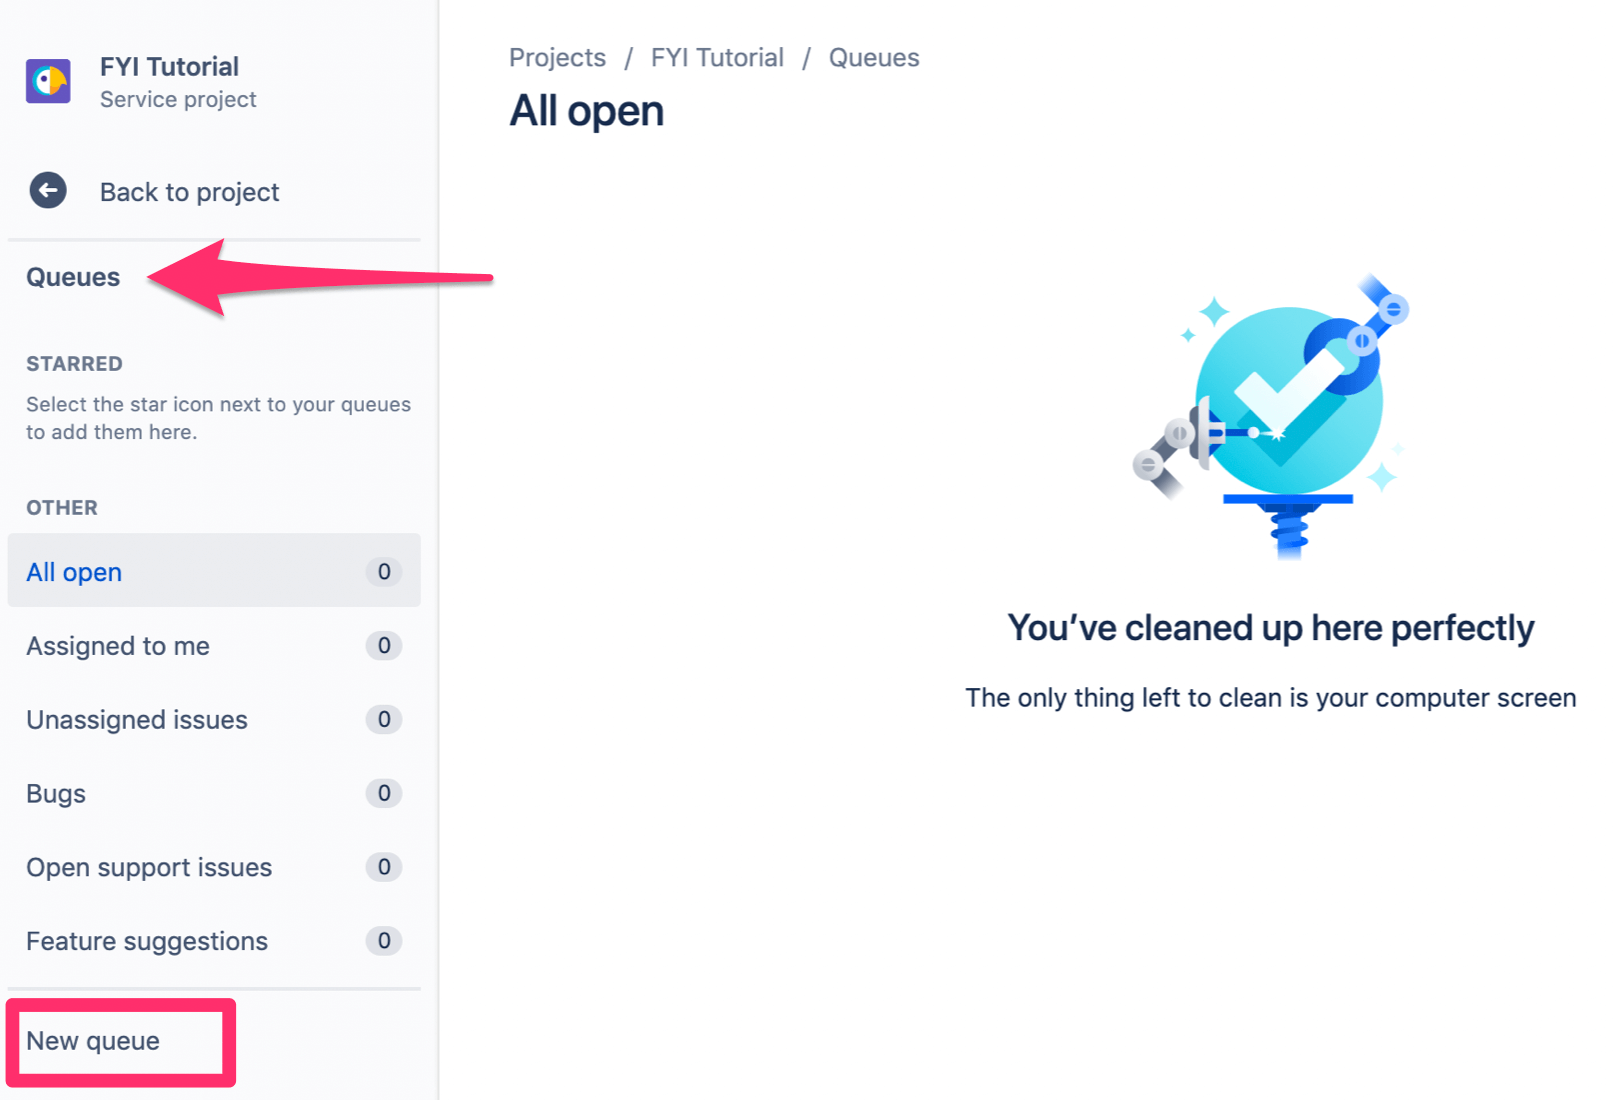
The options for your new queue are seemingly limitless. By default, you can filter requests by type, status, resolution, and label. But Jira gives you the option to create more and customize all of this based on your unique process.
For example, the status types alone in a queue include:
- Canceled
- Closed
- Done
- Escalated
- In Progress
- Pending
- Reopened
- Resolved
- Waiting for Customer
- Waiting for Support
- Work in Progress
Not every queue will necessarily need so many different status options. So you might decide to create one that just includes pending, in progress, and done.
Step 6: Add Customer Service Agents to the Ticketing System
Your ticketing system will only work if your team has been onboarded to Jira Service Desk.
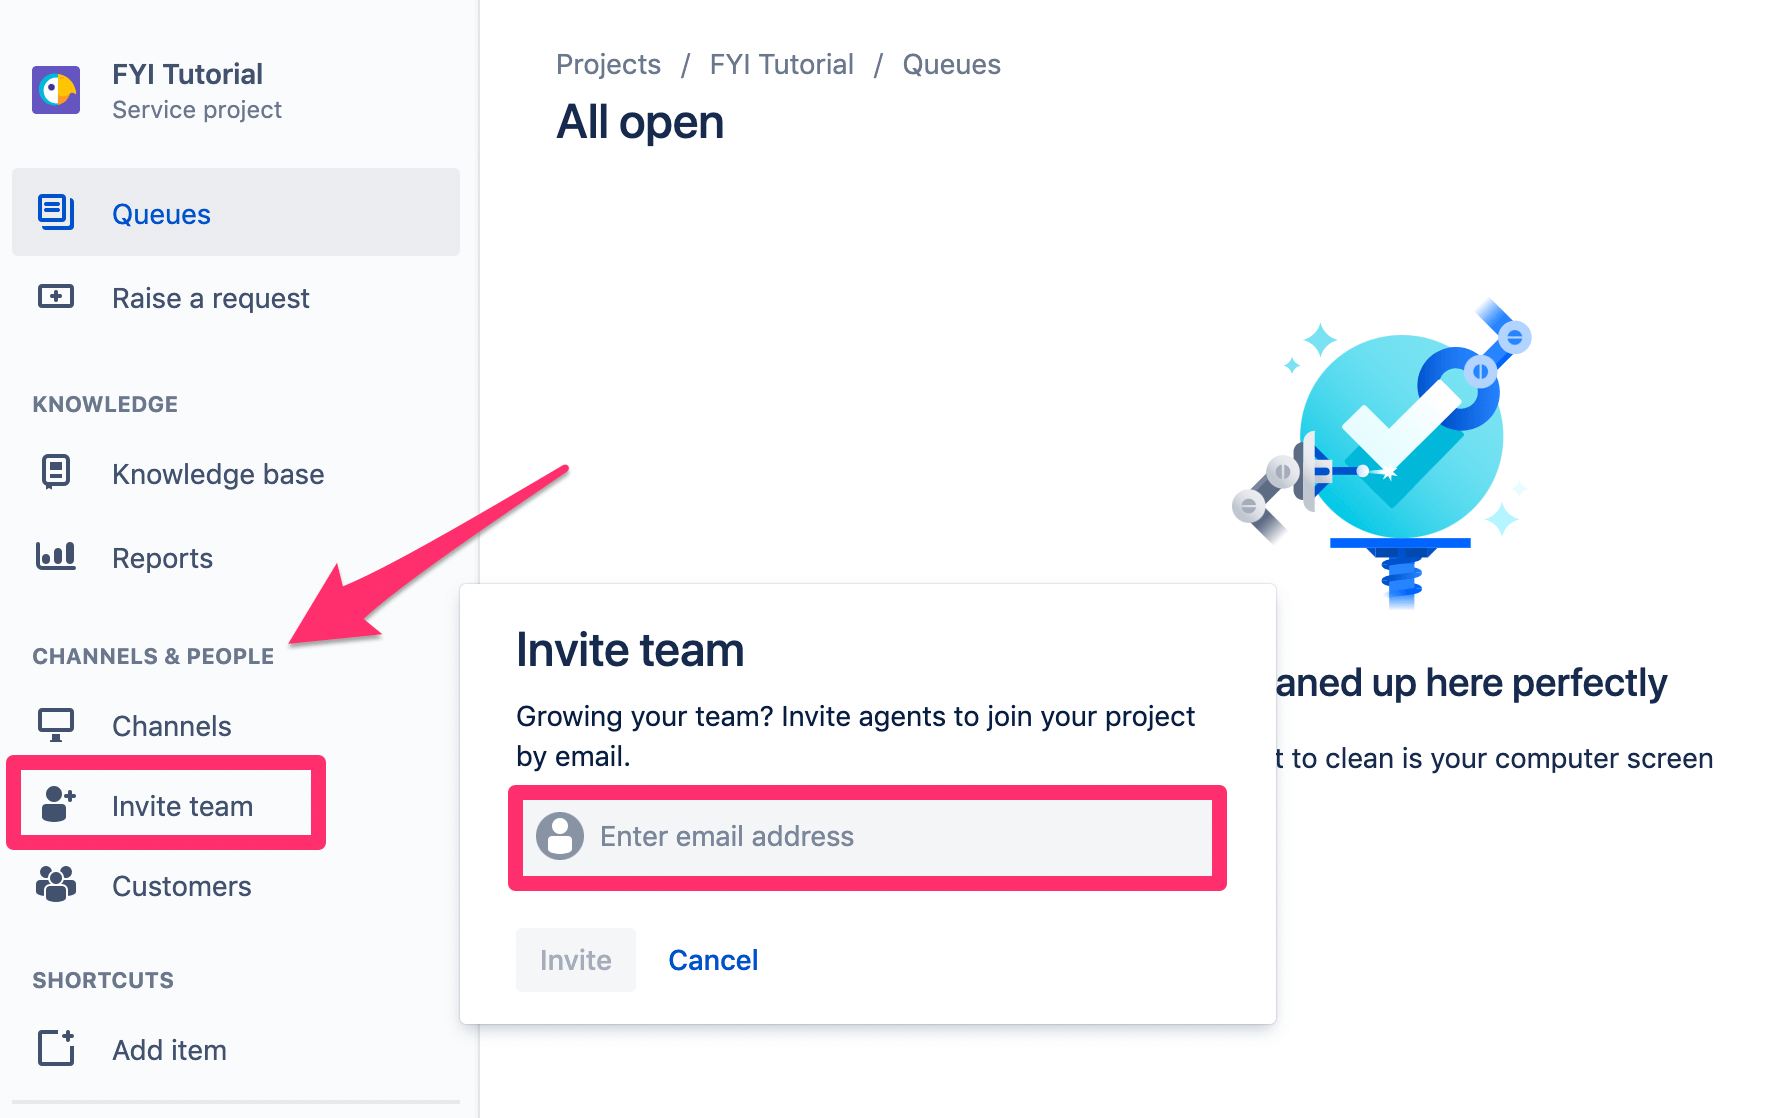
Click Invite team under the Channels & People menu on the left side of your dashboard. Then just enter the appropriate email address to continue.
There are three types of user roles within Jira Service Desk—administrator, service desk team, and service desk customer.
Once your team has been added, you can route specific service request types to different team members.
Step 7: Resolve Open Tickets
The final step to a great ticketing system is the resolution.
Now that your system is up and running, it’s just a matter of making sure that all new tickets are being handled. Here’s a sample ticket queue to show what this might look like:
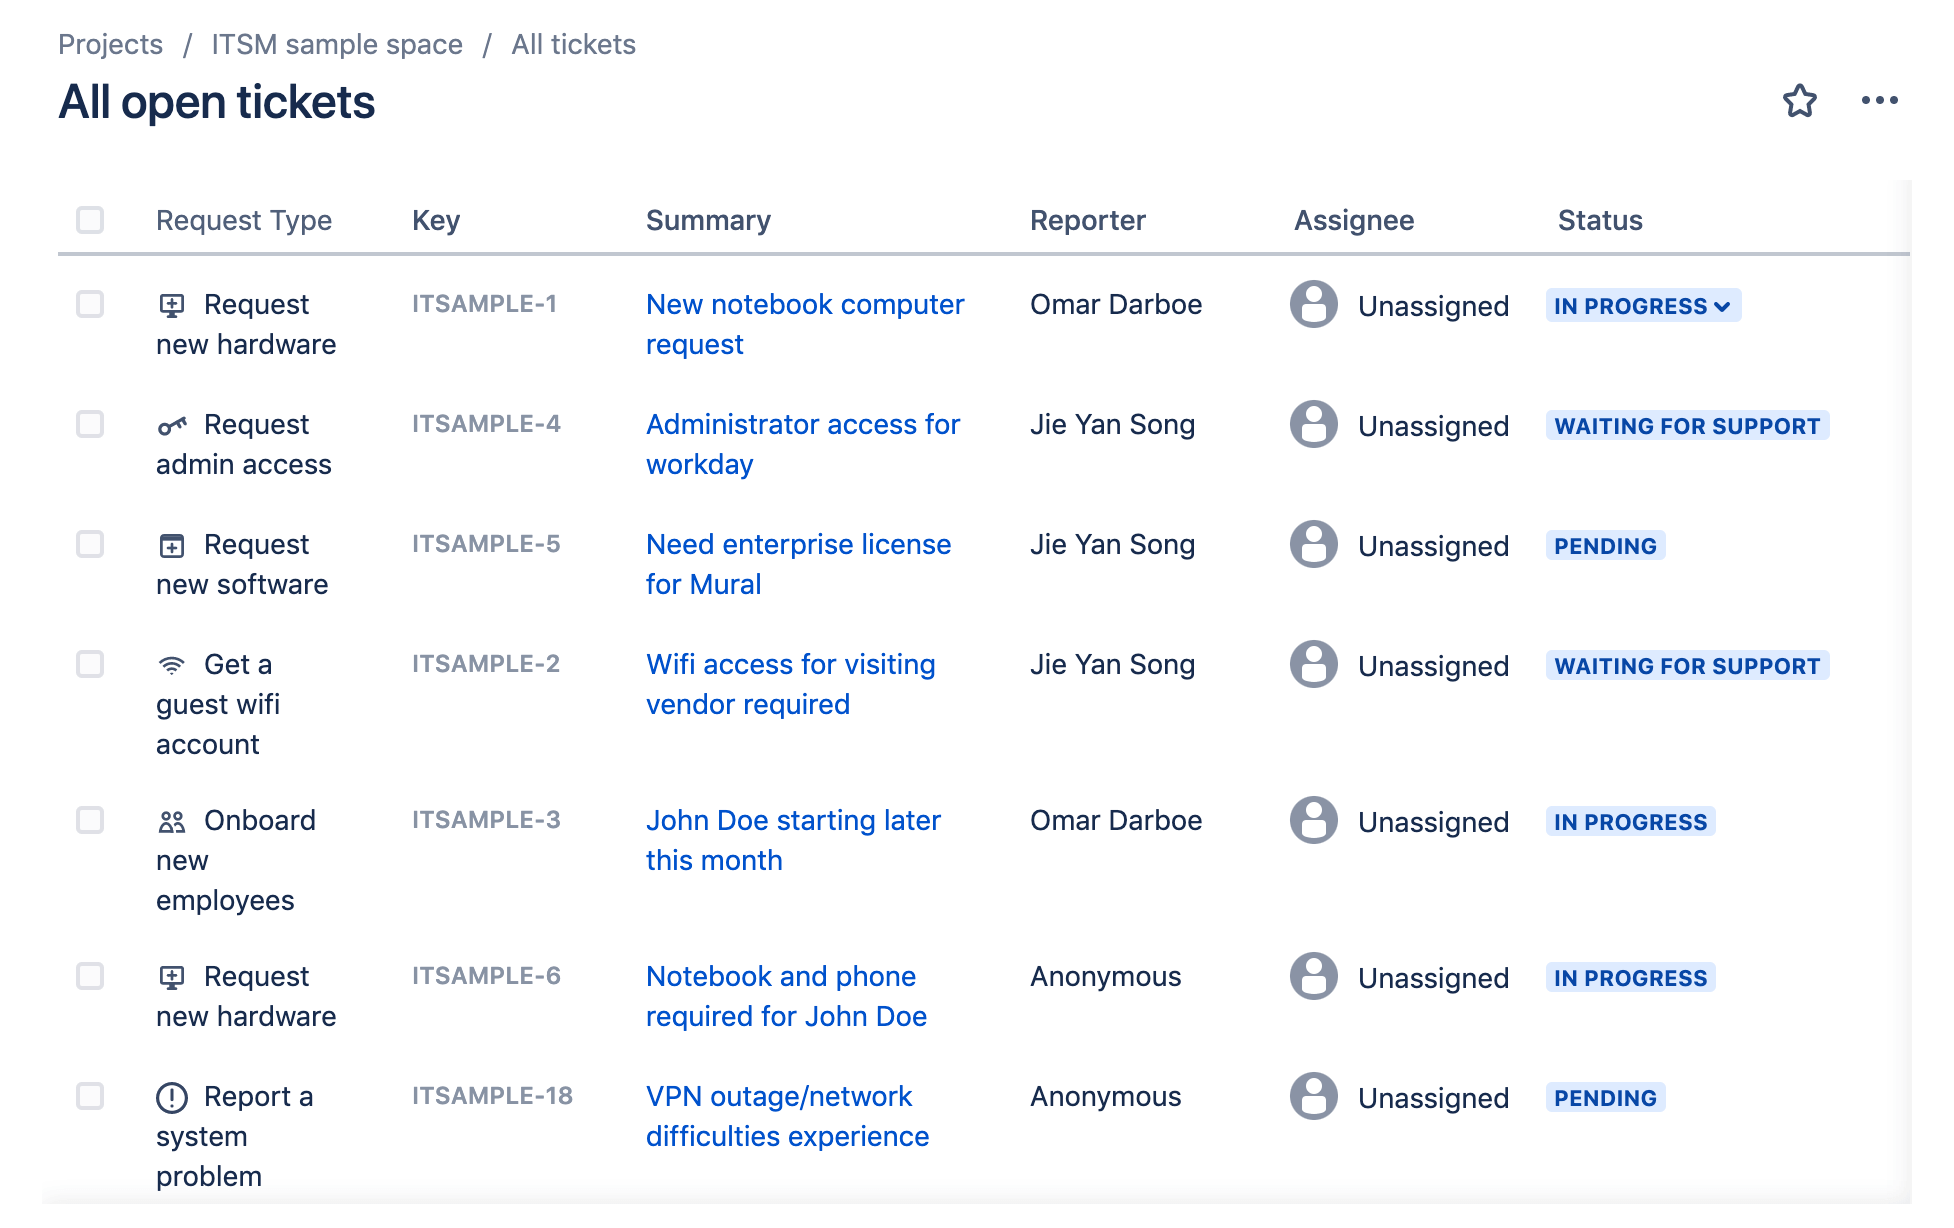
As an administrator, you can also assign tickets to team members from the open ticket list. This is useful if it hasn’t been done automatically based on your settings.
Common Problems When Creating a Ticketing System Using Jira
Creating and running a ticketing system in Jira isn’t always a seamless process. Here are a few common problems that people run into as they’re setting this up. I’ll explain how to resolve each one below:
Problem 1: Prioritizing New Ticket Requests
When you’re just getting started, managing tickets is easy. This is something you might handle on your own, or maybe you just have one agent that’s handling all types of requests.
But this strategy isn’t scalable. So it’s better to get organized from the beginning instead of trying to adjust once it’s too late.
Not all tickets are created equally. If you’re just addressing tickets in the order that they come in, then high-priority issues will get buried at the bottom.
Here’s a scenario. Let’s say you’re getting 50 new tickets per day. You’ve got five agents splitting the workload, each handling ten. Depending on the severity of those requests, an agent might not be able to resolve all of the issues in one day.
If a high-priority ticket comes in on day three, and the agents are still working on tickets from day one, then this high-priority item might not get seen until next week. This is no good.
When you’re customizing the different request types, don’t forget to edit the priority value. Priority options include:
- Highest
- High
- Medium
- Low
- Lowest
For example, bugs would be considered a high-priority ticket. But a customer requesting a new feature probably shouldn’t be at the top of your priority list.
Problem 2: Managing Similar High-Volume Tickets
Just because you set up a ticketing system doesn’t automatically mean that it’s optimized for efficiency. As your organization grows, you’ll start to notice lots of similar questions and problems coming through on tickets.
You want to empower your support agents to clear their queues. This is nearly impossible if you’re getting dozens or hundreds of the same questions every week.
To limit the number of new tickets in your service desk, use Confluence. This is another solution offered by Atlassian, and you can get it for free when you sign up for Jira Service Desk.
With Confluence, you’ll have the ability to create a knowledge base for self-service support.
Now customers and internal users can find the answers to their questions without creating a ticket. If those people do create a ticket, your support agents can simply direct them to the right article for a fast and easy resolution.
Problem 3: Managing Workflows
In theory, a ticketing system is fairly straightforward. A new ticket comes in, and it gets resolved.
But as you’ll quickly discover, the process doesn’t always go from A to B without any intermediate steps. In many cases, there are several steps required to resolve a ticket.
For example, let’s say a customer finds a bug in your software. So they submit a request to get it fixed. The agent who receives this ticket may not be a developer who has the ability to fix the bug.
So that ticket will need to be passed along to the appropriate parties. The bug still needs to get fixed and then potentially released as a new version of the software. This involves project managers, developers, and lots of other moving parts.
Jira Service Desk makes it easy for you to customize workflows based on the request type. All of this can be managed with drag-and-drop functionality.
Depending on the status, the ticket only has so many options for proceeding in the workflow. Here’s a simple example. A ticket marked as “pending” can’t be switched to “done.” First, it must be moved to “work in progress.”
For complex workflows involving multiple agents and moving parts, you’ll definitely want to take advantage of the custom workflow management tools in Jira.

