How to Change Email Display Names as a G Suite Admin
Needing to change an email display name in Google Workspace (formerly called the G Suite) is common. Perhaps, there was a typo when the account was set up, or they want to go by a nickname. People’s names also change with nuptials, and so on.
In this guide, we’ll walk you through the process of changing an email display name as an admin. You don’t need to delete any accounts. You’ll be able to change the display name in just a few minutes without running into any issues.
Before You Start
Changing an email display name in Google Workspace is simple. But there are a few things you should be aware of before you dive in.
A display name and username are not the same things. A username is a name or word that comes before the @ sign in an email address—for example, the “info” part in info@xyz.com. You also use a username to sign in to Google.
On the other hand, a display name is how the user’s name appears within the Google suite of products, i.e., their profile name in Gmail, Google Calendar, etc. It’s usually the first and last name of the user. To give you an example, the username might be jdoe@xyz.com, but the display name is “Jane Doe.”
You can change both the username and display name in Google Workspace using the same method, which we’ll get onto in just a moment.
6 Easy Steps to Change to an Email Display Name as a G Suite Admin
Here’s how to change an email display name in a flash:
Step 1: Ensure the user is logged out of Google Cloud.
Step 2: Sign in to Google Admin Console using your administrator account. Go can do this from admin.google.com.
Step 3: Go to the Users section.
Step 4: Locate the user you want to make adjustments to and click Update user.
Step 5: Enter the user’s new first name and last name in the box. If you wanted to change the username, you’d do so under “Primary email.”
Step 6: Click Update user and then Done to complete the process.
Common Issues When Changing Email Display Names as a G Suite Admin
While making the change is straightforward, here are some issues you may run into and further guidance related to this topic.
How Do You Change the Display Name Format?
There are only two display name formats to choose from. These are:
- First Last, e.g., Jane Doe
- Last, First, e.g., Doe, Jane
You should also know that the display name format settings only apply to emails sent via the Gmail mobile or web apps and the Contacts web app.
Here’s how to change the display name format:
Step 1: Sign in to the Admin Console with your administrator account.
Step 2: Go to Apps > Google Workspace > Gmail > User settings.
Step 3: Select either First Last or Last, First from the menu.
Step 4: If you want all user display names to appear this way, uncheck the box next to Allow users to customize this setting. Leave the box checked if you want users to be able to decide for themselves.
How Do You Add New Users to Google Workspace?
Perhaps a new person joined your organization, or you skipped adding users when you set up Google Workspace. In any case, it’s important you add individual users to Google Workspace.
Sharing accounts can get messy from an organizational perspective. It can also lead to security issues if too many users have access to account details.
Here’s how to add individual user accounts:
Step 1: Go to your Admin Console and then Users.
Step 2: Click Invite new user/Add new user at the top of the page.
Step 3: If you wish to invite a user, select this option and add their details to send an invite. Or you can choose to input their account details manually.
Step 4: Repeat these steps for every new user you wish to add to the account.
Adding Multiple Users via CSV File
Alternatively, you may wish to add users in bulk if you have a large organization. You can do this by adding multiple users from a CSV file.
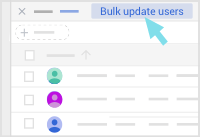
Step 1: Go to the Users section of your Admin Console.
Step 2: Click on Bulk update users at the top of the page.
Step 3: Select Download blank CSV template and open the file with the program you use, such as Google Sheets or Microsoft Excel.
Step 4: Add user details in the relevant columns. These are First Name, Last Name, Email Address, Password, and Org Unit Path. For the last section, you’ll need to enter a forward slash (/) for any users you want to place in your top-level organizational unit.

Step 5: You can set up these accounts so that users can create their own passwords when they first sign in. To do this, type TRUE in the column labeled “Change Password at Next Sign-In.” There’s also space to add any additional information you require, such as recovery email addresses. Save the file.
Step 6: Return to the Users section in your Admin Console and click Bulk update users.
Step 7: Click Upload and select the relevant file. It may take up to 24 hours for the list of users to appear in the directory.
Deleting Users
As an administrator, you may also need to delete users or remove users from the account occasionally. Here’s the process:
Step 1: Go to the Users section.
Step 2: Locate the user in question, then click Remove user or More > Delete user.
Step 3: At this point, you may wish to transfer ownership of the user’s content to another user. If this is the case, select the appropriate options to transfer user content and add the user’s details you wish to transfer content to.
Step 4: Click Remove User or Delete User.
How Do You Change the Domain Name in an Email Address?
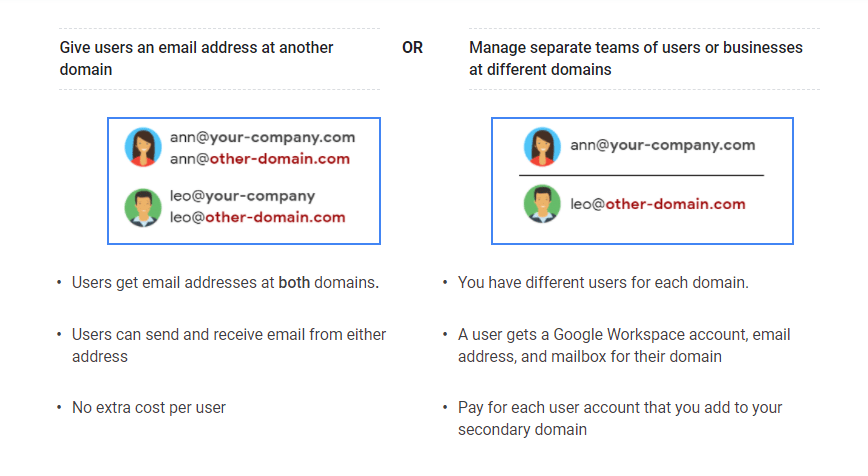
If you have multiple businesses or websites, you may wish to add email addresses connected to another domain. This refers to the second part of the email address, e.g., the “xyz.com” part of jdoe@xyz.com.
You can add alias email addresses for current users at no extra cost. This means they can send and receive emails from either domain.
Or you can add a secondary domain and add separate users to that account. Let’s say you want to differentiate each brand or business and have separate teams working for each. In this case, you must pay for each user you add to the account.
Here’s how to add an alias or secondary domain to Google Workspace:
Step 1: In your Google Admin Console account, go to Domains > Manage domains.
Step 2: Enter the name of the new domain.
Step 3: Choose the domain type, either Secondary domain or User alias domain. When you select the latter, Google automatically creates those alias email addresses for you.
Step 4: Click Add and start verification, then follow the steps to prove you own the domain.
Step 5: Return to the Manage domains section. Locate the new domain and click Activate Gmail.
What Happens to Old Email Addresses?
If you change someone’s username, they must use the new one to log in to their account going forward. They’ll still receive any email sent to their previous email address, which is now classed as an alias email address. This means the user won’t miss out on any important emails sent to the old email address.
If users want to keep their emails organized, they can set up a filter to tag any emails sent to the old email address. This means they can prioritize emails however they want. Plus, they can set up an auto-reply for emails sent to the old address, which notifies senders of their new address.
Alternatively, they can create a temporary account for the previous email address if they’re not ready to get rid of it yet. They can alter the settings so that emails sent to the old address are automatically forwarded to the new address.
The final alternative is, of course, to delete the old email address. This means that the system will return any communications sent to that address to the sender.
How Do You Give Users an Additional Alias?
You may want a particular member of your team to receive emails sent to a business email address, such as a sales@xyz.com or info@xyz.com email. In this case, you must add the address as an alias to the user’s account.
You can add up to 30 additional aliases for each user at no extra cost.
Here’s how to add another alias:
Step 1: Log in to your admin account and go to Users.
Step 2: Find the user in question and click on their name.
Step 3: On their account page, go to User information > Alternate email addresses (email alias).
Step 4: Click Alternate email and type in the username, e.g., “sales.” Note that you can’t give a user an alias that already belongs to another user.
Step 5: Choose the relevant domain from the menu if you have multiple domains. Click Save.
The user will begin to receive emails sent to this alias address within 24 hours. If they also wish to send emails from the alias address, which will likely be the case, they must set up a custom From address.
They can do this by simply clicking the From line in the email and selecting the appropriate address.
Or they can change their default email address to the alias if they want to always send emails from this address. Here’s how they can change the default email address:
Step 1: In Gmail, go to Settings > See all settings.
Step 2: Click the Accounts or Accounts and Import tab.
Step 3: Select Make default in the Send mail as section next to the alias email address.
How Do You Change Your Display Name on a Personal Account?
Note that it’s not possible to change your username or email address if you have a personal account. To do that, you’d need to create a new Gmail account.
But what do you do if you’re not an admin and want to change your display name on your own Gmail account? As long as the admin allows users to change their display name and you haven’t changed your display name too many times in a short period, this shouldn’t be a problem.
Here’s how to change your display name:
Step 1: In your Gmail account, click Settings, then select See all settings.
Step 2: Go to the Accounts or Accounts and Import tab.
Step 3: Where it says “Send mail as,” click Edit info.
Step 4: Enter your chosen display name.
Step 5: Scroll to the bottom and click Save changes.
How Do You Secure Company Email Addresses?
It’s vital that, as an admin, you secure the email addresses that belong to your organization. This is because scammers can imitate company email addresses to fool customers and even internal members of your organization. This may take the form of spam, spoofing, and phishing attempts.
Thankfully, there are several ways you can secure your users’ accounts:
- Set up SPF – This essentially means you name the servers allowed to send emails from your domain. It reduces the chance of spoofing and prevents valid emails from being marked as spam in the recipient’s inbox.
- Set up DKIM – This adds an encrypted signature to the emails you send. The server on the other end decrypts the message to check that it wasn’t changed after you sent it. This prevents sophisticated attacks in which unauthorized users gain access to your emails in transit.
- Set up DMARC – This provides instructions to servers when an email fails to pass the above two authentication methods. You’ll also receive reports when there’s an issue, enabling you to spot hacking attempts and vulnerabilities.
All of the above are means of authenticating your emails and will help to reduce cyber threats.

