How to Change Your Margins in Google Docs
When creating a word processing document, you want the meaning of the text to convey your ideas. But you also want the text to look good, conveying the professionalism you want your document to portray.
Setting the margins in the document is one way to create the kind of look you’re seeking. The margin is the blank space between the edge of the page and the start of the text on the page. Margins exist on the left, right, top, and bottom edges of the page.
A document with flush left and flush right justified margins will portray a look and feel that’s different from a document with a ragged right margin. A ragged left margin with a flush right margin can even be an artistic element for your paper. Setting up the margins correctly ensures your document will print properly too.
As a default, Google Docs sets its margins at 1 inch from the edge of the printed page. However, you can change these margins easily. In fact, you have quite a few more options for setting the Google Docs margins than you may think. We’ll help you figure out how to make the Google Docs margins look perfect to match the style of your document.
Changing Margins With the Ruler
You can drag the ruler in the Google Docs window to change the margin quickly.
Start by making sure the ruler is visible across the top of the screen. If not, click the View menu, followed by Show Ruler.
Changing the Left Margin
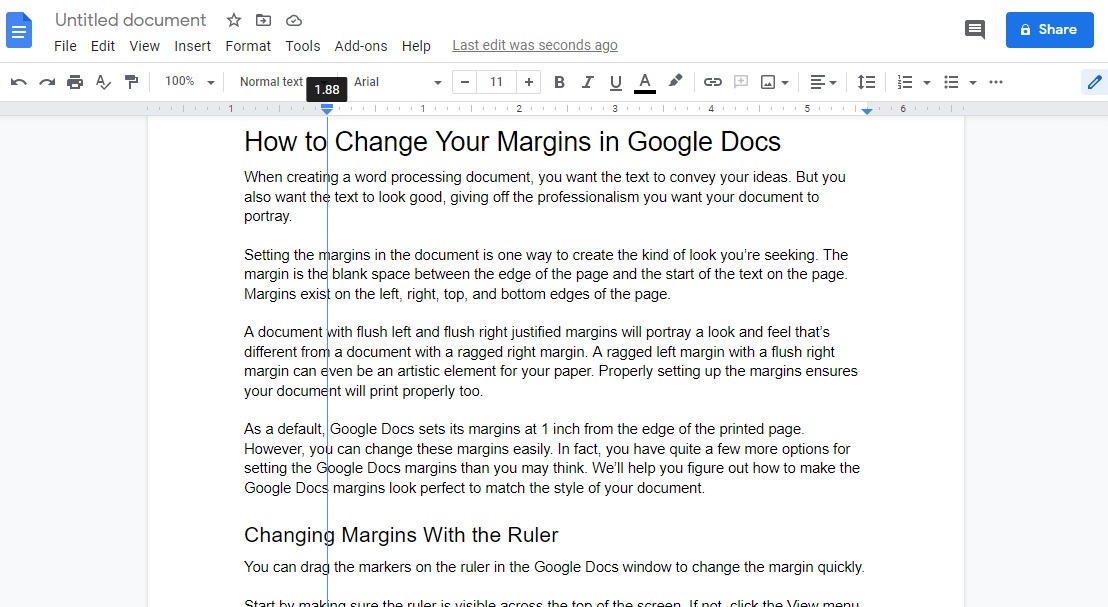
To change the location of the left margin, move the cursor into the gray section of the ruler to the left of the blue triangle and rectangle. The cursor should change to a double-headed arrow. Click and hold on the gray bar.
As you move the cursor back and forth, the position of the left margin will move to follow the cursor. (You’ll notice that the blue triangle and rectangle move along with the gray bar. These two items mark indents for paragraphs, so they should move with the margin. Click on them directly later to change the indent, if desired.)
As you drag the cursor, you’ll see a blue line extend vertically down the page, giving you a visual clue about the new position of the left margin. You also should see the position of the margin in inches from the edge of the paper appear in a black box as you move the gray bar.
Once you reach the position you want to use, release the mouse button. Google Docs automatically will reposition the left margin and adjust the look of the text.
Changing the Right Margin
To change the right margin, follow the same technique as you used for the left margin. Move the cursor into the gray bar to the right of the ruler. Click and hold the mouse button. Then drag the right margin back and forth. You’ll see the same blue line and black box that you see with the left margin. Release the mouse button when you reach the desired position.
Changing Margins in the Page Setup
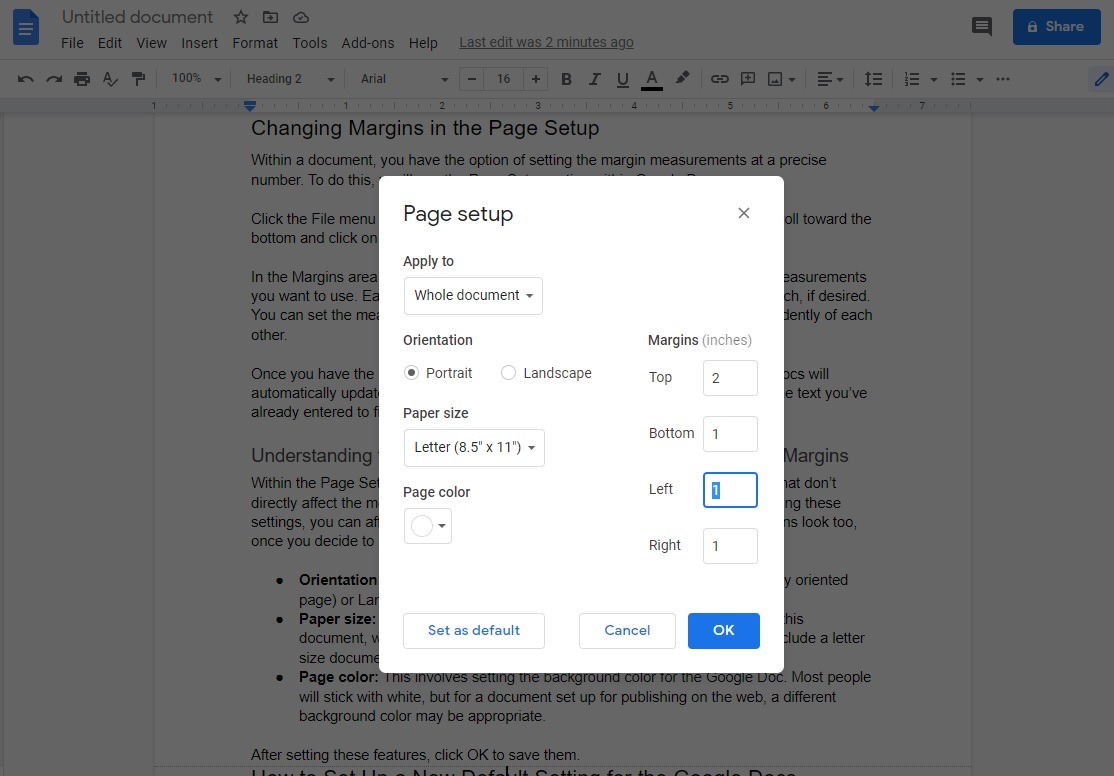
Within a document, you have the option of setting the margin measurements at a precise number. To do this easily, you’ll use the Page Setup option within Google Docs.
Click the File menu at the top left of the document window. In the popup menu, scroll toward the bottom and click on Page Setup.
In the Margins area on the right side of the Page Setup window, enter the margin measurements you want to use. Each number will be in inches, and you can use fractions of an inch (in decimals) if desired. You can set the measurements for the left, right, top, and bottom margins independently of each other.
Once you have the numbers entered into each box, click the OK button. Google Docs will automatically update the margin settings for this document, adjusting the look of the text you’ve already entered to fit the new margins.
Understanding the Page Setup Features Not Directly Related to Margins
Within the Page Setup window, you’ll have a few different options you can select that don’t directly affect the measurements of the Google Docs margins. However, by changing these settings, you can affect the overall look of the page, which changes how the margins look too, once you decide to set them.
- Orientation: Within the orientation section, select either Portrait (a vertically oriented page) or Landscape (a horizontally oriented page).
- Paper size: Select the overall dimensions of the page you want to use for this document, which is important if you plan to print the document. This can include the common letter-sized document, as well as legal, tabloid, and many other sizes.
- Page color: This involves setting the background color for the Google Doc. Most people will stick with white, but for a document set up for publishing on the web, a different background color may be appropriate.
After setting these features, click OK to save them.
How to Set Up a New Default Setting for the Google Docs Margins
After working with the Google Docs margins through multiple documents, you may find that you have a certain set of measurements that you want to use as the default margin measurements going forward for all of your new Google Docs.
Click the File menu and click Page Setup. Within the Page Setup window, as we discussed earlier, enter the measurements in inches for all four margins to match the sizes you want to use as the defaults.
Then click the Set As Default button, and Google Docs will use these margins as the default for all new documents going forward. Click OK.
How to Go Back to the Margin Default
If you simply want to return to the default margins that Google Docs used before you began changing the margins, you can use the Page Setup window. Just enter 1 in the Top, Bottom, Left, and Right boxes to return to the default 1-inch margin for the document. Then click the Set As Default button, followed by the OK button.

Changing the Text Alignment at the Margin
Once you have the margins set for your Google Doc, you can change the way the text looks against those margins. To make changes to the text at the margin, highlight all of the text in the Google Doc by pressing CTRL-A.
When justifying the text against the margin, all of the text will be flat to the margin. When the text is not flat to the margin, this is a ragged alignment of text.
You have four options for setting up the text alignment against the left and right margins.
Left Margin Justify, Right Margin Ragged
To have the text flat against the left margin and ragged against the right margin (meaning each line of text may not quite reach the right margin), click the Align button in the ribbon menu at the top of the Google Doc window. (It’s near the right edge, marked by four horizontal lines and a downward pointing triangle.)
In the popup menu, click the icon with four lines that are all flat to the left side only. (When you hover the cursor over this icon, Left Align will appear in a black popup box.)
Having your text left-aligned and ragged on the right is the most common style for writing, especially for web documents. Some formal documents also will use left aligned and right ragged text.
Right Margin Justify, Left Margin Ragged
To have the right side of the lines of text flat against the right margin with the lines of text not flat to the left margin, click the Align button and select the icon with four lines on it, all of which are flat to the right side only. (When you hover the cursor over this icon, Right Align will appear in a black popup box.)
A right-aligned text format is not common for an entire document. Authors often will use right-aligned text for an artistic element in a portion of the document. Perhaps you would use right-aligned text to highlight a direct quote, for example.
Some people find this style of text difficult to read because of the jagged left side, which is why it is better as an artistic element.
Left Margin Ragged, Right Margin Ragged
To create ragged text at both the left and right margins of the document, click the Align button and select the icon with four lines on it with none of the lines flat to the right or left side. (When you hover the cursor over this icon, Center Align will appear in a black popup box.)
Center alignment is not a common selection for documents. Most authors will use this as an artistic element.
Left Margin Justify, Right Margin Justify
The final option is text aligned flat to both the left and right sides. To accomplish this, Google Docs will stretch out spaces between words or will split some words at the right margin and add hyphens to create a flat look for each line at the margin on the right.
To create flat lines at both the left and right margins, click the Align button and select the icon where all four lines are flat to both the left and right sides. (When you hover the cursor over this icon, Justify will appear in a black popup box.)
Justified text to both the left and right margins is a common element in formal documents and printed materials, such as books and newspapers.
Changing Margins in the Google Docs iOS App
When using Google Docs on an iPhone or on an iPad, you can change the margins as well, using a slightly different technique than with the web browser version of Google Docs.
In the Google Docs app window, tap on the Menu icon (the three dots in the upper right corner). Scroll down until you see the Page Setup section. Tap on Margins in this section. You can select among the following types of margin setups:
- Custom: When selecting custom, you will be able to select specific numbers (in inches) for the top, bottom, left, and right margins.
- Wide: The wide margin setting means the document uses 2-inch margins on all four sides.
- Default: With the default margin setting, Google Docs will make use of 1-inch margins on all four sides.
- Narrow: Select the narrow setting to use 0.5-inch margins on all four sides of the Google Docs window.
Changing Margins in the Google Docs Android App
You cannot change the margins when using the Google Docs app on an Android smartphone or tablet. The margins for your Google Doc will remain at the default of 1 inch.

