How to Add Hanging and Normal Indents to Google Docs
When creating a text document in Google Docs, using indentions is a good way to break up the text and create emphasis points. The indention moves one or more lines of text farther to the right or farther to the left compared to the left margin in the document.
The most common reason to create an indent for a document is to indicate a new paragraph. However, document creators may use indentations for a variety of other reasons.
When using the Google Docs indent features for the first time, it may be a little confusing to start (especially on mobile). Here are some tips to help you begin using indent commands in your documents.
Hanging vs Normal Indents: What’s the Difference?
Before you begin using indents in your Google Docs, it’s helpful to understand the difference between the two types of indents.
What Is a Normal Google Docs Indent?
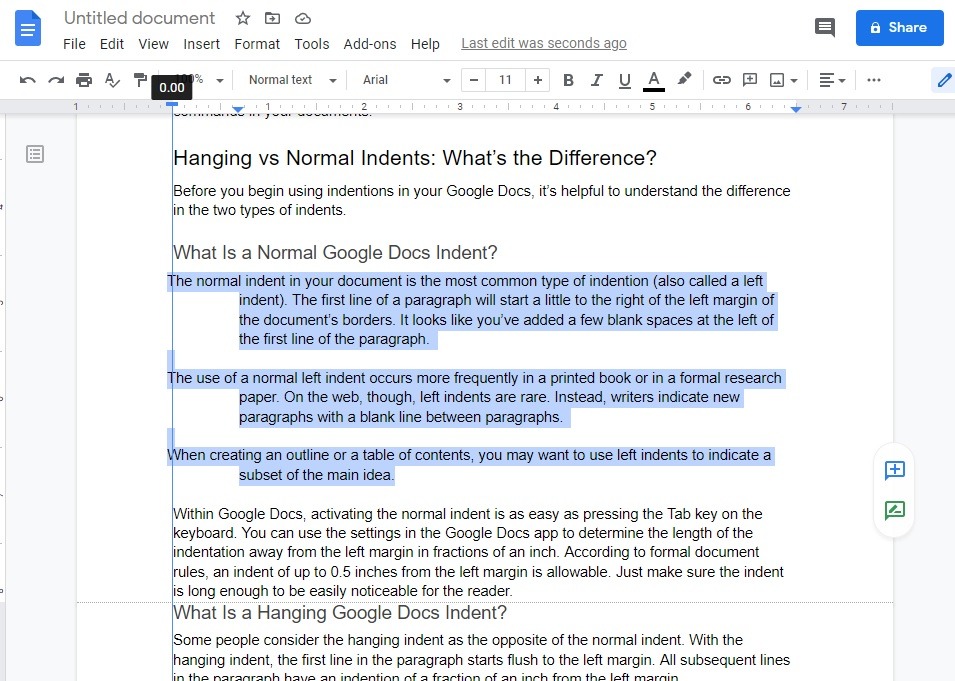
The normal indent in your document is the most common type of indentation (also called a left indent). The first line of a paragraph will start a little to the right of the left margin of the document. It looks like you’ve added a few blank spaces at the left of the first line of the paragraph.
The use of a normal left indent occurs more frequently in a printed book or in a formal research paper. On the web, though, left indents are rare. Instead, writers often indicate new paragraphs with a blank line between paragraphs.
When creating an outline or a table of contents, you may want to use left indents to indicate a subset of the main idea.
Within Google Docs, activating the normal indent is as easy as pressing the Tab key on the keyboard to create a 0.5-inch indent. According to Chicago Style formatting rules for formal documents, an indent of 0.5 inches from the left margin is typical. In a non-formal document, just make sure the indent is long enough to be easily noticeable for the reader.
What Is a Hanging Google Docs Indent?
The hanging indent is the opposite of the normal indent. With the hanging indent, the first line in the paragraph starts flush to the left margin. All subsequent lines in the paragraph have an indention of a fraction of an inch from the left margin.
This is a stylish look that works for certain types of documents. You may see the hanging indent used in PowerPoint presentations or in newsletters. You could use the hanging indent to emphasize a certain paragraph in an academic document, such as if it is a direct quote or an important fact.
For those using Google Docs, the hanging indent is only available through the app’s settings. There’s no default setting for applying a hanging indent with the Tab key or any other keyboard key.
As a general rule, the hanging indentation should be about 0.5 inches from the left margin. Because the hanging indent is an artistic design element, though, you can make the hanging indentation almost any length. Page designers just need to make sure the indention is long enough to be noticeable.
Using the Hanging and Normal Google Docs Indent Options
We’ll list some tips to help you use these two types of indentations. Understand that you can apply either type of indentation in a variety of ways, including:
- On a specific paragraph within the document.
- On multiple paragraphs inside the document.
- On all paragraphs in the document.
You can even mix hanging and normal indentations within the same Google Doc.
How to Add a Hanging Indent
To add a hanging indent in a Google Doc, start with some text on the screen. Then follow the steps listed here.
Step 1: Display the Ruler on the Screen
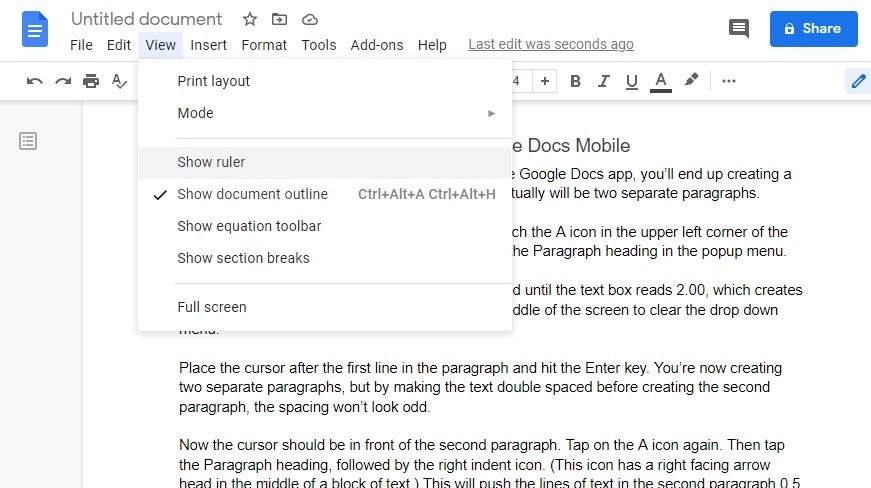
By default, when you start a new Google Doc, you’ll have the ruler visible across the top of the document window, just below the ribbon menu. However, you may have turned off this feature at some point. If so, click the View menu, followed by Show Ruler.
Step 2: Highlight the Text for the Hanging Indent
Highlight the text inside your document upon which you want to apply the hanging indent. You can highlight a single paragraph, the entire document, or a series of paragraphs.
Step 3: Create the Space for the Hanging Indent
With the text highlighted, click on and hold the downward-pointing triangle in the indentation marker located inside the far left of the ruler at the top of the screen. Now drag the triangle to the right to mark the indentation point for the lines in the paragraph after the first line. (The rectangle above the triangle will also move as you drag the triangle.)
When you release the mouse button, you’ll see the highlighted text move away from the left margin the same distance you dragged the triangle. However, all of the lines in the paragraphs will move with the triangle. To create a hanging indent, you don’t want the first line in the paragraph to indent away from the left margin.
To fix this issue, leave the text highlighted. Click and hold on the rectangle above the triangle. Drag the rectangle back to the left until you reach the left margin. The first line in the paragraphs of the highlighted text will move back to the left margin, while the other lines in the highlighted paragraphs will remain indented at the location of the downward-pointing triangle.
Only drag the rectangle back to the right. If the triangle also moves in sync with it, this will mess up your attempt at creating a hanging indent. You’ll need to start the process again.
Step 4: Adjust the Length of the Hanging Indent
If you want to change the length of the hanging Google Docs indent, just highlight the text with the hanging indent again. Click on the downward-facing triangle and drag it to the right or left to adjust the length of the indention.
How to Add a Normal Indent
Normal indents are easy to use with Google Docs, as the Tab key automatically moves the first line in the paragraph 0.5 inches to the right of the left margin as a default. Just press the Tab key as you’re typing a new paragraph.
You do have a few options for controlling the way Google Docs handles the normal indentation process.
Adding a Normal Indentation After Creating a Document
If you don’t want to press the Tab key before every paragraph, you do have another option to add a normal indent.
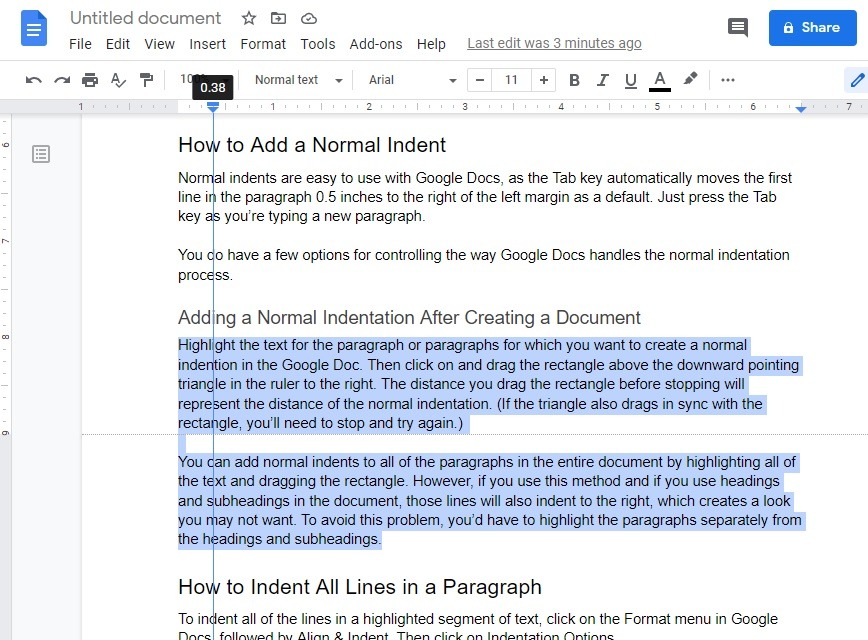
Highlight the text for the paragraph or paragraphs for which you want to create a normal indention in the Google Doc. Then click on and drag the rectangle above the downward-pointing triangle in the ruler to the right. The distance you drag the rectangle before stopping will represent the distance of the normal indentation. (If the triangle also drags in sync with the rectangle, you’ll need to stop and try again.)
You can add normal indents to all of the paragraphs in the entire document by highlighting all of the text and dragging the rectangle. However, if you use this method with headings and subheadings in the document, those lines will also indent to the right, which creates a look you may not want. To avoid this problem, you’d have to highlight the main text paragraphs separately from the headings and subheadings.
How to Indent All Lines in a Paragraph
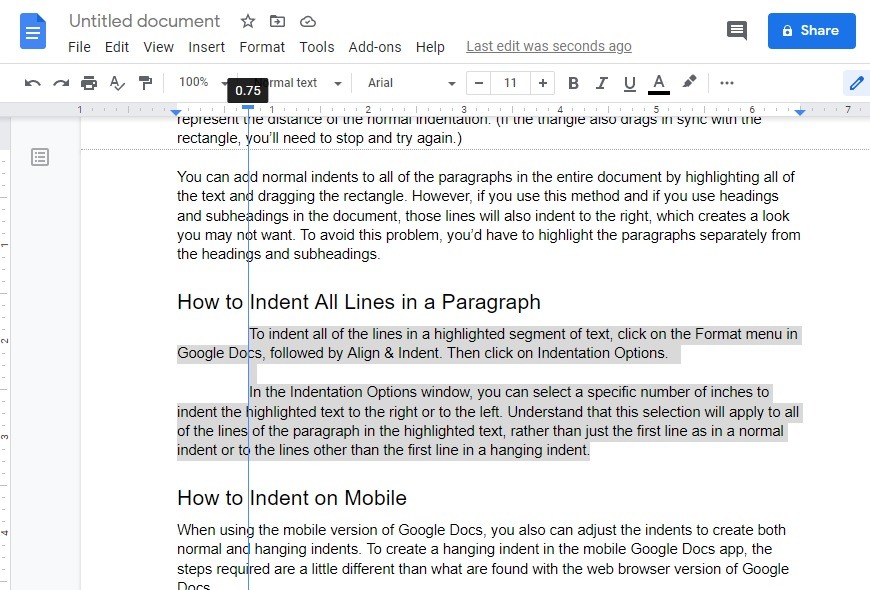
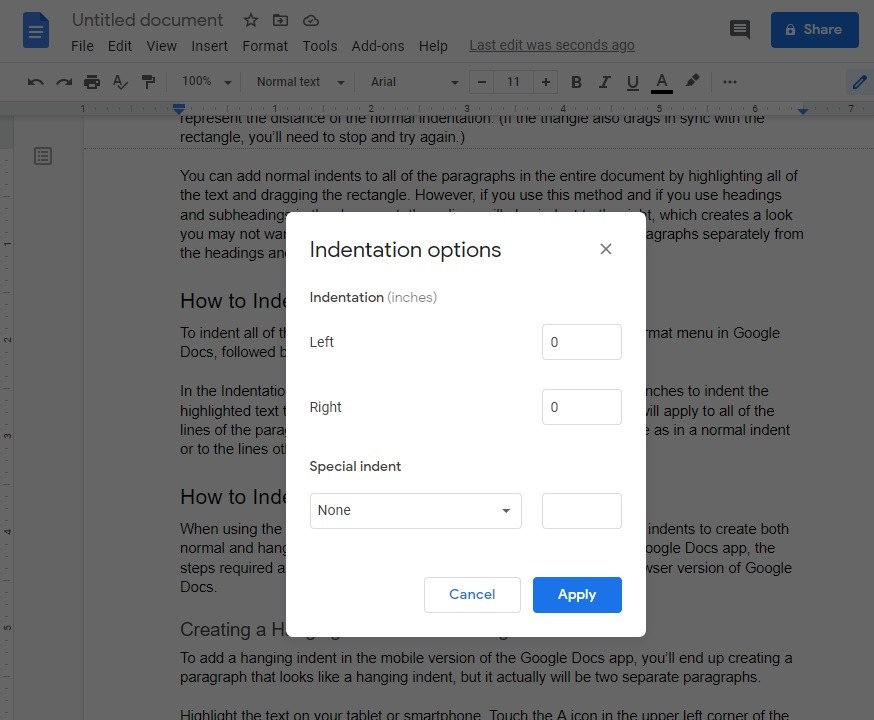
To indent all of the lines in a highlighted segment of text, click on the Format menu in Google Docs, followed by Align & Indent. Then click on Indentation Options.
In the Indentation Options window, you can select a specific number of inches to indent the highlighted text to the right or to the left. Understand that this selection will apply to all of the lines of the paragraph in the highlighted text, rather than just the first line as in a normal indent or to the lines other than the first line in a hanging indent.
How to Indent on Mobile
When using the mobile version of Google Docs, you also can adjust the indents to create both normal and hanging indents. To create indents in the mobile Google Docs app, the steps required are quite a bit different than what is found with the web browser version of Google Docs.
Creating a Hanging Indentation in Google Docs Mobile
To add a hanging indent in the mobile version of the Google Docs app, you’ll end up creating something that looks like a hanging indent in a single paragraph, but it actually will be two separate paragraphs.
Highlight the text on your tablet or smartphone. Touch the A icon in the upper right corner of the screen to open your text formatting options. Touch the Paragraph heading in the popup menu.
In the Line Spacing area, tap the upward arrowhead until the text box reads 2.00, which creates a double-spaced segment of text. Now touch the middle of the screen to clear the drop-down menu.
Place the cursor after the first line in the paragraph and tap the Enter key. You’re now creating two separate paragraphs, but by making the text double spaced before creating the second paragraph, the spacing won’t look odd.
After tapping Enter, the cursor should be in front of the second paragraph. Tap on the A icon again. Then tap the Paragraph heading, followed by the right indent icon. (This icon looks like a right-facing arrowhead in the middle of a block of text.) This will push the lines of text in the second paragraph 0.5 inches to the right, giving you the look of a hanging indent.
Creating the hanging indent on the Google Docs mobile version is only done for artistic reasons, such as when you are attempting to cite a source for an academic paper or when you want to highlight a direct quote in a document. It’s not a formatting tool you want to use regularly throughout a document on the mobile Google Docs app because of how time-consuming it is to set up and use. Save its usage for only a few paragraphs you want to really emphasize.
Creating a Normal Indentation in Google Docs Mobile
The easiest way to create what looks like a normal indent for the first line of your paragraphs in the Google Docs mobile app is to add three to six spaces at the start of each paragraph. Unfortunately, there’s no Tab key on the on-screen keyboard. Use the number of spaces that creates the look you want.
Just tap the spacebar on the on-screen keyboard to add the spaces at the start of each paragraph. Add the same number of spaces at the front of each paragraph to maintain consistency in the spacing throughout the entire document.

