The Ultimate Manual for GitLab SSH Key Setup
Using SSH (Secure Shell or Secure Socket Shell) provides the ability to securely access remote servers and devices on the internet. In GitLab, SSH keys provide a high level of security by requiring authentication between the client and the server before passing code back and forth.
What Is GitLab SSH Key Setup Anyway?
When making use of SSH within GitLab, you will need to have an SSH key pair, consisting of one public key and one private key. The public key allows you to automatically encrypt the data in a way that only the entity that has the private key is able to decipher it.
The SSH key setup process involves creating the public and private keys so that you can use them to send data to the GitLab server securely. SSH develops the public and private keys at the same time, ensuring they have the necessary pairing.
You will have to go through a few steps to make sure that you set up the SSH keys properly, allowing them to serve the function you want with GitLab.
Why Use SSH With GitLab and Git?
As a distributed version control system, Git is a type of software that helps you manage versions of your code. Git tracks the changes made to any set of files, including source code. Teams of developers or programmers often will use Git so they can track changes made to source code in an efficient and quick manner. Git allows the teams to make use of non-linear workflows.
Because of its ability to track versions, Git works especially well for developers on a team who each want to work at a local site and send (or push) their changes to the server hosting the project. GitLab serves as the host.
Making a secure connection between Git and GitLab requires the use of the SSH protocol.
Why Not Use HTTPS Instead?
Using HTTPS (Hypertext Transfer Protocol Secure) accomplishes many of the same benefits found with SSH, as it encrypts data you are sending across the internet. Some coders may even choose to use HTTPS rather than SSH to encrypt their data.
Where HTTPS and SSH differ is in how the recipient gains access to the encrypted data. With HTTPS, users will enter a username and password. However, when sending Git commands to a server, the HTTPS password/username model is not practical. Receiving prompts for passwords on the server during each push causes a lot of disruptions in workflow.
With SSH, the public key remains stored on the server, simplifying the process of authenticating the two entities. SSH is a better option for authenticating accounts when you are using automation tools like CI/CD with your Git account.
How GitLab SSH Key Setup Works
Before you can go through the steps required for the SSH key setup, you need to make sure you have a couple of prerequisites in place.
- OpenSSH: You must have the OpenSSH client installed on your computer. If you are using Linux or MacOS, you should have OpenSSH pre-installed. For those using Windows 10 or newer, OpenSSH will be pre-installed as well. Otherwise, if you are using an older version of Windows, you will need to download and install OpenSSH on your own.
- SSH 6.5: You must be using SSH version 6.5 or newer to be able to make use of SSH key setup. (To see your current version of SSH, at the terminal prompt type ssh -V and press Enter.)
Once you are certain you are ready to set up your SSH keys, you will want to determine which SSH key type you want to use with your GitLab account. In the following examples, we will spell out the different options available for SSH key types.
Example 1: ED25519
The ED25519 SSH key type is among the most common types of keys in use. It became available with OpenSSH version 6.5 in 2014.
One of the biggest benefits of ED25519 is the speed with which it works versus some of the other options. ED25519 is a compact key, as it only uses 68 characters as part of its public key. This represents significantly fewer characters than others, which may make use of several hundred characters. Using fewer characters allows ED25519 to deliver the desired levels of speed. Yet, it doesn’t sacrifice its security features to achieve better performance speeds.
The advantage in performance that you will find with ED25519 tends to diminish on older computing systems. In fact, some of these older systems may not even support ED25519. However, the majority of newer operating systems are able to support ED25519.
Example 2: ED25519_SK
The ED25519_SK key type is only available in GitLab version 14.8 or later. This key type has similar features to ED25519, but it adds the SK designation.
SK is short for “security key,” and it gives the keys support for FIDO2 (which is the Fast Identity Online protocol 2). FIDO2 delivers strong account security by eliminating the need for passwords and negating worries over potentially weak passwords. ED25519_SK substitutes hardware-based authentication for passwords.
If you want to use ED25519_SK keys on GitLab, you will need to have OpenSSH version 8.2 or newer installed on your computer.
Example 3: ECDSA_SK
The ECDSA_SK key type is only available in GitLab version 14.8 or later. Again, by adding the SK designation to this SSH key type, users receive a higher level of security through support for FIDO2.
ECDSA (or Elliptic Curve Digital Signature Algorithm) makes use of keys and certificates to attempt to authenticate the entity using the key. Each certificate will have information about the public key and about the certificate’s owner.
ECDSA alone doesn’t have the level of security or performance speed that you find with ED25519, as we’ll discuss later. However, by adding the SK designation, you can receive the level of security that you need to be able to use this key in GitLab safely.
If you want to use ECDSA_SK keys on GitLab, you will need to have OpenSSH version 8.2 or newer installed on your computer.
Example 4: RSA
RSA (Rivest-Shamir-Adleman) is one of the oldest encryption algorithms available, initially becoming available a few decades ago. Yet, it remains highly effective at providing security with your SSH key.
However, when generating RSA keys for use with SSH and GitLab, you may want to force RSA to make use of a key size of 2,048 bits or larger. This length would give you the equivalent of a password of more than 600 characters.
The default for RSA in the SSH key command is 1,024 bits. With 1,024 bits or fewer in the RSA keys, it is possible for hackers to break the algorithm, although it still remains highly challenging to break an RSA key with 1,024 bits.
Example 5: Deprecated Keys (DSA and ECDSA)
Although GitLab supported SSH keys making use of DSA and ECDSA (without the SK designation) in the past, this is no longer the case. OpenSSH does not support DSA (Digital Signature Algorithm) any longer because of its security weaknesses. GitLab deprecated DSA beginning with GitLab version 11, meaning GitLab no longer supports DSA.
ECDSA has many of the same problems as DSA and no longer receives support under OpenSSH or GitLab. Additionally, it can be challenging to implement ECDSA correctly, which results in some errors while attempting to use it. These errors increase the chance of suffering a hack of the key.
How to Get Started With GitLab SSH Key Setup
The primary reason for making use of SSH with GitLab will be to push changes from your local Git repository to the hosted repository on the GitLab server. GitLab requires the SSH protocol to securely communicate with Git. To create and use an SSH key pair, use the following steps.
Step 1: Determine Whether You Have an SSH Key Pair Already
You may already have an SSH key pair associated with your GitLab account. You then can simply begin using this key pair, rather than going through the steps to create new keys.
Go to the home directory for the operating system you are using with your computer. Look for a subdirectory labeled .ssh/ and open it. This subdirectory will likely contain the public and private keys’ files. If you do not see this subdirectory, you do not have any SSH keys created already, meaning you will need to follow the next few steps listed here.
If you have the .ssh/ subdirectory, open it. You should see a couple of files that indicate you have public and private keys.
- Public key: The public key’s file name should start with id_ with the name of the type of key in use following. The end of the file should have a .pub designation.
- Private key: The private key’s file name should start with id_ with the name of the type of SSH key in use following.
Step 2: Create the SSH Key Pair

At the terminal window, type ssh-keygen -t before typing the type of key that you want to create. In this example, we’ll use the ed25519 key. If you want to add a comment, type -C and then the comment inside quotation marks. Any comment you add will become part of a separate file.
After you press Enter, you’ll see a message that shows GitLab is creating the key pair. GitLab will create a suggested file name and file path in which to save the keys. The majority of the time, you will want to save the key pair in the suggested file path location, so just hit Enter. You also can create your own file path and file name at the prompt.
Step 3: Create or Change Your Passphrase

Next, you can generate a passphrase to use with SSH. After you create the SSH key pair, you should see a prompt in the terminal window for entering your passphrase. You will have to enter the passphrase twice to ensure that it uses the same character string both times. If you don’t want to use a passphrase, just hit Enter at both prompts.
With SSH, the passphrase has a lot of similarities to a password. Unlike a password, the passphrase in SSH derives the private key. Once the passphrase is part of the private key, only having the private key file is of no use to a hacker. The hacker would also need to have the passphrase.
When creating a passphrase, you should use a mixture of lower case letters, upper case letters, numbers, and symbols. It should be at least 15 characters long, but 20 or more characters is even better.
If you want to change your passphrase later, just type ssh-keygen -p -f /path/to/ssh_key at the prompt and hit Enter. This should cause the terminal window to prompt you to enter your new passphrase twice, as described earlier.
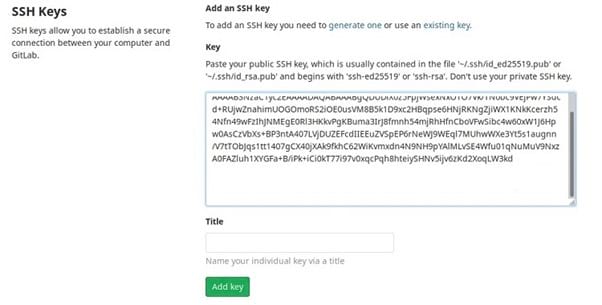
Step 4: Add the SSH Key to Your GitLab Account
![]()
Once you generate the SSH key, you must add it to your GitLab account to begin using it. First, copy the public key file’s contents to the clipboard on your computer. We are using ed25519 again as our key type in this example, but you should substitute the file name for the specific type of public key you created earlier.
- Windows: At the terminal window prompt, type cat ~/.ssh/id_ed25519.pub | clip and hit Enter.
- Linux: At the terminal window prompt, type xclip -sel clip < ~/.ssh/id_ed25519.pub and hit Enter. (To be able to copy the file’s contents in this manner using Linux, you will need to have access to the xclip package.)
- Mac: At the terminal window prompt, type tr -d ‘\n’ < ~/.ssh/id_ed25519.pub | pbcopy and hit Enter.
Next, sign in to your GitLab account. Click on your personal icon in the upper right corner of the screen. In the popup menu, click on Preferences. Along the left side of the Preferences window, click on SSH Keys.
In this window, you should see a box labeled Keys. Click inside the box and paste the contents of the public key file that you copied to the clipboard earlier.
You can add a unique name to the Title box that identifies this public key, so you can easily pick it out again later.
If you are using GitLab version 14.0 or later, you will need to enter an expiration date for the public key in the Expires At box. Finally, click on Add Key to complete the process.
Step 5: Verify the SSH Key Is Operational
![]()
You may want to confirm that you set up the SSH keys correctly. Back at the terminal prompt, type ssh -T git@ followed by the GitLab instance URL you are using and hit Enter.
The GitLab host should return a message about authenticating the GitLab host. The host should ask if you want to continue connecting. Type yes at the prompt and hit Enter. You then may have to type the same text string you typed earlier in this step to verify your request.

