The Ultimate Manual for GitLab Pipelines
DevOps teams making use of GitLab often will look for ways to use automation. By deploying as much automation as possible, the team is able to make the work go faster while decreasing the chances of human error occurring.
One of the best automation tools in GitLab is the CI/CD pipeline, which makes coding jobs more efficient. We’ll break down everything you need to know about GitLab pipelines.
What Are GitLab Pipelines Anyway?
GitLab pipelines help to ensure that code running through them meets certain guidelines and standards. By making use of pipelines, developers receive assurances that all the code they’re using in GitLab goes through the same process, ensuring consistency from project to project.
If trying to run the code manually each time, it would take longer to set up and run. Additionally, the code might not go through the exact same manual steps each time, which could produce inconsistent results from project to project.
Pipelines in GitLab work with the CI/CD process. (CI is short for continuous integration, while CD is short for continuous deployment or delivery.) You can consider pipelines as a key building block in the CI/CD process in GitLab.
When using pipelines in GitLab, developers are able to run their code for building, testing, and deploying. Pipelines make it easier for all the developers on the team to see the status of the coding project. Through the use of automated pipelines, developers are better able to see potential problems and fix them quickly.
Segments That Make Up a GitLab Pipeline
To be able to fully understand GitLab pipelines and how they work, it’s helpful to understand the terminology associated with each part of the CI/CD GitLab pipeline.
- Job: The job is the most basic segment of a CI/CD pipeline. It consists of the instructions. It handles tasks like compiling code, testing units, or checking the quality of code.
- Runner: The runner is a GitLab application that will run the jobs in the pipeline.
- Stage: The stage contains one or more jobs that are awaiting execution. Depending on the configuration of the pipeline, a stage will run and finish all its jobs before the pipeline moves to the next stage. As another option, the process will move to the next job as soon as one job finishes, regardless of the stage in which the job exists.
- Pipeline: The pipeline contains all the other segments. When you push a new commit to your GitLab account, the pipeline will execute the jobs and stages in the desired order, making use of the runner.
Improvements to Pipelines in GitLab
In the early days of using pipelines with CI/CD, GitLab did not make them very easy to use. They had certain built-in limitations that made it difficult for team members to collaborate on the pipelines. Troubleshooting and auditing were extremely difficult too. With a lack of flexibility in pipelines, developers could not roll back to a previous version and discard recent changes, either.
Pipelines in recent versions of GitLab became easier to implement and easier to configure for individual use by making use of the YAML programming language. GitLab calls this type of design pipeline as code. Some of the benefits that making use of YAML and pipeline as code offers include:
- Revert to previous versions: GitLab now tracks any changes to the pipeline over time and simplifies the process of turning back to a previous version.
- List of changes: By tracking changes through the use of pipeline as code, the pipeline tool is able to show all the team members exactly which changes occurred, when they occurred, and who made them.
- Collaboration on the code: Team members now can collaborate on pipelines, making suggestions for improvements and updates.
- Use of templates: Developers can add templates or code snippets to the pipeline to share notes and ideas.
How GitLab Pipelines Work
To prepare to make use of GitLab pipelines, you will need to follow a few steps.
Prepare the Runner
You will need to install and register the GitLab runner on your computer before you can use pipelines. The runner has multiple versions available, so you can find one that will work on all the major operating systems.
Download the GitLab runner that matches your operating system. Within your project in GitLab, then click on Settings, followed by CI/CD. Within the Runners section, click on Show Runner Installation Instructions to find the instructions that match your operating system to perform the install.
Run the Pipeline
After installing the GitLab runner, you then will need to create a YAML file to provide the instructions for the CI/CD pipeline. These instructions should include the types of jobs the runner will execute, the order in which the jobs will execute, and any instructions for special circumstances that the runner may encounter.
To create the YAML file, you will need to open your project window in GitLab. Then click on Project Information, followed by Details. Above the list of files, click on the button with the plus icon, followed by New File.
Create a file name for the YAML file with a .yml file name extension. Add the code for running the pipeline and then click on Commit Changes. The next time you push a new commit to GitLab, the pipeline will run.
To provide additional information on the CI/CD pipelines in GitLab, we’ll discuss some of the most common types of pipeline architectures you can choose to use.
Example 1: Basic
A Basic pipeline lives up to its name by having a very simple design. As you might expect, it works especially well with pipelines that have little-to-no complexity to them. When your GitLab project does not consist of many jobs, it will be easy to maintain and deal with errors through the use of the Basic pipeline.
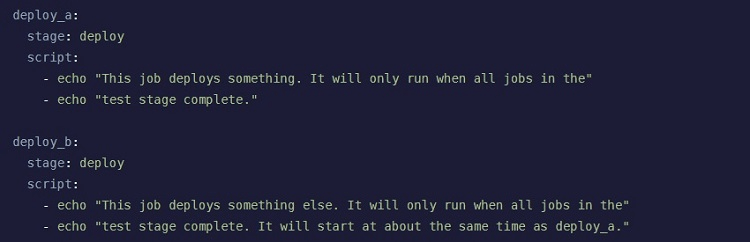
Basic will make use of three stages: build, test, and deploy. It always runs those stages in that order. The Basic pipeline will run and complete everything in the build stage before moving to the test stage. It then runs everything in the test stage before moving to the deploy stage.
Because this is a simple process, the Basic pipeline design does not allow for much complexity in the design of the pipeline. Additionally, when the Basic pipeline consists of a large number of jobs, it can become confusing to manage for developers. With a significant number of jobs in the pipeline, the Basic design loses some of the efficiency benefits it provides, even if the overall design of the pipeline remains simple.
Example 2: Directed Acyclic Graph
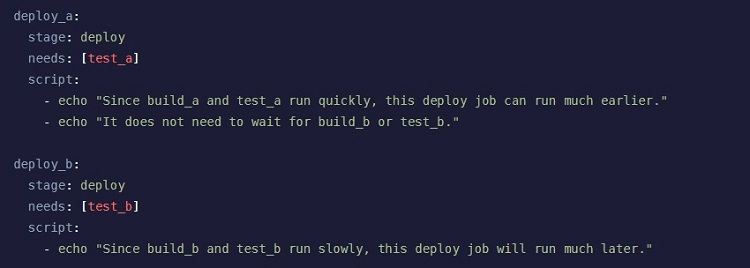
The primary advantage of Directed Acyclic Graph (DAG) pipelines in GitLab is that they give you the ability to run pipelines quickly and efficiently. Rather than waiting for each job inside the stage to complete, this pipeline will run the jobs in parallel. When one job is ready to move to the next stage, it begins running, even if other jobs are still in the first stage (as long as the completed job isn’t dependent on a still-running job).
The DAG pipeline works best for projects that have quite a few dependency relationships between the jobs in different stages.
To make the most of the DAG pipeline, you have to specify all the relationships between each job and stage. Without this dependency relationship information available, the pipeline often is not able to move ahead to the next stage until all the jobs in the stage come to an end.
GitLab allows you to make use of a mixture of DAG and Basic techniques within the same pipeline if desired.
Example 3: Child/Parent
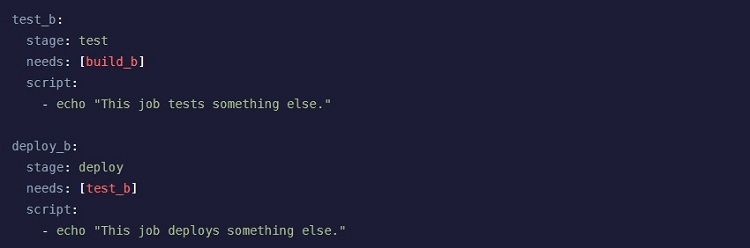
The Child/Parent pipeline design works best for the most complex pipeline designs you may want to implement in GitLab. This design allows you to create sub-pipelines, if desired, to deal with the complexity of certain designs.
The Parent segment of the Child/Parent pipeline may contain multiple sub-pipelines (the Child segments). Each Child segment will only contain the jobs it needs to perform its work. This makes it easier for you to spot errors and problems because the individual Child segments are not complex.
The Child segment could implement the Basic pipeline design, forcing the Parent segment of the pipeline to wait to operate until all the Child segments finish. It’s also possible for the Child segment to use the DAG pipeline design, where the Child segment would move through its stages without waiting for all other unrelated Child segments within the Parent segment to finish.
Example 4: Merge Request
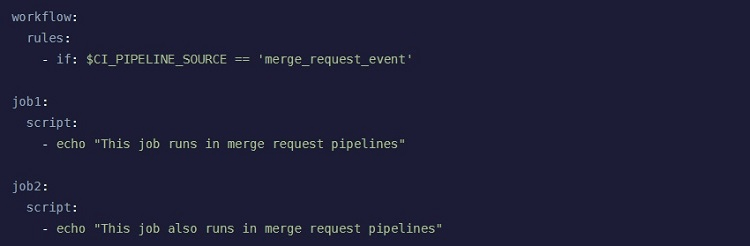
A Merge Request pipeline is a little different than the other three types of pipeline designs we listed, as it deals with how and when the pipeline will run, rather than with the specific design. If you would like your pipeline to run each time you push new commits to a branch, you can use the Merge Request pipeline, for example.
To make use of the latest features of the Merge Request pipeline, you will need to be using GitLab version 14.9 or newer. Additionally, you must be using a GitLab repository, rather than an external repository.
How to Get Started With GitLab Pipelines
Because making use of GitLab pipelines can be a complex process, it’s not always easy to understand how the jobs are working. Some jobs may run in parallel, while others may run sequentially, further adding to the complexity.
GitLab gives you the ability to visualize the pipelines you are using through the creation of several different graphs. Each type of graph gives you a different look at the pipeline process.
Start by clicking on a pipeline in your list of current pipelines and historical pipelines. In the next window, click on Pipeline in the upper left corner. Then select a graph you want to view. (To view the details in the graphs listed here, you will need to be using GitLab version 13.11 or newer.)
Step 1: Full Pipeline Graph
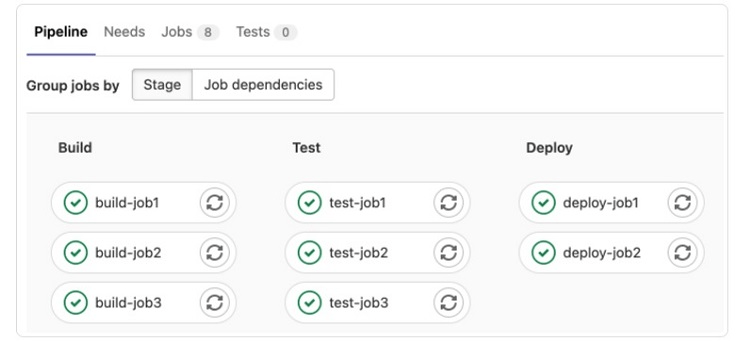
In the full pipeline window, you can group your jobs in one of two ways by clicking on the buttons in the Group Jobs By section.
- Stage: Click the Stage button to see all the jobs currently in the same stage displayed in the same column of the graph.
- Job Dependencies: Click on the Job Dependencies button to arrange the jobs based on the dependencies and needs they have. (GitLab uses the term needs when it’s necessary to execute jobs out of the traditional order.)
The full pipeline graph does have some limitations. If any individual stage has more than 100 jobs, this graph can only display the first 100 jobs. All the jobs will run properly in the pipeline, but the graph cannot display them all and give you information on all of them.
Step 2: Job Dependencies Graph
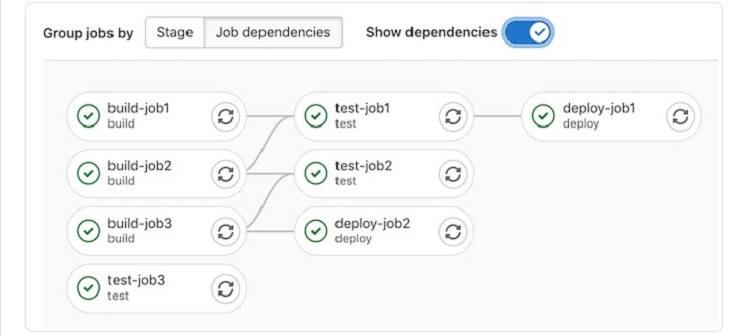
If you want the graph to display any relationships among the jobs, you can do this easily.
Click on the Job Dependencies button to sort the buttons for each job by the dependencies they have. Then click on the Show Dependencies toggle button and slide it to the right to display lines that show how each job in the list relates to the other jobs.
To see further information on the dependencies for any individual job in the graph, as well as information on whether it passed, hover the cursor over the job button.
Step 3: Downstream Pipelines Graph

On the far right of the full pipeline graph window with jobs grouped by stage, you will see a list of any downstream pipelines, if any exist. These pipelines will appear if you have multi-stage pipelines as part of the full pipeline.
From the list of the downstream pipelines, you can perform actions on them.
- Cancel: To cancel a downstream pipeline, click on the cancel button, which has a circle with a line through it in the button.
- Retry: To retry running a downstream pipeline, click on the retry button, which has two curved arrows on the button.
Step 4: Mini Pipeline Graph
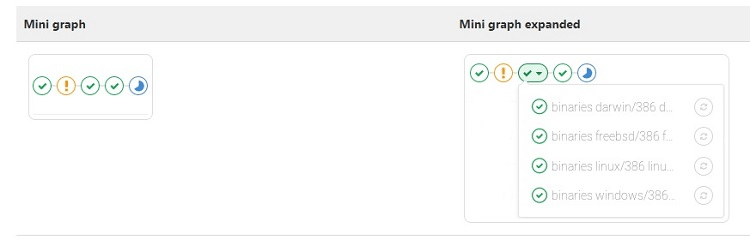
If you want to have a quick view of the status of a pipeline, rather than using the full pipeline graph, you can make use of a mini pipeline graph. Open the mini graph from the index page for pipelines in GitLab.
The mini pipeline graph will show a single commit, displaying all of the jobs related to it and any dependent jobs. The mini graph uses different labeled buttons to show the status of each job, so you can see at a glance whether any jobs failed.
When you hover the cursor over the top of any of the labeled buttons, you will see a list of each job related to that button. You’ll see the name of each job and its current status. If any of the jobs failed, you would have the option of clicking on the retry button to try to run the job again.
With the mini pipeline graph, you cannot view the jobs by dependency, as you can in the full pipeline graph. You only can view them by stage and status.

