The Ultimate Manual for GitLab Permissions
Depending on your role in a particular GitLab project, you will receive certain permissions regarding taking actions for the project. These permissions settings determine the type of work you can do on the project and the types of changes you can make. We’ll help you understand the five different permissions levels that GitLab has available.
What Are GitLab Permissions Anyway?
GitLab uses permissions to determine the role of each member of the group for a particular project. Permissions define the actions that a particular member can perform. Permissions roles in GitLab include:
- Guest
- Reporter
- Developer
- Maintainer
- Owner
Rather than having to give each member of the group customized abilities to perform certain tasks and actions, you can assign each member a certain permission level. All of the team members who exist at that level will have the same set of permissions regarding the various actions they can take in GitLab. This greatly simplifies the management of the project’s actions.
Additionally, considering you can set permissions for more than 100 different actions through GitLab, trying to set each of those permissions one at a time would be overwhelming. By assigning each user to one of the five permission roles, you will save a significant amount of time.
How GitLab Permissions Work
Even though more than 100 actions exist for which you can set GitLab permissions, each of these permissions exists in a subgroup. Dealing with a dozen or so subgroups can make it easier to figure out which permission role to give to each member. The primary permission subgroups available include the following.
Analytics
With actions related to analytics, you can see how productivity, security, deployment frequency, and lead times are occurring for either a particular project or for a group as a whole.
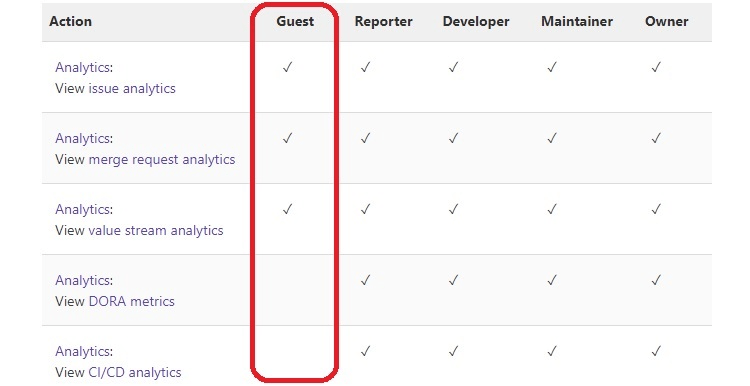
A Guest permissions role will have a limited ability to view analytics. The other four roles will have complete ability to view analytics.
Application Security
For actions related to application security, you can view details and statistics about any vulnerabilities regarding the project. Vulnerability scanners inside GitLab can measure your project to determine its potential vulnerability problems.
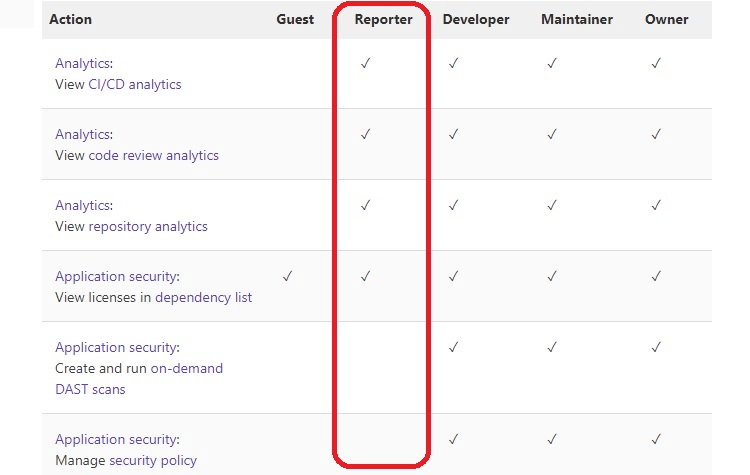
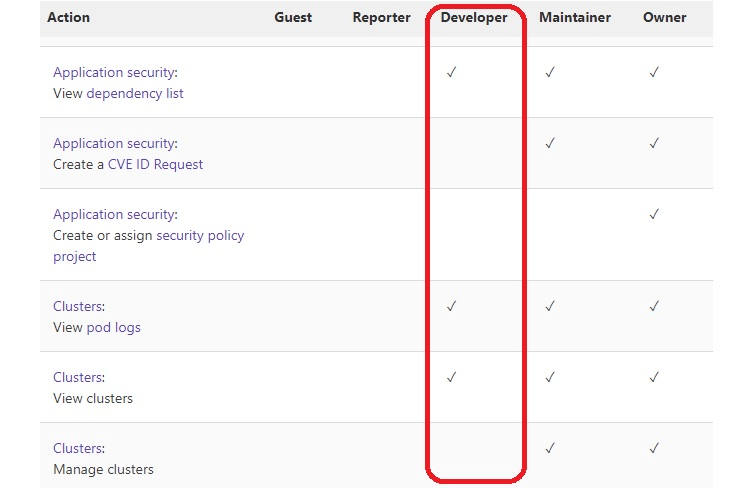
Someone with a Guest or Reporter permission role will have extremely limited abilities to view actions related to application security. Only someone with the Owner role is able to view all application security actions.
Container Registry
The container registry in GitLab is a secure registry made for hosting Docker images. Actions involved with the container registry have full integration with GitLab.
Only the Maintainer and Owner roles are able to view all actions related to the container registry. The other three permission roles have a limited ability to view such actions.
GitLab Pages
Actions for GitLab Pages deal with the ability to publish static websites directly from a GitLab repository. As long as you are using a static site generator, you can publish from GitLab Pages.
The Guest, Reporter, and Developer roles will have a limited ability to view actions regarding GitLab Pages. The Maintainer and Owner permission roles can manage all such actions.
Incident Management
Incident management actions allow members of a project to view any alerts related to the project. These alerts can pop up during the development of the code, which allows you to find potential problems early in the process, hopefully making them easier to fix.
All five permission roles have at least some capability to deal with actions related to incident management. Only the Maintainer and Owner roles can view all actions with incident management, however.
Issues
Issues actions in GitLab give members the ability to collaborate on ideas and make plans about how they will tackle certain problems.
The Reporter role can view the majority of actions related to issues, while the Guest role has a limited capability. The other three permission roles have access to nearly all issues and actions.
Merge Requests
Actions related to merge requests involve the way members are able to collaborate on proposed code changes before actually merging that code into a branch.
With merge request actions, only the Owner role has access to all of them. The Developer and Maintainer permission roles can access the majority of them. The Guest has no access to merge request actions, and the Reporter has extremely limited access.
Projects
Actions for projects in GitLab involve building, testing, collaborating, and planning code. They also involve tracking issues.
The Owner role is the only one with full access to actions related to Projects. The other four roles have varying access to projects, although the Developer role has access to nearly all projects’ actions.
Repository
Any repository actions in GitLab refer to the storing and editing of code, all of which receives tracking through version control.
With repository actions, the Owner and Maintainer roles have access to nearly all these actions, while the Developer has access to most of them. The Reporter and Guest roles have very limited access.
Security Dashboard
The security dashboard actions give you the ability to view any trends related to detected vulnerabilities that the security scanners find.
With the security dashboard actions, the Guest and Reporter roles have no access to them. Developer, Maintainer, and Owner roles have access to all these actions.
Next, we’ll provide greater detail about the five permission roles available to users in GitLab.
Example 1: Guest
Those with the Guest permission role will have the least ability to perform changes to or to view information about the project. A Guest user can read content, can create issues, and can comment on tickets, but the Guest cannot read or write to the repository. The Guest is able to view Wiki pages related to the project as well.
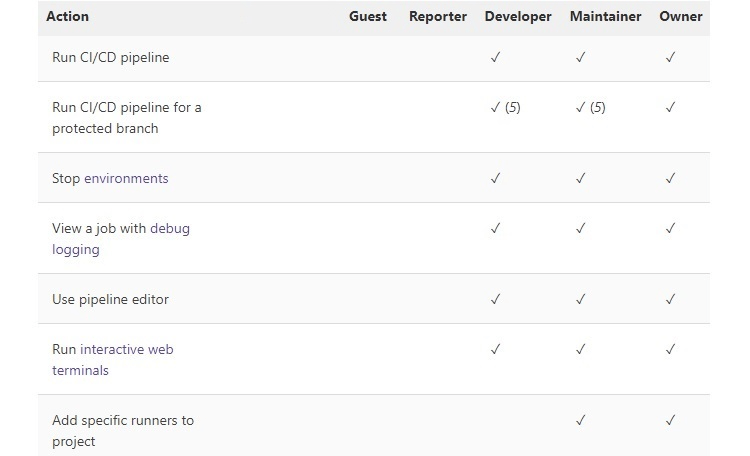
When the pipelines for the project are public, the Guest permission role is able to view the list of jobs and review a log of completed jobs.
Primarily, you would grant someone a Guest role who is a non-active member of the project.
Example 2: Reporter
The Reporter permission role is slightly above the Guest role. Those with Reporter permission are able to work with the issue tracker, while also locking issue threads. This role is able to view the error tracking list for the project.
A Reporter can create snippets of code, view statistics related to the project, and see the list of merge requests related to the project.
You should assign someone to the Reporter permission role if they need to obtain more insights about the project than someone with the Guest role, while also needing to track issues.
Example 3: Developer
The Developer permission role has significantly more capabilities to perform actions than the Reporter role. Those with Developer permission are able to clone, develop, submit, and push code. Select the Developer role for someone who needs to be able to actively contribute to the project without needing administrative capabilities.
Some of the specific actions that the Developer permission role is able to take include:
- Create new branches
- Remove certain branches
- Lock merge request threads
- Create, manage, accept, and label merge requests
- Create or update a commit status
- Delete images from a container registry
- Add tags to the issue tracker
- Create and edit Wiki pages
- Apply code change suggestions
- Create, edit, and delete project milestones
Example 4: Maintainer

The Maintainer permission role only ranks below the Owner role in terms of the number of actions available. In the Maintainer role, the member manages the overall project, as well as managing the members of the project.
The Maintainer role can take all the actions allowed in the Developer role, as well as actions including:
- Add new members to the project
- Determine write protection status for branches
- Determine write protection status for pushes to branches
- Edit the settings for the project
- Configure project hooks
- Manage job triggers
- Manage runners
- Manage environmental variables
- Manage domains
- Manage certificates
- Manage and delete GitLab Pages
- Edit comments that any user posts
- Delete Wiki pages
Example 5: Owner
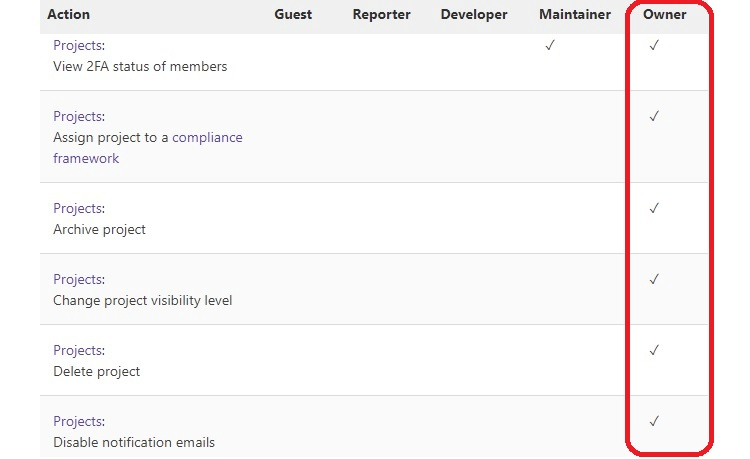
Someone with the Owner role is able to set and grant permissions for all other members. Additionally, with the Owner role, the member can delete or migrate projects, delete issues, disable any email notification settings, and change the project’s visibility status. These are actions that someone with the Maintainer role would not be able to do.
In simple terms, someone with the Owner permission role is able to control any and all actions and aspects of a project, including removing the project.
For a project that has group ownership, the project could have multiple members who hold the Owner permission role. For a personal project, only one member would have the Owner role.
Depending on the organization at which you are using GitLab, someone with the Owner permission role could be held liable for any content that is part of the project. Even if someone else created the objectionable or dangerous code and content, the member with the Owner permission role is held liable, as an Owner role should know everything about the project’s content.
How to Get Started With GitLab Permissions
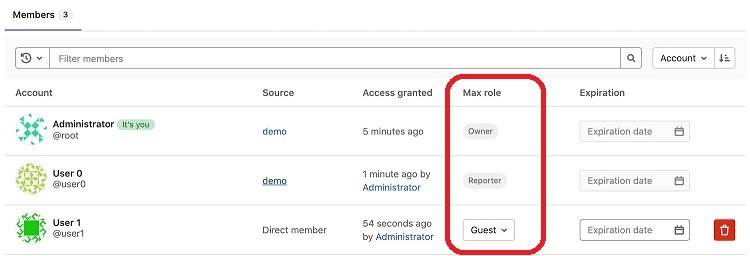
You can view which permission roles the members of your project currently have by viewing the membership list on GitHub.
We will be discussing the term maximum role throughout these steps. Maximum role for each member of the project refers to the highest level of permission that a particular member has. With the permission role set, the member has that permission role, as well as all permission roles below that one.
Before delving into the particular steps for viewing the maximum role for members of a particular project, you need to open the members list. To see the members, click Menu along the top of the GitLab window. In the drop-down menu, click Projects. From the list of projects, find the project for which you want to see the members and click on it.
Along the left side of the window, click on Project Information, followed by Members.
Step 1: Determine Permissions for Inherited Members
If you have members you inherited from another project, you may need to check the permissions for these inherited members. Inherited membership also can occur when you start or place a project into a particular group, allowing the members of that group to automatically maintain the permissions they have for the group.
Find the Filter area of the list and click on Membership. Then click Inherited along the top of the window before pressing the Enter key. You then should see the list of inherited members.
When a user comes into the group because that user is a direct member of the project that is entering the group, you can adjust the maximum role of that type of inherited user. By default, this inherited member will have the lowest permission level of Guest. However, you can change the maximum role through a drop-down menu in this window.
If a member becomes part of the project because that member was already part of the group before the project became part of the group, you would have to make any changes to the maximum role for this type of inherited user at the group level.
Step 2: Search for Particular Members
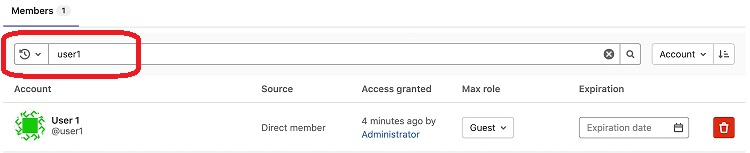
If you just need to check the permission level for a single member of the group or project, you can do this quickly.
Find the Filter area of the list and click on Membership. With the members displayed on the screen, place the cursor in the search box at the top of the screen. Start typing the name on which you want to search and then press the Enter key. You will see all members who match your search criteria. Use the Maximum Role column toward the right side of the screen to determine the level of permission for the user.
When searching, you are able to search for members using one of three options:
- Name
- User name
- Email address
Step 3: Sort the List of Members

If you want to see all members of a particular project who have a certain maximum role, you can do that through the sort option.
First, in the Filter area of the list, click on Membership. Then open the window with the members list displayed. In the upper far right of the window, you can click on the drop-down menu to select the method by which GitLab will sort the list of members. Options in the drop-down menu include:
- Account: Sorting by account should sort the list by user name in alphabetical order.
- Access granted: Sorting by access granted should sort the list by the time at which each user received access to the project with the oldest members listed first.
- Max role: Sorting by maximum role will list all the members grouped by the permissions they hold within the project.
- Last sign-in: Sorting by last sign-in will place the members who accessed the project most recently at the top of the list.
Once you select a type of sorting option in the drop-down menu, you then can select the direction of the sort by clicking the button to the right of the drop-down menu. This is a toggle button that switches the sort direction back and forth.
When you would like to compare permission levels for the members of the project, sorting by maximum role will be the best option.
Step 4: Add New Members With Their Permissions
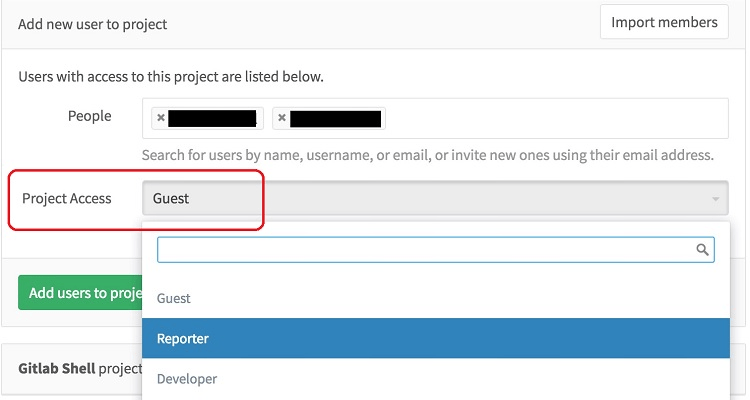
When you add a new member to a project, you will need to set that user’s permission role level. (You will need to either have Maintainer or Owner permission yourself to be able to add new members and to set the permission level for the new members.)
With the current list of members for the project listed on the screen, click on Invite Members. In the People text box, enter the email address of the person you want to add to the project as a member.
If this member’s email address is inside GitLab because that member already has a GitLab account, the member’s actual name should populate the People box. If not, the member’s email address will populate the People box. Later, the new member will receive an email reminder from GitLab about creating an account.
You can add multiple team members to this box, as long as all of them will have the same level of permission.
Then click on the Project Access drop-down menu to select a permission role for the members. (You cannot add a member with an Owner permission role directly inside the project, as you will need to do this from a group level.)
You may be able to select an expiration date for the member’s access to this project. This is an optional step. Finally, click the Add Users to Project button to make these members part of the project with the permission role that you selected for them.

