The Ultimate Manual to GitLab Jira Integration
GitLab and Jira working in tandem help development teams worldwide boost their efficiency and productivity. The problem? Setting up a GitLab-Jira integration can be confusing for some users. Worry not; our ultimate guide will show you how.
What Is a GitLab-Jira Integration Anyway?
Let’s take a look at them separately first. GitLab is a free-to-use web-based Git repository manager that offers a number of helpful project management tools and additional capabilities. On the other hand, Jira is free-to-use software primarily employed for issue tracking and project management—it enables teams to manage their work better and is known for its bug-tracking prowess.
A GitLab-Jira integration is where you combine the power of both of these tools for enhanced functionality. One of the key advantages of integration is the visibility you get into your team’s development workflow, but there are many more, as we’ll see a bit later.
How GitLab Jira Integration Works
GitLab Jira integration takes a little bit of time to set up, but it’s more than worth it in the long run. But how does it work anyway? Effectively, a GitLab project can integrate with all the Jira projects in a single Jira instance. In other words, you’ll be able to quickly detect problems, receive continual real-time updates, and navigate between the tools with much greater ease.
The tools boost your development workflow because you bridge the gap between the two sides that typically stay separate: project managers and developers. For instance, syncing GitLab and Jira allows you to use Git commit messages to mention and write comments on specific Jira issues, bolstering communication before problems emerge.
The extended functionality you gain allows teams to stay ahead of the game, from logging GitLab events in the associated Jira issue to closing Jira issues with GitLab commits and merging requests automatically. In a nutshell, you’ll be able to collaborate better at every phase of a project and create superior software—in the often tricky development process, that counts for a lot.
Example #1: Commenting on Jira Issues Within Git
You may find yourself needing to expand your team collaboration and desiring more project updates than you’re getting. By integrating Jira with GitLab, you’ll be able to use Git commit messages to reference and write comments in a specific Jira issue. For example, when a developer mentions explicit Jira issues within their Git commits by issue number, the Jira issue will receive a new comment and a handy link that refers to it.
Developers only need to refer to a ticket number in a commit message, and from there, the relationship between the Git commit and Jira ticket gets created. The result is that both developers and managers may follow its progress and stay updated. The developmental side of things gets tied together with project tracking, making things easier all around.
The best part is that once you’ve configured both tools, the rest is automatic, boosting your workflow through the roof.
Example #2: Closing Jira Issues Within Git
If you find yourself wasting time going into Jira each time to mark the closing of a particular issue and need a quicker way, GitLab Jira integration can help.
Developers know that Jira uses both a project name and issue number to refer to issues within an existing project. However, the integration of both tools means that when a GitLab project receives a Git commit message that refers to an issue, action is taken automatically in the matching Jira project. For instance, a commit message could close an issue without extra hassle.
The commit message can show intent to close the issue via the Git commit, meaning a developer can notify the project team via Jira about closing an issue without going into it and manually doing so. Centrally, the commit statement becomes attached to the issue in Jira, speeding up your workflow process up and saving much-needed time for developers.
There’s also improved transparency during the critical stages of development that come with this functionality. Software developers need to keep up-to-date on what’s happening throughout even small development projects, and the integration between the tools provides this. It creates a workflow that most developers will find hard to go back on once the integration gets set up.
How To Get Started With GitLab Jira Integration
Now you know about the value of integrating these tools, below, we’ve listed some key steps to follow.
Step 1: Know the GitLab Requirements for Jira Integration
Before you leap into the integration process, it’s important to understand the requirements based on the version of GitLab you’re using. There are two ways of using GitLab: the self-hosted route where you have to handle a few more things yourself, and GitLab.com, where most of it is taken care of for you right away.
If you’re using the self-hosted version of GitLab, you need to ensure the tool is available for Jira before anything else. In other words, make sure your GitLab instance is accessible by Jira before getting started. If you’re connecting to Jira Cloud, your instance will need to be accessible via the internet for the integration to work successfully.
Alternatively, if you’re using the Jira Server, ensure that your instance is accessible whichever way you set up your network. Getting this part wrong will stop the integration dead in its tracks.
If you’re using GitLab.com—GitLab’s SaaS offering—the good news is you don’t need to install anything else or fiddle with any settings. All you need to do is to sign in and start using GitLab. If you haven’t already got a GitLab account, you can sign up for one in just a few minutes.
Either way, as long as these requirements get met, you should be able to carry out the integration process with little difficulty. Of course, the process itself puts some people off, but we’ll take you through it in the next step.
Step 2: Configure Your Jira Cloud and Create an API Token
The title of this step might sound complicated, but it’s not as bad as you might think; grab a drink and make yourself comfortable. The first thing we need to do is set up our GitLab Jira integration by configuring the Jira Cloud. We’ll also need to create an API token in Jira Cloud to support authentications.
Start by setting up a new user in Jira under Select Administration and then User Management. From there, click Create User. Of course, you can skip this part if you already have a user created beforehand.
Now we need to create an API token. Using the Jira email address you used to register with, login to id.atlassian.com. Be aware that the user with this email address must have write access to Jira projects.
All we need to do to create an API token is to click Create API token, like so:
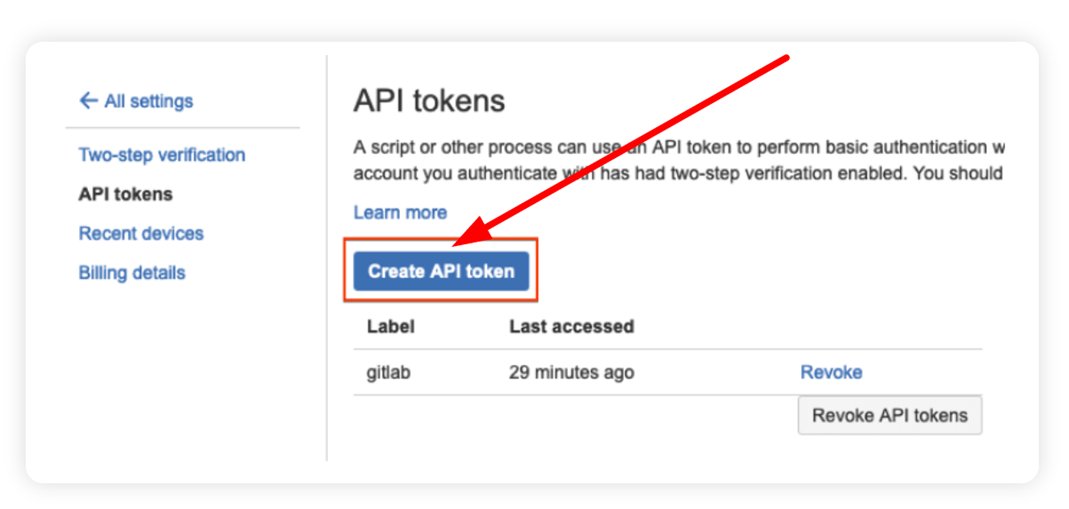
From there, copy the generated API token by clicking Copy to clipboard—we’ll need this later when configuring GitLab.
That’s the Jira part sorted.
Step 3: Configure Your GitLab in One of Two Ways
Now that we have configured Jira Cloud and created the API token, we need to turn our focus to GitLab. You can do this in two ways, and we’ll show you how to do both. The first is to use a service template that pre-fills the default Jira values for your GitLab projects. The second way is to set it up on an individual project level.
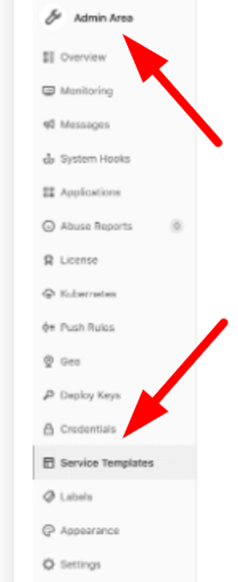
Let’s start with the service template route. To set up a service template in GitLab, you need to choose the Jira Service Template from the Admin Area and look for where it says Service Templates, as shown below:
Once you’ve done that, you’ll need to configure the issue tracking URLs for each project. You can do this by replacing issues_tracker_id with your actual external issue tracker ID. And you’re finished!
That’s the first way of doing it, but there’s another way.
The second method involves configuring your GitLab by setting up an individual project template. Some might find this second method more complicated, but it isn’t especially difficult as long as you read the fields carefully.
Start by navigating to the Integrations page and click the Jira service to permit the GitLab Jira integration, like so:
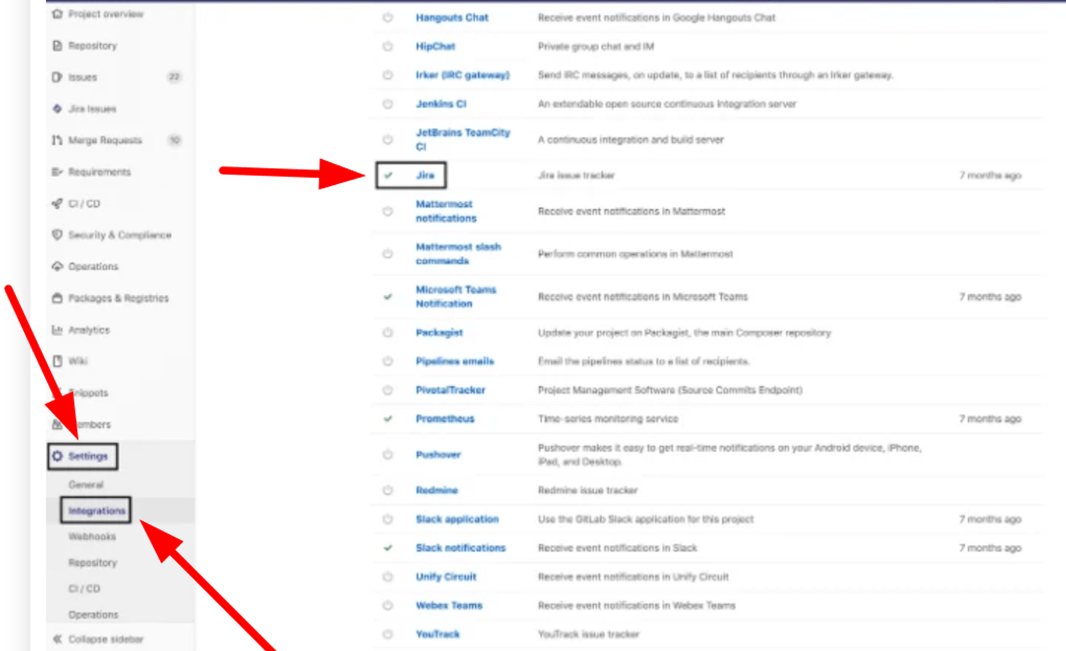
Be sure to select a Trigger action because this decides whether a Jira issue is mentioned in GitLab commits or merge requests.
The final part is where some users get lost, and that’s down to not understanding what the fields want from you. Breaking each of them down makes it easier to fill in.
So, where it says Web URL, this is the base URL for the Jira instance web interface. This URL will look something like https://jira.examplehere.com. Fill that in as required.
Next, we have the Jira API URL; this is the base URL for the Jira instance API. Not specifying this field will result in a default value getting used instead. It looks something like https://jira-api.examplehere.com.
From there, you need your username or email, the ones you used to register with Jira. Fill those in and then move to the final field, the Transition ID.
The Transition ID is needed for committing or merging Jira issues and helps connect everything up. It’s the ID for a transition that would change the state of an issue. Fill that in as required.
Once you have filled those in, your GitLab project will begin to interact with Jira and includes a Jira link that launches the project—more than helpful.
To complete the setup, all we need to do is click the green button that says Test settings and save changes, like so:

That’s it. The GitLab Jira Integration is complete, and you can say hello to a smoother workflow for the entire team.
Step 4: Know Your GitLab Jira Integration Best Practices
While your integration is now complete, there are a number of GitLab Jira best practices to keep in mind. We’ve listed them below for you:
- You don’t want to mix your deployment models. For instance, if you’re already self-hosting Jira, be sure to do the same for GitLab and even Jira Cloud. Integrating different deployment models is possible, but you’ll spend a lot of energy facing the firewall between them—this wastes time and makes things far more complex than they need to be.
- Using the integration, you’ll be able to see all the pull requests and commits by each team member over time. This functionality is great for referencing and makes it easy to see how your team handled each stage of development. You’ll find this information under Projects and then Insights.
- Using the GitLab Jira importer, you can easily import your Jira issues to GitLab.com or your self-managed GitLab—either way works. Issues from several Jira projects can be imported into a GitLab project. Just be aware you need to have read access to Jira issues and a Maintainer or higher role in the GitLab project.
- Some users find that GitLab can’t close a Jira issue all the time. This problem is often a technical one that you can fix without hassle. If you encounter it, be sure the Transition ID you set in the Jira settings matches your project’s needs to allow an issue to be closed. Also, check that the Jira issue is not already resolved and that the Jira issue resolution field itself is not set.
- Sometimes the CAPTCHA gets triggered after failed login attempts—this leads to 401 errors when testing the Jira integration. Note that if the CAPTCHA is activated, you can’t use Jira’s REST API to authenticate with Jira’s site. It’s easily fixed; all you need to do is sign in to your Jira instance and complete the CAPTCHA.
- Don’t forget that you can integrate a single GitLab project with all Jira projects within a single Jira instance—in other words; you don’t have to link a GitLab project to any specific Jira project.

