The Ultimate Manual for GitLab API
When seeking to automate certain processes within GitLab, the GitLab API is one of the best options. Rather than you and your team needing to carry out steps manually using the GitLab interface or the command line, the API automates several processes without the need for your intervention.
Making use of the GitLab API is easier when you have some background knowledge. We’ll discuss everything you need to know about the GitLab API.
What Is GitLab API Anyway?
In the most basic format, the GitLab API is a tool that helps you automate work for your team. Rather than taking the time and effort to manually perform a number of tasks in GitLab, you can set up and code the API to automate these processes.
Automation is important because it saves time and increases efficiency for your team. It also reduces the chance of errors occurring, as may happen when running tasks manually. Automation ensures that the process occurs in the same way each time, which provides consistency.
What Is an API?
Before we really delve into the various options with the GitLab API, it’s important to have an understanding of an API, short for Application Programming Interface. The API is code that allows two different applications to communicate automatically. The API eliminates the need for manual intervention from developers.
An API consists of a list of operations that the developer can use. The documentation for the API would also contain a list of what each operation can do. You simply call for an operation to occur through the API, and the API would handle the actual work to perform the operation.
The API saves time for you by handling the details of implementing operations. You simply need to specify the operation you want to use and the location of any extra data or information you want to use within the operation, and the API will take care of the rest.
APIs are not unique to GitLab. APIs are in use in a wide range of situations that you probably encounter daily without even knowing it. A few real-world examples include:
- Camera: When creating an app that will make use of a smartphone’s camera, app developers can use an API that contains the code for automatically accessing the camera, rather than forcing the app user to give access to the camera.
- Location: A website developer may want to personalize the data displayed on the website to your specific location. It can access the geolocation API in your web browser to receive this information. (Your browser’s geolocation API typically would not give this information to the website without your permission, though.)
- Chatbot: A chatbot would make use of an API to communicate with people in real time. Some chatbot APIs will use advanced machine learning techniques and artificial intelligence to automatically respond to cues in the conversations and to be able to respond to a variety of queries without manual intervention from anyone.
How GitLab API Works
The GitLab API automates a number of tasks for you. It is especially beneficial when attempting to automatically run bulk tasks.
Generating Test Reports
You may want to use a GitLab API to test a number of repositories and projects stored in GitLab, generating a report about any problems or failures that occur. The GitLab API allows you to automate this process by creating an API call that runs whenever a job fails.
Create an API call that includes the base URL, the group resource, and the resource in which to store the issues. The API then automatically collects these issues, preparing to display them for you.
Another API call can publish the issues as part of the Wiki for the project. All of this occurs automatically, so you and your team can simply see the results, rather than having to worry about trying to manually generate the report of the issues.
Obtaining Private Information
Although the majority of GitLab API calls will involve obtaining publicly available information and making use of it, the GitLab API also can access private information. As part of the API call, you will have to provide coding that authenticates your request for this private information.
The GitLab API process allows you to obtain personal access tokens to gain authentication. In your GitLab user profile window, you can click on Access Tokens along the left side of the window. Give the token an easily identifiable name in the Name box and then place a checkmark in the API checkbox in the Scopes section. Finally, click on Create Personal Access Token at the bottom of the page.
Copy the personal access token and add it to your API call request. You then can have secure access to the private information for which you have authorization, as the API will authenticate your identity automatically.
Types of GitLab APIs
Three types of GitLab APIs are available, as we’ll discuss in the following sections. The REST API is the most popular type of GitLab API, followed by the GraphQL API and then the SCIM API.
Example 1: REST API
The REST API is the most common type of API in use with GitLab. It gives you and your development team the ability to create new applications and make use of existing applications with GitLab. The REST API works to do things like manage users, manage project information, create groups, assign tasks to users, and retrieve lists of users.
REST API can automate some of the most common tasks that you may need to perform within GitLab. It also is a strong choice for automating tasks that require quite a bit of time to do manually because of the large amount of data that is in use.
The attributes you can use as REST API resources in GitLab are available in two different segments of projects and groups. The GitLab REST API also contains a number of attributes that GitLab classifies as standalone, meaning they don’t fit into either the groups or projects segments.
Projects
![]()
Within GitLab, the projects segment of the REST API most commonly serves as the host for your code. However, you also can use the GitLab projects API to do things like collaborate on the code, make plans on how to handle the code, build the code, and test the code. You can use CI/CD with the API to deploy the project.
When running a project using the GitLab API, you can specify one of three options for the API call’s Visibility field. This field determines how others can interact with the project.
- Private: A private project means that you as the project owner will need to give contributors direct access to the project.
- Internal: Any user who is part of your group on GitLab will be able to access the project without requiring specific permission.
- Public: Any GitLab user can gain access to the project.
When a user makes a call to see all visible projects, only those projects that the user has the ability to access will be part of the display. Rather than having to manually assign authentication for each user, the use of the Visibility field in the API call will automate this process.
Groups
![]()
The groups segment in the GitLab REST API is able to create a list of any groups in which the authenticated user is a member. If you are making use of groups within the REST API, but you are not listing any authentication information, the results will only display groups publicly open to all GitLab users.
You do not have to use attributes with the groups segment, but some of the most popular optional attributes are:
- Search: Use the search string attribute to narrow the returned list of groups to those that have a name matching the search criteria.
- Sort: Use the sort string attribute to list the groups in either ascending or descending alphabetical order.
- Owned: Use the owned boolean attribute to list only those groups that the current authenticated user personally owns.
In addition to viewing a list of the groups in which you are a member, you can see information about those groups. Some of the information you can obtain through the use of group attributes in the REST API format include:
- Projects available to a group
- Projects shared with the group
- Any avatar in use for the group
- Any badges in use for the group
- All of the group’s subgroups
- Details of the group
- Any push rules in place for the group
Example 2: GraphQL API

The GraphQL API allows the API request to focus on a limited amount of information. This API allows for queries for data retrieval. It provides options for creating, updating, and deleting data. You also can use the GraphQL API to sort objects on specific criteria.
To make use of the GraphQL API, you can call it from the command line or from the GraphiQL user interface.
- Command Line: From the command line, you can run your GraphQL API queries using the cURL command on the command line to introduce the request. (We’ll discuss cURL in more detail in the last section.)
- GraphiQL: The GraphiQL interface allows you to run queries directly against the GitLab server.
Example 3: SCIM API

The SCIM API is in use far less often than the other two types of GitLab APIs. (SCIM is short for System for Cross-domain Identity Management.)
The SCIM API became available in GitLab version 11.10. You will use the SCIM API to implement the RFC7644 protocol, which is a protocol for managing identity data on the web, as well as for managing and representing users and groups.
One of the most common uses for the SCIM API is to return a single user or a list of users who match identifying parameters. The following attributes are available to use with the SCIM API. (Only the group_path attribute is required; the others are optional.)
- The group_path attribute is a required string attribute that indicates the path toward the group.
- The filter attribute is a string attribute for filtering the results.
- The startindex attribute is an integer attribute that indicates the correct position in the file from which to begin returning results.
- The count attribute is an integer attribute that indicates the maximum number of results to return.
How to Get Started With GitLab API
When making use of the REST API in GitLab, you will need to create a Markdown file. The Markdown file requires a number of different items
Step 1: Description of the Method

You will set up a table that describes the methods using attributes. When creating the table, all required attributes should be at the top of the table.
Each table must start with a title attribute. Other attributes are optional, depending on the requirements for the REST API request.
Step 2: cURL Command
![]()
The cURL (short for client URL) is a command line tool. It gives you the ability to request a data transfer from the server. You’ll use the cURL command followed by a URL to specify the exact location of the server that contains the data you want.
When using the cURL command, you have a few different types of tasks you can implement by adding a command after typing curl in the Markdown file.
- Use the –data command to create a new project under the namespace for the authenticated user.
- Use the –header command to obtain the details of a certain group.
- Use the –request command to create a new project where you want to append the parameters to the URL.
The request command has subcommands you can use, including DELETE to remove existing objects, POST to create a new object, and PUT to update existing objects.
Step 3: JSON Format

As part of the cURL command, you can add a request type using the JSON (or JavaScript Object Notation) format. JSON attempts to simplify the exchange of data with the server. When using JSON in an API, it reduces the number of requests from the client to the server, making the entire process more efficient.
The REST API in GitLab makes use of JSON to serialize data. You have a few request types you can make using JSON.
- Use the GET request type to access a resource and to return the results as JSON.
- Use the POST request to determine whether you created the resource correctly as JSON. You will receive a 201 Created return value when this request is successful.
- Use the GET and PUT request types together to determine whether you accessed the resource correctly as JSON. You will receive a 200 OK return value when this request is successful.
Step 4: Higher Level Tiers for Attributes
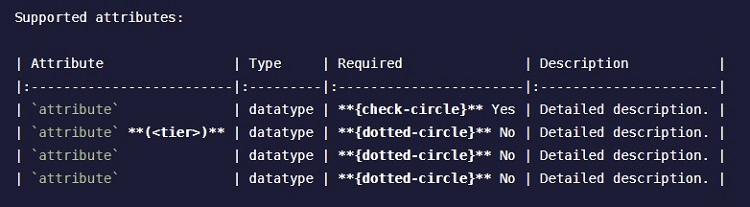
When building the REST API resources in the Markdown file, you may have some attributes only available in higher-level tiers versus the other attributes. You can assign a tier badge in the Markdown document to specify these higher-level tiers. This is an optional step.

