The Ultimate Manual to GitHub Workflow
GitHub users looking to automate certain processes can make use of GitHub Workflow. This consists of a series of commands, or what GitHub calls actions, that will run any time your repository encounters a certain event.
We will discuss the key items you need to understand to make use of GitHub Workflow.
What Is GitHub Workflow Anyway?
Workflow in GitHub automates a variety of tasks that you may want to complete during the lifecycle of software development. You can set up the GitHub action commands to run any time a certain event takes place. The event triggers the commands, which ultimately become the GitHub Workflow.
Workflow will contain a series of commands that perform the desired automated task. GitHub calls these commands actions, jobs, and steps.
What Is GitHub?
Developers use GitHub to store code and manage different versions of their code. Developers are able to protect certain parts of the code while they work on other parts.
GitHub is a cloud-based service that provides an easy-to-use interface and framework for developers wanting to use Git. Git is an open-source software system that developers can use to manage code.
Even though Git is open-source software, GitHub is a for-profit company. Developers can make use of Git without using GitHub, but GitHub’s interface makes the process easier.
GitHub Pricing
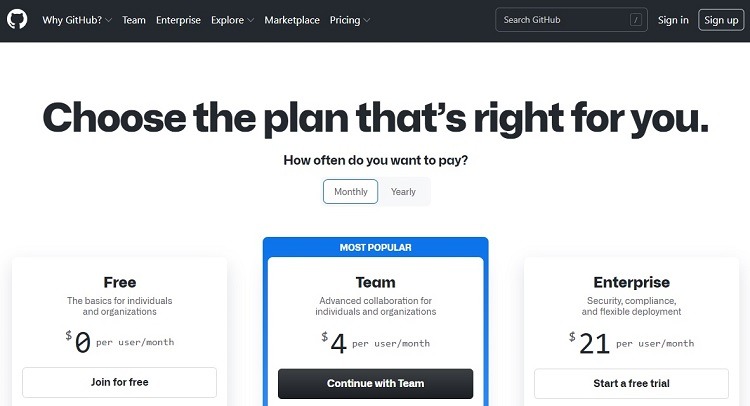
GitHub offers three different subscription tiers for developers, two of which carry a price and one of which is free. Each tier has a different set of features that aid with GitHub Workflow.
Running GitHub commands as part of Workflow is part of the subscription price for each tier. However, each subscription tier has a limitation on the number of automation minutes for running commands that are available per month. (To deploy actions in GitHub Workflow, subscribers will be using automation minutes.)
For month-to-month subscribers, once they hit the limitation on the number of automation minutes, they cannot add more minutes for an additional cost. Other types of accounts, such as those with the annual billing payment option, may offer the ability to purchase additional minutes for the remainder of the month after hitting the limit.
- Free: The Free tier is not a free trial period. Instead, subscribers can continue using it as long as they want into the future. Free tier subscribers will have access to 2,000 automation minutes per month.
- Team: The Team tier is GitHub’s most popular tier. It is available for $4 per user per month. It includes the features found in the Free tier, along with a higher level of customer support. Subscribers will have access to up to 3,000 automation minutes per month.
- Enterprise: Subscribers to the Enterprise tier receive all of the benefits found in the Team tier, along with automatic security protocol updates, automatic software version updates, and SAML single sign-on capabilities. Subscribers in this tier receive up to 50,000 automation minutes per month.
Keep in mind that a GitHub host that uses Windows to run jobs will consume minutes up to two times faster than using Linux. For those using macOS, it may consume minutes up to 10 times faster than Linux. If you will be using macOS or Windows instead of Linux to run the commands that are part of GitHub Workflow, you may need to upgrade to a higher subscription tier to meet your automation needs.
How GitHub Workflow Works
To deploy GitHub Workflow, you will add the automated procedure to your GitHub repository. Once an event occurs, you can set up Workflow so that it triggers one or more jobs. Some of these jobs may include:
- Build a project
- Test a project
- Release a project
- Deploy a project
It’s even possible to reference another Workflow from the original Workflow. Setting up a GitHub Workflow can involve a simple process, a highly complex process, or something in between, depending on what you need it to do.
Parts of a GitHub Workflow
The GitHub Workflow is the primary aspect of running the automated process. It consists of several components.
- Action: Each command issued as part of the GitHub Workflow is a GitHub action. These actions are standalone commands, but they also can work in tandem as a series of commands, called a job. An action and a step will have a similar definition within GitHub Workflows.
- Event: To trigger a GitHub Workflow, an event must occur. If someone makes a pull request from your repository, for example, this may qualify as an event. You will determine which events that occur within GitHub will trigger an automated GitHub Workflow.
- Job: A job consists of individual steps or actions. You can set up the jobs within GitHub Workflow to run one after the other or to run in parallel. If setting up the jobs to run sequentially, you can have the GitHub Workflow start a new job only if it completes the previous job successfully, similar to an if-then programming technique. This feature can help with complex situations within GitHub.
- Step: Each step in the GitHub Workflow configuration is an individual task, consisting of an action or a shell command. The tasks that make up a step will work in combination to create a job.
Example 1: Make Use of a Template

GitHub offers the ability to use templates with GitHub Workflow. This is a significant time-saving function, as you can borrow some or all of the code from these templates, rather than having to create everything from scratch.
If you have a useful GitHub Workflow created that your organization could use again in the future, you also can create a template from this already-created file.
The majority of users will have a limitation in using Workflow templates to create actions within public repositories. Those who subscribe to the Enterprise tier of GitHub may be able to use their Workflow templates to create actions in either public or private repositories.
To use a GitHub Workflow template, open the main page of your repository. Click Actions along the top of the page. Search through the list of templates to find the one you would like to use and click on it. Then click on Set Up This Workflow. (You may need to click New Workflow to see the list of templates.)
Make any changes required to ensure the template will work for your specific needs. Click on Start Commit to start using the template.
Example 2: Determine Which Event Will Trigger the Workflow
Before you can begin to make use of GitHub Workflows, you will want to figure out which type of event will trigger the action. Some of the most common event options include:
- Create: When someone on your GitHub account creates a branch or tag, you can use the Create event to generate a GitHub Workflow action. This automatically alerts other team members to this type of action.
- Delete: When someone deletes a certain branch or tag in a folder, you can set up a GitHub Workflow that will alert other users to this occurrence with the Delete event. Through the instructions in the Workflow file, you can ensure the Delete event only runs when the deletion occurs in a certain folder, rather than in any random folder that’s part of the GitHub account.
- Push or Pull: Whenever someone pushes code to your GitHub repository or makes a pull request, these events can trigger a Workflow action. Push events and Pull events are among the most common reasons to use GitHub Workflow.
- Schedule: Use the Schedule event to create a GitHub Workflow action at a specific time or day, regardless of what else is happening in your GitHub repository. The Schedule event may occur on the same folder of the repository each time, or it can run based on the last action someone took with the GitHub account.
Finally, account owners can trigger a Workflow action manually whenever desired. You’d use an event called workflow_dispatch to manually run the action.
Example 3: Create a Message Through a Workflow Action
When a user on your GitHub account performs a certain action, you can use GitHub Workflow to create a message for the user and for the GitHub log. These messages can include errors or notices that alert the end-user to a mistake. And by adding the message to the log, you can see each time the system generated the message when you check the system later. The message options for the GitHub Workflow file include:
- Error: The Error message provides information about an error that the user makes. If the software has some bad code in it, this also could generate an Error message.
- Notice: The Notice message is able to generate a message related to a particular file in the repository. It even can generate a message about a specific position in the file that is causing an issue.
- Warning: The Warning message can alert the user when he or she makes a common mistake in syntax when entering a command into GitHub. It can help the user correct the error and move toward the desired outcome.
Example 4: View Logs for Workflow Action History
If you want to see whether the GitHub Workflows associated with your account are running as expected, you can check the logs. These logs can give you an idea about any errors that occur when your GitHub Workflows run.
GitHub generates a log file that will provide information on the status of the action. GitHub should generate these logs automatically for you and store them with your GitHub account.
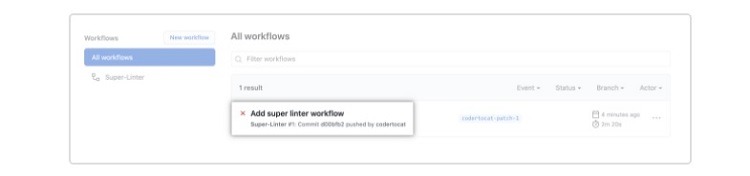
To view the log, click Actions along the top of the GitHub page. If you have more than one log available, select the one you want to view along the left side of the screen. A list of different GitHub Workflow actions will appear in the right side of the window. Click on the name of the action you want to view
You’ll then see individual jobs listed on the left side of the screen. You should see the status of each job on the right side of the screen. Click on one of the links on the right side to see details.
How to Get Started With GitHub Workflow
When working with GitHub Workflow and actions, you will work with YAML syntax. This syntax must follow a particular set of rules and commands in the file. These commands will result in an action metadata file with a .yml or .yaml file extension.
To create a YAML file that you will use to track a GitHub Workflow, follow these steps.
Step 1: Create the Workflows Directory
You need to have a directory created in the root of your GitHub repository to hold your code for the GitHub Workflow. This must be the workflows directory.
To create this directory, navigate to the root of your GitHub repository. Then click on the New File command. In the text box, add the directory name to create, which should be workflows in this example, followed by a slash character. Click on the button to create the folder.
Step 2: Create the File for the Workflow
Navigate to the Workflows folder you just created. Click on the Add File button and select Create New File from the drop-down menu.
In the text box, type the file name, along with the file extension. The file name extension for this example should be either the .yml or .yaml extension.
Toward the bottom of the page, if desired, type a message name in the text box that describes the file. If you have more than one email address associated with GitHub, select the email that signifies the author of the file.
Click Propose New File button to create the file.
Step 3: Add Content To the YAML File
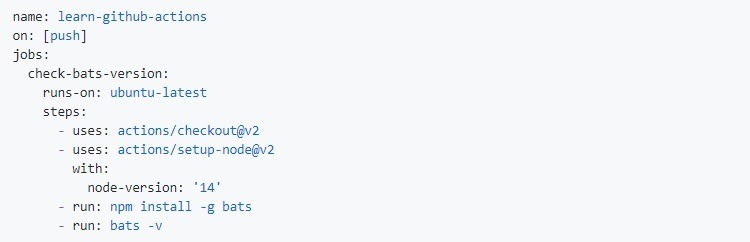
You will need to add a few sections at the top of your YAML file that will run the GitHub Workflow.
- Name: Add the name of the GitHub Workflow action to the Name section at the top of the file. GitHub displays this name while running the process, making it easy to identify.
- On: Underneath the Name section, add an On section that will tell GitHub which type of event should trigger this particular GitHub Workflow.
- Jobs/Steps: Use these two sections to set up the coding areas that will trigger the desired action.
Finally, add the coding that will create the GitHub Workflow action. Save the file and push it to your GitHub repository. Whenever the designated event occurs, GitHub should run this action.
Step 4: Test the GitHub Workflow
You can test the GitHub Workflow action to make sure that it is working properly.
First, perform the action that should trigger the GitHub Workflow you created. Depending on the complexity of the GitHub Workflow you’re running, it may take a few minutes for the action to run and complete.
Then navigate to your GitHub repository. Click on the Actions button. GitHub will generate a report that shows any actions occurring in your account. Toward the top of the report, you should see a listing that contains the message name you entered when you created the file (as we described earlier).
Click on this listing in this report to see more details about the file. It should let you know whether the action completed successfully or unsuccessfully. If it was a successful run, click on the job name to see a step-by-step listing of the GitHub Workflow action.

