The Ultimate Manual to GitHub Pull Request
GitHub is a popular cloud-based service that allows coders to create and manage different versions of their code. Through this management process, coders can use GitHub pull requests to notify team members about potential changes that need review and collaboration.
We will help you understand how to use GitHub pull requests and their importance.
What Are GitHub Pull Requests Anyway?
The GitHub pull request is a request for the people that maintain a repository to accept code that will make changes to the repository.
With a GitHub pull request, you can alert others to any coding changes you pushed to a branch in a repository on GitHub. With the pull request active, those who are part of the collaboration process can review the proposed coding changes. They can suggest tweaks or other changes, or they can simply comment on the proposed changes.
Eventually, the changes may become part of the main branch in the repository. Or the collaborators may decide that the proposed code changes will not work for the main branch.
What Is GitHub?
GitHub provides a means of managing different versions of code. Developers can protect certain segments of their code while they work on other segments. GitHub also makes the process of collaborating on code a far easier process.
GitHub is a for-profit service aimed at those who want to use Git, which is an open-source software package. Git gives developers a means of managing different versions of the code they’re creating.
As open-source software, Git itself is free to use. GitHub enters the picture by creating an interface that simplifies using Git. By subscribing to GitHub, using Git becomes far easier. Coders are more efficient with Git when they subscribe to GitHub.
GitHub Pricing
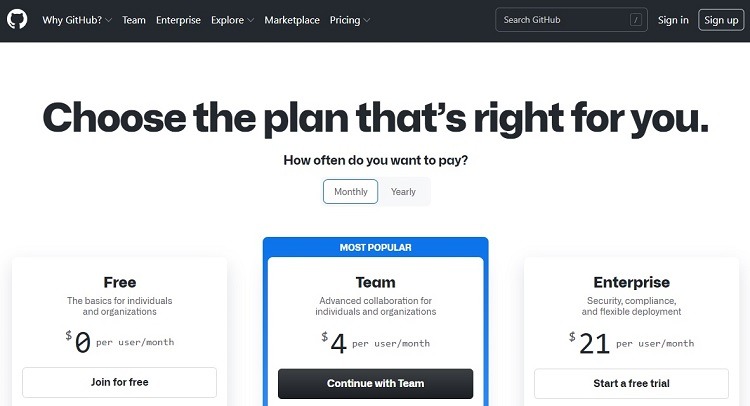
Depending on your needs for GitHub, you can subscribe to one of three tiers. Two of the tiers carry a monthly subscription price, while one is completely free to use, although with limited features.
All three subscription tiers allow pull requests. The complexity and depth of the pull requests change in the upper tiers, though.
- Free: Rather than serving as a free trial period, the Free subscription tier is free to use at all times. Those using the Free tier can make basic pull requests, including giving collaborators the ability to provide notification of changes that they push to a repository.
- Team: The Team tier includes all of the features found in the Free tier, along with dozens of extra features. In terms of pull requests, the Team tier allows you to assign multiple other users or an entire team to review the pull request. You can assign one or more users to handle a pull request. Additionally, Team tier users can create draft pull requests, which will undergo extra collaboration and review before reaching the formal submission phase. The Team tier costs $4 per user per month.
- Enterprise: The Enterprise tier includes all of the features in the Team tier, as well as advanced security features. The Enterprise tier provides automatic version updates as well. The Enterprise tier contains all of the pull request features found in the Team tier. You’ll pay $21 per user per month to subscribe to the Enterprise tier.
How GitHub Pull Requests Work
When you make a pull request, you are asking the party that manages the repository in GitHub to accept some changes to the code that you are proposing. The pull request alerts the repository manager to the proposed changes and allows the manager to review them.
After reviewing the changes, the manager then has a few options.
- Accept the changes and implement them.
- Reject the changes.
- Ask for some additional editing before having you resubmit the changes.
Through a pull request, you can specify that certain people beyond the manager receive notification of the proposed changes. This is an extremely helpful feature when you want to be able to receive feedback from multiple people about the changes you are requesting.
As people collaborate on the pull request, all of the changes and suggestions occur outside of the main branch, so no changes become active until the changes receive approval.
Example 1: Benefits of Using Pull Requests
The primary benefit of using a pull request is that it keeps changes you are considering separate from the main branch. None of the changes become active until they go through the full vetting process. There are a few other benefits of making use of pull requests.
- Discussing code changes: By having more people look at the code through the pull request, rather than just implementing it immediately, it’s easier to make sure the coding changes will actually fit the goals for the project. Having multiple opinions on the direction of the code will nearly always yield better results in the long run.
- Streamlining feedback: Through the pull request, comments and suggestions about the code will reside in one place. This simplifies the process of going back and reviewing the comments later. It also greatly reduces the chances of glossing over or forgetting about an important comment. Additionally, feedback can link to a certain portion of the code, making it easier to address specific issues.
- Debugging the code: When multiple coders take a look at a piece of code, the chances of finding errors or potential problems will increase. Rather than activating a piece of code that has bugs, the pull request process in GitHub hopefully will allow the organization to clean up the code before it goes live.
- Cleaner merging: When it’s time to merge a pull request with the main branch and implement the changes, users can clean up the comments, removing those comments that don’t really explain the changes. This presents a more streamlined final coding project that will be easier to decipher when others are reviewing the changes to the code later.
Example 2: Closing a Pull Request
Sometimes, you may make a pull request that doesn’t end up merging into the main branch. Perhaps the manager or the team members decide that the pull request is not going to fit the project. Perhaps the organization chooses to use another pull request that incorporates some of the ideas from your pull request.
Depending on the way your organization works, this could occur quite frequently. Some organizations use pull requests as more of a way to flesh out ideas, most of which never end up in use. Other organizations only generate pull requests for ideas and code changes that are almost certainly going to be put to use and that just need a little bit of tweaking. Some organizations follow both paths, depending on the project.
Regardless, you can close a pull request without merging it into the main branch. The closing process ends the pull request.
To close a pull request, start at the repository window. Click the Pull Requests tab. You’ll then see a list of all of the active pull requests. Click on the pull request that should close. In the subsequent window, scroll toward the bottom and click the Close Pull Request button.
Another option is to delete the branch from which you generated the pull request. Deleting this branch will also delete the pull request, as the coding changes contained in the pull request will no longer be available.
How to Get Started With GitHub Pull Requests
To create a pull request in GitHub, follow these basic steps.
Step 1: Create a Repository
Within GitHub, you’ll use repositories to organize a project. The repository will contain all of the folders, files, images, and other information related to the project. Any data the project needs to operate will be in the repository.
Making use of GitHub pull requests requires the use of a repository. You may have a repository in place already. If not, you will need to create one.
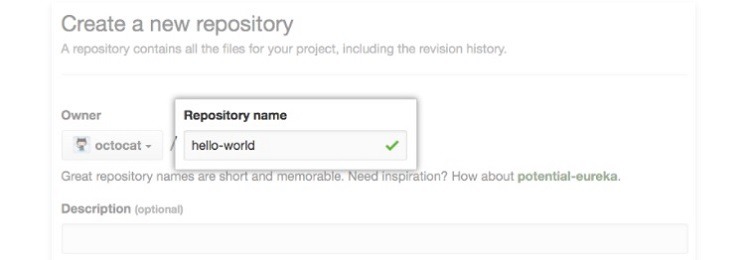
Click on the plus sign in the upper right corner of the GitHub window. In the drop-down menu, click on New Repository. Then create a unique name for the repository. You can add a description for the repository in the text box if desired. You also can add a Readme file to provide further explanation.
Finally, click the Create Repository button to finish the process.
Step 2: Create a Branch
Branches are important to the way GitHub works. Branches allow you to protect one version of the repository while you work on another version.
A repository always has one branch, called the main branch. When adding another branch to the main branch, you’re creating a copy of the main branch. You then will make any potential editing changes in the new branch. Eventually, you will decide whether to apply, or merge, the changes in the new branch into the main branch.
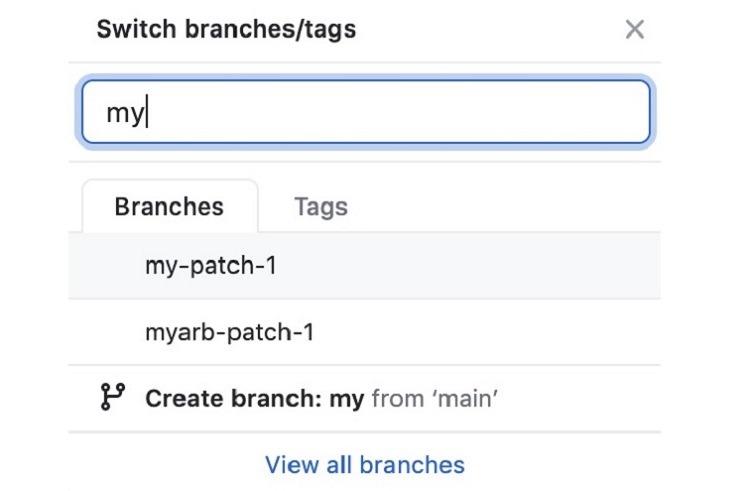
To create a new branch in which you can work separately from the main branch, click Code at the top of the repository window in GitHub. Along the top of the new window, you should click on the Main drop-down menu. You’ll then see a text box. Enter the name of the new branch that you want to create and use in the text box.
Toward the bottom of the window, you’ll see a Branches tab. This tab should be active, but you may need to click on it if it isn’t active. Underneath the Branches tab, click on Create Branch.
Once you create the new branch, GitHub will automatically place a copy of everything contained in the main branch into your new branch.
Step 3: Make Changes to the New Branch
You now are ready to make changes and edits to the files in this new branch, while leaving the main branch alone. After a pull request, should you and your team later decide to accept the changes, you then can merge them into the main branch.
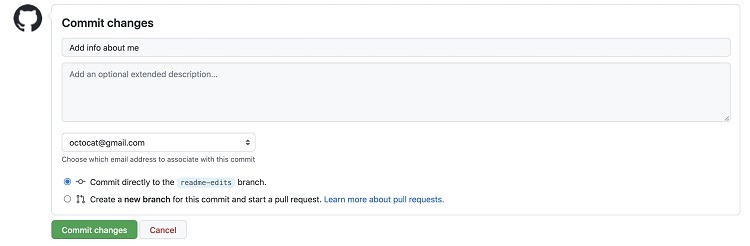
After completing Step 2, GitHub automatically will open the coding area for your new branch. You can make changes to the files in this new branch and save those changes. GitHub calls these saved changes commits.
Each time you make a commit in this new branch, GitHub will give you the chance to create a commit message. This simply is an explanation of the change made, which allows other team members to review and understand the changes after you make a pull request. As the other team members are reviewing your changes, the commit messages provide valuable insight, so take this step seriously.
Step 4: Make a Pull Request

After making some changes to the new branch, you are ready to create a pull request, so others can receive notification about your changes, giving them a chance to review the changes. After you make the pull request, others on the team may agree with the changes you are proposing. A team member with permission then may merge your changes into the main branch, making the changes active.
You are able to make a pull request as soon as you save a commit in the new branch. You only have to make one commit to create a pull request, although you can complete several commits before generating a pull request.
Making a pull request after a simple change to the code allows you to obtain feedback about the direction you are heading. If others disagree about the direction you are going with your changes, you will know immediately. You won’t waste a lot of time creating a large number of changes when others disagree with the direction you’re taking.
How to Create a Pull Request
When you create the pull request, it will list any changes you made to the original files and code, including any deletions you made. All of the changes will appear in different colors, allowing them to stand out clearly. Other collaborators are able to quickly comprehend the changes through the color-coding.
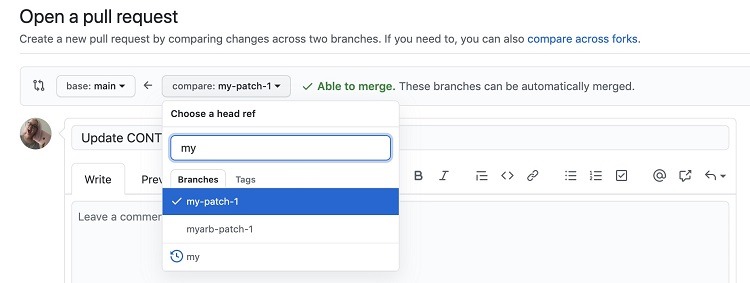
Click the Pull Requests tab in the window for the branch that contains the commits you made. Next, use the drop-down menus to select the branch that contains your commits and the branch where you are suggesting to merge the commits. The two drop-down menus will have an arrow between them, so you can make sure you select the proper branch in each menu. The arrow should point toward the branch where you want the changes to appear (usually the main branch).
Add a title for the pull request and add an explanation in the text box. You can use the @ button to aim the pull request at specific members of your team who are also using GitHub.
Finally, click the Create Pull Request button. In the drop-down menu, you then can click on either Create Pull Request or Create Draft Pull Request. You will want to use the draft option for pull requests that are not quite ready for a full-fledged review and that need more collaboration.
Step 5: Merge the Pull Request
Once the collaboration finishes and once the team agrees to deploy the changes, you can merge the pull request. This will activate the commits you made by placing them into the main branch. Understand that only certain users with the proper permission levels will be able to complete the merge process.
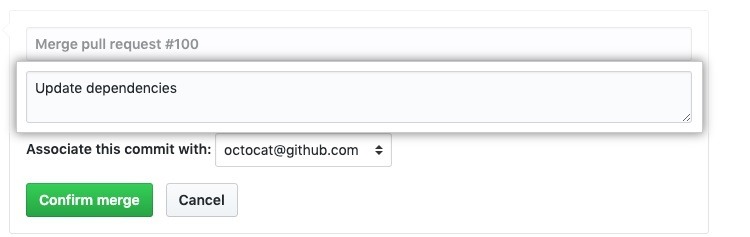
Click on the Pull Requests tab in the repository window. From the list that appears in the drop-down menu, select the pull request that you want to merge. Then click the Merge Pull Request button to make the merge happen.
You may see a popup window where you can enter an explanation for the merge. Then click Confirm Merge to complete the process.
Once the merge occurs, you may want to delete the new branch you created earlier that contained the changes as you were working. Once the changes merge into the main branch, there’s no reason to keep the other branch. You do not have to delete it, but deleting it reduces clutter in your GitHub repository.

