The Ultimate Manual to GitHub Pages
Organizations that need an easy-to-use option to create web pages with hosting will want to explore GitHub Pages. This service is available for free to those with a GitHub account, allowing GitHub subscribers to test and try the Pages service without any long-term cost obligation.
Certainly, GitHub Pages may be too simplistic for some people’s web hosting needs, but it is a handy option for those who only need the basics.
What Are GitHub Pages Anyway?

GitHub Pages is a web hosting service that is part of GitHub. You can upload files to your GitHub repository and then automatically use those files to build a web page. Once you upload the files, GitHub Pages is able to construct the web page for you, if desired.
GitHub Pages can make use of a few different types of files, including:
- CSS
- HTML
- JavaScript
- Image files
When hosting web pages through GitHub Pages, you have the option of using your own domain name, or you can use the default GitHub domain of github.io with your user name as part of it.
What Is GitHub?
GitHub is a for-profit service that allows developers to store and manage their code. WIthin GitHub, developers will use Git, which is an open-source software system that simplifies the management of code. For example, developers can work on segments of the code while protecting other segments of code through Git.
As open-source software, Git itself is free. Developers can make use of Git without having to subscribe to GitHub. However, GitHub provides a user-friendly interface that Git does not have on its own.
GitHub Pricing
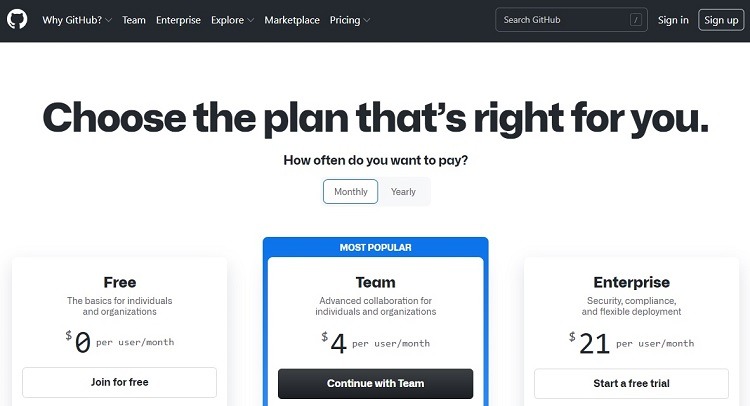
When subscribing to GitHub, you will have three subscription tiers from which to choose. Two GitHub tiers carry a monthly subscription cost, while one tier is completely free.
GitHub Pages is available as part of all three subscription tiers in GitHub. You do not have to pay extra to make use of GitHub Pages. However, you will have slightly different features available for using GitHub Pages within each subscription tier.
- Free: The Free tier is not a free trial period. People can continue to use the Free tier of GitHub for as long as they want. When using the Free tier, subscribers will have to make use of Public repositories as the only visibility option (which we will discuss later). There’s no option to use Private or Internal visibility in the repository in the Free tier.
- Team: Subscribers will pay $4 per month per user on the account for the Team tier. The Team tier gives multiple people the capability to make pull requests. It contains all of the features in the Free tier, along with a few extra features related to customer support options. Both Public and Private visibility repositories are available for use with GitHub Pages in the Team tier.
- Enterprise: The GitHub Enterprise pricing tier works best for large organizations that need stronger security protocols versus those found in the Team tier. Those subscribing to the Enterprise tier can use Private, Public, and Internal repository visibilities for GitHub Pages. The Enterprise tier costs $21 per user per month.
How GitHub Pages Work
GitHub Pages is a web page creation tool that works for creating basic web pages. It caters to organizations and private users who want an easy-to-use system for making a simple web page.
Someone may choose to use GitHub Pages to handle web pages that show off a personal portfolio or that discuss a project the user is creating. Some GitHub Pages users will create a blog that explains a coding project, inviting others to comment and collaborate.
Many people seeking to collaborate on coding projects, which is a common use case for GitHub subscribers, will be able to set up GitHub Pages that can manage this collaboration easily. When others collaborate on your coding project through your web page built through GitHub Pages, you will learn more about coding and may find ways to improve your code that you did not think about on your own.
Publishing Your GitHub Pages
The deployment of your web page through GitHub Pages happens automatically. Once you push your files for creating the website into the repository, GitHub will create the web page for you.
It can take up to an hour to see the web page become live. Continue checking back to make sure the page loads correctly. Once the page goes live, share the link with others to give them access to the page.
To make changes to the web page, just change the files in the repository. After making editing changes to a particular file or pushing (or uploading) new files to the repository, GitHub will automatically reflect these changes on your web page. These changes should be visible within several seconds after you push them to your GitHub repository.
Example 1: Types of GitHub Pages
When working with GitHub Pages, users can select among three different types of pages.
- Organization: To create organization web pages, the repository that serves as the source for the web page files will serve the account for the entire organization.
- Project: If you want to create a web page associated with a particular project, you can set up a repository for the project. This differs from using a repository associated with a particular user or organization account. The source files for the project web page will be in the same repository as the files associated with the project.
- User: When operating GitHub Pages associated with a private user account, you’ll use a repository associated with the personal account.
Within your GitHub subscription, you only can have one user or organization web page through GitHub Pages. But you can set up an unlimited number of project web pages.
Example 2: Visibility for Repository
When creating the repository that will contain the files for GitHub Pages, you will need to determine the type of visibility for the repository at the time of setup. The visibility setting for the repository will determine who can see the web page after you build it and who can change the files. Three options are available.
Public Visibility
When you want anyone on the web to be able to see the GitHub Pages web page that you built, select Public for the repository setting. Even when creating a Public repository, you will maintain the ability to place restrictions on which people can make changes to the files stored in the repository.
Private Visibility
When you want multiple people who are part of the organization’s GitHub account to be able to make changes to the web page, use the Private setting. Through this setting, you will have control by inviting certain people to make changes to the files.
Within the Private setting, the final version of the web page will be visible to anyone on the web by default. However, if you have a subscription to the Enterprise pricing tier of GitHub, you can limit who can see the web page to only other members of the enterprise.
Internal Visibility
When making use of the Enterprise pricing tier in GitHub, you can select the Internal visibility setting for your GitHub Pages. This setting allows only invited members of the enterprise to view the web page, to collaborate on the files that make up the pages, and to make editing changes to the files.
During the collaboration over the files and pages, none of the information discussed will be visible to those who are not participating in the collaboration or who do not have permission to see the information.
Example 3: Use a Theme With GitHub Pages
When you want to create a better-looking web page with GitHub Pages, consider making use of themes through Jekyll. GitHub and Jekyll closely collaborate with each other, meaning the two work almost seamlessly. Jekyll is a type of software that focuses on generating web pages.
To select a theme, you do not have to leave the GitHub interface. Jekyll’s themes are available through the GitHub interface.
From your web page’s repository, click on Settings in the upper right corner. In the drop-down menu, click on Pages.
Look for the Theme Chooser section of the window. Click on the Choose a Theme button. (If you selected a theme in the past, this button will have a Change Theme label.) Jekyll will display a few different theme options in boxes along the top of the window. Select one to use and click the Select Theme button to activate it. (Depending on your setup, Jekyll may require that you edit a Readme file in your repository.)
Example 4: Removing your GitHub Web Page
If you would like to remove a web page you created using GitHub Pages, you will need to unpublish the site.
If you have a project type of web page, start by navigating to the repository for your web page. Then click on the Settings button in the upper right corner, followed by Pages from the drop-down menu. Click on the Source drop-down menu button and click on None.
For a user or organization type of GitHub web page, navigate to the repository that hosts the web page. Then delete the branch that is the publishing source or delete the repository that hosts the web page.
To delete the repository, navigate to the repository screen and click on the Settings button, followed by Danger Zone. Then click the Delete This Repository button. You will need to verify your selection through a few different steps.
To delete a branch, navigate to the repository screen. Click on the Branches button near the upper left corner. In the list of branches in use, find the branch to delete and click on the trash can icon.
For those who are using a private domain name with the web page, rather than the github.io domain, a few more steps may be necessary. Primarily, you will need to update the DNS settings for the domain to avoid having a domain takeover occur.
How to Get Started With GitHub Pages
Step 1: Create a GitHub Account

For those who don’t yet have a GitHub account, signing up for one is an easy process. From the GitHub home page, click on the Sign Up button in the upper right corner. Follow the directions, including listing your email address and creating a password. You’ll need to select a pricing tier to use as well.
Step 2: Create a GitHub Repository
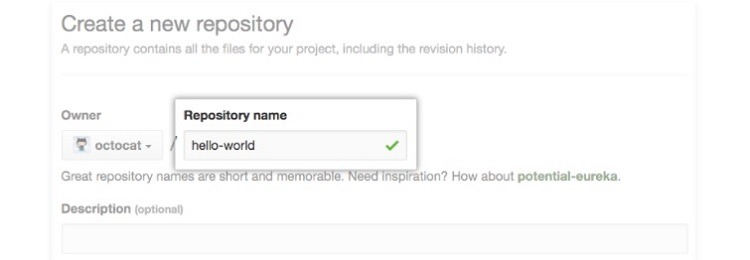
You must create a repository for your GitHub account that will hold the files and source code for the web pages you want to create. Some GitHub subscribers may already have a repository set up for the account. They can use this repository to hold the files for the GitHub Pages, if desired.
Otherwise, to create a new repository, click on the plus sign in the upper right corner of the main GitHub screen. In the drop-down menu, click on New Repository. Select the user name that will own the repository, which, barring some unusual circumstances, usually will be your user name.
Enter a name for the repository in the text box on the next screen. In the Description box toward the bottom of the window, enter an explanation of the plan for the repository, if desired.
Then select the visibility you want to use for the repository, as we described earlier. Finally, click Create Repository.
Step 3: Select the Design for the Web Page
When selecting the design to use with the GitHub Pages web page, you have a couple of options.
Some people will prefer to create their own web page using HTML. For those who have experience with HTML coding, creating a web page can be a quick process. Place the coding in an index.html file to develop the web page.
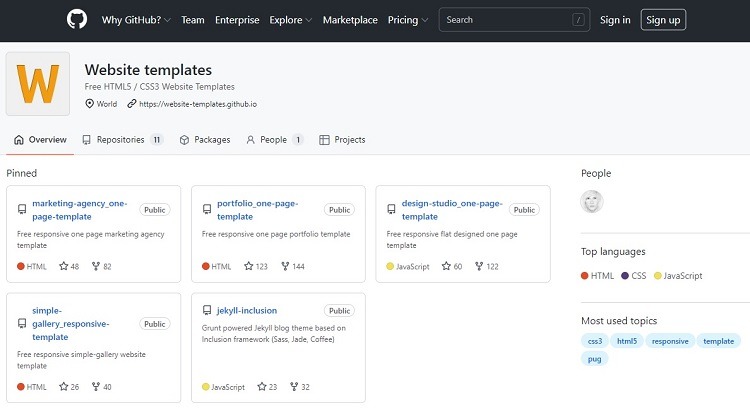
Another option is to use a template. GitHub offers a few free templates on its Website Templates web page. Third-party entities also offer templates that will work for creating GitHub Pages. Some of these templates are available for free, while others will have a fee associated with them.
You later can apply a theme through Jekyll, if desired.
Step 4: Push the Files to the Repository
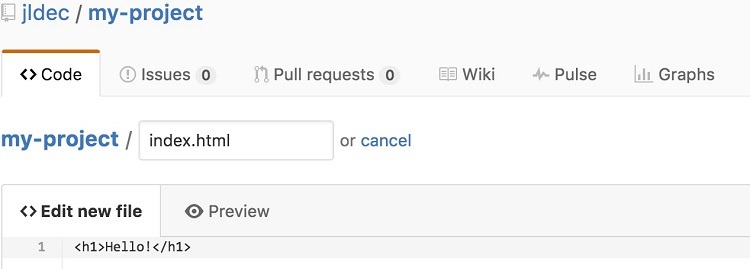
Upload any files needed to create the GitHub Pages web page to your repository. At a minimum, you will need the index.html file. But you also may want to add other HTML, CSS, or image files to the repository. (GitHub calls the process of uploading files to your repository a “push” of the files.)
The more files you push to the repository, the most detailed you can make the web page.
Step 5: Select the Publishing Source
The final step involves telling GitHub where the coding for the web page exists. When using GitHub Pages with user or organization sites, the root of the repository will be the default location for files needed to publish the page.
You also have the option of storing the source files in a different location than the root. You’ll be able to tell GitHub which folder to use.
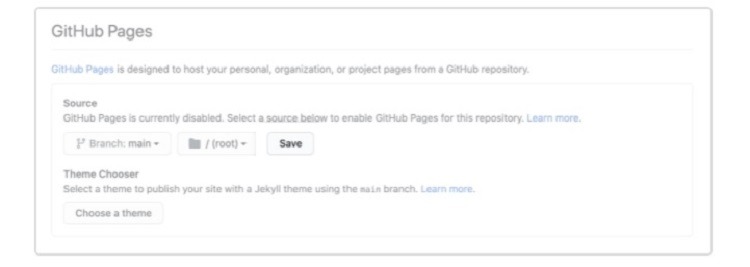
From the GitHub interface, open the repository that hosts the files for the GitHub Pages. From the upper right corner, click on Settings. Click on Pages in the drop-down menu that appears.
In the GitHub Pages window, click on either Branch or None to open another drop-down menu. Then select Main as the branch you want to use.
Click the folder you want to use as the publishing source before clicking Save. This should tell GitHub to go ahead and publish your web page.

