The Ultimate Manual to GitHub Markdown
GitHub Markdown is the markup language for user content at GitHub and allows users at all skill levels to write plain text documents, which get rendered in HTML. Our guide will detail everything you need to know about GitHub Markdown.
What Is GitHub Markdown Anyway?
GitHub Flavored Markdown, also known as GFM, is the version of Markdown currently supported for content on GitHub. Custom elements have essentially been added to Markdown to make things easier for GitHub users.
Markdown itself is an easy-to-write syntax for formatting plain text. It’s best to think of it as a set of rules that format text on web pages. Many different versions of Markdown exist today, each with its own variables for additional web functionality.
How GitHub Markdown Works
GitHub Markdown allows software developers to write and format text on GitHub. GitHub effectively combines a syntax for formatting text with GitHub Flavored Markdown and adds additional writing features for users. The custom functionality helps format prose and code across the platform, making a software developer’s job easier.
Every comment field on GitHub contains a text formatting toolbar that enables you to format text without first learning the Markdown syntax. Markdown allows users to format text using bold and italic styles and create headers, lists, and links. The toolbar on GitHub takes this further and includes specific features like task lists, links to issues and pull requests, and handy @ mentions.

GFM is a strict superset of CommonMark. The extra features existing in GitHub user content—those not available in CommonMark Spec—are extensions and are highlighted to show this. While GFM does support a large variety of inputs, keep in mind that GitHub.com and GitHub Enterprise adds post-processing after it’s converted to HTML. These platforms do this for security reasons and to maintain the consistency of the site.
That aside, you may still wonder why exactly you would want to use Markdown; the good news is I can give you some specific examples.
Example #1: You Don’t Understand HTML and Need Accessibility
Using Markdown, including the customized version on GitHub, is more accessible than using HTML. If you’re someone who doesn’t know the first thing about HTML—and let’s be honest, it’s not easy to understand for most people—then Markdown is an excellent place to start. Markdown was created initially for greater clarity.
Markdown is easier to type and read, and, importantly, no extra words or letters are required. For example, asterisks placed around words convey emphasis even if you’re not sure if it is italics or bold. Software developers, designers, and general web developers find this clarity makes their life far more manageable. For the non-technical members of your team, it’s a big help.
The Markdown characters are intuitive and easy to remember and are all about readability for others who are not used to writing in hypertext. The central idea is that a Markdown-formatted document should be publishable as it is, as plain text, without tags or other formatting instructions getting in the way. HTML tags are “noisy” because they make a document harder to read for those unfamiliar with the language. A Markdown document makes sense to almost anyone.
Example #2: You Want Flexibility and Less Time Spent Fighting Errors
Markdown is easy and flexible to use, specifically because there are fewer things to include in a document from the start. Not only that, but there are multiple options available, allowing writers to choose the formatting characters that they best understand. If you like writing text in a certain way, you can, unlike with HTML, where the flexibility is more limited.
This greater ease of use and versatility results in fewer errors, too. HTML asks for trouble because even its one-letter tags require three characters to open and four to close them. One forgotten element, like a slash or a misplaced quotation mark, could mean your entire page won’t load properly. If you’re in a rush to get code written, there’s a tendency not to notice when minor errors occur, or a slash is missed. And it can take much longer to review all of the code looking for the mistake.
While you’ll still make mistakes in Markdown, they are typically far easier to spot and less likely to cause you significant problems. Best of all, you can write Markdown anywhere you see a blinking cursor because, at its core, it’s just plain text. The characters you see on the page will be how the final formatted results appear. The Markdown on GitHub even adds shortcuts to execute writing text easier, making it great for beginners.
How To Get Started With GitHub Markdown
Below we’ve listed some key steps to follow to get the most out of GitHub Markdown.
Step 1: How To Add Headings With GitHub Markdown
Using GitHub’s version of Markdown is easy enough to pick up. But if you’re new to the language, it’s worth knowing some of the essential elements to add to your code.
It goes without saying how valuable headers are for web documents, so learning how to add them in Markdown is crucial. There are six levels of headings supported on the platform, and the smaller the title, the more characters you need to add.
To create a heading, you want to use the Hash symbol: #. Be sure to follow this with a space and the name of the heading you want. For each smaller heading size, add an additional hash mark. It should look like this:
- # Heading 1
- ## Heading 2
- ### Heading 3
- #### Heading 4
- ##### Heading 5
- ###### Heading 6
You may wish to align your headings towards the center of the page, but general alignment isn’t supported by default in Markdown. Headings get rendered with a default left alignment. The good news is that you can add headers quickly using the text formatting toolbar on GitHub, as shown below:
Step 2: How To Add Lines and Breaks With GitHub Markdown
Even when you type text in separate lines, one right after the other, Markdown, and the GitHub platform, will typically render it as a single line. That may be what you’re after, but what about when you want dedicated line breaks?
You can create breaks in two ways: soft line breaks and hard line breaks. Soft line breaks are created by adding two spaces at the end of the line, and Markdown does the rest, rendering each line separate. Hard line breaks get created by inserting an empty line between each line of text—that’s all you need to do.
To add horizontal lines or the horizontal rule, you need to place three or more asterisks (*), hyphens (-), or underscores (_) on a single line. You can add space between them, and this won’t mess up your formatting. The “hr” element gets used for thematic breaks using HTML; it’s just easier to add using GitHub Markdown.
Step 3: How To Add Styling Essentials With GitHub Markdown
You now know how to add headers and line breaks, but what about the other styling essentials like bolding text or using italics? As you might expect, they are not difficult to create using GitHub Markdown; you just need to know how to do it.
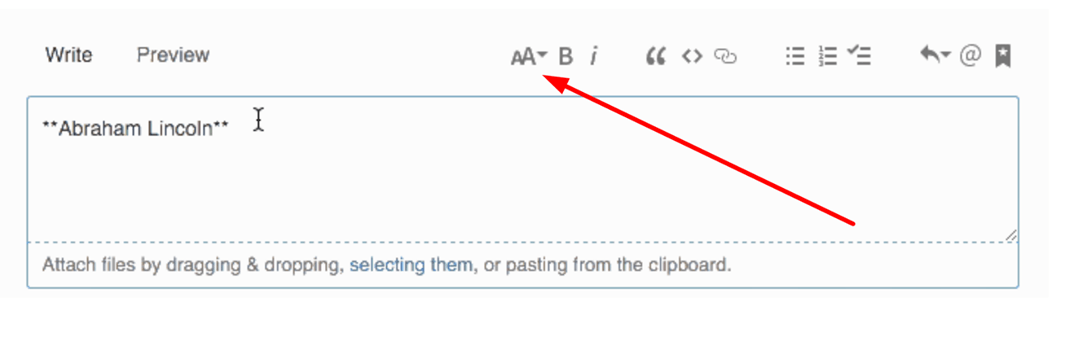
Let’s start with bolding text. To turn words or lines bold, you need to place them between double asterisks (**) or double underscores (__). So, it would look like this:
**This sentence is now bold, thanks to asterisks.**
Or like this:
__This sentence is now bold, thanks to underscores.__
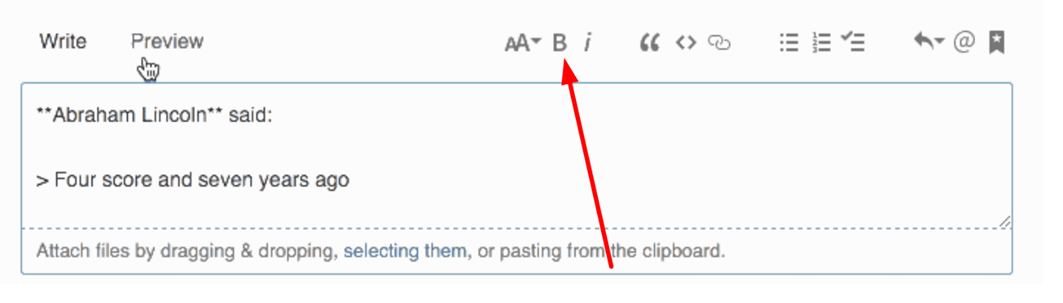
You can also do this more quickly in the text formatting toolbar by clicking on the bold button:
To italicize words or lines, you want to surround the word or lines between a single asterisk or single underscore, like so:
*This is now in italics.*
Or like this:
_This is now in italics._
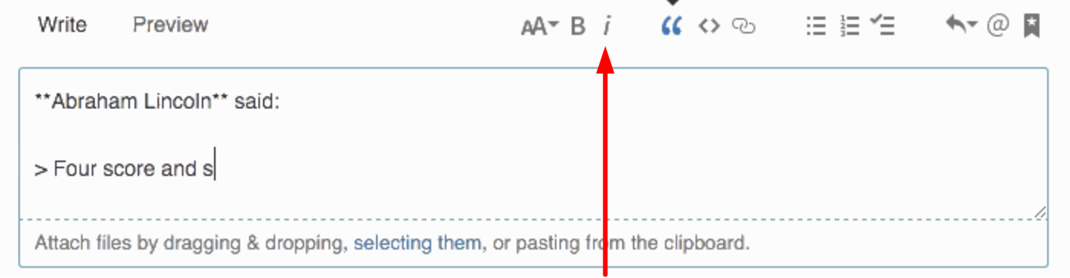
If adding in the characters manually is slowing you down, you can use the text formatting toolbar on GitHub to italicize like so:
To use strikethrough, you need to use a double tilde:
~~I am using strikethrough in this sentence.~~
That’s all it takes.
You can do more with Markdown typically by just inserting these characters at the start and end of sentences, as we have above. The bulk of what you can do with Markdown is as easy as you’ve seen in these examples. The toolbar is there for developers as a backup for anything else, although most prefer writing out everything to keep the creative flow going.
Step 4: Know Your GitHub Markdown Best Practices
Using Markdown on GitHub is pretty intuitive. However, there are some best practices worth knowing:
- Wherever you can, try to include a description of the link in Markdown—this helps people read and provides clarification.
- The GitHub platform supports embedding images into issues, pull requests, discussions, and comments—you can also showcase an image from your repository, add a link to one, or upload an image.
- You can mention a person or other team member on GitHub by simply typing @ and their username or team name. This action will activate a notification and brings their attention to the conversation. People will likewise receive a message if you edit a comment to mention their username or team name. Typing an @ symbol will bring up a list of people or teams on a project.
- You can bring up a list of suggested issues and pull requests within the repository—typing in # does the trick. Be sure to type in the issue or pull request number or title to filter the list, and then press enter to complete the result.
- Emoji lovers will be pleased to know you can add them to your writing by typing :EMOJICODE: Furthermore, typing in a sole colon will bring up a list of suggested emojis you can use. The list will filter as you type—find the emoji you’re looking for and then hit enter to insert it.
- You can stipulate the theme an image is displayed to by appending #gh-dark-mode-only or #gh-light-mode-only to the end of an image URL using GitHub Markdown. You can use this to display images that get optimized for dark or light backgrounds.
Step 5: Complete the GitHub Markdown Course
GitHub offers a free course to help you get the best from Markdown. It’s available from GitHub Learning Lab, where a bot gives you instructions and feedback throughout your learning experience. You’ll need a GitHub account and the ability to navigate and edit files in GitHub to complete it, so if you haven’t already, you can sign up to GitHub here.
The course goes through all of the basics you need to know and covers everything from collaborating to using headings like a pro.
In the course, you’ll learn how to add lists, images, and links in a comment or text file and determine how to use Markdown in a GitHub repository. On average, it takes around 45 minutes to complete the course, but there’s no time limit. There’s even an emoji that appears next to key terms to help you with definitions.

The course has you working with issues, pull requests, and editing files. If that is too advanced, there’s also a free Introduction to GitHub course. You’ll also be able to post on the GitHub Community Forum for added support when you need it.
At the end of the course, you’ll have a published GitHub Pages site that showcases different types of Markdown, ready for you to edit and check back on when required. Whether you’re a developer, experienced GitHub user, new to Git, or a manager looking to improve teamwork, it’s an ideal course.

