The Ultimate Manual to GitHub Emojis
In 2021, emojis are a crucial form of communication. These modern hieroglyphics are found everywhere – from emails to texts to tweets, and even GitHub!
Earlier this year, GitHub released an even better way to use emojis, by typing in keywords. Not only that, but GitHub has created an efficient key that allows users to have an easy-to-read code using these emojis. Plus, users can even create or access their own custom emojis through the platform.
I’ve spent hours poring over the different kinds of GitHub emojis and how to use them the most effectively for your business.
What are GitHub Emojis Anyway?
There are two primary uses for GitHub emojis.
First, GitHub allows users to sprinkle in emojis through their messages and titles, just like many other online platforms. Emojis can make your communication more fun and visual. Not only that, but emojis can be a great way to express tone and even humor online.
Second, there is a more uncommon and business savvy use of emojis on GitHub. Some GitHub users have created codes of emojis to indicate specific meanings. For example, a fire emoji could indicate that the comment needs to be dealt with immediately.
How GitHub Emojis Works
GitHub allows users to insert emojis either through text shortcuts or through an emoji drop-down menu. As we stated earlier, these emojis are typically used to convey humor and tone or indicate common problems or further action items.
Example #1: Casual Use, Emoji Shortcuts
Most of the time when people use emojis on GitHub, it will be in this setting. Luckily, GitHub makes it pretty easy to do so.
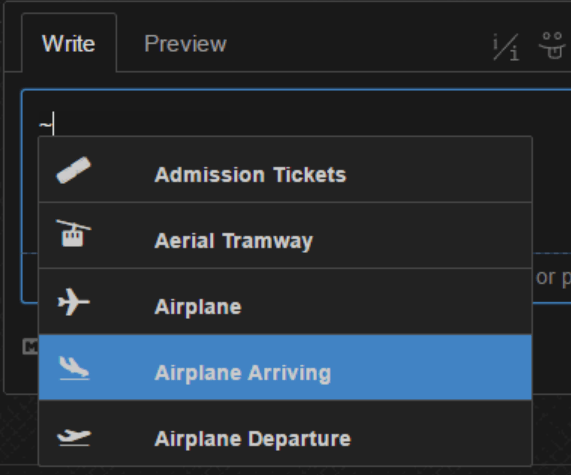
Earlier this year, GitHub released a new feature: autocomplete phrases that users can plug in to quickly find the emoji that they would like to use. So, if you’re not totally sure what you’d like to use, you can start typing and a list of options will pop up.
For example, if you wanted to convey that you loved a teammate’s work, or appreciated what they were doing, you could plug in the “:” followed by the word “heart” and finish with another “:”. As a whole, it would look like this: “:heart:”
In this example, there are several different options that pop up, including a classic red heart, an emoji with heart eyes, a heartbeat, and more. Simply click the emoji you want to use, and it will appear in your text box.
This is an awesome feature, especially if you are in a rush and don’t feel like scrolling through the many emojis available to find the perfect one.
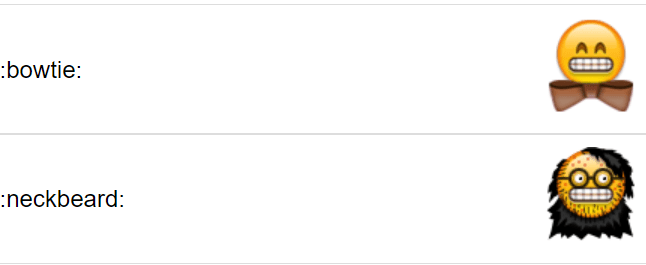
Not only that, but GitHub also includes a few more types of emojis that you can specifically insert with various words, called emotes. These emojis are typically not included in most programs, but they can be inserted through image-replacement technology.
For example, GitHub allows people to plug in the codes :bowtie: and :neckbeard: to get unique emotes that don’t exist on iOS.
The GitHub team has created an entire database of the emojis they offer on the platform. This is arranged into many easy-to-use categories such as people, objects, nature, and more.
Example #2: Emojis as Codes
The second option concerning GitHub emojis is to use them as a code. One GitHub user, erikthedeveloper, has even designed an easy-to-use suggestion manual for how to use this method. In many instances, the emojis relate to whatever is happening in the workspace. For example, the wrench emoji is used to indicate that something needs to be changed.

In addition to the suggested symbols, Erik also recommends that people begin their comments with the emoji first. This way, your teammates will know the context of the comment and the kind of actions that they may need to take after reviewing it.

Not only that, but for added understanding, users can combine symbols too. For example, using Erik’s code, a smiley face and a pickaxe at the beginning of a comment could indicate that the person reviewing it really likes most of the code, but they have a small issue they’d like to nitpick. This could help the recipient of the comment understand that they did a great job, but there is still a change that needs to be made.
While Erik did a wonderful job with his guide, it could also be beneficial to spend some time making your own code that is unique to you. Feel free to make your own guide to use with your teammates that better fits your needs. If there are specific comments or scenarios that are common, it could be effective to start assigning your own emojis to them.
This method can streamline the communication practice within your organization. Although it may be a bit difficult to learn the emojis at first, with a little practice you’ll start learning the common ones in no time.
How to Get Started With Creating Your Own GitHub Emojis
While GitHub offers plenty of emojis to choose from, a specific userscript also allows for users to create and add their own custom emojis.
Installation
To be able to access these emojis, you’ll need to download some kind of a userscript engine to your device. The best user script for you will depend on your browser. For example, if you have Firefox, GitHub suggests Greasemonkey. For Chrome, the best option would most likely be Tampermonkey or Ninjakit. See the complete list here.

After that, you’ll need to install GitHub Custom Emojis by clicking this link.
Once you click it, the software will immediately begin downloading to your device.
Add Emojis
When it comes to adding emojis to GitHub, you can either upload another artist’s emoji, if they allow it, or create your own.
In order for an emoji to be uploaded to the main GitHub collection, it must have approval from the artist that has created it. Make sure to research the artist heavily. Users must provide proof of the artist allowing it to be uploaded.
Once you have the permission, or you have created your own emoji, you can begin the process of adding it to the collection.
According to the GitHub information page, author Rob Garrison said to follow this pattern for text emojis.
{
“text”: “^\u203f^”,
“name”: “simple smile”
}
The “text” part can be whatever you’d like. The guide suggests using the Google Closure Compiler in order to create an escape sequence for special characters. In addition, make sure not to include the prefix “~.” GitHub will automatically add this later on when it is time to search for the emoji.
Next, the “name” is the text that will be needed to search the emoji. This may be one of the emojis that would pop up if you wanted to search “simple” with the autocomplete feature. Make sure that you choose a name that’s easy to remember and search for your emoji, so it is as easy as possible to access.
For an image emoji, GitHub suggests using this pattern when adding emojis to a custom collection.
{
“url”: “https://cloud.githubusercontent.com/…”,
“labels”: “happy cheer woot”,
“source”: “Name by Author – Source URL”,
“license”: “?”,
“size”: “50×50”,
“text”: “woot”
}
When adding an image emoji to a non-custom collection, try to use this pattern instead. In addition, just as Garrison said, only add the license information if it is necessary.
{
“url”: “http://cloud.githubusercontent.com/…”,
“labels”: “collection name woot happy cheer”,
“license”: “optional, unless it’s under a different license”,
“name”: “collection_name_woot”
}
The first step in this process is to include the URL. First, to upload an image to the GitHub cloud, drag and drop it into the textbox. The upload will automatically begin, and after that it will be replaced by a markdown. The URL from the markdown is what you will use for the “URL” category.
In addition, keep in mind that all content uploaded onto GitHub must adhere to the content security policy. Essentially, this was put in place to ensure that GitHub is only supporting safe content. It is also used to prevent any XSS attacks, which are when malicious scripts are injected into trusted websites. This is one of the most common types of website vulnerabilities. Click here for the complete explanation.
Next, you’ll need to add some labels. Essentially, these will help you find your emoji again. Make the labels you choose easy to remember and intuitive. In addition, the GitHub guide recommends using similar categories to the ones of the default emojis. These are general descriptions like “nature” or “objects.”
The source is necessary to include so that it is easier to track down the origin of the emoji. The last part you need to include is the text, which will describe the emoji. This will just be one word or phrase, like “pink heart” – do not include any colons. Once again, GitHub will automatically add these.
You will also have an option to add the size of the image, but this is not required.
Use Custom Emojis
Now that you know how to upload your own emojis to GitHub, now it’s time to learn how to access and use them.
To begin, start with a general textbox. You may remember that for the normal GitHub emojis, to type in a shortcut you’ll need to put colons on either side of the word. For example, for a smiley face, you would type in “:smiley:”
With custom emojis, this process is pretty similar, there is just an added step.
For text emojis, start by typing a “~” and then a drop-down will appear with various emojis to choose from. From here, you can also choose to enter keywords of what kind of emoji you may be looking for. For example, you could type in “~heart” to see what kinds of heart emojis are available.
For picture-oriented emojis, including some that move, type “:_” instead of “~” and another drop down will appear, showing all kinds of different options.
You can start typing in keywords like the text emojis, or you can start to type the title of the custom emoji. Once the emoji you’re looking for pops up, hover your mouse over it, click it and it will be inserted. Anytime you want to insert any kind of emoji, simply repeat this process as many times as you’d like.
Really, the only difference is the small characters that are placed in front of the keywords. This is just to distinguish from GitHub’s main library of emojis, since there may be keyword overlap between the two.
Access Emojis from the Dropdown Menu
Custom emojis can also be accessed from a dropdown menu, instead of typing in the keywords for them. Near the text box, you should see a small icon that looks like a face with its tongue sticking out. This is the Emoji Collections dropdown.
Click on it, and it will open. From here, you can look through collections and when you find a category you’re interested in, select it. After selecting it, you’ll be able to scroll through all the emojis available in that particular category. This is a really nice tool, particularly when you aren’t completely sure the exact emoji you’re looking for.
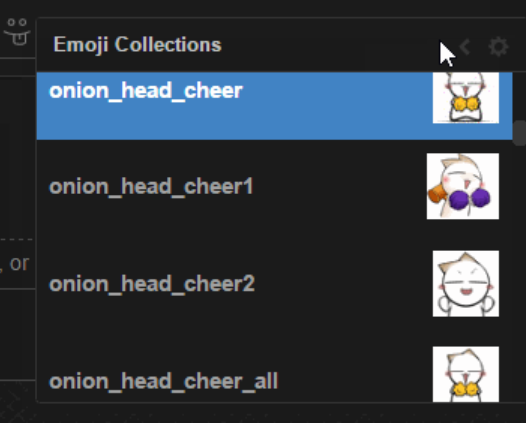
Once you find the emoji you’d like to use, just use your mouse to click it and it will be inserted into your textbox.
Ultimately, GitHub allows for extensive emoji use on the platform. There are hundreds of emojis that come with the platform and can be easily searched using certain codes and keywords.
If you want to add your own emojis, GitHub allows you to create a custom emoji collection that you can access at any time. This means that the options for emojis are essentially limitless on the platform.
These emojis will allow users to communicate in a more efficient and entertaining way. Users can insert more of their personality, create tone over text, and even create their own emoji codes to indicate the next action item to their team.

