The Ultimate Manual to GitHub Desktop
If you want to make your work with Git and GitHub easier, then you’ll want to use GitHub Desktop. It’s an open-source tool that simplifies your entire development workflow so you can spend more time where it matters.
What Is GitHub Desktop Anyway?
GitHub Desktop is an application for your personal computer that allows you to interact with GitHub directly, meaning you don’t have to depend on your browser. It’s a tool for beginners that enables you to manage things using a graphical interface—what’s known as a front-end—speeding up your development workflow.
There are a variety of valuable features the application offers, as we’ll see later in the guide.
How GitHub Desktop Works
To appreciate the value of GitHub Desktop, first, we need to understand the different elements involved. Let’s start with Git itself.
Git is a control system used to manage code—around 70% of software developers use it. Git enables you to save drafts of your code so you can revert to previous versions if complex errors happen during development. A project managed using Git is known as a repository.
A repository is useful because it contains all of the files and folders associated with an ongoing project, including each file’s revision history. Your file history, called “commits,” effectively informs Git when changes you want to make should be saved.
One common mistake is to think of Git and GitHub as the same thing, which isn’t strictly accurate. GitHub is a hosting service for the local Git repositories, which can then store them in the cloud. Using GitHub allows you to back up your files, collaborate with others, and share your code when required.
In a nutshell, GitHub is a tool to help you work with Git. Other services can host repositories too, but GitHub is a trusted and free service, preferred by most software developers.
That brings us to GitHub Desktop—or what’s sometimes known as a graphical user interface (GUI). With a GitHub account set up in advance, you’ll be able to install and use GitHub Desktop.
If GitHub makes working with Git easy, GitHub Desktop effectively takes it further. It gives you powerful features straight from an app installed on your computer. You’ll be able to interact with Git without using the command line by using the interface of GitHub Desktop alone.
Example #1: You Want To Start Slow With Git
GitHub Desktop is ideal for those that want to work with Git but don’t feel like they have the confidence to use the Command Line Interface (CLI) on its own. While learning how to code from the command line is often celebrated, it’s not achievable for everyone at first. Learning how to use Git, and coding in general, takes a great deal of time, and it can be overwhelming at the beginning.
GitHub realized this and hence created an entry point for GitHub that’s easy to use, with clear and bold graphics. The tool itself is highly flexible and removes some of the complexity of using the CLI. It offers a structured user interface for those just starting and prevents them from spending too much of their initial time looking at a black screen where progress can be hard to make.
What’s more, the desktop application has a specific button for every Git command—think of them like shortcuts—to those still training. Once a developer has improved, they can write all of the code themselves if they desire.
Example #2: You’re Not Programmatically Minded
Not everyone wants to dive into the complicated world of coding. The amount of time required to get good at it can be too much of a commitment, and for others, too stressful when things break. It’s also fair to say that not everyone is going to be programmatically minded, and yet, they may still be required to use a Git repository in their job.
An example of this would be a team that shares content via a Git repository. Not every member of that team will necessarily understand and have experience using Git. They may not plan to practice it either, alternatively focusing on other areas of their expertise. This common scenario is where the GitHub Desktop app is helpful again. The tool will allow the team members with less experience to push new updates without fully understanding the code itself.
It’s worth noting that the GitHub Desktop app can’t do everything one can do with a command line, but the UI itself offers the essential Git commands, making it a helpful workaround for the non-coders on your team. Of course, some people use the app to learn at their own pace before moving over to the command line. Either way, GitHub Desktop is a valuable tool.
How to Get Started With GitHub Desktop
Below we’ve listed some key steps to follow to get the most out of using GitHub Desktop.
Step 1: Create a GitHub Account
For starters, to use GitHub and the GitHub Desktop app, you’ll need a GitHub account. If you already have one, don’t worry; skip to step two and go from there.
If not, in your browser, open up a new tab and navigate over to github.com. In the top right-hand corner, you’ll see a button that says Sign up:

Go ahead and click it to be taken to the next page. Once that’s loaded, you’ll need to fill in your details, including your email, your username for the platform, and a new password.
From there, you’ll get asked to verify your account by clicking on the link inside the email. Upon verification, your GitHub account gets created, and you can start using the platform.
Step 2: Download and Install GitHub Desktop
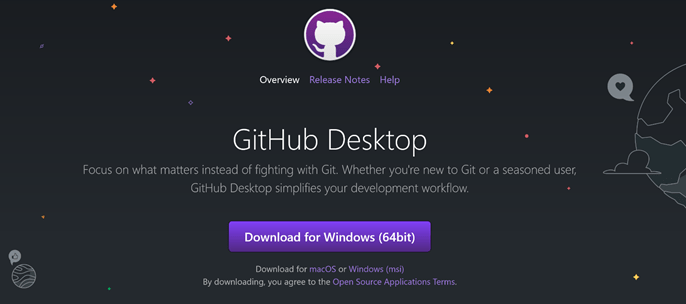
With your GitHub account set up, you’re ready to install the GitHub Desktop app on your personal computer. To do so, in your browser, open up a new tab and navigate to https://desktop.github.com/.
The page will look like this:
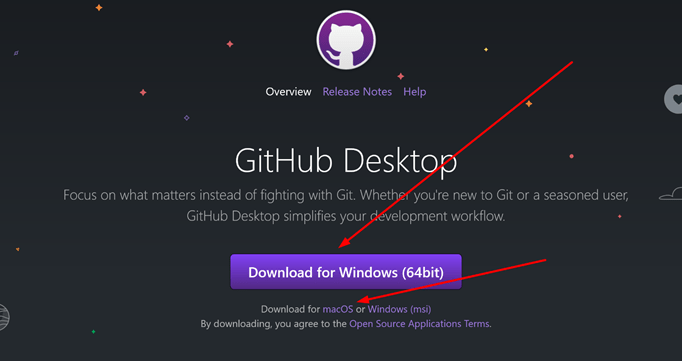
Windows users need to click the large purple button that says Download for Windows, but if you’re a Mac user, you’ll need to look underneath the button and click where it says macOS. Note that you have to be using macOS 10.12 or later and Windows 7 64-bit or later. You must also have a 64-bit operating system to run GitHub Desktop.
Once that’s downloaded, you’ll need to install the app by clicking on the installer, running it, and then signing in with the account you created in the previous step. You don’t have to sign in with your account straight away, and can skip it, but it’s worth doing so now.
You now should have the desktop app on your computer and ready to go.
Step 3: Create a Repository in GitHub Desktop
Inside the desktop app, you’ll now see a page that looks like this:
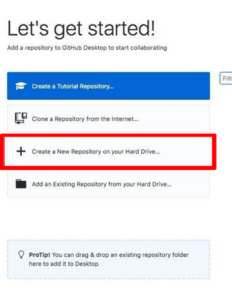
The most important action we can take here is to create a new repository. To do so, click the second box down, where it says, Create a New Repository on your Hard Drive.
A pop-up will appear that you need to fill in—start by naming your first repository. Once you’ve picked a name, you’ll need to choose a local path too. We want to make sure this is an accessible path on your computer, like your desktop, so think about that before choosing. You also want to tick the small box that says Initialize this repository with a README if you wish to alter the README file itself later.
Once all that is complete, you can finally click Create Repository. You have now created a new Git repository using the GitHub Desktop app without using your browser.
At the top of the new page, you’ll see the name of your repository and the branch. Essentially, right now, the repository is only available locally on your computer. To publish it, we’ll want to click where it says Publish Repository. You’ll now be able to see your new repository in your profile on github.com.
It’s a great example of the control you now have straight from your desktop. Congrats!
Step 4: Know Your GitHub Desktop Best Practices
With GitHub Desktop now set up on your computer, you’ll want to get the most out of it.
It takes time to set up and configure everything, and there’s a lot to learn, so we’ve listed some quick best practices to help get you started:
- Authenticating the desktop app with your account on GitHub is worth it because it allows you to connect to remote repositories. You may have already done this by signing in with your account already, but if not, doing so will increase the app’s functionality, and we recommend it.
- You can use the GitHub Desktop app to create a branch of a project. Branches allow you to separate your development work from other branches in the given repository, permitting you to experiment with any changes you make. To do so, click Current Branch, and then in the list of branches, click the branch you want, name it, and click Create.
- You can configure the GitHub Desktop app in multiple different ways. You’ll be able to choose the default text editor or shell, edit your current Git configuration, change the appearance, customize system dialog boxes, or even set privacy preferences.
- To switch between Light and Dark mode, go to Options, Appearance, and pick the best setting for you. Additionally, you can select Automatically switch theme to match system if you want the tool to match the theme on your desktop.
- You can use the desktop app to create issues to collaborate on projects with others. Issues will let you keep track of ideas and discuss any changes to your projects. To create an issue, in the menu bar, use the Repository menu, then click Create Issue.
- You can actually launch GitHub Desktop from the command line. To do so, open up a command prompt and type github. You can also launch GitHub Desktop for a specific repository; just type github followed by the path to the repository.
Step 5: Use the Support Community and Enable GitHub Discussions
Software developers frequently hit roadblocks, and sometimes, no amount of best practices will solve the exact problem they have with a chunk of code. What they need is collaboration and the ability to share their problem with others, who may even be facing the same dilemma.
Cue the GitHub support community. This well-known and respectable community is all about finding solutions, sharing ideas, and following new discussions. The community has a dedicated forum for introducing yourself and allows you to ask questions and find information about upcoming GitHub events and developer meetups. It’s the perfect place for beginners to learn all they can about using Git and GitHub, so it’s well worth spending some time there.
One way you can take the community support even further is to enable GitHub Discussions on an existing repository—it effectively brings the community directly to you and your work. Repository owners can allow GitHub Discussions on both their public and private repositories in a few clicks.
To do so, go to github.com, and navigate to the main page of a repository. Under your repository name, click Settings, like so:

Now, under Features, click Set up discussions. Under Start a new discussion, edit the template, and choose the tone you want to set for your community. Finally, click Start discussion.
Keep in mind that you can also set up your own contributing guidelines or a code of conduct to ensure collaborators stay on-topic and prevent unhealthy conversations from forming. A code of conduct helps protect you as well as your participants and prevents an unhappy work environment.
It’s best to communicate expectations here on when collaborators should open an issue or discussion. Be sure to research the different codes of conduct for open-source projects and choose one that suits what you’re looking for overall. Don’t forget to think about whether you’re able to—and willing—to enforce a code.

