The Ultimate Manual to GitHub Codespaces
GitHub’s development platform is constantly evolving. As of August 2021, GitHub officially rolled out its browser-based coding environment—Codespaces.
Whether you’re an existing GitHub user, new to GitHub, or using GitHub for business, this in-depth guide will explain everything you need to know about GitHub Codespaces.
What is GitHub Codespaces Anyway?
In short, GitHub Codespaces is a cloud-hosted development environment. It gives your development team on-demand access to a secure development environment from remote servers.
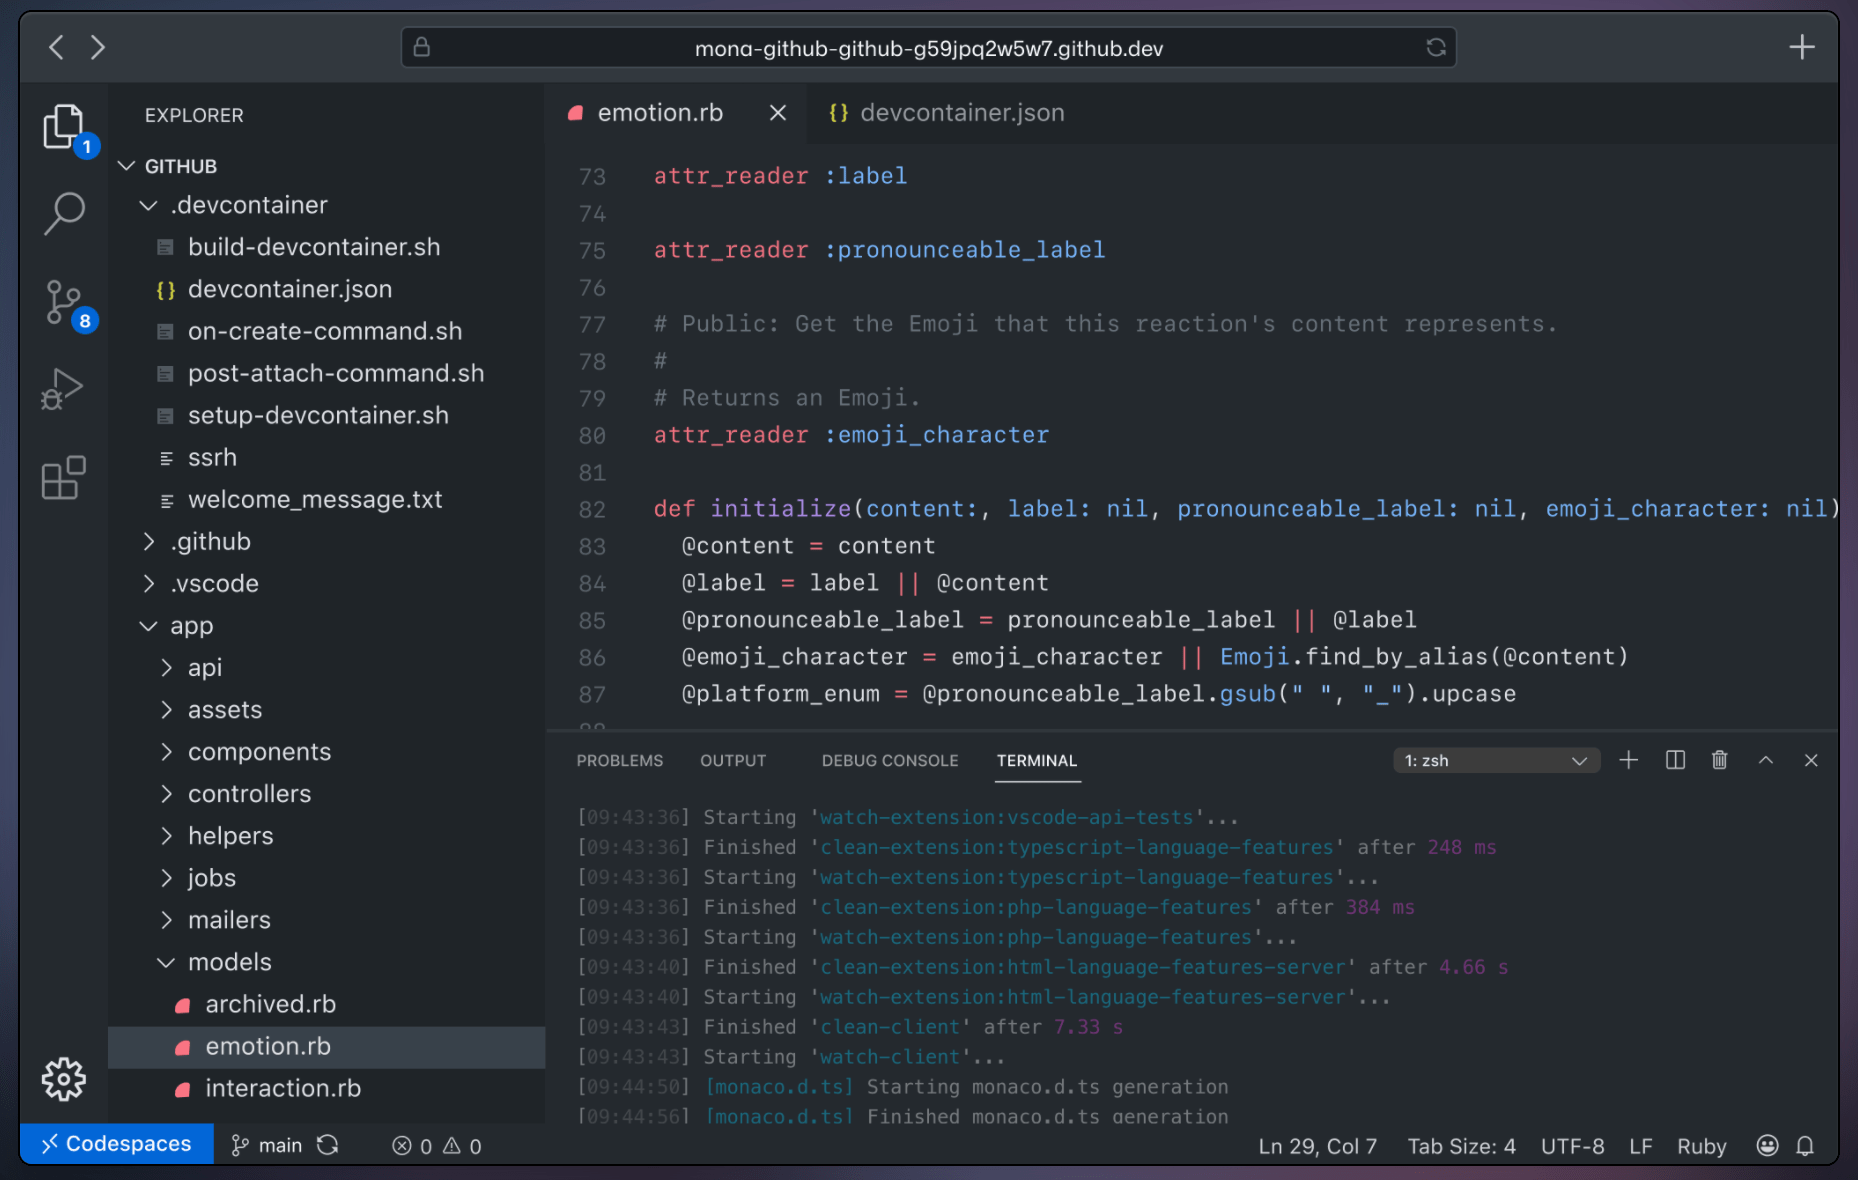
This means that developers have full access to Visual Studio Code directly from a web browser. There’s no local installation required. Codespacess gives you access to the editor, version control, debugger, terminal, settings sync, extensions, and more.
Another unique standout of Codespaces is its versatility. In addition to browser-based development, Codespaces also works locally. A developer can access the same project from a local Visual Studio Code installation and their web browser alike.
Overall, GitHub Codespaces meets the larger trends associated with coding and development. More and more platforms are ditching local development environments and turning to the cloud. This translates to more speed, enhanced UX, and developer-friendly collaboration features.
By leveraging cloud development platforms like Codespaces, it’s much easier for multiple developers to work together on a project. New developers can quickly join and collaborate without any complex configuration requirements.
Here’s an example of what Codespaces looks like from a web browser:
Here are some of the most significant advantages of GitHub Codespaces compared to traditional, local development environments:
- It allows developers to code from the fastest machines. This ultimately increases the developer’s efficiency and productivity, as the burden of local machine setup is removed from the process.
- Cloud development platforms are highly secured. Only authorized users can access GitHub Codespaces.
- Developers have the freedom to use different tech stacks, a variety of tools, and different versions of software without having to adjust the configuration of their local machines.
- Teams can access Codespaces from any device with browser-based coding. The experience is seamless across laptops, desktops, tablets, and more—improving portability.
- It’s easy for developers to manage extensions and dependencies across multiple Codespaces and on a per-project basis alike.
- Codespaces run consistently for every developer. So your team won’t run into issues of the development environment working for one developer but not another.
- GitHub Codespaces runs directly in GitHub, in a matter of seconds. So any developer can start coding and collaborate on a project almost instantaneously.
Overall, GitHub Codespaces eliminates issues related to local machines. It breaks down barriers when it comes to shipping high-quality code while offering an excellent experience for all developers.
How GitHub Codespaces Works
To comprehend how Codespaces works, you need to understand the problem with local development environments. Each developer working on a project would need to constantly update their tools, tech stack, and versions to push code. Failure to manage this properly with each local machine can create problems as that code is pushed to a collaborative environment.
For larger projects, this can create issues with dependencies and configurations each time new tools are introduced or new versions are released. Developers might spend most of their day trying to fix issues with dependencies and updates. Rather than writing quality code, valuable time is wasted setting up their development environments.
This type of scenario is all too common whenever a new team member or contributor starts working on a project. It creates major setbacks for everyone on the team and it crushes productivity.
Codespaces has eliminated this problem.
Under the hood, this platform uses virtual machines, containers, and other virtualization tools to provide browser-based coding capabilities. It’s like having the backend part and front end part of a client-server architecture—all-in-one.
On the backend, all of the application code gets run using a Docker container—and with codespaces, there’s no need to install a Docker. The IDE is the frontend aspect, which connects with the running application.
The backend environment computes everything associated with software development. This includes debugging, compiling, restoring, and more. Whenever a developer needs to work on a project, they can access it from a cloud-hosted development environment. Codespaces automatically takes care of this entire configuration.
Codespaces Pricing and Billing
Codespaces is only available for organizations on a GitHub Team or GitHub Enterprise Cloud plan. So if you’re not seeing an “Open with Codespaces” option in GitHub, it probably means you’re not using one of GitHub’s eligible paid services.
By default, every organization’s spending limit on Codespaces is set to $0. So you need to set a spending limit before you can start using this browser-based development environment.
Once a spending limit is reached, you won’t be able to resume projects or create new codespaces. But you’ll still have the ability to export work in progress.
Pricing is based on compute usage and storage usage. Compute usage is based on uptime minutes for active Codespace instances. Storage includes all files used in Codespaces, including configuration files, cloned repositories, and more. Both of these are reported daily and billed monthly.
Here’s alike at the Codespaces Compute rates:
- 2 Cores and 4 GB of RAM — $0.18 per hour
- 4 Cores and 8 GB of RAM — $0.36 per hour
- 8 Cores and 16 GB of RAM — $0.72 per hour
- 16 Cores and 32 GB of RAM — $1.44 per hour
- 32 Cores and 64 GB of RAM — $2.88 per hour
Codespaces storage, which is charged when inactive, starts at $0.07 per gigabyte per month.
Let’s take a look at some real-world examples of how Codespaces can be used:
Example #1: Custom Configurations With devcontainer.json
Obviously, customization capabilities are a key part of any development project. This statement holds true for both hobbyists and enterprise organizations alike.
With GitHub Codespaces, everything can be fully customized on a per-project basis. So your team isn’t boxed in from project to project. This is possible with a devcontainer.json file within the project repository. It can best be compared to development with VS Code Remote Container.
Here are some ways that you can customize Codespaces:
- Auto-install tools, frameworks, and runtimes
- Set variables for each environment
- Forward your most commonly used ports
- Set the Linux-based OS
- Install preferred extensions
- Configure your editor settings
For more information, check out this resource from GitHub about configuring Codespaces for your project. Only users with write permissions in a repository can create or edit configurations.
Example #2: Migrating to Codespaces
Arguably the best proof of concept for Codespaces comes directly from GitHub. Not only did they make this new coding environment available for GitHub users, but the GitHub engineering team is also using Codespaces in-house.
The team had to undo all of its previous assumptions that were used for the previous 14 years.
This migration began with a goal for on-demand development environment provisioning. First, they changed how Codespaces cloned GitHub. Rather than running a full clone for provisioning, Codespaces executed shallow clones with the most recent commits with unshallow repositories working in the background. This step reduced the clone time to just 90 seconds, down from 20 minutes.
Along with network caching changes, bootstrap dependencies, service level optimizations, and pre-builds, the engineering team ultimately created pre-configured Codespaces available for launch in just ten seconds.
So new developers on the team can enter a functioning development environment in less time than it would take them to install a team chat software. You can read the full story here.
How to Get Started With GitHub Codespaces
During its beta stages, Codespaces was free to use for users who requested it. But now that it’s been officially rolled out, the tool is only available for GitHub Team and GitHub Enterprise Cloud organizations. The following instructions only apply to GitHub users on these plans.
If you’re not currently on a GitHub Team or GitHub Enterprise plan, you need to sign up before you can proceed. You can sign up or upgrade your account here.
Step 1: Create a New Codespace
Assuming you’re on an eligible GitHub plan and you’ve increased the default spending limit for Codespaces, you can now create a new Codespace directly from your web browser.
Start by navigating to the main page of a repository in GitHub.com. Click the name of that repository and navigate to the Code dropdown menu. From here, navigate to the Codespaces tab and select New Codespace to continue.
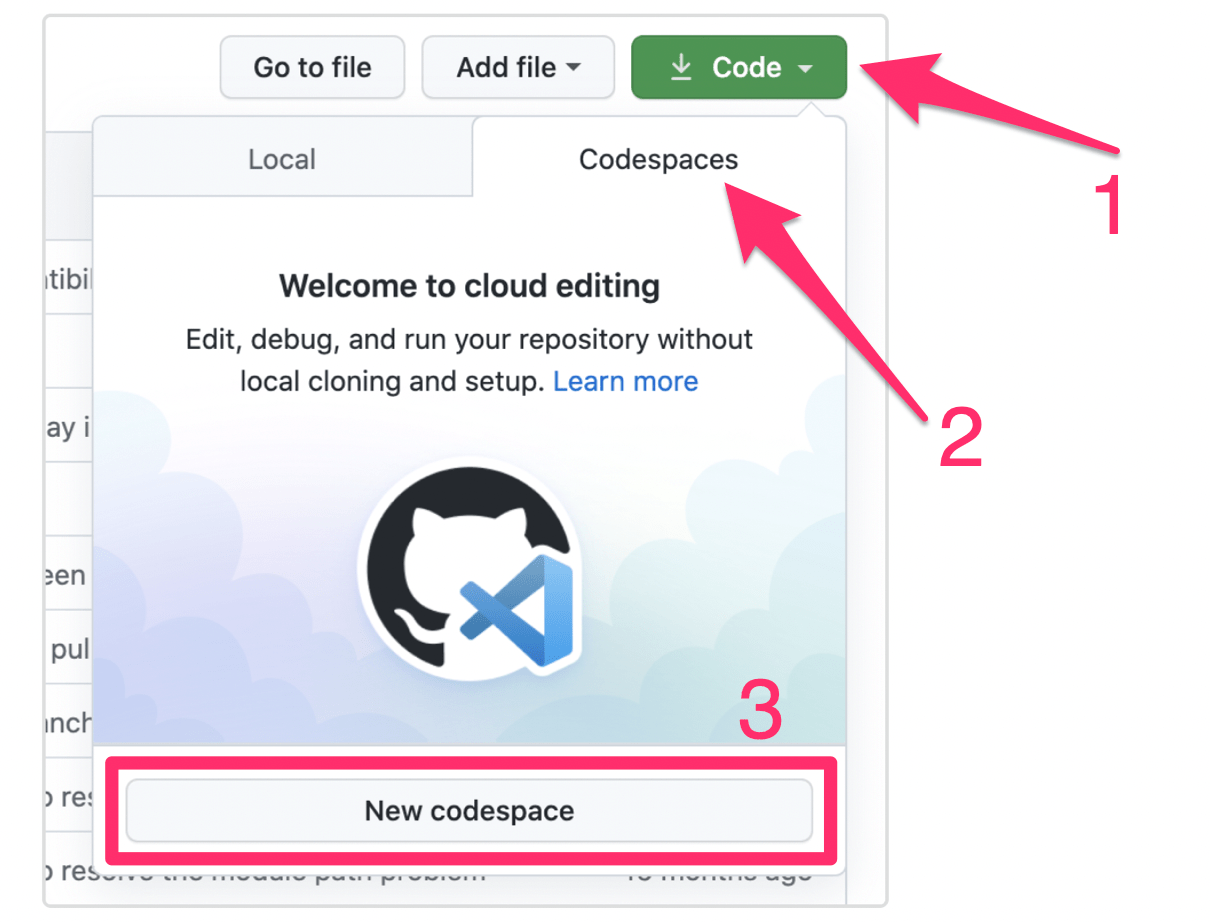
Next, you’ll be prompted to choose your machine type based on cores and RAM. We talked about these options earlier when we discussed the different pricing and billing options for Codespaces.
In addition to accessing Codespaces from your browser-based editor, you can also use the GitHub Codespaces browser extension, available on the Visual Studio Marketplace. So there are lots of ways to get started here, depending on your device and personal preferences.
Step 2: Customize Your Codespace
Every developer has the ability to customize their development environment in Codespaces. These customizations are designed to accommodate everyone’s individual workflow, regardless of the device they’re using.
The custom configurations typically fall into one of two categories—projected-based configurations and user-specific configurations.
Project configurations may include customizations like:
- Extensions to install
- Lifecycle comments
- Environment variables
- Port mapping and forwarding
- Image choices to spin up the development container
The user-specific configurations are applied globally to the developer. The configurations will automatically be applied to the developer, regardless of what Codespace or project they’re working on.
Other developers working on the same project won’t have the same preferences. Each person can create their own configurations based on their style and workflow during the development process.
User-specific configurations can be applied by synching Codespaces with the local VS code IDE settings. You can also apply them using dotfiles, like .gitignore, .vscode, .eslintrc, and more. When one of these settings on a Codespace is cloned, the installation scripts will apply your custom configurations to your codespace. It will include things like version controls, terminal preferences, and more.
Step 3: Set Up Your Project
Codespaces can be used to set up projects that can be segmented into four main category types:
- Node.js projects
- C# (.NET) projects
- Java projects
- Python projects
Each one has slightly different instructions and prerequisites. But they all follow a fairly similar and straightforward sequence.
For example, for a Node.js project, you’d need to have an existing TypeScript or Node.js repository in GitHub. Then you can just add a dev container to your Codespace using a template, modify your devcontainer.json file, run the application, and commit your changes.
Step 4: Start Developing
Once you’ve created a new Codespace, customized your configurations, and set up a project, you can start to write, edit, or debug code directly from your web browser.
As soon as you open your Codespace in GitHub, you’ll start to see the same familiar features available in Visual Studio Code. You’ll still get the full development experience of Visual Studio Code without any local installation requirements.
If you’re completely new to this tool and unfamiliar with the interface, here are a few quick pointers to get you started:
- Your sidebar is located on the left side of the interface. By default, you’ll see all of your project files here. This includes assets, components, layouts, docs, javascript, data, content, and more.
- The activity bar gives you a way to switch between views. To reorder views, take advantage of drag-and-drop capabilities within the Codespaces sidebar.
- You can edit all of your files directly in the cloud-based editor. The tab for each editor allows you to position everything exactly where you want it.
- The status bar, located at the bottom of the screen, gives you useful info about the Codespace. It includes things like configured ports, branch names, and more.
- View all of the debug information, outputs, and integrated terminal directly from the Codespaces panel.
After making changes in your Codespace, whether it’s configuration edits or new code, you still need to commit these changes. Once committed, everyone else in the repository will see your work.

