The Ultimate Manual To GitHub Actions
Continuous integration/continuous delivery (CI/CD) is a top priority for DevOps professionals. With GitHub Actions, you can manage CI/CD workflows directly from your repository.
This in-depth guide explains everything you need to know about GitHub Actions, including how it works and how to get started.
What is GitHub Actions Anyway?
GitHub Actions is a native CI/CD platform that gives developers the ability to automate workflows directly in GitHub.
That platform supports repository events that go beyond DevOps. For example, you can use it to automate workflows for adding labels whenever a new issue gets added to your repository. But you can also create workflows that build and test pull requests in a repository, automatically deploy merged pull requests into production, and more.
GitHub Actions comes standard with GitHub, so you won’t need to use third-party software or add-ons to automate CI/CD.
GitHub Actions launched in 2018 with the goal of helping developers automate workflows within GitHub.
But unlike other development automation tools, GitHub Actions goes beyond basic use cases for tests, builds, and deployment. It brings continuous integration and continuous deployment (CI/CD) directly into the native GitHub experience.
Developers use it to automate workflows across issues, pull requests, and more.
Pricing for GitHub Actions is based on minutes used per month, but it’s free for all public repositories. For private repositories, the free GitHub plan supports up to 2,000 minutes per month. GitHub Team and Pro plans come with 3,000 GitHub Actions minutes per month, and GitHub Enterprise supports up to 50,000 minutes per month.
How GitHub Actions Works
At its core, GitHub Actions uses automation and event-driven triggers to enhance the software development lifecycle within GitHub. The triggers can be anything from starting a new pull request to creating a completely new repository.
Automations from GitHub Actions are managed through workflows. The workflows are YAML files placed in .github/workflows directories for the repositories that define the process.
GitHub Actions is extremely versatile, and every repository can have more than one workflow, with each one performing different tasks. For example, you can set up one workflow that deploys an app each time a release gets created, another workflow that creates a label each time a new issue is opened, and another workflow that builds and tests pull requests.
As a CI/CD tool, you can use GitHub Actions to deploy code changes, test code, track changes, and deploy changes to a third-party cloud application platform. Using a native CI/D tool is much easier than relying on another platform. This allows you to leverage CI/CD features alongside your code directly in GitHub.
It’s built to help developers build CI/CD pipelines without a dedicated DevOps engineer.
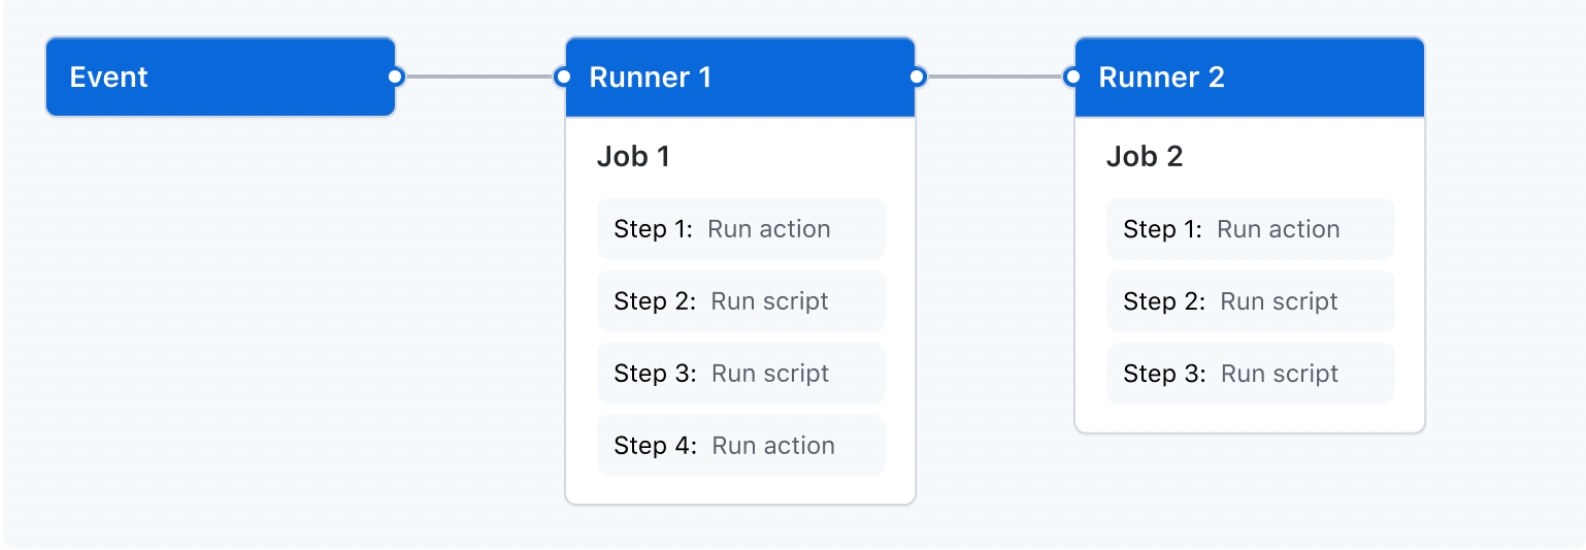
Events, jobs, runners, and actions are the core components of GitHub Actions. We’ll discuss each one in greater detail below:
Events
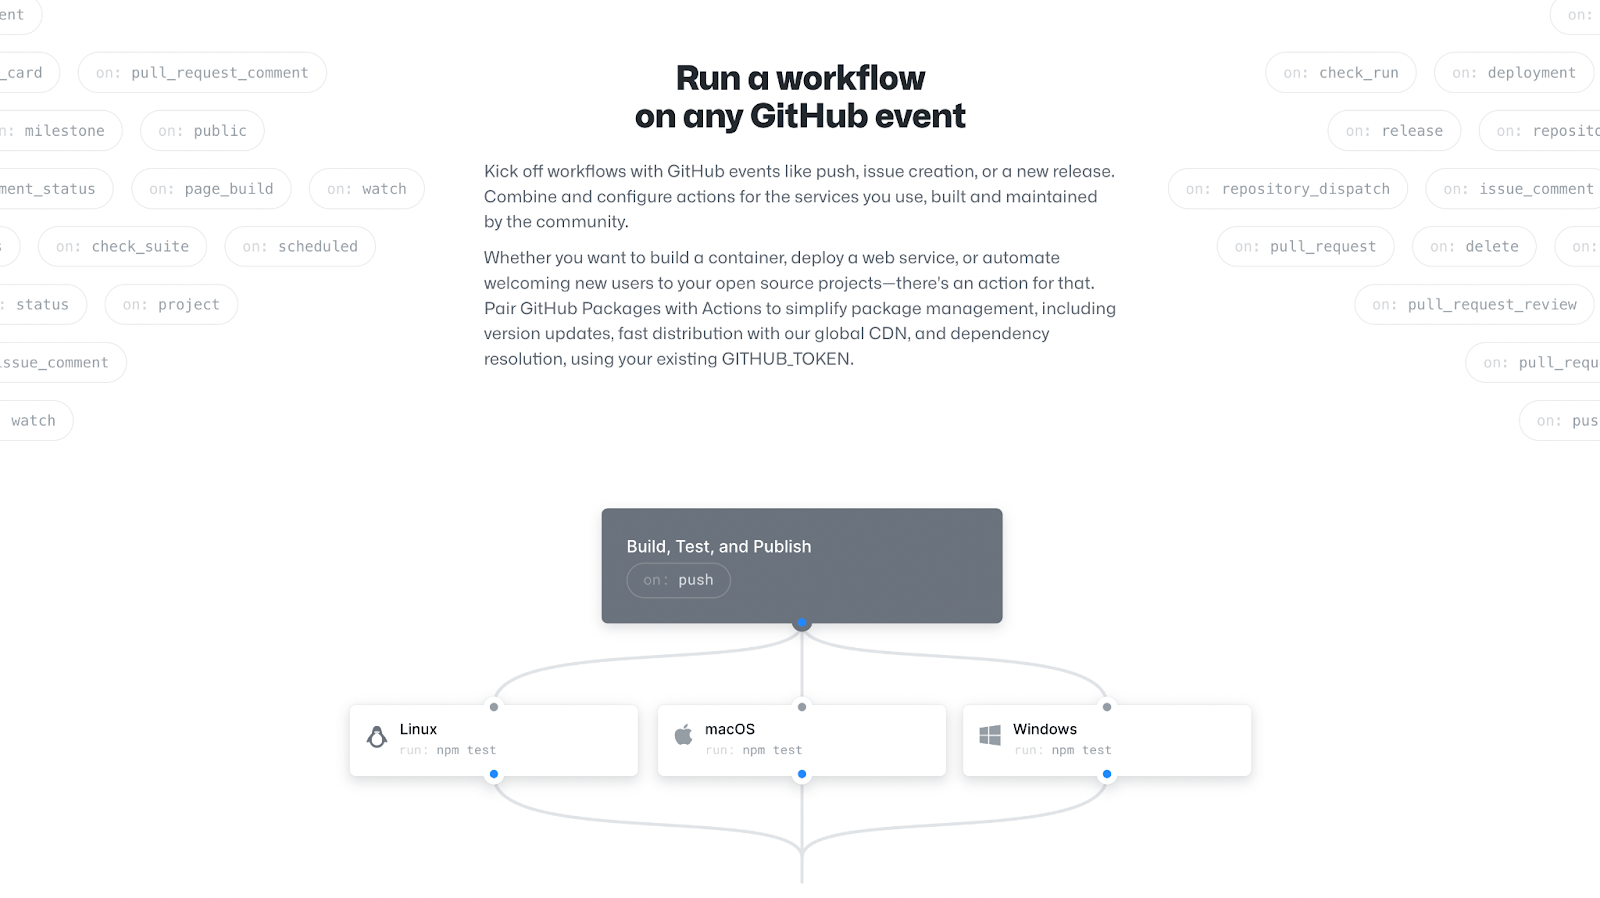
Events are specific activities within a repository that trigger a workflow to start. Examples of events could include:
- Pushing commits to a repository
- Opening a new issue
- Creating a new pull request
There are dozens of events that could trigger workflows. You can check out this GitHub documentation for a full list of available events.
You can also use GitHub Actions to trigger workflows that run on a schedule, trigger actions using a REST API, or trigger them manually.
Jobs
Each job is a set of steps within a workflow.
Steps are either actions that will get run or a shell script that will get executed. Each step gets executed from the same runner, making it possible for steps to share data with each other.
For example, you can create a step that builds an application followed by another step that tests that application.
By default, each job runs parallel with other jobs. But you can configure job dependencies to enhance your workflow. If one job is dependent on another, it will wait for that connecting job to finish before it executes.
For example, let’s say you have three build jobs for three different architectures. Each of these will run parallel to each other. But you can set up a packaging job that’s dependent on the first three that won’t run until the builds are successfully completed.
Runners
Each runner is a server that executes a triggered workflow. Runners can run one job at a time, with each workflow run in its own provisioned virtual machine or container.
Microsoft Windows, macOS, and Ubuntu Linux runners are provided by GitHub. But you also have the option to host your own runners or use another hardware configuration for self-hosted runners.
Actions
Actions are custom applications that perform complex and repeatable tasks. The purpose of each action is to reduce the amount of time spent writing repetitive code within workflow files.
Actions can set up cloud authentications, pull Git repositories, and set up your build environment. Developers can write their own actions or use pre-built actions in the GitHub Marketplace for workflows.
Let’s look at some common examples and use cases of how GitHub Actions works in the real world.
Example #1: Automate Repetitive Tasks
GitHub Actions can simplify the software development lifecycle through task automation, including:
- Creating a pull request
- Adding a new contributor to the repository
- Merging pull requests
- Integrating a webhook from third-party applications
- Sorting issues
- Assigning reviewers to pull requests
There is seemingly an unlimited number of repetitive tasks that you can put on autopilot with GitHub Actions.
Example #2: Build, Test, and Deploy Without Leaving GitHub
GitHub Actions makes it possible to run CI/CD workflows in virtual machines and containers without having to leave your GitHub repositories. So there’s no need for a third-party tool for CI/CD.
If you do prefer to use third-party CI/CD tools, GitHub Actions allows you to integrate them into your repository as well.
Example #3: Code Review and Testing
You can use GitHub Actions to integrate a third-party testing platform into your repository at any stage in the workflow.
GitHub Actions also supports matrix builds and multi-container tests for your code—allowing you to run tests on Windows, macOS, and Linux simultaneously.
Example #4: Manage GitHub Users
GitHub Actions makes it easy to assign developer permissions and set organization rules at scale. You can also set up GitHub Actions to notify a reviewer of new pull requests and other tasks that need attention.
As your project and team scale, setting up these workflows with GitHub Actions can make your life much easier and reduce the amount of time spent on administrative tasks.
Example #5: Integrate Tools and Services Into GitHub Projects
Developers can use GitHub Actions to integrate third-party tools and connect third-party services directly into a GitHub repository.
You can do this with team chat apps, issue tracking tools, container management platforms, and so much more. This makes it much easier to build, test, and deploy within a GitHub workflow.
Example #6: Track Projects
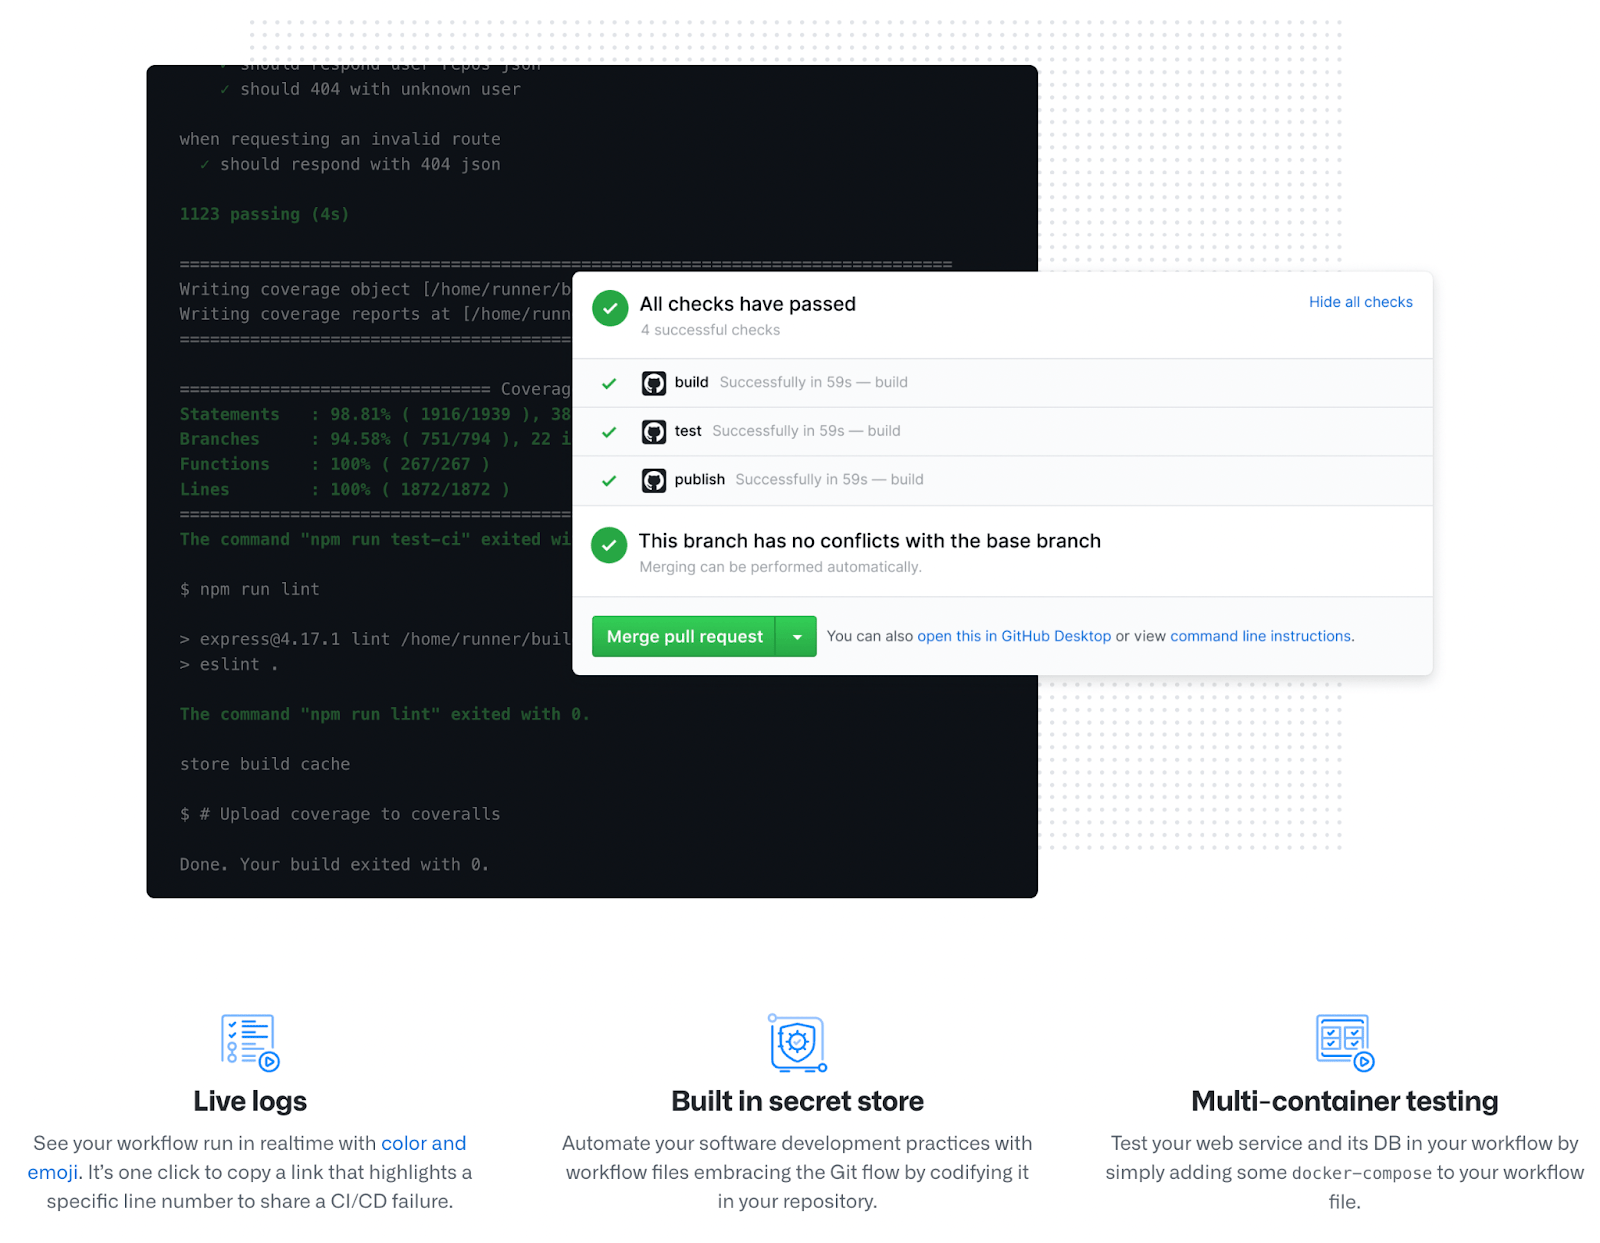
GitHub Actions is an excellent tool for tracking errors, measuring performance, and monitoring new application builds.
You can use live logs to watch your GitHub workflows execute in real-time. If a step fails, you can also leverage the live logs for identifying and solving the problem.
How to Get Started With GitHub Actions
Now that you understand what GitHub Actions is and how it works, it’s time to start using it on your own. These five steps below will guide you through the process of using GitHub Actions to create a CI/CD pipeline:
Step 1: Get Organized
This tutorial assumes that you already have an active GitHub account. For those of you who don’t, you can create a GitHub account here.
All GitHub plans come standard with GitHub Actions built-in. GitHub Actions is free for all public repositories, and even GitHub users on a free plan have up to 2,000 minutes per month of GitHub Actions on private repositories.
You do not need to set up, maintain, or configure any resources in your CI/CD pipeline. There are no hardware requirements, webhooks, or anything else to worry about—everything is already built into GitHub via GitHub Actions.
It’s also worth noting that GitHub Actions supports any language, platform, and cloud. So you can use it with whatever tech stack you’re currently using without having to reconfigure anything.
GitHub Actions offers a flexible approach for CI/CD. When you open GitHub actions in a repository for the first time, you can choose between pre-built workflows or creating your own from scratch.
Step 2: Create or Select Your Repository and Project
Now it’s time to select a repository on GitHub. Depending on your goal here, there are three options to consider:
- Use the code base of an existing project
- Fork a project
- Start from scratch
If it’s your first time going through this process, you might want to practice using GitHub Actions before applying it to a serious project that you’re actively working on. Forking an open-source sample repository is usually a safe play for beginners.
Step 3: Open GitHub Actions in Your Repository and Choose a Workflow
Once you’ve selected a repository in the project, you can open GitHub Actions directly on GitHub.
Navigate to the Actions tab at the top of your repository’s navigation menu.

You should see lots of different workflow automation templates on this screen. GitHub Actions will even suggest certain flows for your specific repository.
The workflows you choose here will depend on your needs and goals. But if you just want to practice and get your feet wet with GitHub Actions, these are some CI/CD workflows you can start with:
- Development Workflow — You can use development workflows to run jobs when pull requests are opened, synchronized, or edited. Common jobs associated with this workflow include running npm tests, installing npm packages, setting up dependencies, and setting up Nodes.
- Analysis Workflow — A CodeQL analysis flow will run CodeQL security tests on your code after it’s been merged to the main branch. This ensures that it doesn’t have any known vulnerabilities. Overall, it’s a simple and effective way to scan your code after a merge.
- Release and Build Workflow — This workflow will run tests and enforce code changes when you’re building an app. It will ultimately deploy the final code of your production environment, create a release using the proper structure for the automated release notes, publish, and bundle the project into a container. You can also use this to automatically change the version number of your application and adjust the repository tag accordingly.
These are fairly basic examples of workflows that can be used to test, build, stage, and deploy code for a sample project. You can obviously add more if you like or try setting up others as a replacement.
It’s important for beginners to start small. You don’t need to set up a complex CI/CD pipeline that’s built to scale on day one. Just focus on setting up flows that make your day-to-day life easier for your specific tasks.
Step 4: Make Changes to Trigger the CI/CD Pipeline
Once you’ve set up the CI/CD pipeline, you need an event to trigger it.
The event in this step will obviously depend on the workflows you’ve already set up. To illustrate a simple example, let’s say you’re using GitHub and GitHub Actions to manage the code of your website.
You can make some small changes to something on the header, add an image, or just anything that will test if the workflow is set up properly. Then push the chances to see if the CI/CD pipelines work as intended.
Step 5: Use the Workflow Visualizer and Live Logs to Test Your Pipeline
GitHub Actions has a workflow visualization tool that you can find directly from the main Actions page. Each job in the workflow will have one of the following symbols next to it:
- Green checkmark: means the flow is working
- Yellow circle: flow in progress
- Red sign: job failed
This is just your YAML file flow shown visually. This makes it much easier to see what’s working and what’s happening in real-time.
You can also use the live logs to find out if things are working or not working. The logs contain timestamps and show exactly which part of the workflow failed, making it much easier to solve the problem. The live logs use color codes to show which job fails, so you can identify them immediately when you open the log.

