How to Download an Image from a Google Doc
CMOs, managers, freelancers, and students – nearly everyone uses and is a fan of G Suite, and more specifically Google Docs.
And why not? It’s user-friendly, super convenient, and universally accessible – provided you give the required permissions.
But no matter how great the platform is, it does have a few shortcomings.
For instance, have you ever tried to save an embedded image from a Google doc? Yep, it’s no fun… and tricky.
Don’t worry, though! We’ve created a handy guide below to help you work with images in Google Docs.
So let’s get to it!
Why Is Downloading an Image From Google Docs So Hard?
For whatever reason, Google Docs doesn’t allow you to download images directly. Yes, you can paste and hyperlink to the image or remove it – but you just. cannot. save. it!
Ugh.
Didn’t notice it before? Just take a look at the screenshots below.
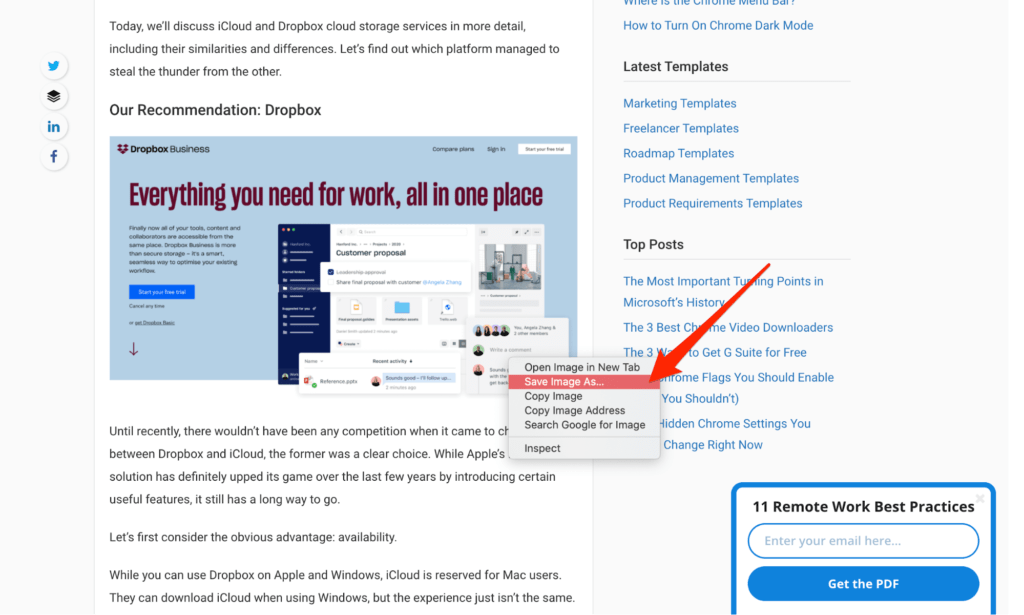
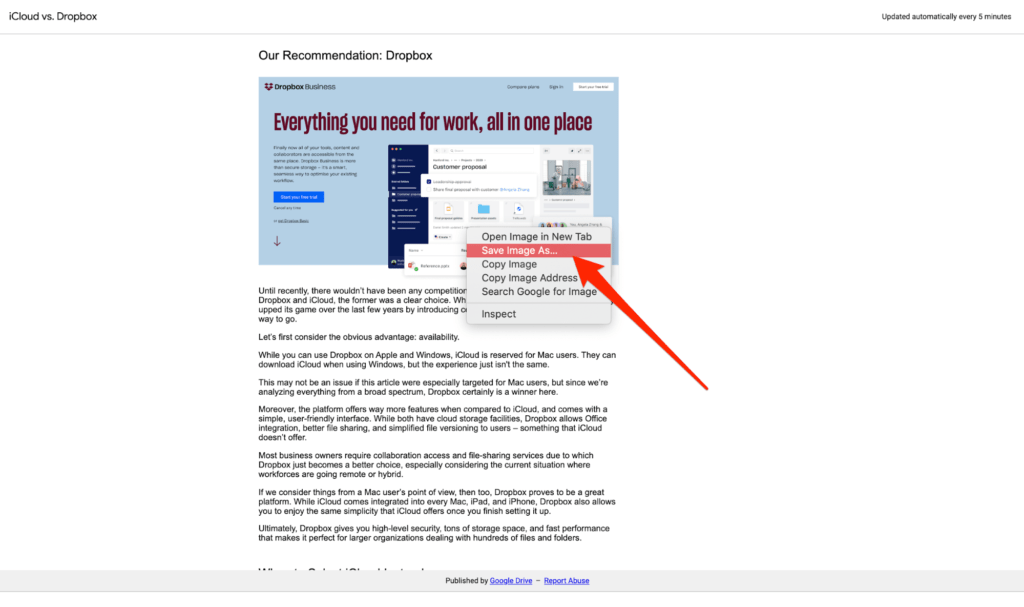
We want to download this image from one of the articles on our FYI blog. As we right-click on it, we see the Save Image As option. Once we click on it, a pop-up box will appear that will then enable us to save the image in the Downloads folder.
Easy. Simple. And convenient.
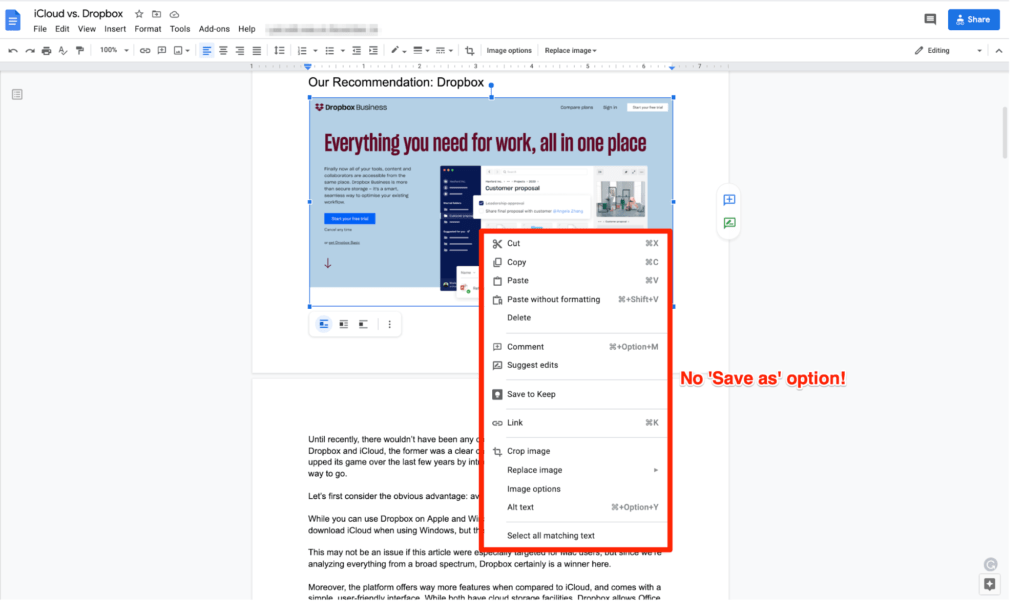
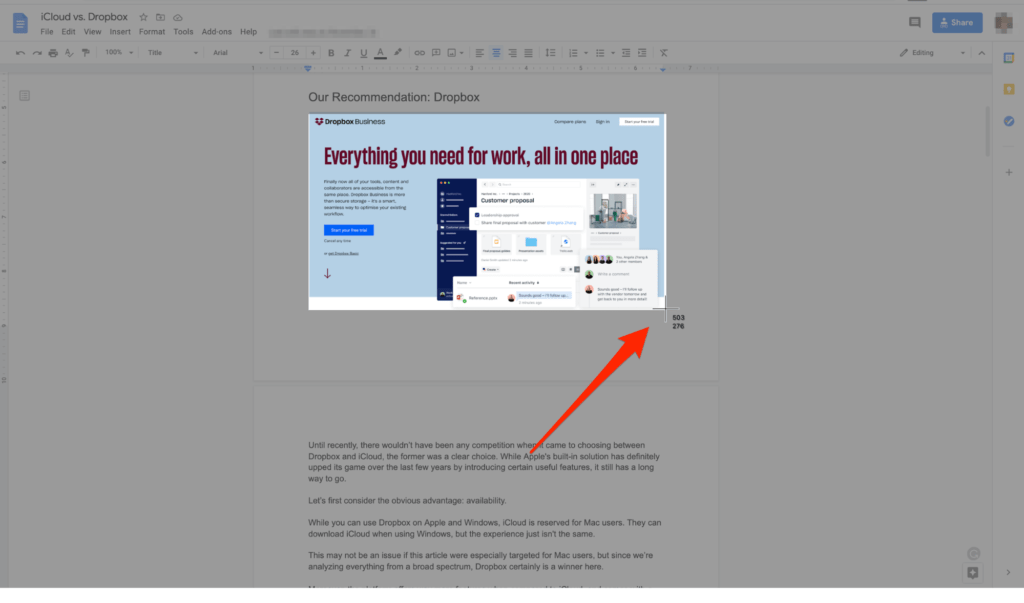
This screenshot is a Google doc of the same article.
The difference here is that when you right-click on the image to save it, you won’t find the Save Image As option anymore. You’ll see Copy, Delete, and even Paste without formatting, but no option to save it.
The reason? Well, there’s no specific reason given as Google is yet to address this issue.
Luckily, there are various methods that allow you to work around this shortcoming.
7 Ways to Download a Google Doc Image
So you can’t right-click on the Google doc image and save it – that much has been established. To make picture-saving easier for you, we’ve listed some of the most efficient, easy, and quick ways to do it.
Let’s take a quick look.
Method One: Saving Images From Google Docs Using Publish to the Web
This is definitely one of the most common methods to save images from Google docs, and one that we would recommend as well.
Step #1 Log in to your Gmail account to open the Google doc file from where you want to save the images.
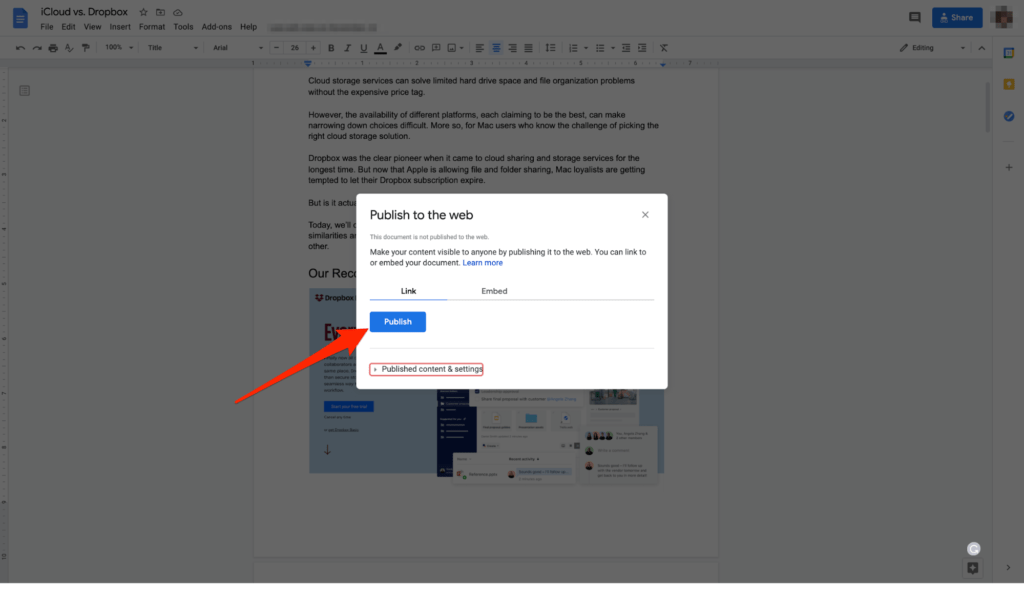
Step #2 Click on File located on the top menu bar and then select Publish to the web.

Step #3 A pop-up box will appear. Click on Publish, and when prompted, select OK.
Step #4 Copy the link generated, and then paste it on another tab. You’ll now see a published version of the document.
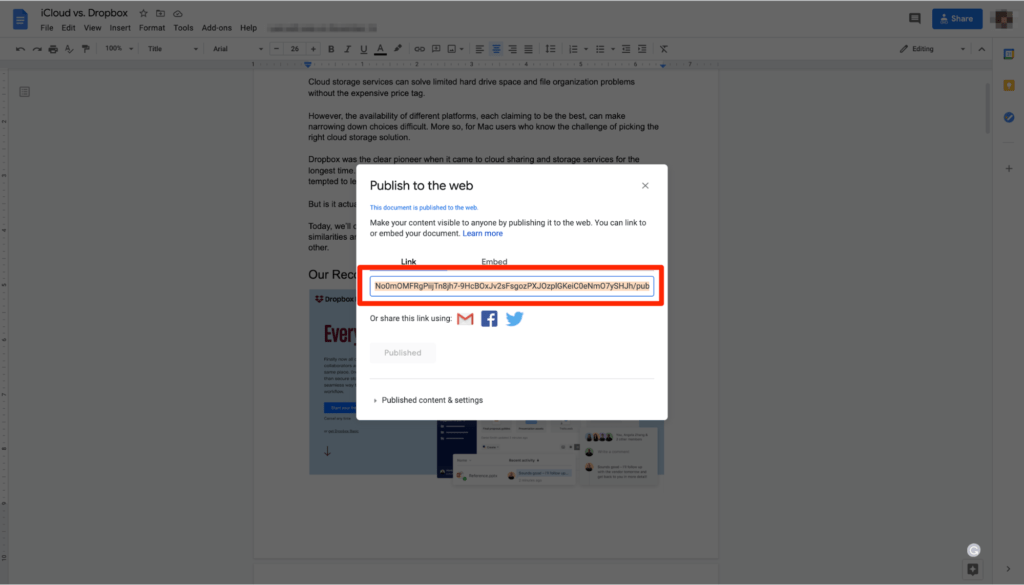
Step #5 Right-click on the images that you want to save by selecting the Save Image As option.
Want to unpublish the doc file? That part is covered as well.
You have the option to unpublish the link if you don’t want other people to find out about it. Just go back to the original Google doc and select the Stop Publishing. This will then unpublish the document from the web.
Method Two: Saving Images From Google Docs by Taking a Screenshot
Screenshots are super useful. You can capture images, texts, or lists to view later, use them as receipts to expose liars, or use it to save an image from Google docs.
Here’s what you need to do to get the doc images:
Step #1 Open the doc that has the picture(s) you want to save.
Step #2 The second step involves you taking a screenshot of your screen, which can be done in two ways, depending on the device you use:
- If you’re using a Mac, press Shift + Command + 4.
- If you’re using Windows, use Control (Ctrl) + Print Screen or PrtScr.
There’s also a third way where you can use a third-party screenshot tool.
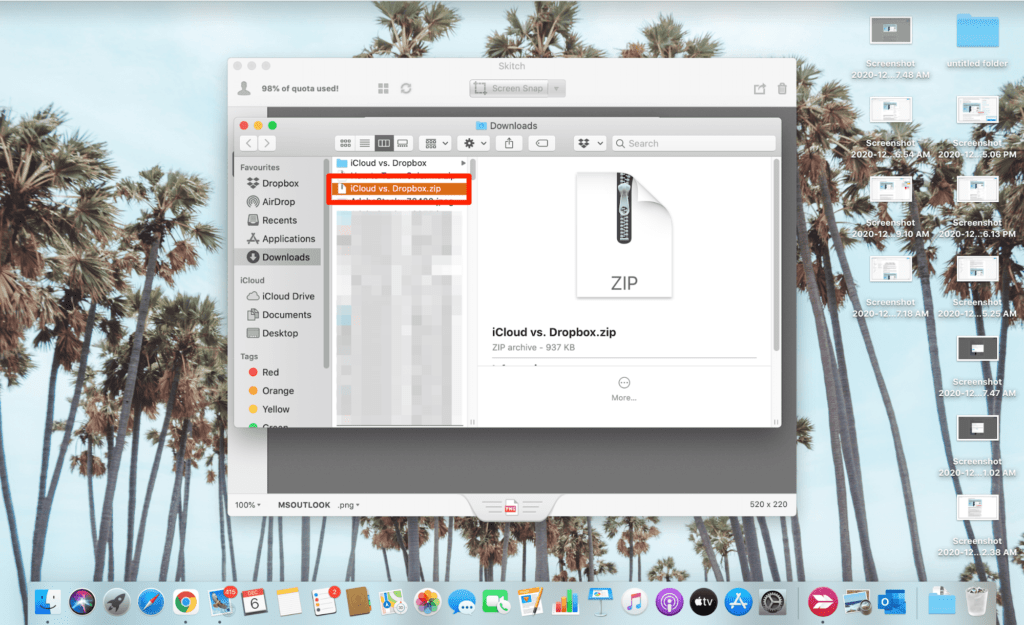
We would highly recommend downloading an app known as Skitch for this. It has a Crosshair Snapshot feature that enables you to take a screenshot of your doc images.
Once you’re done taking a screenshot of your images, you can mail all of them to yourself and then download them from there.
Method Three: Saving Images From Google Docs Using Google Keep
In this method, you’ll save your images to Google Keep, which is a note-taking service developed by Google. It’s also one of the most common methods recommended by experts as it’s quick and safe.
Step #1 Open the Google doc that has the image you want to save.
Step #2 Right-click on the doc image and select Save to Keep.

Step #3 You’ll find a sidebar that will appear on the right-hand side of your screen. It’ll have the image you added on Google Keep. Again, right-click on it and choose Save image as to download it.
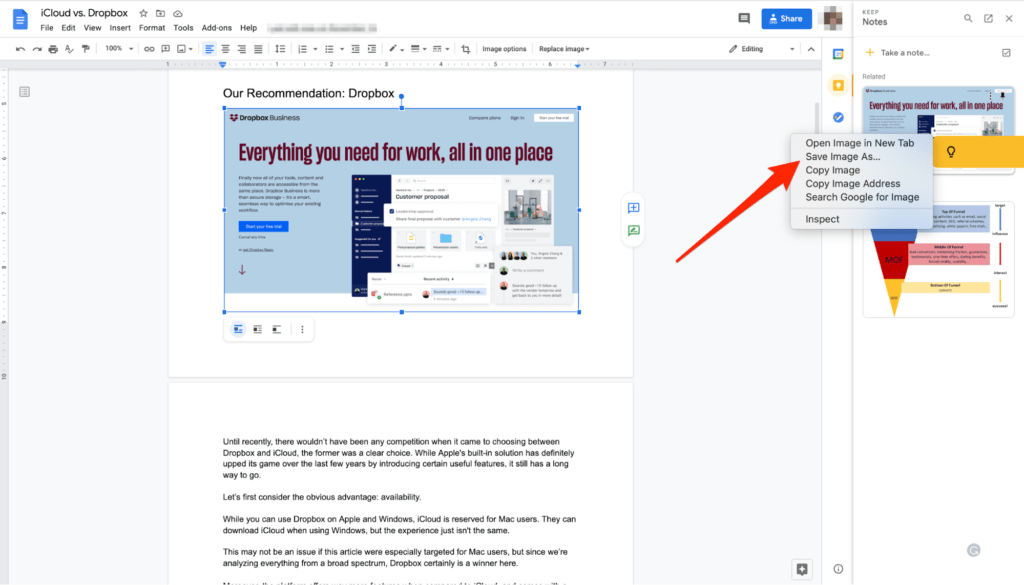
One of the best things about this method is you don’t have to manually download or sign up for Google Keep since you aren’t exactly using the feature – it’s just the sidebar!
That said, this method only works on Google Chrome, so make sure you open the Google doc on the right web browser.
Method Four: Saving Images From Google Docs by Downloading It as a Web Page
Google Docs has a built-in feature that allows you to download the whole document in various file formats, such as Microsoft Word, a PDF, or as an EPUB publication. In this case, you’ll download it as a web page.
Step #1 After opening your Google doc, go to File located on the top main menu. From there, select Download, followed by Web Page (.html, zipped).
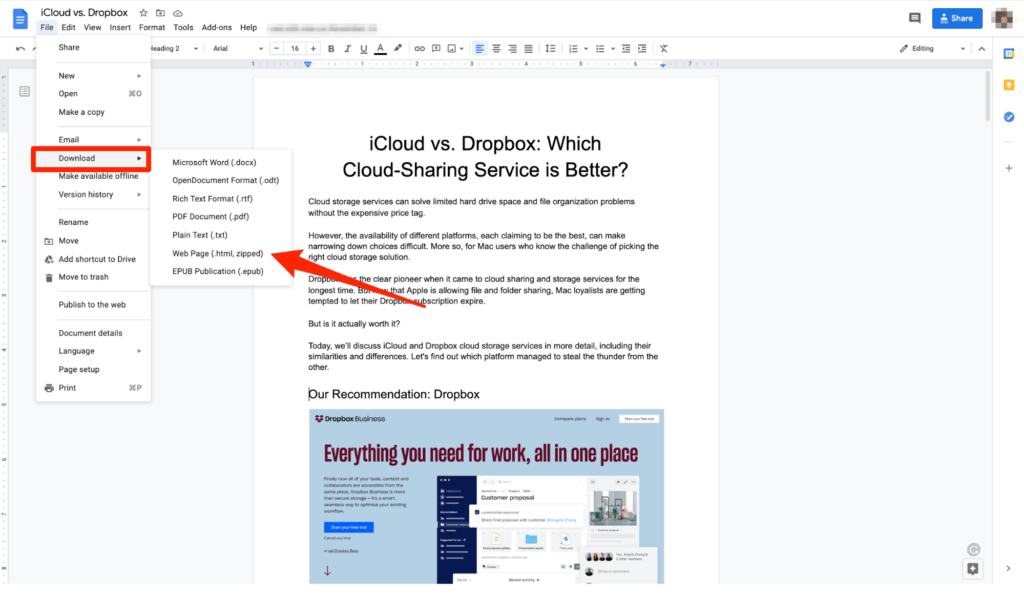
Step #2 Once the download is complete, you’ll have to unzip the file.
Step #3 Double-click on the zip file to get the unzipped version. You’ll find two options here: the HTML link and images.
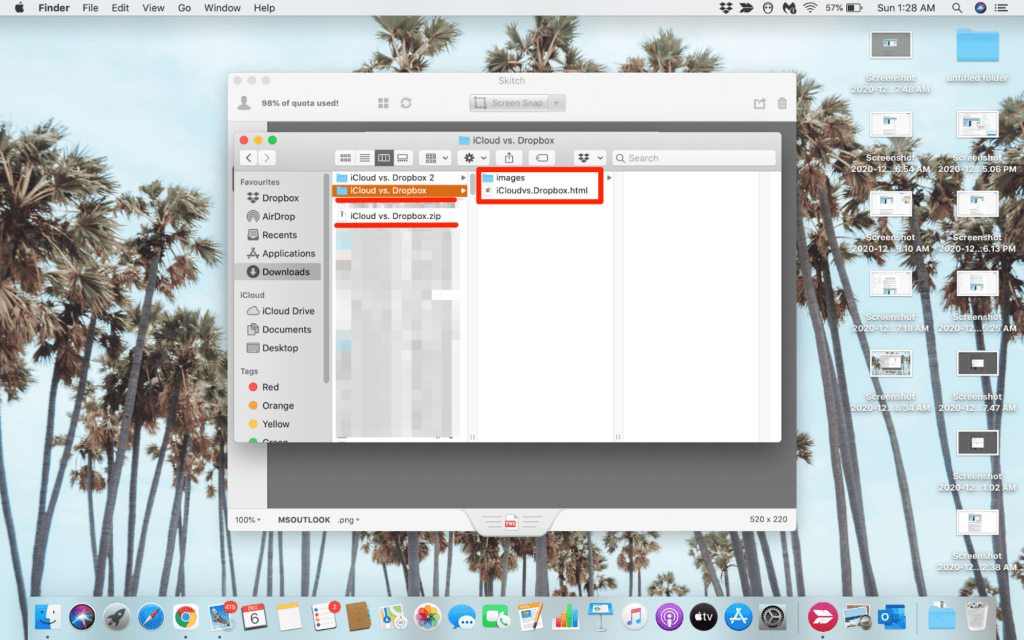
You can then use the images in the Image file to upload them wherever you want.
We would highly recommend this method for times when you want to download multiple images. It’s incredibly effort- and time-saving since all the pictures are downloaded at once.
Method Five: Saving Images from Google Docs Using an Image Extractor Add-On
Just like the previous method, you can download several images from your Google docs file by using an image extractor add-on. Here, we’ll be using add-ons for Google Docs.
Don’t worry, it’s much easier than it sounds – just do as directed below:
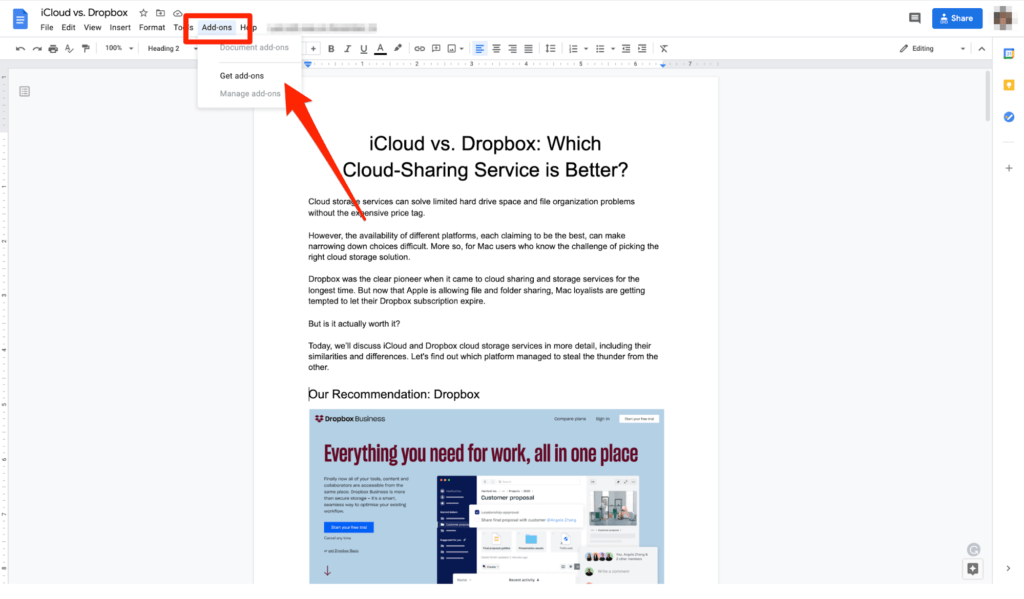
Step #1 Open your Google doc and click on the Add-ons option on the main menu. Select Get add-ons.
Step #2 A pop-up box will appear. Type in ‘Image extractor’ in the search bar and press Enter.
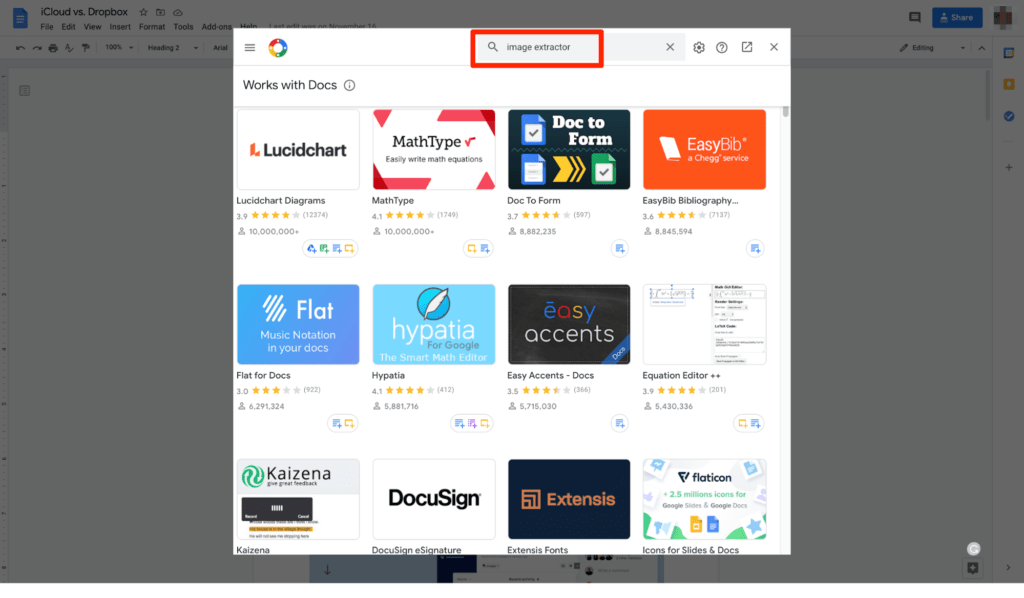
Step #3 Select the add-on you want and hit Install. This will automatically initiate the installation of the image extractor extension in your Google docs, which you can use later to download the Google doc images.
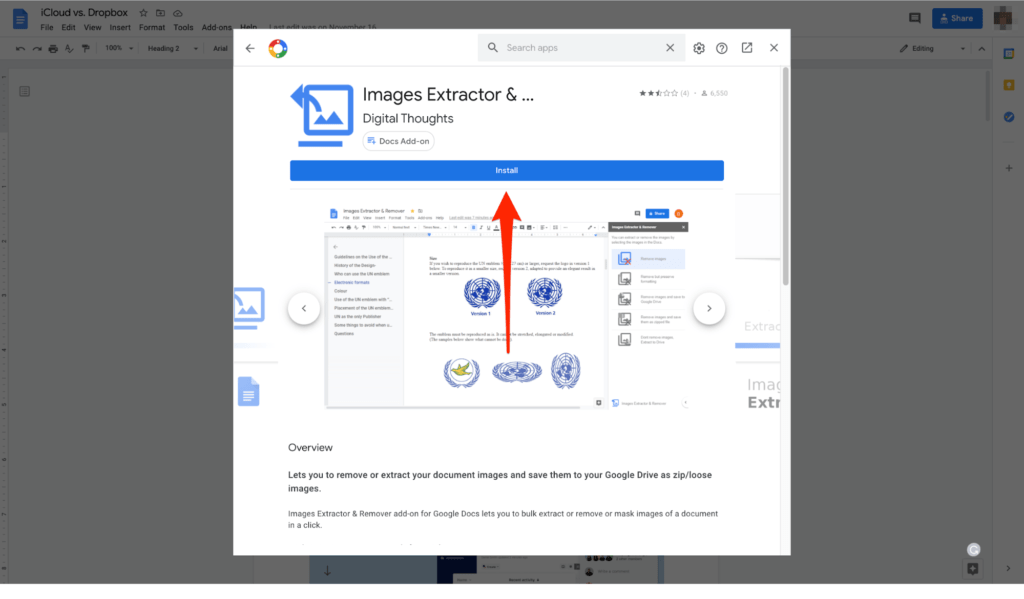
Remember, you’ll have to grant permissions for the extension for it to work. For this, go to Add-ons on the menu bar, select Image extractor, and then lastly, click on Start.
After starting the extension, simply click on Download after right-clicking on the image in your Google doc.
Method Six: Saving Images From Google Docs Using Download as Microsoft Word
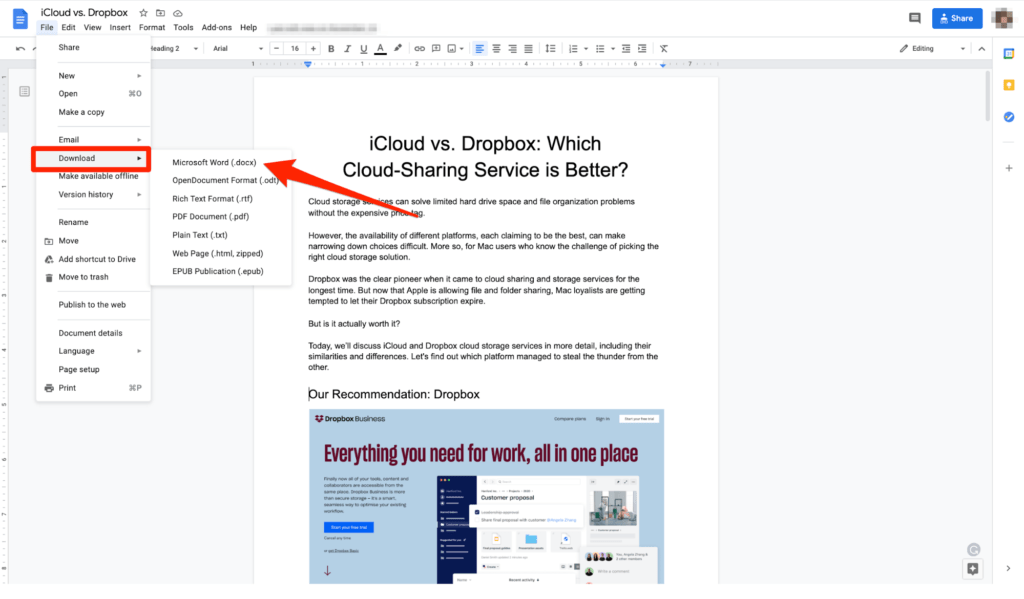
Remember how you had downloaded the entire document as a web page in Method Four?
That is exactly what you’ll do here, but instead of selecting the Web Page format option, you’ll choose Microsoft Word or .DOCX instead.
Step #1 After opening your Google doc, go to File located on the top main menu. From there, select Download, followed by Microsoft Word (.docx).
Step #2 Once the download is complete, open the file in Microsoft Word. Right-click on the image you want to save and then click on Save image as/Save as Picture.
You’ll see another pop-up box after that, prompting you to save your image as well as select the location where you want it to be saved. After customizing your settings as per your preference, click on Save.
Once the images are extracted from your document, you’ll have the option to do anything you want: upload it to a content management system or CMS, share it on social media, or mail it to a client.
Method Seven: Saving Images from Google Docs Using a WordPress Plugin
If you find yourself using WordPress daily or publish your Google docs file directly into the platform, this is the perfect method you’ll need to save images from Google Docs.
Step #1 The first thing to do here is to download the Google Docs file in Word or .DOCX format. For this, you can proceed by following the steps we discussed in the previous method.
Once you’ve downloaded the file, upload it on WordPress.
Step #2 Next, you’ll have to download a WordPress plugin that allows you to upload the Microsoft Word file. We would recommend Mammoth .docx converter, but you can use whichever plugin you like ana offers this facility.
After downloading the plugin, create a new post on WordPress. On the WordPress Post Page, you’ll see the Mammoth .docx converter option. Upload your .DOCX file now and then click on Import.
And that’s it! Your Google docs file is now successfully imported to your WordPress post – with all your images in that!
Wrapping Up
When it comes to the best productivity tools available virtually, Google Docs is arguably on the number one spot. With its easy to use and convenient design, it’s definitely a powerful word processor.
Of course, you might encounter a few challenges like downloading an image directly from the docs file, but if you use the right technique or tool, you’ll find nearly every problem has an easy fix.
We’re wishing hard for Google to launch a Save As option super soon, but until then, you can use any one of our seven listed methods above.

