The Ultimate Manual to Common GitHub Issues
GitHub is a powerful collaboration tool and version control platform with more than 56 million users. One of its most attractive features is GitHub Issues, a tracking tool that allows teams to collaborate on projects in real-time. Read on to find out how to effectively use GitHub Issues for common development problems.

What Are Issues in Software Development Anyway?
Just like in any other field of work, problems are bound to come up in software development. Typically, these challenges manifest as problems with the code’s functionality, such as bugs or defects.
However, not all software development problems are related to the final product’s functionality. Sometimes, developers may suggest a change to improve the code, ask questions about a repository, or request missing documentation. All these are called issues.
In short, an Issue in software development refers to a unit of work that needs to be performed to improve a system. Therefore, issue tracking, also commonly referred to as issue management, is a fundamental part of software development. In this case, issue tracking is the process of detecting, reporting, fixing, and documenting all issues in the final product.
How GitHub Issues Works
Given that issues are bound to come up in the development lifecycle, it is helpful to have a way to track them as they occur. Moreover, it is beneficial to have a central place for developer teams to collaborate on issues. Tools like Jira and YouTrack are handy for issue tracking.
However, GitHub comes with its own lightweight issue tracking system known as GitHub Issues. This way, you don’t need a separate tool or platform just for issues. This functionality is built right into your repositories and is available immediately when you create a new repository.
Here, anyone in a public repository can quickly create an issue. Each new issue comes with a discussion thread where team members can contribute. Typical scenarios where GitHub users create issues include to:
- Discuss specific details of a project, such as feedback, bug reports, or planned improvements.
- Propose a new feature or change.
- Define requirements for a new feature.
- Manage a specific workflow, such as getting a commitment from other team members or requesting access to a system.
- Organize work on a specific deliverable.
Additionally, GitHub offers several ways to create an issue, including from a note in a project, a repository, a specific line of code, an item in a task, or a comment in an issue or pull request.
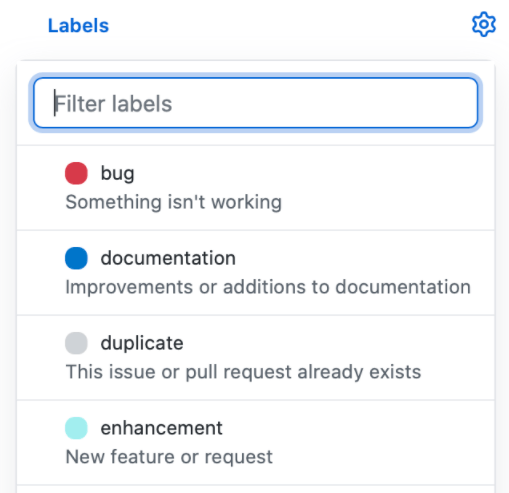
GitHub even provides labels to categorize issues. The labels make it easier to track issues. For example, you can tag unintended behavior or unexpected problems with the Bug label. Equally, you can label all-new feature requests with the Enhancement label. This way, you can sort through issues at a glance or even filter them by type.
GitHub even lets you edit labels and assign each label a unique color to make sorting through your issues even more effortless.
Let’s take a look at some examples of GitHub Issues use cases.
Example #1 – Reporting Bugs With GitHub Issues
Say you have encountered a problem when testing software and want to bring it to the attention of the developers so they can fix it. GitHub Issues is the perfect place to submit a bug report. But first, you’ll need to make sure that the bug gets due attention and is fixed quickly.
To this end, you’ll need to write a good bug report. First, the report should include a clear and concise description of the bug, along with a unique bug number. Next, include the steps to reproduce the bug, the tests you performed, and where the defect occurred. In short, provide all the information to make it easy for the developer to understand the problem clearly.
With your information in hand, it is time to submit your bug report with GitHub issues:
- First, navigate to the main page of the repository you are working on.
- Then, click Issues.
- Click New Issues.
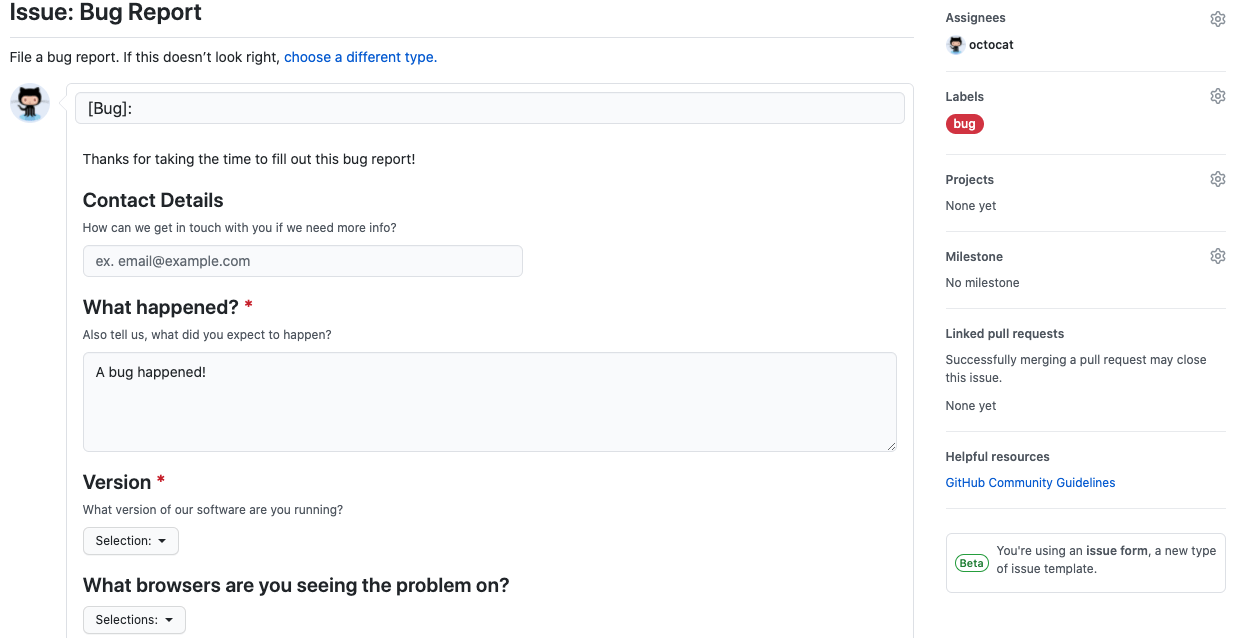
Then, fill in your information, including a descriptive title and the details of the issue. There is an option to preview your issue before submitting it. This way, you can look at your proposal from the developers’ perspective and make any formatting changes if required.
Finally, click Submit new issue. The developers will now be able to see the details of the bug in their Issue List.
There are a few more things that you can do to improve your reporting. For example, adding a label specifying that the issue is bug-related makes it easy for developers to categorize their workflow. Additionally, you can assign the issue to a specific team member to guarantee that someone will work on the issue.
You can edit the report even after submitting it. You’ll also get a unique URL for your issue that you can share with team members. You can also use this URL to reference other problems or pull requests.
Example #2 – Commenting on Issues in GitHub
Let’s follow the previous example. But, this time, you are the one to fix the bug. However, you don’t want to change the code base until you have the go-ahead from other crucial team members.
Or, maybe you want to offer your insights on another collaborator’s issue.
GitHub supports comments on issues to make sure everyone is on the same page. In this case, you or other team members can add comments to an issue. These comments may be suggestions on how to approach the fix or other input relating to the issue.
The crucial thing is to keep the comments relevant to the issue. To comment on an issue:
- Navigate to your repository’s main page.
- Click Issues under your repository name.
- Click the issue you want to comment on.
- Scroll to the bottom of the issue and write your comment.
- Click Comment to submit it.
Not every issue requires detailed or complex points. To this end, GitHub lets you use reactions to express your feelings more directly. These reactions are limited to feelings relevant to typical code discussions such as confusion, smile, +1, or heart reactions.

These reactions are also available for pull requests. Finally, GitHub’s @mention feature lets you tag specific people in your comments. The mentioned members will get an email notification, so remember to use this feature sparingly.
How to Get Started With Common GitHub Issues
If you’re ready to start using GitHub’s issue tracker, here’s how to go about it:
Step 1 – Stick With the GitHub Issues Default Settings
You’ll probably want to customize GitHub Issues right off the bat. For example, you might want to create issue forms or templates to structure reporting. But, first, it’s a good idea to get a feel of how the feature works in a collaborative setting before implementing a tighter rein on discussions.
To this end, stick with the default settings, at least for a while. This step may sound counter-intuitive. After all, the idea is to limit noise and have an actionable discussion.
But, the idea behind the collaboration is to create an environment where developers and stakeholders can share information and weigh in before code gets done. Providing a free-for-all environment encourages the free flow of ideas.
Also, this strategy helps you to understand exactly what’s relevant when it’s time to structure issue tracking. You’ll have a better sense of what discussion should occur on GitHub Issues and which can be deferred to another collaboration channel such as GitHub Discussions.
Step 2 – Create A Standard Guideline For Issue Reporting
Guidelines for issue reporting can help to bring some order to GitHub Issues. Of course, you don’t want to limit the flow of information just yet, but you still need a semblance of order. Creating a structure that everyone follows will help bring some sanity to issues management.
Consider documenting a structure for all users to follow when using GitHub Issues. Some of the things to think about include:
Titles: It is a no-brainer that every issue should have a title. But, encourage your team to keep the titles short and descriptive. After all, most contributors only see the title in the list view. Bad titles are more likely to be ignored or dismissed.
Description: Encourage reporters to keep their issue descriptions clear and concise. Bullet points, colons, and incomplete clauses are great for keeping the message brief. Also, encourage contributors to offer details of what they tried to resolve the issue, even if it did not work.
Similarly, keep the issue descriptions up-to-date with the most current information and status. This way, team members don’t need to read the entire thread history to understand what’s going on.
Directly Responsible Individual: Ask contributors to mention the Directly Responsible Individual (DRI) in their issue. The DRI is responsible for completing a clear deliverable. Also, make separate issues when there is more than one person required to work on the task. Additionally, mentioning members to provide specific feedback helps to make collaboration more productive.
Use Formatting: GitHub issues offer great formatting options to help make collaboration more productive. Use things like check-boxes, bold text, lists, images, links, and syntax highlighting where appropriate. Shrewd formatting can help to reduce endless back and forth and ensure that everyone is on the same page.
Step 3 – Structure Issue Reporting
Once you have a feel of using GitHub Issues, you may notice specific trends. For example, you may find reporters making announcements, sharing company news, or discussing open-ended questions.
While it’s encouraged to keep everyone in the loop, not every discussion belongs in GitHub Issues. So, you may want to limit this feature to actionable discussions, such as sharing feedback, filing a bug report, or asking specific questions about files in the repository. But, again, an issues template is invaluable for creating structure.
GitHub already offers templates for the most common issues to get you started. Or, you can build a template from scratch using GitHub’s template builder. I suggest starting with the standard templates that GitHub offers. You can even customize the templates to fit your team’s preferences.
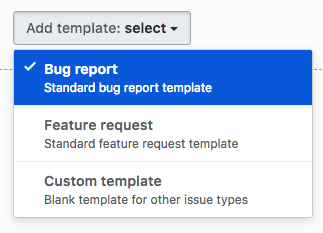
Then, you can work up to building custom templates once you’ve identified areas for improvement. These templates are stored in your repository and are available any time a reporter creates a new issue. The template automatically pre-populates the issue form to guide your team on how to structure their issue.
Step 4 – Use Labels (Sparingly)
GitHub offers a variety of labels to make work more manageable. For example, you can quickly aggregate similar kinds of issues based on their labels.
You can start with the default labels and create your own as you streamline your workflow. Besides issues, you can also use these labels on discussions and pull requests. Some of the crucial labels to consider include:
- Bug – Indicates unintended behavior or an unexpected problem.
- Duplicate – Indicates identical issues, discussions, or pull requests.
- Documentation – Indicates required additions or improvements to the documentation.
- Help Wanted – Indicates a maintainer requires help on an issue.
- Question – Indicates an issue that needs more information or discussion.
- Invalid – Indicates an issue that is no longer relevant.
- Enhancements – Indicates a new feature request.
Again, the labels mentioned above are included when you create a repository. You have the option to edit the labels or delete them altogether. But I recommend sticking with the default until you are used to how they work. Of course, unless your organization has precise requirements.

You can apply labels by navigating to the issue and clicking the settings symbol in the right sidebar. Then, simply choose the tag you’d like to apply to the issue from the dropdown menu.
However, don’t get too carried away using labels. Instead, use them sparingly. Using multiple tags for issues makes it hard on the eyes. It is also challenging to prioritize issues to work on if each one is decorated with numerous labels.
For example, an end-user experience expert is only interested in relevant issues and may not care much about data access problems.
Step 5 – Use Checklists For Large Issues
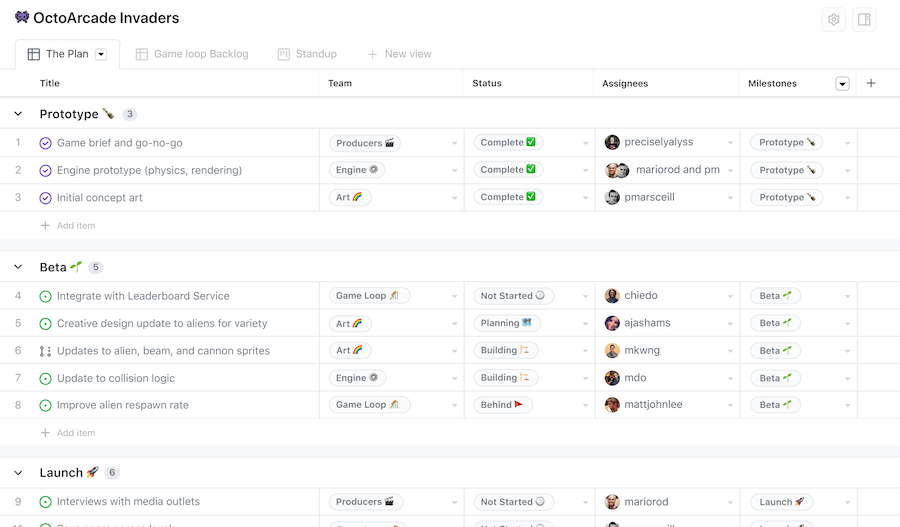
Initially, your team may use GitHub Issues for simple workflows like requesting documentation or discussing code. But, the workflow becomes increasingly complex as the project unfolds. For example, you may need to migrate to a new build system or implement a new feature. GitHub Issues supports these complex issues and allows you to aggregate the entire context of the issue in one place.
Consider breaking the issue down into checklists rather than creating a network of issues for a significant issue like migrating to a new build system. This way, you can quickly check off boxes as your team makes progress on the issue.
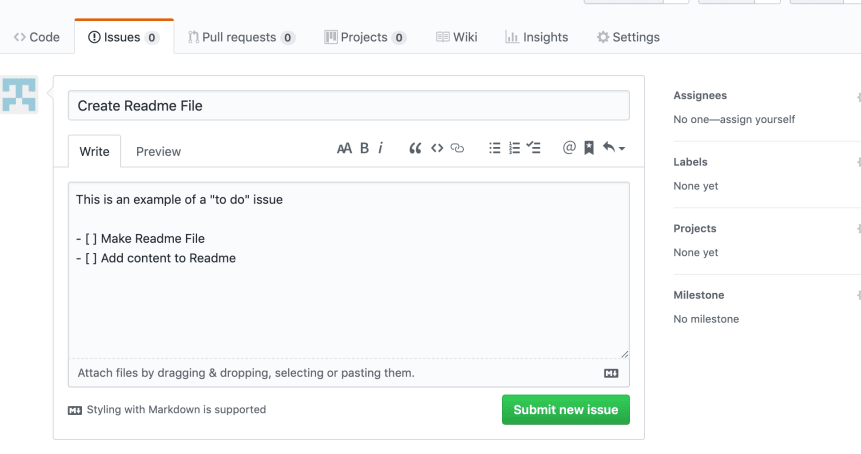
Specifically, GitHub’s Markdown feature helps to track the progress of large issues. Here, each task that needs to be completed goes on a separate line. Each task also comes with a clickable checkbox. You can check or uncheck the box depending on whether or not the task has been completed.
Markdown comes with a lot of extra functionality to simplify collaboration. For example, the task lists’ progress appears in different places within GitHub, including your repository’s issues list. You can even reference another issue or convert a task into an issue.
You can create your task list items by prefacing the items with [ ] when adding your description.

