Clear the Chrome Cache in 4 Quick Steps

Want to clear your cache in Chrome?
Follow these steps.
How to Clear the Cache in Chrome
1. Open Chrome
2. Click on the settings in the top right and go to “More Tools”
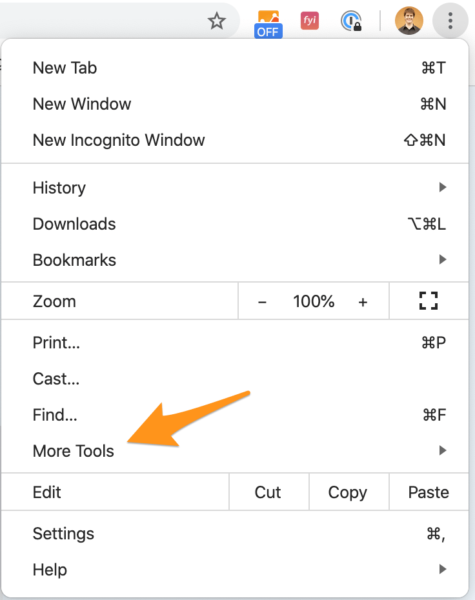
3. Click on “Clear Browsing Data”
4. The clear cache settings will pop up:
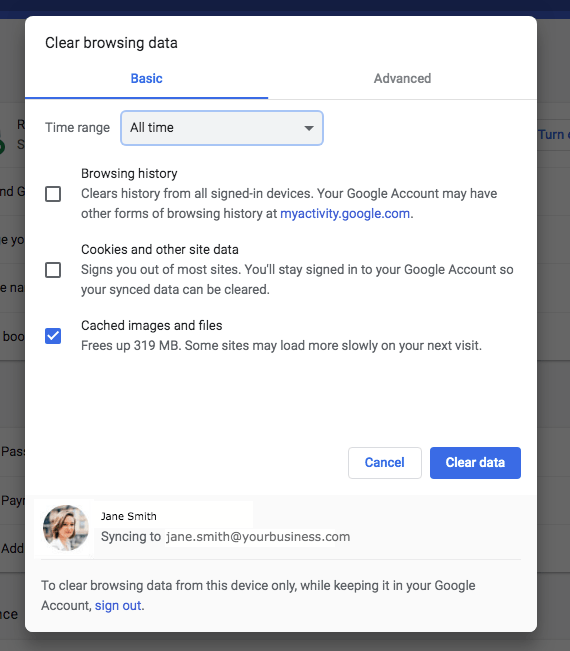
To clear your entire cache, select “All time” from the dropdown at the top and click the “Clear data” button.
You’re done!
All cached images, websites and files are gone. Obviously if you also want to wipe browsing history and cookies, select those too.
Clear Cache for a Limited Time Period
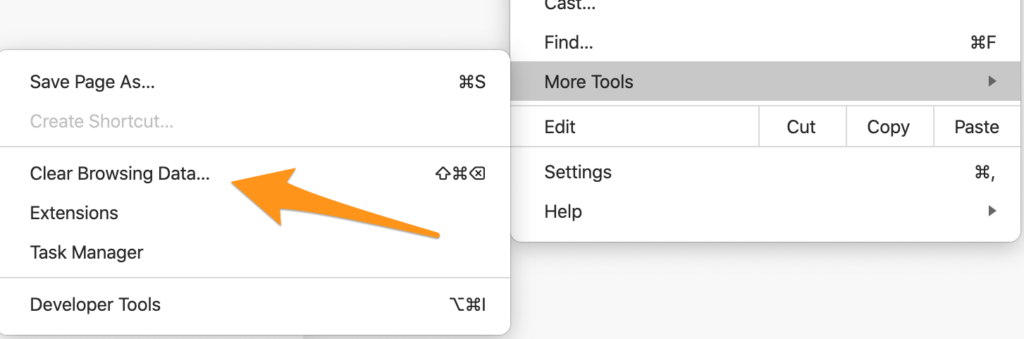
Go to More Tools > Clear Browsing Data and you’ll see this dropdown at the top:
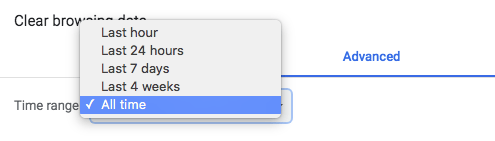
You can pick from preset time periods of the last hour, 24 hours, 7 days, and the last four weeks.
One reason to do this is if you’ve visited a site recently and it’s made your browser act oddly, or if you’ve recently visited a site you think might have malware on it. Recent malware infections that started showing popup ads, for instance, might be solveable by clearing your cache back to the time when you visited the infected website, without clearing the whole thing and having to sign back in to all your accounts.
Clear Specific Items from the Cache
You can choose to clear cached images and files, passwords, sign-in information, autofill form data, and other specific types of cached data separately under the Advanced tab:
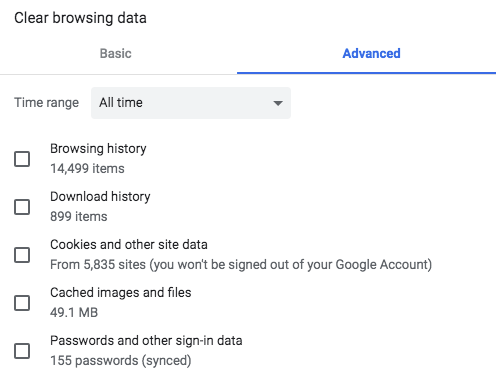
Just choose the types of data you want to delete and the time period you want to erase them from, then click Clear data.
You might want to do this if you’ve recently changed a password or if you’re using a new postal address, payment card, or login credentials for websites.
Clear Cache from a Specific Device
Open Chrome on the device you want to delete the cache for and sign out of your Google account. Then you’ll be able to delete the cache from just that device without affecting the rest of your Google account.
Cookies are stored on the device so deleting those doesn’t require you to sign out of Chrome. But autofill and other data is synched across devices by your Chrome account.
Can you automate the process of clearing your cache in Chrome?
You don’t have to clear your cache by hand. You can set Chrome to not use the cache at all, delete local data on closing, or use third-party extensions to disable caching.
Clear Cookies on Exit
You can set Chrome to automatically clear cookies on exit. Go to menu > Advanced > Content Settings, then scroll down and select Advanced > Content Settings. Here you’ll find Cookies. Click on this and select Keep local data only until you quit your browser. Now, whenever you finish a browser session your cookies will be deleted automatically.
Disable Cache in Developer Tools
You can also disable the cache altogether in Chrome Developer Tools. Open Developer Tools, click on Network, and select Disable Cache. This is only an option as long as Developer Tools is open, so it’s more a curiosity than a functional choice for most.
Use an Extension
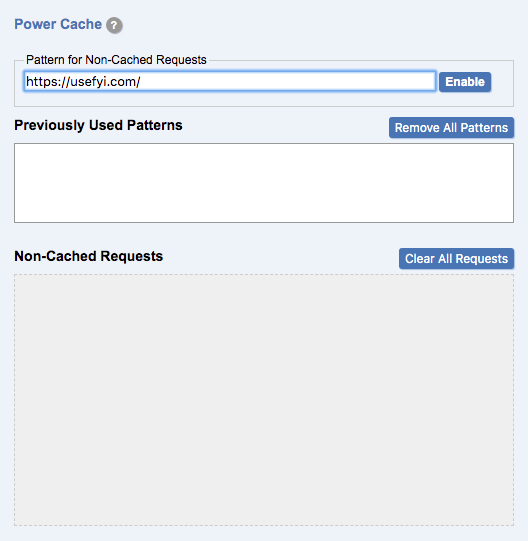
Rather than build everything in, Chrome devolves a lot of peripheral functionality onto third-party extensions. There are several cache-controlling extensions, we recommend Power Cache.
Power Cache lets you toggle between cache on and off, and set up lists of URL patterns to disable caching for.
If you’re spending time constantly using Developer Tools to turn caching off this might be a good solution.
Can I clear the browser cache for just one website?
You can clear the browser cache for a single page, and this can help you fix browser issues on that specific website without throwing out all your cached data. It can also help if you’re on a page where the CSS has been changed. Before you clear the cache, the page’s HTML might be loaded from the server, but the CSS will likely be loaded from the cache. If the page is set to fetch new CSS from a new stylesheet, and your browser is trying to match it with the old one, it’s not going to look right or work right. Clearing the cache fixes this.
Here’s how to clear the browser cache for just one web page:
Open the webpage you want to clear the cache for, and go into Chrome Developer Tools.
That’s CMD+Option+I on a Mac, and CTRL+Shift+I or F12 on Windows, Linux, and Chromebooks.
From here, you’ll want to find the Refresh button next to the address bar:
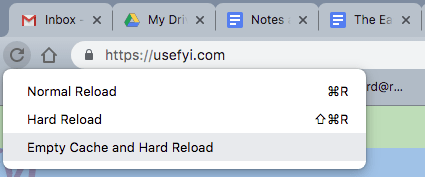
Click Empty Cache and Hard Reload in the list of options, and you’re done. The cache for this website, and this website only, has been emptied. You won’t need to do anything in developer tools, but you won’t see the Empty Cache and Hard Reload option if you don’t have developer tools open.
Why should you clear your cache?
Clearing the cache in your browser is the equivalent of everyone’s favorite IT 101 fixes: have you tried turning it off and turning it back on again?
Caching was invented in the first place to speed up browsing, allowing your browser to load files locally from your computer instead of having to download them every time. In theory, if your internet connection is slower than your computer, caching makes sense. Though not as much as it did in the dial-up days when it was introduced.
However, a too-full cache can actually slow your browser, and there are other reasons to delete your cache too. Clearing your cache can accelerate Chrome, return websites to functionality, and let you check on recent changes to websites. It can restore Chrome itself to working order too.
Chrome is Waiting for Cache Error Message
For some Windows users, Chrome actually crashes while loading web pages, freezing with the message ‘Chrome is waiting for cache’ displayed in the status bar in the bottom left-hand corner of the page. When this happens, clearing the cache usually fixes the problem.
Restoring Websites
When a new version of a website is rolled out, if your browser has a version of the old website in cache it will try to load that. The result can be a site that won’t load, crashes, looks strange, or that won’t let you do certain things on the site. You might get a ‘400 — bad request’ error message instead of your web page. If this happens, clearing your cache can make a website work again.
Sometimes, the version of a page in your cache is corrupted, or the browser struggles to assemble the page from cached files. If you’re having trouble using a website the way it should work, clearing your cache could fix the problem.
Security
If you’re using a shared or public computer, clearing the browser cache clears the local files that have been downloaded from the browser to the computer’s hard disk. Left in place, these files can be a target for had actors who can use identifying information for spear-phishing and fraud.
Seeing the Most Recent Version of a Page
Visiting a page again or refreshing a page should show you the newest version. But it doesn’t always work. Sometimes, very recent incremental changes don’t show up. This is obviously a headache for developers who want to see their changes as they make them, but it’s also a problem if you want to see a very up-to-date version of a news site. To make sure you’re seeing the most up-to-date version of a web page, delete the cache and then refresh.
Speeding up Your Browser
In the days of giant hard disks, storage space isn’t what slows most people’s computers down. And even if your browser cache is 2GB, it’s not likely to be the fact that data is stored on your computer that’s making your browsing slow.
But caching can still slow your browser down if your cache is big enough and old enough. Clearing it every few months should be enough for this purpose, but it doesn’t always produce noticeable results.
Things can slow down initially. When you clear the cache, Chrome will slow down as it rebuilds everything from scratch. Once that’s done, it will speed up slightly since there isn’t as much bloat.

